30分钟内基于激光雷达的手部姿态估计
介绍
大家好!虽然赛博朋克还没有进入我们的生活,神经接口也远非理想,但激光雷达可以成为机械手未来之路的第一阶段。因此,为了在假期期间不感到无聊,我决定幻想一下计算机的控制,可能还有任何设备,比如挖掘机、宇宙飞船、无人机或火炉。
主要思想是移动鼠标,不是移动整只手,而是只移动食指,这将使你可以在不将手离开键盘的情况下浏览菜单,按下按钮,并与热键一起变成一个真正的键盘忍者!如果添加滑动或滚动手势会发生什么?我想会有炸弹!(但这一刻我们还需要等待几年)
让我们开始组装我们未来机械手的原型
你需要:
带有 LiDAR Intel Realsense L515 的摄像头。
能够在python中编程
记住学校数学
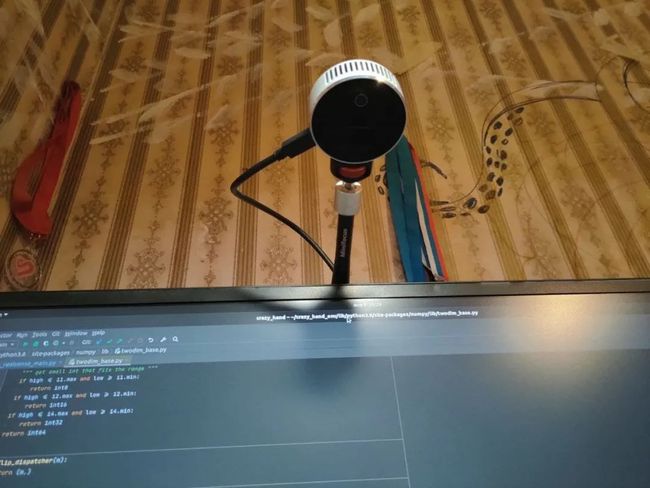
安装在监视器上的相机又名三脚架
我们用全球速卖通的三脚架将相机固定在上,结果证明非常方便,轻便且便宜
我们弄清楚如何制作原型
有许多方法可以完成这项任务。你可以自己训练检测器或手部分割,裁剪右手的结果图像,然后将这个来自 Facebook 研究的精彩存储库应用于图像,获得出色的结果。
要使用媒体管道存储库,阅读此链接后,你可以知道这是当今最好的选择之一:https://ai.googleblog.com/2019/08/on-device-real-time-hand-tracking-with.html
首先,一切都已经开箱即用 - 安装和启动将需要 30 分钟,考虑到所有先决条件。
其次,得益于强大的开发团队,他们不仅采用了手部姿势估计的最新技术,还提供了易于理解的 API。
第三,网络已准备好在 CPU 上运行,因此进入门槛极低。
可能你会问我为什么不使用本次比赛获胜者的存储库。
事实上,我详细研究了他们的解决方案,他们已经准备好了,没有成堆的数百万个网格等。但在我看来,最大的问题是他们处理深度图像。
由于他们是学者,他们毫不犹豫地通过Matlab转换了所有数据,另外,拍摄深度的分辨率在我看来很小。这可能会对结果产生深远的影响。
因此,似乎最简单的方法是获取RGB图片中的关键点,并通过XY坐标取深度帧中沿Z轴的值。现在的任务不是对某些东西进行太多的优化。因此我们将从开发的角度进行优化,因为它更快。
记住学校数学
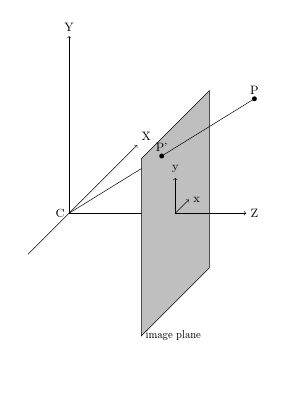
正如我已经写过的,为了获得鼠标光标所在点的坐标,我们需要构建一条穿过手指指骨的两个关键点的线,并找到该线与该点的交点显示器的平面。
图片示意性地显示了显示器的平面和与其相交的线。你可以看看此处的数学。
使用两点,我们得到空间中直线的参数化表示。
我不会过多关注学校的数学课程。
安装用于使用相机的库
这可能是这项工作中最难的部分。事实证明,Ubuntu 相机的软件非常粗糙,充斥着各种各样的bug。
直到现在,我还是没能打败相机的奇怪行为,有时它在启动时不加载参数。
重启电脑后相机只能工作一次!但是有一个解决方案:在每次启动之前,对相机进行软件硬重置,重置USB,也许一切都会好起来。
顺便说一下,对于 Windows 10,一切都很好。但是,开发人员想像一个基于 Windows 的机器人这件事情就很奇怪。
要真正了解 Ubuntu 20,请执行以下操作:
$ sudo apt-get install libusb-1.0-0-dev
Then rerun cmake and make install. Here is a complete recipe that worked for me:
$ sudo apt-get install libusb-1.0-0-dev
$ git clone https://github.com/IntelRealSense/librealsense.git
$ cd librealsense/
$ mkdir build && cd build
通过分类收集,它将或多或少地稳定。一个月的技术支持沟通表明,你需要安装Ubuntu16,否则将遭受痛苦。懂的都懂。
我们继续了解神经网络的复杂性
现在我们看另一个手指和鼠标操作的视频。请注意,指针不能停留在一个地方,而是围绕预定点浮动的。同时,我可以轻松地将其指向我需要的单词,但是对于一个字母,则比较困难,我必须小心地移动光标:
正如你所理解的,这不是在和我握手,这完全是从激光雷达获得的,关于基于值的关键点和 Z 坐标的不断波动。
让我们仔细看看:
在我们的媒体管道 SOTA 中,波动肯定较少,但它们也存在。事实证明,他们通过在当前帧和训练网络中使用过去帧热图中的 prokid vaniya 来解决这个问题——它提供了更多的稳定性,但不是 100%的稳定。
此外,在我看来,标记的特殊性也起作用。在这么多帧上做相同的标记几乎是不可能的,更何况帧的分辨率到处都不同,而且不是很大。
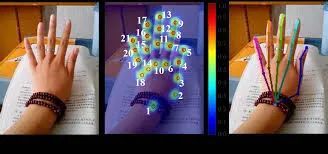
此外,我们没有看到光的闪烁,这很可能不是恒定的,因为操作时间和相机曝光量不同。并且网络还从热图中返回一个sandwich ,它等于屏幕上关键点的数量,这个张量的大小是 BxNx96x96,其中 N 是关键点的数量,当然,在阈值和调整到原始帧大小后,我们得到:
渲染热图示例:
代码审查
所有代码都在这个存储库中,并且非常简短。让我们看看主文件,然后自己看看其余的。
import cv2
import mediapipe as mp
import numpy as np
import pyautogui
import pyrealsense2.pyrealsense2 as rs
from google.protobuf.json_format import MessageToDict
from mediapipe.python.solutions.drawing_utils import _normalized_to_pixel_coordinates
from pynput import keyboard
from utils.common import get_filtered_values, draw_cam_out, get_right_index
from utils.hard_reset import hardware_reset
from utils.set_options import set_short_range
pyautogui.FAILSAFE = False
mp_drawing = mp.solutions.drawing_utils
mp_hands = mp.solutions.hands
# Hand Pose Estimation
hands = mp_hands.Hands(max_num_hands=2, min_detection_confidence=0.9)
def on_press(key):
if key == keyboard.Key.ctrl:
        pyautogui.leftClick()
if key == keyboard.Key.alt:
        pyautogui.rightClick()
def get_color_depth(pipeline, align, colorizer):
    frames = pipeline.wait_for_frames(timeout_ms=15000) # waiting for a frame from the camera
    aligned_frames = align.process(frames)
    depth_frame = aligned_frames.get_depth_frame()
    color_frame = aligned_frames.get_color_frame()
if not depth_frame or not color_frame:
return None, None, None
    depth_ima = np.asanyarray(depth_frame.get_data())
    depth_col_img = np.asanyarray(colorizer.colorize(depth_frame).get_data())
    color_image = np.asanyarray(color_frame.get_data())
    depth_col_img = cv2.cvtColor(cv2.flip(cv2.flip(depth_col_img, 1), 0), cv2.COLOR_BGR2RGB)
    color_img = cv2.cvtColor(cv2.flip(cv2.flip(color_img, 1), 0), cv2.COLOR_BGR2RGB)
    depth_img = np.flipud(np.fliplr(depth_img))
    depth_col_img = cv2.resize(depth_col_img, (1280 * 2, 720 * 2))
    col_img = cv2.resize(col_img, (1280 * 2, 720 * 2))
    depth_img = cv2.resize(depth_img, (1280 * 2, 720 * 2))
return color_image, depth_color_image, depth_image
def get_right_hand_coords(color_image, depth_color_image):
    color_image.flags.writeable = False
    results = hands.process(color_image)
    color_image.flags.writeable = True
    color_image = cv2.cvtColor(color_image, cv2.COLOR_RGB2BGR)
    handedness_dict = []
    idx_to_coordinates = {}
    xy0, xy1 = None, None
if results.multi_hand_landmarks:
for idx, hand_handedness in enumerate(results.multi_handedness):
            handedness_dict.append(MessageToDict(hand_handedness))
        right_hand_index = get_right_index(handedness_dict)
if right_hand_index != -1:
for i, landmark_list in enumerate(results.multi_hand_landmarks):
if i == right_hand_index:
                    image_rows, image_cols, _ = color_image.shape
for idx, landmark in enumerate(landmark_list.landmark):
                        landmark_px = _normalized_to_pixel_coordinates(landmark.x, landmark.y,
                                                                       image_cols, image_rows)
if landmark_px:
                            idx_to_coordinates[idx] = landmark_px
for i, landmark_px in enumerate(idx_to_coordinates.values()):
if i == 5:
                    xy0 = landmark_px
if i == 7:
                    xy1 = landmark_px
break
return col_img, depth_col_img, xy0, xy1, idx_to_coordinates
def start():
    pipeline = rs.pipeline() # initialize librealsense
    config = rs.config()
    print("Start load conf")
    config.enable_stream(rs.stream.depth, 1024, 768, rs.format.z16, 30)
    config.enable_stream(rs.stream.color, 1280, 720, rs.format.bgr8, 30)
    profile = pipeline.start(config)
depth_sensor = profile.get_device (). first_depth_sensor ()
    set_short_range (depth_sensor) # load parameters for working at a short distance
    colorizer = rs.colorizer ()
    print ("Conf loaded")
    align_to = rs.stream.color
    align = rs.align (align_to) # combine depth map and color image
    try:
        while True:
            col_img, depth_col_img, depth_img = get_col_depth (pipelin, align, colorize)
            if color_img is None and color_img is None and color_img is None:
                continue
            color_img, depth_col_img, xy00, xy11, idx_to_coordinates = get_right_hand_coords (col_img,
                                                                                                 depth_col_img)
            if xy00 is not None or xy11 is not None:
                z_val_f, z_val_s, m_xy, c_xy, xy00_f, xy11_f, x, y, z = get_filtered_values (depth_img, xy00, xy11)
                pyautogui.moveTo (int (x), int (3500 - z)) # 3500 hardcode specific to my monitor
                if draw_cam_out (col_img, depth_col_img, xy00_f, xy11_f, c_xy, m_xy):
                    break
    finally:
        hands.close ()
        pipeline.stop ()
hardware_reset () # reboot the camera and wait for it to appear
listener = keyboard.Listener (on_press = on_press) # set a listener for keyboard button presses
listener.start ()
start () # start the program
我没有使用类或流,因为对于这样一个简单的情况,在无限的 while 循环中执行主线程中的所有内容就足够了。
一开始,媒体管道、相机被初始化,短距离和辅助变量的相机设置被加载。
接下来是称为“alight depth to color”的魔法——这个函数匹配RGB图像中的每个点,深度帧上的一个点,也就是说,它让我们有机会获得XY坐标,Z值。
据了解,需要在你的显示器上进行校准。我特意没有把这些参数单独拎出来,让决定运行代码的读者自己做,同时在代码中重复使用。
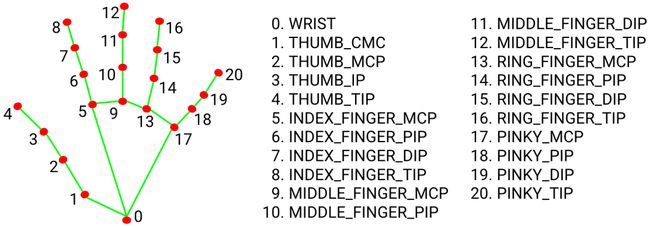
接下来,我们从整个预测中仅提取右手编号为 5 和 7 的点。
剩下要做的就是使用移动平均值过滤获得的坐标。当然,可以应用更严格的过滤算法,但是在查看了它们的可视化并拉动了各种杠杆之后,很明显深度为 5 帧的移动平均线对于演示就足够了,我想指出的是对于 XY,2-3 帧就足够了。但 Z 的情况更糟。
deque_l = 5
x0_d = collections.deque(deque_l * [0.], deque_l)
y0_d = collections.deque(deque_l * [0.], deque_l)
x1_d = collections.deque(deque_l * [0.], deque_l)
y1_d = collections.deque(deque_l * [0.], deque_l)
z_val_f_d = collections.deque(deque_l * [0.], deque_l)
z_val_s_d = collections.deque(deque_l * [0.], deque_l)
m_xy_d = collections.deque(deque_l * [0.], deque_l)
c_xy_d = collections.deque(deque_l * [0.], deque_l)
x_d = collections.deque(deque_l * [0.], deque_l)
y_d = collections.deque(deque_l * [0.], deque_l)
z_d = collections.deque(deque_l * [0.], deque_l)
def get_filtered_values(depth_image, xy0, xy1):
global x0_d, y0_d, x1_d, y1_d, m_xy_d, c_xy_d, z_val_f_d, z_val_s_d, x_d, y_d, z_d
    x0_d.append(float(xy0[1]))
    x0_f = round(mean(x0_d))
    y0_d.append(float(xy0[0]))
    y0_f = round(mean(y0_d))
    x1_d.append(float(xy1[1]))
    x1_f = round(mean(x1_d))
    y1_d.append(float(xy1[0]))
    y1_f = round(mean(y1_d))
    z_val_f = get_area_mean_z_val(depth_image, x0_f, y0_f)
    z_val_f_d.append(float(z_val_f))
    z_val_f = mean(z_val_f_d)
    z_val_s = get_area_mean_z_val(depth_image, x1_f, y1_f)
    z_val_s_d.append(float(z_val_s))
    z_val_s = mean(z_val_s_d)
    points = [(y0_f, x0_f), (y1_f, x1_f)]
    x_coords, y_coords = zip(*points)
    A = np.vstack([x_coords, np.ones(len(x_coords))]).T
    m, c = lstsq(A, y_coords)[0]
    m_xy_d.append(float(m))
    m_xy = mean(m_xy_d)
    c_xy_d.append(float(c))
    c_xy = mean(c_xy_d)
    a0, a1, a2, a3 = equation_plane()
    x, y, z = line_plane_intersection(y0_f, x0_f, z_v_s, y1_f, x1_f, z_v_f, a0, a1, a2, a3)
    x_d.append(float(x))
    x = round(mean(x_d))
    y_d.append(float(y))
    y = round(mean(y_d))
    z_d.append(float(z))
    z = round(mean(z_d))
return z_v_f, z_v_s, m_xy, c_xy, (y00_f, x0_f), (y11_f, x1_f), x, y, z
我们创建了一个长度为 5 帧的双端队列,并对一行中的所有内容求平均值。
另外,我们计算 y = mx + c,Ax + By + Cz + d = 0,直线的方程是 RGB 中的光线图片和监视器平面的方程,我们得到y = 0。
☆ END ☆
如果看到这里,说明你喜欢这篇文章,请转发、点赞。微信搜索「uncle_pn」,欢迎添加小编微信「 woshicver」,每日朋友圈更新一篇高质量博文。
↓扫描二维码添加小编↓
