Android studio 类微信主界面
类微信界面的开发 Android studio
最后的完成效果如图
这是点击底框四个按钮之前

点击联系人框时,中间的界面发生变化,当前点击框的颜色和图标颜色发生变化
此界面的完成需要用到的包括LinearLayout和fragment相配合
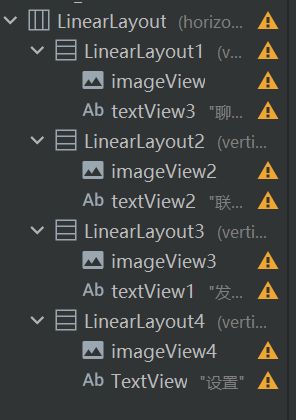
首先需要建立一个外围框架的main.xml文件,在此界面中,我们使用vertical的LinearLayout作为整个页面的布局,然后插入顶部的textview以及中间部分的fragment还有底部的一个horizontal的LinearLayout

在底部的LinearLayout里面再创建4个vertical的LinearLayout作为底部四个点击块
每一个点击块都进行imageview和textview的布局

然后再进行fragment里面的设置
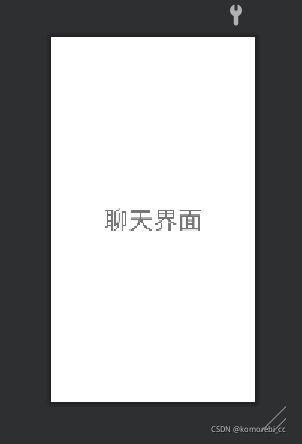
这里我们的底部有四个点击块,所以我们需要4个不同的fragment来分别对应每个点击块想要呈现的内容,于是新建4个xml

每一个xml里面只需要放置一个textview来表示每一个界面所要表达的意思

此时,有关于布局页面的工作已经完成啦
接下来需要进行java代码的工作了
首先每一个fragment的xml都需要一个.java文件进行插入main.xml

这里展示BlankFragment的代码
package com.example.mywork_wccyu;

import android.os.Bundle;
import android.app.Fragment;
import android.view.LayoutInflater;
import android.view.View;
import android.view.ViewGroup;

public class BlankFragment extends Fragment {

    public BlankFragment() {

    }
    @Override
    public View onCreateView(LayoutInflater inflater, ViewGroup container,
                             Bundle savedInstanceState) {

        return inflater.inflate(R.layout.fragment_blank, container, false);
    }
}
这里需要注意的是 每个.java文件里面的类名和构造函数名需要与文件名一致
然后就是主代码的部分
首先需要将布局页面的控件都进行初始化和分配空间
    private Fragment blankFragment=new BlankFragment();
    private Fragment blank1Fragment=new Blank1Fragment();
    private Fragment blank2Fragment=new Blank2Fragment();
    private Fragment blank3Fragment=new Blank3Fragment();
    private ImageView imageView,imageView2,imageView3,imageView4;

    private FragmentManager fragmentManager;
    private LinearLayout LinearLayout1,LinearLayout2,LinearLayout3,LinearLayout4;
然后再将变量与xml里面的实例连起来
        LinearLayout1=findViewById(R.id.LinearLayout1);
        LinearLayout2=findViewById(R.id.LinearLayout2);
        LinearLayout3=findViewById(R.id.LinearLayout3);
        LinearLayout4=findViewById(R.id.LinearLayout4);
        imageView=findViewById(R.id.imageView);
        imageView2=findViewById(R.id.imageView2);
        imageView3=findViewById(R.id.imageView3);
        imageView4=findViewById(R.id.imageView4);
由于我们需要用到点击反馈,所以需要继承AppCompatActivity 也需要implements View.onClickListener
public class MainActivity extends AppCompatActivity implements View.OnClickListener
然后设置4个点击块的监听函数
        LinearLayout1.setOnClickListener(this);
        LinearLayout2.setOnClickListener(this);
        LinearLayout3.setOnClickListener(this);
        LinearLayout4.setOnClickListener(this);
接下来还需要进行fragment的初始化
以及当进行点击时fragment页面的切换
由于还没有关于切换的动作
此时的fragment里面是四个fragment的叠加
而我们需要的效果则是点击哪个点击块的时候,与之对应的fragmen界面显示出来,所以还需要一个将fragment隐藏起来的动作,在点击时,再将其显示出来
这里可以将将初始化,隐藏,显示写成函数
初始化函数如下
    protected void initfragment(){

        fragmentManager=getFragmentManager();
        FragmentTransaction transaction=fragmentManager.beginTransaction();
        transaction.add(R.id.id_content,blankFragment);
        transaction.add(R.id.id_content,blank1Fragment);
        transaction.add(R.id.id_content,blank2Fragment);
        transaction.add(R.id.id_content,blank3Fragment);
        transaction.commit();
    }
隐藏函数如下
    protected void hidefragment(FragmentTransaction transaction){

        transaction.hide(blankFragment);
        transaction.hide(blank1Fragment);
        transaction.hide(blank2Fragment);
        transaction.hide(blank3Fragment);
    }
显示函数如下
    private void showfragment(int i) {

        fragmentManager=getFragmentManager();
        FragmentTransaction transaction=fragmentManager.beginTransaction();
        hidefragment(transaction);
        switch (i){

            case 0:
                transaction.show(blankFragment);
                chbackc(LinearLayout1);
                backtoused(LinearLayout2);
                backtoused(LinearLayout3);
                backtoused(LinearLayout4);
                break;
            case 1:
                transaction.show(blank1Fragment);
                chbackc(LinearLayout2);
                backtoused(LinearLayout1);
                backtoused(LinearLayout3);
                backtoused(LinearLayout4);
                break;
            case 2:
                transaction.show(blank2Fragment);
                chbackc(LinearLayout3);
                backtoused(LinearLayout2);
                backtoused(LinearLayout1);
                backtoused(LinearLayout4);
                break;
            case 3:
                transaction.show(blank3Fragment);
                chbackc(LinearLayout4);
                backtoused(LinearLayout2);
                backtoused(LinearLayout3);
                backtoused(LinearLayout1);
                break;
            default:
                break;
        }
        transaction.commit();
    }
在显示函数中的chbackc和backtoused两个函数,这两个函数是用于改变点击块背景颜色和图标颜色
    private void chbackc(View view){

        switch(view.getId()){

            case R.id.LinearLayout1:
                LinearLayout1.setBackgroundColor(0xFFFFFF00);
                imageView.setColorFilter(Color.WHITE);
                break;
            case R.id.LinearLayout2:
                LinearLayout2.setBackgroundColor(0xFFFFFF00);
                imageView2.setColorFilter(Color.WHITE);
                break;
            case R.id.LinearLayout3:
                LinearLayout3.setBackgroundColor(0xFFFFFF00);
                imageView3.setColorFilter(Color.WHITE);
                break;
            case R.id.LinearLayout4:
                LinearLayout4.setBackgroundColor(0xFFFFFF00);
                imageView4.setColorFilter(Color.WHITE);
                break;
            default:
                break;
        }
    }
    private void backtoused(View view){

        switch(view.getId()){

            case R.id.LinearLayout1:
                LinearLayout1.setBackgroundColor(0xFF00FF00);
                imageView.setColorFilter(0xFF03DAC5);
                break;
            case R.id.LinearLayout2:
                LinearLayout2.setBackgroundColor(0xFF00FF00);
                imageView2.setColorFilter(0xFF03DAC5);
                break;
            case R.id.LinearLayout3:
                LinearLayout3.setBackgroundColor(0xFF00FF00);
                imageView3.setColorFilter(0xFF03DAC5);
                break;
            case R.id.LinearLayout4:
                LinearLayout4.setBackgroundColor(0xFF00FF00);
                imageView4.setColorFilter(0xFF03DAC5);
                break;
            default:
                break;
        }
    }
代码仓库地址:https://github.com/greychan-soko/work1


