在Ubuntu中手动安装nginx+nextcloud
在Ubuntu中手动安装nginx+nextcloud
- 前言
-
- 什么是NextCloud?
- NextCloud功能
- 先决条件
- 步骤1:在Ubuntu 20.04上下载NextCloud
- 步骤2:在MariaDB数据库服务器中为Nextcloud创建数据库和用户
- 步骤3:为Nextcloud创建Nginx配置文件
- 步骤4:更改nextcloud/config.php覆写host
- 步骤5:安装并启用PHP模块
- 步骤6:在Web浏览器中完成安装
- 步骤7:添加备案号
- 附录
-
- A. 如何设置NextCloud电子邮件通知
- B. 如何从命令行重置Nextcloud用户密码
- C.如何移动数据目录
- D. 增加PHP内存限制
- E. 设置PHP以正确查询系统环境变量
- F. 故障排除技巧
前言
什么是NextCloud?
NextCloud是免费的开源自托管云存储解决方案。它在功能上类似于Dropbox。专有的云存储解决方案(Dropbox,Google Drive等)很方便,但要付出一定的代价:它们可以用于收集个人数据,因为你的文件存储在他们的计算机上。如果你担心隐私,则可以切换到NextCloud,可以将其安装在私有家庭服务器或虚拟私有服务器(VPS)上。你可以通过NextCloud将文件上传到服务器,然后将这些文件同步到台式机,笔记本电脑或智能手机。这样,你就可以完全控制数据。NextCloud功能
- 免费和开源
- 端到端加密,这意味着文件可以在上传到服务器之前在客户端设备上进行加密,因此即使有人窃取了你的服务器,他们也无法读取你的文件。
- 可以与在线办公套件(Collobora Online,OnlyOffice)集成,因此你可以直接从NextCloud创建和编辑doc,ppt,xls文件。
- 该应用程序商店包含数百个扩展功能的应用程序(例如日历应用程序,联系人应用程序,笔记记录应用程序,视频会议应用程序等)。
- 同步客户端可在Linux,macOS,Windows,iOS和android上使用。
先决条件
NextCloud用PHP编程语言编写。要遵循本教程,你首先需要在Ubuntu 20.04上安装Nginx,MariaDB,PHP7.4-FPM。
你可以在家庭服务器或VPS(虚拟专用服务器)上安装NextCloud 。你还需要一个域名,因此稍后你将能够启用HTTPS来加密HTTP通信。Nextcloud可以不带域名安装,但是如果你不加密HTTP连接以防止监听,那实际上是没有意义的。如果你真的想修改服务器软件并最大程度地利用它们,我建议你购买一个域名,并配置SSL证书。
现在,让我们安装NextCloud。
步骤1:在Ubuntu 20.04上下载NextCloud
登录到你的Ubuntu 20.04服务器。然后将NextCloud zip存档下载到你的服务器上。在撰写本文时,最新的稳定版本是18.0.4。你可能需要更改版本号。转到https://nextcloud.com/install并单击download for server按钮以查看最新版本。
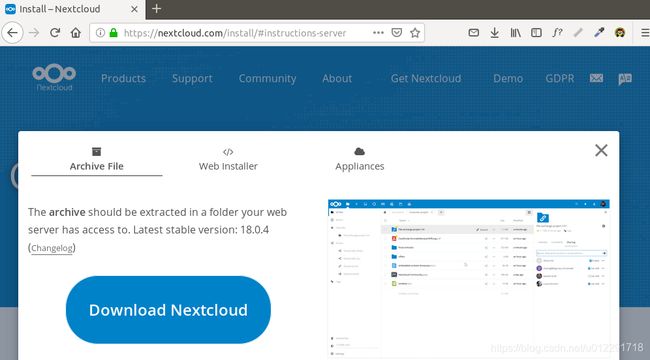
你可以运行以下命令将其下载到服务器上。
wget https://download.nextcloud.com/server/releases/nextcloud-18.0.4.zip
你始终可以使用上述URL格式下载NextCloud。如果出现新版本,只需18.0.4用新版本号替换即可。
下载完成后,使用unzip提取档案。
sudo apt install unzip
sudo unzip nextcloud-18.0.4.zip -d /usr/share/nginx/
该-d选项指定目标目录。NextCloud Web文件将被提取到/usr/share/nginx/nextcloud/。然后,我们需要将此目录的所有者更改为,www-data以便Web服务器(Nginx)可以写入此目录。
sudo chown www-data:www-data /usr/share/nginx/nextcloud/ -R
步骤2:在MariaDB数据库服务器中为Nextcloud创建数据库和用户
使用以下命令登录MariaDB数据库服务器。由于MariaDB现在使用unix_socket插件来验证用户登录名,因此无需输入MariaDB root密码。我们只需要在mysql命令前面加上即可sudo。
sudo mysql
然后为Nextcloud创建一个数据库。本教程将数据库命名为nextcloud。你可以使用任何喜欢的名称。
create database nextcloud;
创建数据库用户。同样,你可以为该用户使用你的首选名称。替换your-password为你的首选密码。
create user nextclouduser@localhost identified by ‘your-password’;
授予该用户对nextcloud数据库的所有权限。
grant all privileges on nextcloud.* to nextclouduser@localhost identified by ‘your-password’;
刷新权限并退出。
flush privileges;
exit;
步骤3:为Nextcloud创建Nginx配置文件
使用类似vim的命令行文本编辑器nextcloud.conf在/etc/nginx/conf.d/目录中创建文件。
sudo vim /etc/nginx/conf.d/nextcloud.conf
复制以下文本并将其粘贴到文件中。nextcloud.example.com用你自己的首选子域替换,1_nextcloud.example.com_bundle.crt和2_nextcloud.example.com.key使用你自己的证书替换。不要忘记在你的DNS区域编辑器中为该子域创建DNS A记录。
# http默认转发到https
server {
    listen 80;
    server_name nextcloud.example.com;
    return 301 https://$server_name$request_uri;
}

server {
    listen 443 ssl http2;
    server_name nextcloud.example.com;
    ssl_certificate /home/ubuntu/certs/Nginx/1_nextcloud.example.com_bundle.crt;
    ssl_certificate_key /home/ubuntu/certs/Nginx/2_nextcloud.example.com.key;
    ssl_protocols TLSv1 TLSv1.1 TLSv1.2;
    ssl_ciphers ECDHE-RSA-AES128-GCM-SHA256:ECDHE:ECDH:AES:HIGH:!NULL:!aNULL:!MD5:!ADH:!RC4;
    ssl_session_timeout 5m;
    # 访问域名根目录时重定向到nextcloud
    location = / {
        return 301 https://$server_name/nextcloud;
    }
    # 访问https://nextcloud.example.com/nextcloud时转发到本地8080端口
    location ~/nextcloud {
        proxy_pass http://127.0.0.1:8080;
        client_max_body_size 512M;
    }
    # 访问https://nextcloud.example.com/.well-known时转发到本地8080端口
    location /.well-known {
        proxy_pass http://127.0.0.1:8080;
    }
    # 下面可以添加你的其它服务,让它们和nextcloud共用443端口(没有需求不用加)
    # 访问https://nextcloud.example.com/other时转发到本地8081端口
    location ~/other {
        proxy_pass http://127.0.0.1:8081;
    }
}

server {
    listen 8080;
    listen [::]:8080;
    server_name 127.0.0.1;

    # Add headers to serve security related headers
    add_header X-Content-Type-Options nosniff;
    add_header X-XSS-Protection "1; mode=block";
    add_header X-Robots-Tag none;
    add_header X-Download-Options noopen;
    add_header X-Permitted-Cross-Domain-Policies none;
    add_header Referrer-Policy no-referrer;

    #I found this header is needed on Ubuntu, but not on Arch Linux.
    add_header X-Frame-Options "SAMEORIGIN";

    # Path to the root of your installation
    root /usr/share/nginx;

    access_log /var/log/nginx/nextcloud.access;
    error_log /var/log/nginx/nextcloud.error;

    location = /robots.txt {
        allow all;
        log_not_found off;
        access_log off;
    }

    location /.well-known {
        # The following 6 rules are borrowed from `.htaccess`

        location = /.well-known/carddav   { return 301 /nextcloud/remote.php/dav/; }
        location = /.well-known/caldav    { return 301 /nextcloud/remote.php/dav/; }

        # Anything else is dynamically handled by Nextcloud
        location ^~ /.well-known          { return 301 /nextcloud/index.php$uri; }

        try_files $uri $uri/ =404;
    }

    location ^~ /nextcloud {
        # set max upload size
        client_max_body_size 512M;
        fastcgi_buffers 64 4K;

        # Enable gzip but do not remove ETag headers
        gzip on;
        gzip_vary on;
        gzip_comp_level 4;
        gzip_min_length 256;
        gzip_proxied expired no-cache no-store private no_last_modified no_etag auth;
        gzip_types application/atom+xml application/javascript application/json application/ld+json application/manifest+json application/rss+xml application/vnd.geo+json application/vnd.ms-fontobject application/x-font-ttf application/x-web-app-manifest+json application/xhtml+xml application/xml font/opentype image/bmp image/svg+xml image/x-icon text/cache-manifest text/css text/plain text/vcard text/vnd.rim.location.xloc text/vtt text/x-component text/x-cross-domain-policy;

        # Pagespeed is not supported by Nextcloud, so if your server is built
        # with the `ngx_pagespeed` module, uncomment this line to disable it.
        #pagespeed off;

        # HTTP response headers borrowed from Nextcloud `.htaccess`
        add_header Referrer-Policy                      "no-referrer"   always;
        add_header X-Content-Type-Options               "nosniff"       always;
        add_header X-Download-Options                   "noopen"        always;
        add_header X-Frame-Options                      "SAMEORIGIN"    always;
        add_header X-Permitted-Cross-Domain-Policies    "none"          always;
        add_header X-Robots-Tag                         "none"          always;
        add_header X-XSS-Protection                     "1; mode=block" always;

        # Remove X-Powered-By, which is an information leak
        fastcgi_hide_header X-Powered-By;

        # Specify how to handle directories -- specifying `/nextcloud/index.php$request_uri`
        # here as the fallback means that Nginx always exhibits the desired behaviour
        # when a client requests a path that corresponds to a directory that exists
        # on the server. In particular, if that directory contains an index.php file,
        # that file is correctly served; if it doesn't, then the request is passed to
        # the front-end controller. This consistent behaviour means that we don't need
        # to specify custom rules for certain paths (e.g. images and other assets,
        # `/updater`, `/ocm-provider`, `/ocs-provider`), and thus
        # `try_files $uri $uri/ /nextcloud/index.php$request_uri`
        # always provides the desired behaviour.
        index index.php index.html /nextcloud/index.php$request_uri;

         # Rule borrowed from `.htaccess` to handle Microsoft DAV clients
        location = /nextcloud {
            if ( $http_user_agent ~ ^DavClnt ) {
                return 302 /nextcloud/remote.php/webdav/$is_args$args;
            }
        }

        # Rules borrowed from `.htaccess` to hide certain paths from clients
        location ~ ^/nextcloud/(?:build|tests|config|lib|3rdparty|templates|data)(?:$|/)    { return 404; }
        location ~ ^/nextcloud/(?:\.|autotest|occ|issue|indie|db_|console)                { return 404; }

        # Ensure this block, which passes PHP files to the PHP process, is above the blocks
        # which handle static assets (as seen below). If this block is not declared first,
        # then Nginx will encounter an infinite rewriting loop when it prepends
        # `/nextcloud/index.php` to the URI, resulting in a HTTP 500 error response.
        location ~ \.php(?:$|/) {
            include fastcgi_params;
            fastcgi_split_path_info ^(.+\.php)(/.*)$;
            try_files $fastcgi_script_name =404;
            fastcgi_param SCRIPT_FILENAME $document_root$fastcgi_script_name;
            fastcgi_param PATH_INFO $fastcgi_path_info;
            #Avoid sending the security headers twice
            fastcgi_param modHeadersAvailable true;
            fastcgi_param front_controller_active true;
            fastcgi_pass unix:/run/php/php7.4-fpm.sock;
            fastcgi_intercept_errors on;
            fastcgi_request_buffering off;
        }

        location ~ \.(?:css|js|svg|gif)$ {
            try_files $uri /nextcloud/index.php$request_uri;
            expires 6M;         # Cache-Control policy borrowed from `.htaccess`
            access_log off;     # Optional: Don't log access to assets
        }

        location ~ \.woff2?$ {
            try_files $uri /nextcloud/index.php$request_uri;
            expires 7d;         # Cache-Control policy borrowed from `.htaccess`
            access_log off;     # Optional: Don't log access to assets
        }

        location /nextcloud {
            try_files $uri $uri/ /nextcloud/index.php$request_uri;
        }
    }
}
保存并关闭文件。
然后测试Nginx配置。
sudo nginx -t
如果测试成功,请重新加载Nginx以使更改生效。
sudo nginx -s reload
步骤4:更改nextcloud/config.php覆写host
进入到/usr/share/nginx/nextcloud/编辑config.php文件
cd /usr/share/nginx/nextcloud/
sudo vim config.php
添加overwriteprotocol,overwritehost,overwritewebroot,并修改overwrite.cli.url。修改完成后如图

步骤5:安装并启用PHP模块
运行以下命令以安装NextCloud所需或推荐的PHP模块。
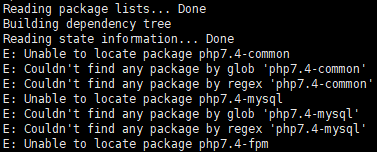
sudo apt install imagemagick php-imagick php7.4-common php7.4-mysql php7.4-fpm php7.4-gd php7.4-json php7.4-curl php7.4-zip php7.4-xml php7.4-mbstring php7.4-bz2 php7.4-intl php7.4-bcmath php7.4-gmp
sudo apt install software-properties-common
sudo add-apt-repository ppa:ondrej/php
sudo apt update
然后再次尝试安装,由于软件源在国外,安装时间会比较长
步骤6:在Web浏览器中完成安装
现在,你可以使用HTTPS连接访问Nextcloud Web安装向导。
https://nextcloud.example.com/nextcloud
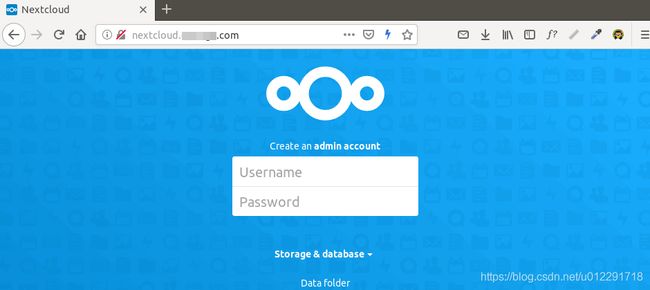
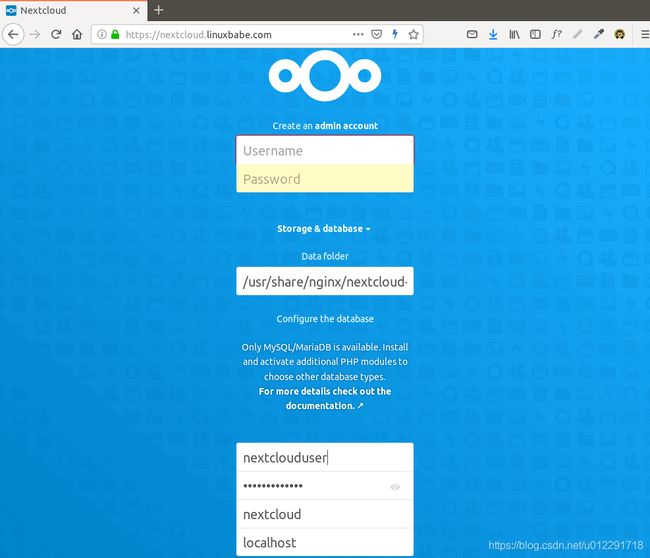
要完成安装,你需要创建一个管理员帐户,输入Nextcloud数据文件夹的路径,输入在步骤2中创建的数据库详细信息。你可以使用默认值localhost作为主机地址,也可以输入localhost:3306,因为MariaDB在端口3306上进行侦听。
数据文件夹是存储用户文件的位置。为了安全起见,最好将数据目录放置在Nextcloud webroot目录之外。因此我们可以将其更改为/ usr / share / nginx / nextcloud-data。可以使用以下命令创建:
sudo chown www-data:www-data /usr/share/nginx/nextcloud-data -R
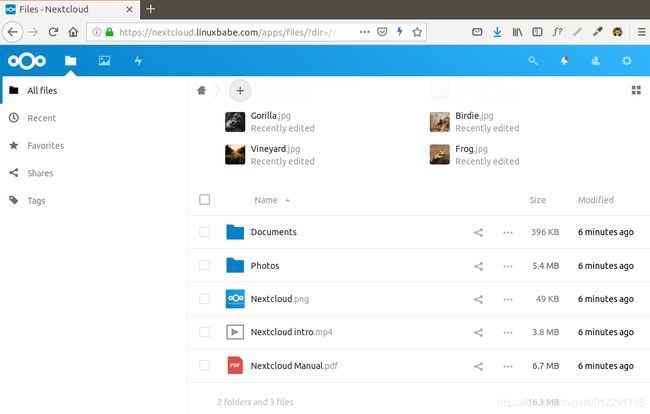
单击Finish Setup按钮,你将看到Nextcloud的Web界面。恭喜!你可以开始将其用作私有云存储。
步骤7:添加备案号
在国内所有的域名都需要备案才能进行dns解析,且备案后需要将备案号放在网站。nextcloud本身没有添加备案号的功能,但可以通过插件jsloader完成备案号的添加。
首先单击头像,找到应用,然后等待插件加载出来,最好有科学上网,否则你可能看不到第三方插件。找到jsloader,安装并启用。安装完成后找到设置,选择jsloader

把下面的文本复制到第一个框里面,第二个输入框什么都不要填,然后保存。
function add_icp_num(inclass) {
    icp_num = "你的备案号";
    var matches = document.querySelectorAll("footer");
    if (JSON.stringify(matches)== "{}") return;
    addclass = inclass==undefined ? "" : " class=\""+inclass+"\"";
    var childs = matches[0].childNodes;
    for (var i = childs.length - 1; i >= 0; i--) matches[0].removeChild(childs[i]);
    matches[0].insertAdjacentHTML(
        "beforeend",
        "" + icp_num + ""
    );
}

var uri = window.location.pathname;
var splited = uri.split("/");
if (splited[2] == "login") {
    add_icp_num('info');
} else if (splited[2]== "s") {
    add_icp_num();
} else if (splited[2]== "index.php" && splited[3].startsWith("login")) {
    add_icp_num('info');
} else if(splited[2]== "index.php" && splited[3]== "s") {
    add_icp_num();
}
登出之后就能在主页的最下面看见备案号了。
附录
A. 如何设置NextCloud电子邮件通知
如果你的NextCloud实例将被多个人使用,那么NextCloud服务器可以发送交易电子邮件,例如密码重置电子邮件,这一点很重要。首先,你应该为自己的帐户设置一个电子邮件地址。转到Settings->Personal Info并为你的帐户设置一个电子邮件地址。

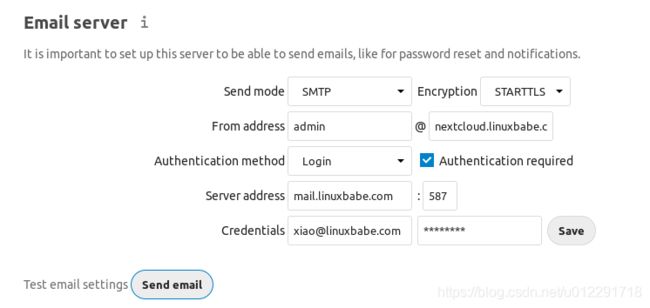
然后转到设置->基本设置。你将找到电子邮件服务器设置。有两种发送模式:sendmail和smtp。sendmail如果你的NextCloud主机正在运行SMTP服务器,则可以选择模式。

如果要使用在另一台主机上运行的SMTP服务器,请选择smtp模式,然后输入SMTP服务器地址和登录凭据,如下所示。选择STARTTLS进行加密。
B. 如何从命令行重置Nextcloud用户密码
如果你丢失了管理员帐户密码,并且没有在Nextcloud中设置电子邮件传递,则需要通过在服务器上运行以下命令来重置密码。nextcloud_username用你的真实用户名替换。
sudo -u www-data php /usr/share/nginx/nextcloud/occ user:resetpassword nextcloud_username
C.如何移动数据目录
如果你需要移动NextCloud数据目录,则有4个步骤来完成此操作。首先,你需要使用cp命令将数据目录复制到新目录。例如,我的外部硬盘驱动器的安装点是/media/linuxbabe/b43e4eea-9796-4ac6-9c48-2bcaa46353731。我在外部硬盘驱动器上创建新的数据目录。
sudo mkdir /media/linuxbabe/b43e4eea-9796-4ac6-9c48-2bcaa46353731/nextcloud-data/
然后,我将原始数据目录复制到新数据目录。-R标志表示复制操作是递归的。
sudo cp /usr/share/nginx/nextcloud-data/* /media/linuxbabe/b43e4eea-9796-4ac6-9c48-2bcaa46353731/nextcloud-data/ -R
你还需要复制.ocdata文件。
sudo cp /usr/share/nginx/nextcloud-data/.ocdata /media/linuxbabe/b43e4eea-9796-4ac6-9c48-2bcaa46353731/nextcloud-data/
接下来,你需要将www-data(Nginx用户)设置为所有者。
sudo chown www-data:www-data /media/linuxbabe/b43e4eea-9796-4ac6-9c48-2bcaa46353731/nextcloud-data/ -R
最后,你需要编辑config.php文件。
sudo vim/usr/share/nginx/nextcloud/config/config.php
找到以下行并更改的值datadirectory。
‘datadirectory’ => ‘/usr/share/nginx/nextcloud-data’,
保存并关闭文件。重新加载NextCloud网页即可。
D. 增加PHP内存限制
默认的PHP内存限制为128MB。NextCloud建议使用512MB,以获得更好的性能。要更改PHP内存限制,请编辑php.ini文件。
sudo vim /etc/php/7.4/fpm/php.ini
查找以下行。(第409行)
memory_limit = 128M
更改值。
memory_limit = 512M
保存并关闭文件。或者,你可以运行以下命令来更改值,而无需手动打开文件。
sudo sed -i ‘s/memory_limit = 128M/memory_limit = 512M/g’ /etc/php/7.4/fpm/php.ini
然后重新加载PHP-FPM服务,以使更改生效。
sudo systemctl reload php7.4-fpm
E. 设置PHP以正确查询系统环境变量
编辑www.conf文件。
sudo vim /etc/php/7.4/fpm/pool.d/www.conf
找到以下行(第396行)
;clear_env = no
删除分号以取消注释此行。
clear_env = no
保存并关闭文件。或者,你可以运行以下命令来取消注释此行,而无需手动打开文件。
sudo sed -i ‘s/;clear_env = no/clear_env = no/g’ /etc/php/7.4/fpm/pool.d/www.conf
然后重新加载PHP-FPM服务,以使更改生效。
sudo systemctl reload php7.4-fpm
F. 故障排除技巧
如果遇到错误,则可以检查以下日志文件之一,以查找问题所在。
- Nginx错误日志: /var/log/nginx/error.log
- Nextcloud虚拟主机的Nginx错误日志: /var/log/nginx/nextcloud.error
- Nextcloud应用程序日志: /usr/share/nginx/nextcloud/data/nextcloud.log

