图像基本处理——腐蚀和膨胀
文章目录
- 一、形态学——腐蚀
- 二、形态学——膨胀
- 三、腐蚀和膨胀组合运算
-
- (一)开运算
- (二)闭运算
- (三)梯度运算
- 四、礼帽和黑帽
-
- (一)礼帽
- (二)黑帽
一、形态学——腐蚀
腐蚀就是通过卷积核,将边界部分向内部靠近,逐步腐蚀掉。
-
opencv腐蚀函数
def erode(src: Any,
          kernel: Any,
          dst: Any = None,
          anchor: Any = None,
          iterations: Any = None,
          borderType: Any = None,
          borderValue: Any = None)
部分参数说明
src:腐蚀图像对象
kernel:卷积核,一般是全1矩阵
anchor:结构元素的锚点位置,默认值为(-1,-1)表示位于结构元素中心位置
iteration:迭代运算次数 -
腐蚀函数使用
代码内容
①读取原始图片import cv2 import numpy as np # 读取原始图片 harriet = cv2.imread("harriet.png") cv2.imshow("Harriet", harriet) cv2.waitKey(0) cv2.destroyAllWindows()
②进行腐蚀操作# 构造一个全1的5*5矩阵 kernel = np.ones((5, 5), np.int) # 进行腐蚀操作 erosion = cv2.erode(harriet, kernel, iterations=1) cv2.imshow("Harriet", erosion) cv2.waitKey(0) cv2.destroyAllWindows()
通过腐蚀结果可以看出,进行腐蚀过后,整个笔画变细了。腐蚀操作一般用于来去掉图片的毛刺。 -
实例查看腐蚀函数参数
代码内容import cv2 import numpy as np circle = cv2.imread("circle.png") cv2.imshow("circle", circle) cv2.waitKey(0) cv2.destroyAllWindows() kernel = np.ones((30, 30), np.int) erosion1 = cv2.erode(circle, kernel, iterations=1) erosion2 = cv2.erode(circle, kernel, iterations=2) erosion3 = cv2.erode(circle, kernel, iterations=3) res = np.hstack((erosion1, erosion2, erosion3)) cv2.imshow("res", res) cv2.waitKey(0) cv2.destroyAllWindows()
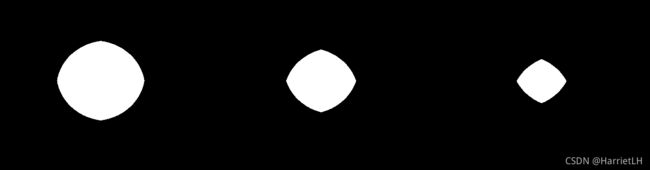
通过腐蚀的最终结果可以发现,迭代次数越大,腐蚀效果越明显,同理可以验证卷积核越大,腐蚀效果也越明显。
二、形态学——膨胀
膨胀就是通过卷积核,将边界部分向外部靠近,逐步变粗。实际上膨胀就是腐蚀的逆过程。
- opencv膨胀函数
其中,参数含义跟腐蚀参数一致。def dilate(src: Any, kernel: Any, dst: Any = None, anchor: Any = None, iterations: Any = None, borderType: Any = None, borderValue: Any = None) - 实际举例
所用到的原始图片跟上面一致。harriet = cv2.imread("harriet.png") # 构造一个全1的5*5矩阵 kernel = np.ones((5, 5), np.int) dilate = cv2.dilate(harriet, kernel, iterations=1) cv2.imshow("Harriet", dilate) cv2.waitKey(0) cv2.destroyAllWindows() circle = cv2.imread("circle.png") kernel = np.ones((30, 30), np.int) dilate1 = cv2.dilate(circle, kernel, iterations=1) dilate2 = cv2.dilate(circle, kernel, iterations=2) dilate3 = cv2.dilate(circle, kernel, iterations=3) res = np.hstack((dilate1, dilate2, dilate3)) cv2.imshow("res", res) cv2.waitKey(0) cv2.destroyAllWindows()
膨胀后图片

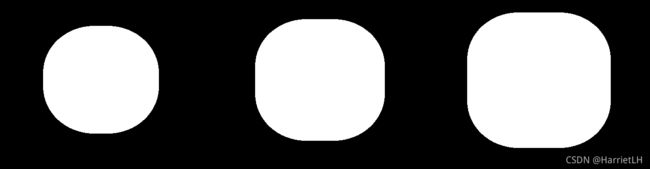
同理发现,迭代次数越大,膨胀效果越明显。
三、腐蚀和膨胀组合运算
开运算,闭运算和梯度运算都是进行了腐蚀和膨胀操作,开运算和闭运算主要在于进行的先后顺序。
opencv的开闭运算函数
def morphologyEx(src: Any,
                 op: Any,
                 kernel: Any,
                 dst: Any = None,
                 anchor: Any = None,
                 iterations: Any = None,
                 borderType: Any = None,
                 borderValue: Any = None)
主要在于op的参数选择
开运算
cv2.MORPH_OPEN
闭运算
cv2.MORPH_CLOSE
梯度运算
cv2.MORPH_GRADIENT
(一)开运算
开运算是先腐蚀,在闭运算。
- 实际举例
harriet = cv2.imread("harriet.png")
# 构造一个全1的5*5矩阵
kernel = np.ones((5, 5), np.int)
opening = cv2.morphologyEx(harriet, cv2.MORPH_OPEN, kernel)
cv2.imshow("open", opening)
cv2.waitKey(0)
cv2.destroyAllWindows()
(二)闭运算
闭运算先膨胀,后腐蚀
- 实际举例
harriet = cv2.imread("harriet.png")
# 构造一个全1的5*5矩阵
kernel = np.ones((5, 5), np.int)
closeing = cv2.morphologyEx(harriet, cv2.MORPH_CLOSE, kernel)
cv2.imshow("close", closeing)
cv2.waitKey(0)
cv2.destroyAllWindows()
通过两种运算的对比发现,图像存在毛刺的时候,采用闭运算并一定能够去掉毛刺部分,反而可能导致毛刺变粗。
(三)梯度运算
梯度运算是用膨胀后的内容减去腐蚀后的内容,得到边界内容或者是轮廓。
- 实际举例
circle = cv2.imread("circle.png")
# 构造一个全1的5*5矩阵
kernel = np.ones((5, 5), np.int)
gradient = cv2.morphologyEx(circle, cv2.MORPH_GRADIENT, kernel)
cv2.imshow("gradient", gradient)
cv2.waitKey(0)
cv2.destroyAllWindows()
四、礼帽和黑帽
opencv使用的函数同上面的腐蚀和膨胀运算使用到的函数。
op参数说明
礼帽
cv2.MORPH_TOHAT
黑帽
cv2.MORPH_BLACKHAT
(一)礼帽
礼帽结果为原始图像减去开运算结果,得到结果应该为多余的毛刺部分。
- 实际举例
harriet = cv2.imread("harriet.png")
# 构造一个全1的5*5矩阵
kernel = np.ones((5, 5), np.int)
tohat = cv2.morphologyEx(harriet, cv2.MORPH_TOHAT, kernel)
cv2.imshow("tohat", tohat)
cv2.waitKey(0)
cv2.destroyAllWindows()
(二)黑帽
黑帽结果为闭运算结果减去原始图像,得到结果应该为原始图像的大概轮廓。
- 实际举例
harriet = cv2.imread("harriet.png")
# 构造一个全1的5*5矩阵
kernel = np.ones((5, 5), np.int)
blackhat = cv2.morphologyEx(harriet, cv2.MORPH_BLACKHAT, kernel)
cv2.imshow("tohat", blackhat)
cv2.waitKey(0)
cv2.destroyAllWindows()