1.前言
今天看到一道面试题,挺有意思的。
研究了一下,汇报一下学习所得。
const tmp = `
{{person.name}}
money:{{person.money}}
mother:{{parents[1]}}
`
//需要编写render函数
const html = render(tmp, {
  person: {
    name: 'petter',
    money: '10w',
  },
  parents: ['Mr jack','Mrs lucy']
});

//期望的输出
const expect = `
  petter
  money:100w
  mother:Mrs lucy
`
2.简单模板编译
2.1思路一:正则替换
1.先遍历data找出所有的值
const val = {
 'person.name': 'petter',
 'person.money': '100w',
 'person.parents[0]': 'Mr jack'
 'person.parents[1]': 'Mrs lucy'
}
2.遍历val,如果模板中有val,则全局替换
这样做有两个问题,一个是数组不好处理。第二个是层级不好处理。层级越深性能越差
2.2思路二:new Function + with
1.先把所有的大胡子语法转成标准的字符串模板
2.利用new Function(' with (data){return 转化后的模板 }')
这样模板中的就可以直接使用${person.money}这种数据不需要额外转化
const render = (tmp,data)=>{
    const genCode = (temp)=>{
        const reg = /\{\{(\S+)\}\}/g
        return temp.replace(reg,function(...res){
            return '${'+res[1]+'}'
        })
    }
    const code = genCode(tmp)
    const fn = new Function(

        'data',`with(data){ return \`${code}\` }`)
    return fn(data)
}
我们看一下fn函数的效果
//console.log(fn.toString())
function anonymous(data) {
    with(data){ return `
        ${person.name}
        money:${person.money}
        mother:${parents[1]}`
        }
    }
这样很好的解决的方案一的一些问题
3.带逻辑的高级编译
一般面试的时候不会带有逻辑语法,但是我们需要知道逻辑语法的处理思路。
逻辑没法用正则替换直接处理。我们只能用正则去匹配到这一段逻辑。
然后在语法框架下单独去写方法去处理逻辑。
所以我们首先需要拿到语法框架,也就是所谓的AST。它就是专门描述语法结构的一个对象
//比如现在的模板
const tmp = `
choose one person
{{person1.name}}
{{person2.name}}
// 数据
const obj = {
person1: {
money: 1000,
name: '高帅穷'
},
person2: {
money: 100000,
name: '矮丑富'
},
}
// 结果
let res = render(tmp,obj)
console.log(res) //choose one person
矮丑富
`基本思路:
1.利用正则匹配拿到AST
2.利用AST去拼字符串(字符串里面有一些方法,用来产出你所要的结果,需要提前定义好)
3.new function + with 去生成render函数
4.传参执行render
3.1 生成ast
定义一个ast中节点的结构
class Node {
    constructor(tag,attrs,text){
        this.id = id++
        this.tag = tag
        this.text = this.handleText(text)
        this.attrs = attrs
        this.elseFlag = false
        this.ifFlag = false
        this.ifExp = ''
        this.handleAttrs()
    }
    handleText(text){
        let reg = /\{\{(\S+)\}\}/
        if(reg.test(text)){
            return text.replace(reg,function(...res){
                return res[1]
            })
        }else{
            return `\'${text}\'`
        }

    }
    handleAttrs(){
        const ifReg = /#if=\"(\S+)\"/
        const elesReg = /#else/
        if(elesReg.test(this.attrs)){
            this.elseFlag = true
        }
        const res = this.attrs.match(ifReg)
        if(res){
            this.ifFlag = true
            this.ifExp = res[1]
        }
    }
}
3.2 匹配正则 执行响应的回调 拿到ast
我这里写的正则是每次匹配的是一行闭合标签
如果匹配到则触发相应的方法,将其转化为一个节点存到ast数组里
每次处理完一行,则把它从tmep里剪掉,再处理下一行,知道处理完
const genAST = (temp)=>{ //只适用标签间没有文本
        const root = []
        const blockreg =  /(\s*<(\w+)([^]*?)>([^>]*?)<\/\2>\s*)/    // ?一定要加 非贪婪模式 否则会匹配到后面啷个标签
        while(temp ){
            let block = temp.match(blockreg)
            let node = new Node(block[2],block[3],block[4])
            root.push(node)
            temp = advance(temp,block[1].length)
        }
        return root
    }
    const ast = genAST(temp)
    console.log(ast)
我们看一下拿到的ast
[
            Node {
                id: 1,
                tag: 'h1',
                text: "'choose one person'",
                attrs: '',
                elseFlag: false,
                ifFlag: false,
                ifExp: ''
            },
        Node {
            id: 2,
            tag: 'div',
            text: 'person1.name',
            attrs: ' #if="person1.money>person2.money"',
            elseFlag: false,
            ifFlag: true,
            ifExp: 'person1.money>person2.money'
        },
        Node {
            id: 3,
            tag: 'div',
            text: 'person2.name',
            attrs: ' #else',
            elseFlag: true,
            ifFlag: false,
            ifExp: ''
        }
    ]
3.2 拼字符串
下面开始拼字符串
const genCode = (ast)=>{
        let str = ''
        for(var i = 0;i
我们瞅一眼拼好的字符串
//  console.log('code:',code)
// code: str+=_c('h1','choose one person');str+=(person1.money>person2.money)?_c('div',person1.name):_c('div',person2.name);
3.3 生成render函数并执行
function render(){
    //...
   const fn = new Function('data',`with(data){ let str = ''; ${code} return str }`)
   return fn(data)
}
我们瞅一眼最终的fn函数
// console.log(fn.toString())
function anonymous(data) {
            with(data){
                let str = '';
                str+=_c('h1','choose one person');
                str+=(person1.money>person2.money)?_c('div',person1.name):_c('div',person2.name);
                return str
            }
        }
我们再定义一下_c,advance
 const creatEle=(type,text)=> `<${type}>${text}`

 data._c = creatEle //这里很重要 因为_c其实读的是with中data参数的_c,一定要给赋值上

 const advance = (temp,n)=>{
        return temp.substring(n)
    }
3.4 完整代码
const tmp = `
choose one person
{{person1.name}}
{{person2.name}}
`
let id = 1
class Node {
constructor(tag,attrs,text){
this.id = id++
this.tag = tag
this.text = this.handleText(text)
this.attrs = attrs
this.elseFlag = false
this.ifFlag = false
this.ifExp = ''
this.handleAttrs()
}
handleText(text){
let reg = /\{\{(\S+)\}\}/
if(reg.test(text)){
return text.replace(reg,function(...res){
return res[1]
})
}else{
return `\'${text}\'`
}
}
handleAttrs(){
const ifReg = /#if=\"(\S+)\"/
const elesReg = /#else/
if(elesReg.test(this.attrs)){
this.elseFlag = true
}
const res = this.attrs.match(ifReg)
if(res){
this.ifFlag = true
this.ifExp = res[1]
}
}
}
const render = (temp,data)=>{
const creatEle=(type,text)=> `<${type}>${text}`
data._c = creatEle
const advance = (temp,n)=>{
return temp.substring(n)
}
const genAST = (temp)=>{ //只适用标签间没有文本
const root = []
const blockreg = /(\s*<(\w+)([^]*?)>([^>]*?)<\/\2>\s*)/ // ?一定要加 非贪婪模式 否则会匹配到后面啷个标签
while(temp ){
let block = temp.match(blockreg)
let node = new Node(block[2],block[3],block[4])
root.push(node)
temp = advance(temp,block[1].length)
}
return root
}
const ast = genAST(temp)
console.log(ast)
const genCode = (ast)=>{
let str = ''
for(var i = 0;iperson2.money)?_c('div',person1.name):_c('div',person2.name);
const fn = new Function('data',`with(data){ let str = ''; ${code} return str }`)
console.log(fn.toString())
return fn(data)
}
const obj = {
person1: {
money: 1000,
name: '高帅穷'
},
person2: {
money: 100000,
name: '矮丑富'
},
}
let res = render(tmp,obj)
console.log(res) //choose one person
矮丑富 3.5 优点与待改进点
首先可以肯定,模板编译大家都是这么做的,处理模板=>生成ast=>生成render函数=>传参执行函数
好处: 由于模板不会变,一般都是data变,所以只需要编译一次,就可以反复使用局限性: 这里说的局限性是指我写的方法的局限性,
1.由于正则是专门为这道题写的,所以模板格式换一换就正则就不生效了。根本原因是我的正则匹配的是类似一行标签里面的所有东西。我的感悟是匹配的越多,情况越复杂,越容易出问题。
2.node实现和if逻辑的实现上比较简陋改进点: 对于正则可以参考vue中的实现,匹配力度为开始便签结束便签。从而区分是属性还是标签还是文本。具体可以看下vue中的实现。
4.一些应用
1.pug
也是模板编译成ast生成render然后再new Function,没用with,但是实现了一个类似的方法,把参数一个个传进去了,感觉不是特别好
const pug = require('pug');
const path = require('path')

const compiledFunction = pug.compile('p #{name1}的 Pug 代码,用来调试#{obj}');
// console.log(compiledFunction.toString())
console.log(compiledFunction({
    name1: 'fyy',
    obj: 'compiler'
}));

//看一下编译出的函数
// function template(locals) {
//     var pug_html = ""
//     var locals_for_with = (locals || {});

//     (function (name1, obj) {

//         pug_html = pug_html + "\u003Cp\u003E"; //p标签

//         pug_html = pug_html + pug.escape(name1);
//         pug_html = pug_html + "的 Pug 代码,用来调试";

//         pug_html = pug_html + pug.escape(obj) + "\u003C\u002Fp\u003E";
//     }.call(this,locals_for_with.name1,locals_for_with.obj));
//     return pug_html;
// }
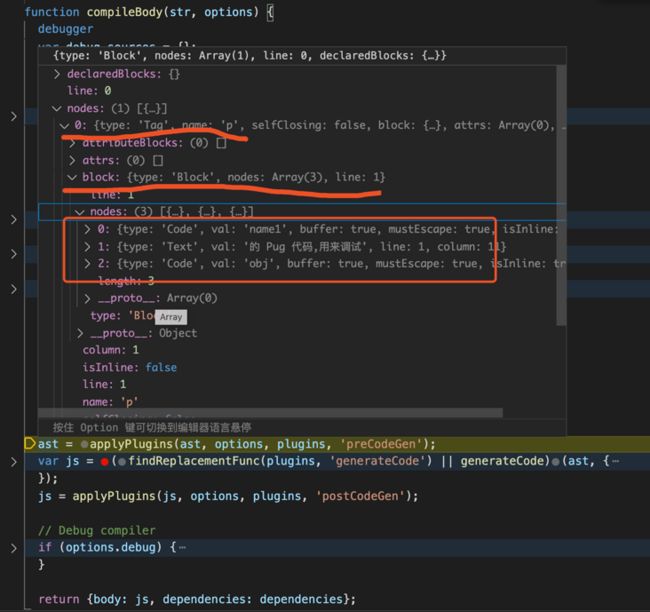
看下compileBody里面有啥 ,原来是生成了ast,看下它的ast原来是长这屌样
2.Vue
vue的话后面会写文章细说,先简单看看
 //html

        {{name}}

//script
let vm = new Vue({
            data() {

                return {
                    name:'fyy'
                }
            },
        });
        vm.$mount('#app')
我们看下这段代码是怎么编译的
function compileToFunction(template) {
    let root = parserHTML(template) //ast

    // 生成代码
    let code = generate(root)
    console.log(code)
    // _c('div',{id:"app",a:"1",style:{"color":"red","background":"lightblue"}},_c('li',{b:"1"},_v(_s(name))))   //name取的是this上的name
    let render = new Function(`with(this){return ${code}}`); // code 中会用到数据 数据在vm上

    return render;

    // html=> ast(只能描述语法 语法不存在的属性无法描述) => render函数 + (with + new Function) => 虚拟dom (增加额外的属性) => 生成真实dom
}
5.总结
总的来说,感觉模板编译就是正则匹配生成ast+根据逻辑拼字符串函数的一个过程,当然难点也就在这两个地方。
万幸,一般面试估计只会出的2.2的难度。本文章知识点应该是能完全覆盖的。如果不写框架的话,懂这些应该够用了。
后面的文章会具体分析下vue是怎么做这块的


