Flutter系列三:Flutter启动流程分析
本文我们来分析下Flutter的启动流程,首先我们从main.dart文件的main函数开始:
void main() => runApp(MyApp());
main函数则调用的是runApp函数:
void runApp(Widget app) {
  WidgetsFlutterBinding.ensureInitialized()
    ..scheduleAttachRootWidget(app)
    ..scheduleWarmUpFrame();
}
函数中有用到Dart语法中的级联运算符(…),代表的含义是WidgetsFlutterBinding.ensureInitialized()生成的对象分别调用了scheduleAttachRootWidget和scheduleWarmUpFrame这两个方法。
先概括一下这三行代码的重要作用:
- 生成一个Flutter Engine(C++代码)和Flutter Framework(Dart代码)的中间桥接对象,官方定义为胶水对象;
- 根据app生成一个渲染树;
- 绘制热身帧, 将渲染树生成的Layer图层通过Flutter Engine渲染到Flutter View上。
概括起来很简单,但是其中包含的内容是相当复杂的。我们接下来就从这三行代码入手分析一下其中具体的流程。
WidgetsFlutterBinding
WidgetsFlutterBinding类中的所有代码如下:
class WidgetsFlutterBinding extends BindingBase with GestureBinding, SchedulerBinding, ServicesBinding, PaintingBinding, SemanticsBinding, RendererBinding, WidgetsBinding {
  // 类初始化方法
  static WidgetsBinding ensureInitialized() {
    if (WidgetsBinding.instance == null)
      // 构造方法调用
      WidgetsFlutterBinding();
    // 返回对象WidgetsBinding
    return WidgetsBinding.instance!;
  }
}
WidgetsFlutterBinding继承自BindingBase,混入了GestureBinding,SchedulerBinding,ServicesBinding,PaintingBinding,SemanticsBinding,RendererBinding和WidgetsBinding7个mixin。这7个mixin的功能后面详解介绍。
ensureInitialized方法就是获取WidgetsBinding.instance单例的过程。由于mixin没有构造方法,所以WidgetsFlutterBinding()实际调用的是父类BindingBase的构造方法。
BindingBase() {
  // 调用initInstances
  initInstances();
}
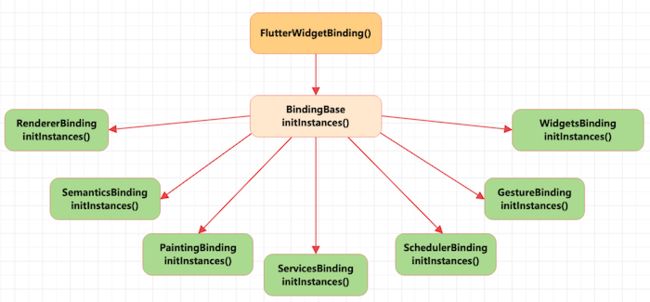
WidgetsFlutterBinding混入的7个mixin都重写了initInstances()方法,所以他们的initInstances()都会被调用。最后的调用逻辑如下图所示:
通过精妙的mixin代码设计,实现了高内聚低耦合和模块职责单一,并且通过mixin依赖,实现了initInstances()方法调用的串行按执行顺序。
FlutterView
问题:为什么突兀的来介绍FlutterView对象呢?
FlutterView是Flutter Engine给Flutter Framework开放的用户界面和事件的接口,可以把Flutter Framework理解为围绕FlutterView的一个处理框架。所以其重要性不言而喻。
上面WidgetsFlutterBinding混入的多个mixin主要就是处理window对象(即FlutterView对象的)的回调事件和提交渲染内容,所以我们先来介绍一下FlutterView是非常有必要的。
window对象是BindingBase的一个变量, 名字上推测他就是个单例对象:
ui.SingletonFlutterWindow get window => ui.window;
ui.window是PlatformDispatcher.instance中windowId为0的主window:
final SingletonFlutterWindow window = SingletonFlutterWindow._(0, PlatformDispatcher.instance);
SingletonFlutterWindow的继承图谱如下:
abstract class FlutterView {}
class FlutterWindow extends FlutterView {}
class SingletonFlutterWindow extends FlutterWindow {}
FlutterView
abstract class FlutterView {
  //
  PlatformDispatcher get platformDispatcher;

  //
  ViewConfiguration get viewConfiguration;

  //
  double get devicePixelRatio => viewConfiguration.devicePixelRatio;

  //
  Rect get physicalGeometry => viewConfiguration.geometry;

  //
  Size get physicalSize => viewConfiguration.geometry.size;

  //
  WindowPadding get viewInsets => viewConfiguration.viewInsets;

  //
  WindowPadding get viewPadding => viewConfiguration.viewPadding;

  //
  WindowPadding get systemGestureInsets => viewConfiguration.systemGestureInsets;

  //
  WindowPadding get padding => viewConfiguration.padding;

  //
  void render(Scene scene) => _render(scene, this);
  void _render(Scene scene, FlutterView view) native 'PlatformConfiguration_render';
}
FlutterView有几个重要的属性和方法:
- PlatformDispatcher是FlutterView的核心,FlutterView是对它的一层封装,是真正向Flutter Engine发送消息和得到回调的类;
- ViewConfiguration是Platform View的一些信息的描述,其中主要包括几个信息:
devicePixelRatio:物理像素和虚拟像素的比值。这个和手机有关,譬如iPhone手机可能是2或者3,Android手机就有可能是个小数,譬如3.5等。geometry:Flutter渲染的View在Native platform中的位置和大小。viewInsets: 各个边显示的内容和能显示内容的边距大小;譬如:没有键盘的时候viewInsets.bottom为0,当有键盘的时候键盘挡住了一些区域,键盘底下无法显示内容,所以viewInsets.bottom就变成了键盘的高度。padding: 系统UI的显示区域如状态栏,这部分区域最好不要显示内容,否则有可能被覆盖了。譬如,很多iPhone顶部的刘海区域,padding.top就是其高度。viewPadding:viewInsets和padding的和。参考地址
- 下面的属性都是对ViewConfiguration内部属性的暴露,便于外部获取。
render方法是将Flutter代码生成的渲染内容(Layer Tree生成的Scene)传递给Flutter Engine, 让GPU去渲染。
ViewConfiguration其实也是从PlatformDispatcher获取的。
FlutterWindow
FlutterWindow没有什么功能,只是封装了一个构造方法,我们不做分析,接下来我们来看看SingletonFlutterWindow的一些重要代码:
- devicePixelRatio, physicalSize, padding和viewInsets等的变化会触发的回调
onMetricsChanged;
本质是转发了platformDispatcher的回调,后面的回调方法都类似。
VoidCallback? get onMetricsChanged => platformDispatcher.onMetricsChanged;
set onMetricsChanged(VoidCallback? callback) {
    platformDispatcher.onMetricsChanged = callback;
}
- 手机设置的地区(如中国大陆),以及设置的地区更改后收到的回调
onLocaleChanged;
Locale get locale => platformDispatcher.locale;

VoidCallback? get onLocaleChanged => platformDispatcher.onLocaleChanged;
set onLocaleChanged(VoidCallback? callback) {
    platformDispatcher.onLocaleChanged = callback;
}
- 文字缩放倍率变化后的回调
onTextScaleFactorChanged;
  VoidCallback? get onTextScaleFactorChanged => platformDispatcher.onTextScaleFactorChanged;
  set onTextScaleFactorChanged(VoidCallback? callback) {
    platformDispatcher.onTextScaleFactorChanged = callback;
  }
- platformBrightness变化后的回调
onPlatformBrightnessChanged;
VoidCallback? get onPlatformBrightnessChanged => platformDispatcher.onPlatformBrightnessChanged;
  set onPlatformBrightnessChanged(VoidCallback? callback) {
    platformDispatcher.onPlatformBrightnessChanged = callback;
}
- Flutter Engine根据VSync发送的准备开始下一帧的回调
onBeginFrame;
FrameCallback? get onBeginFrame => platformDispatcher.onBeginFrame;
set onBeginFrame(FrameCallback? callback) {
    platformDispatcher.onBeginFrame = callback;
  }
- onBeginFrame完成后,开始绘制帧的回调
onDrawFrame;
  VoidCallback? get onDrawFrame => platformDispatcher.onDrawFrame;
  set onDrawFrame(VoidCallback? callback) {
    platformDispatcher.onDrawFrame = callback;
  }
- 用户的手势操作(点击,滑动等)的回调
onPointerDataPacket;
PointerDataPacketCallback? get onPointerDataPacket => platformDispatcher.onPointerDataPacket;
set onPointerDataPacket(PointerDataPacketCallback? callback) {
    platformDispatcher.onPointerDataPacket = callback;
  }
- 收到插件发送的消息的回调
onPlatformMessage;
PlatformMessageCallback? get onPlatformMessage => platformDispatcher.onPlatformMessage;
  set onPlatformMessage(PlatformMessageCallback? callback) {
    platformDispatcher.onPlatformMessage = callback;
  }
- 语义的设置和修改后的回调;
void updateSemantics(SemanticsUpdate update) => platformDispatcher.updateSemantics(update);

VoidCallback? get onAccessibilityFeaturesChanged => platformDispatcher.onAccessibilityFeaturesChanged;
  set onAccessibilityFeaturesChanged(VoidCallback? callback) {
    platformDispatcher.onAccessibilityFeaturesChanged = callback;
  }
总结:
FlutterView对象window本质上是对PlatformDispatcher的封装,从PlatformDispatcher获取一些界面相关信息,获取从Flutter Engine 发送来的事件,然后触发和转发相应的回调方法。
如果有想法,可以基于
window实现自己的Flutter Framework。
BindingBase
BindingBase的主要功能前面都已经说明,这里总结一下:
- 构造函数调用
initInstances方法,其实是为了依次调用7个mixin的initInstances方法。 - 提供了一个
window单例。
abstract class BindingBase {
    BindingBase() {
        // 初始化
        initInstances();
    }
    // 单例window
    ui.SingletonFlutterWindow get window => ui.window;
}
RendererBinding
RendererBinding的功能主要和渲染树相关。我们来看看它的重要代码:
initInstances初始化方法:
void initInstances() {
    super.initInstances();
    _instance = this;
    // 1
    _pipelineOwner = PipelineOwner(
      onNeedVisualUpdate: ensureVisualUpdate,
      onSemanticsOwnerCreated: _handleSemanticsOwnerCreated,
      onSemanticsOwnerDisposed: _handleSemanticsOwnerDisposed,
    );
    // 2
    window
      ..onMetricsChanged = handleMetricsChanged
      ..onTextScaleFactorChanged = handleTextScaleFactorChanged
      ..onPlatformBrightnessChanged = handlePlatformBrightnessChanged
      ..onSemanticsEnabledChanged = _handleSemanticsEnabledChanged
      ..onSemanticsAction = _handleSemanticsAction;
    // 3
    initRenderView();

    _handleSemanticsEnabledChanged();
    // 4
    addPersistentFrameCallback(_handlePersistentFrameCallback);
    // 5
    initMouseTracker();
}
- 生成了一个PipelineOwner对象。它的主要作用是收集需要更新的RenderObjects,然后借助RendererBinding进行UI刷新。
- 处理window对象的
onMetricsChanged,onTextScaleFactorChanged等回调方法。 initRenderView生成了一个RenderView对象renderView, 然后将renderView设置为_pipelineOwner的根节点rootNode。
这个
renderView是渲染树的根节点,我们的MyApp将作为它的子节点插入渲染树。先剧透一下,后面会介绍。
addPersistentFrameCallback调用的是SchedulerBinding的方法, PersistentFrameCallback主要执行的是Widget的build / layout / paint等一系列操作。
void addPersistentFrameCallback(FrameCallback callback) {
    _persistentCallbacks.add(callback);
}
- 生成一个MouseTracker对象,处理
hitTestResult或者PointerAddedEvent和PointerRemovedEvent事件。
void dispatchEvent(PointerEvent event, HitTestResult? hitTestResult) {
    if (hitTestResult != null ||
        event is PointerAddedEvent ||
        event is PointerRemovedEvent) {
      assert(event.position != null);
      _mouseTracker!.updateWithEvent(event,
          () => hitTestResult ?? renderView.hitTestMouseTrackers(event.position));
    }
    super.dispatchEvent(event, hitTestResult);
  }
这里是事件传递的重要方法,后面介绍GestureBinding事件传递的时候会再次见到它。
drawFrame绘制方法
void drawFrame() {
    // 1
    pipelineOwner.flushLayout();
    // 2
    pipelineOwner.flushCompositingBits();
    // 3
    pipelineOwner.flushPaint();
    // 4
    if (sendFramesToEngine) {
      // 5
      renderView.compositeFrame(); // this sends the bits to the GPU
      // 6
      pipelineOwner.flushSemantics(); // this also sends the semantics to the OS.
    }
  }
pipelineOwner.flushLayout是对Dirty RenderObject进行布局定位;pipelineOwner.flushCompositingBits是更新RenderObject的needsCompositing属性,这个属性在很多情况下需要用到,譬如裁剪(Clip),旋转(Transform)等。pipelineOwner.flushPaint是在PaintingContext对RenderObject进行绘制。renderView.compositeFrame方法是用SceneBuilder将前几步的绘制结果转换成一个Scene(可以理解为一帧画面)对象,然后调用window的render方法提交给GUP去显示,代码如下:
void compositeFrame() {
    ...
    final ui.SceneBuilder builder = ui.SceneBuilder();
    final ui.Scene scene = layer!.buildScene(builder);
    _window.render(scene);
    ...
  }
5.pipelineOwner.flushSemantics更新语义辅助信息。
SemanticsBinding
Semantics译来就是语义,主要就是描述应用程序中的UI信息。在iOS和Android主要是用于读屏使用,帮助有视力障碍的人使用。在网页开发中可以方便搜索等。
在Flutter Framework中Semantics非常常见,但是其实在移动端开发中,这个功能其实很少使用到。我们就一笔带过,简单看下它的初始化方法:
mixin SemanticsBinding on BindingBase {
    void initInstances() {
        super.initInstances();
        _instance = this;
        _accessibilityFeatures = window.accessibilityFeatures;
    }
}
PaintingBinding
不要被它的名字误导了,其实它是处理图片缓存的mixin。和RenderObject的Paint没啥关系。
接下来我们看看PaintingBinding的主要代码:
initInstances初始化方法
mixin PaintingBinding on BindingBase, ServicesBinding {
  @override
  void initInstances() {
    super.initInstances();
    _instance = this;
    _imageCache = createImageCache();
    shaderWarmUp?.execute();
}
_imageCache是图片缓存的类,最大能存1000张图片,最大内存是100MB;shaderWarmUp?.execute()是一个异步方法,初始化了一个默认的着色器,避免需要着色器的时候再初始化出现掉帧现象。
Reduce shader compilation jank on mobile
handleMemoryPressure处理内存警告
void handleMemoryPressure() {
    super.handleMemoryPressure();
    imageCache?.clear();
  }
图片存储非常耗内存,所以当App内存警告时需要清除掉缓存。
ServicesBinding
ServicesBinding的主要功能是接收MethodChannel和SystemChannels传递过来的消息。我们来看看ServicesBinding的主要代码:
initInstances初始化方法
void initInstances() {
    super.initInstances();
    _instance = this;
    // 1
    _defaultBinaryMessenger = createBinaryMessenger();
    // 2
    _restorationManager = createRestorationManager();
    // 3
    window.onPlatformMessage = defaultBinaryMessenger.handlePlatformMessage;
    // 4
    initLicenses();
    // 5
    SystemChannels.system.setMessageHandler((dynamic message) => handleSystemMessage(message as Object));
    SystemChannels.lifecycle.setMessageHandler(_handleLifecycleMessage);
    // 6
    readInitialLifecycleStateFromNativeWindow();
}
createBinaryMessenger()创建了一个MethodChannel;createRestorationManager()创建了一个RestorationManager用于恢复界面数据的功能;
这个场景主要是手机App进入后台后可能已经被杀死(释放资源给其他App在前台流程运行),可以通过恢复数据在App切换回来的时候,让用户感觉手机App一直在后台运行的假象;
- 通过第一步创建的
_defaultBinaryMessenger实现和Plugin插件的通信 initLicenses是给一些文件加上Licenses说明;- 接收SystemChannels传递过来的内存警告和过来的生命周期回调;
Future handleSystemMessage(Object systemMessage) async {
    final Map message = systemMessage as Map;
    final String type = message['type'] as String;
    switch (type) {
      case 'memoryPressure':
        handleMemoryPressure();
        break;
    }
    return;
  }
- 读取当前的生命周期状态,处理则是在父类SchedulerBinding这个mixin中去实现的。
SchedulerBinding
SchedulerBinding主要处理任务调度。在Flutter中有几个调度阶段:
- idle
这个阶段没有绘制帧任务处理,主要处理Task,Microtask,Timer回调,用户输入和手势,以及其他一些任务。
- transientCallbacks
这个阶段主要处理动画状态的计算和更新
- midFrameMicrotasks
这个阶段处理transientCallbacks阶段触发的Microtasks
- persistentCallbacks
这个阶段主要处理build/layout/paint,在RendererBinding那部分有提到
- postFrameCallbacks
这个阶段主要在下一帧之前,做一些清理工作或者准备工作
接下来我们看看SchedulerBinding的重要代码:
handleAppLifecycleStateChanged
AppLifecycleState? get lifecycleState => _lifecycleState;
void handleAppLifecycleStateChanged(AppLifecycleState state) {
    assert(state != null);
    _lifecycleState = state;
    switch (state) {
      case AppLifecycleState.resumed:
      case AppLifecycleState.inactive:
        _setFramesEnabledState(true);
        break;
      case AppLifecycleState.paused:
      case AppLifecycleState.detached:
        _setFramesEnabledState(false);
        break;
    }
}
void _setFramesEnabledState(bool enabled) {
    if (_framesEnabled == enabled)
      return;
    _framesEnabled = enabled;
    if (enabled)
      scheduleFrame();
}
监听生命周期变化,生命周期的状态改变设置_framesEnabled的值,如果_framesEnabled为false停止刷新界面;如果_framesEnabled为true调用scheduleFrame向Native Platform请求刷新视图的请求。
scheduleFrame
void scheduleFrame() {
    if (_hasScheduledFrame || !framesEnabled)
      return;
    // 1
    ensureFrameCallbacksRegistered();
    // 2
    window.scheduleFrame();
    _hasScheduledFrame = true;
  }
ensureFrameCallbacksRegistered()是先确保向window注册了onBeginFrame和onDrawFrame两个重要回调函数;
void ensureFrameCallbacksRegistered() {
    window.onBeginFrame ??= _handleBeginFrame;
    window.onDrawFrame ??= _handleDrawFrame;
}
window.scheduleFrame()是向Native platform发起一个刷新视图的请求;发送这个请求后,Native platform会在合适的时间调用onBegineFrame和onDrawFrame这两个函数, 这两个回调会完成刷新视图所需的操作,比如更新widgets、动画、和完成渲染等。这些都完成后再调用window.scheduleFrame(),一直循环下去,直到程序退出前台或者程序退出。
handleBeginFrame
void handleBeginFrame(Duration? rawTimeStamp) {
    _hasScheduledFrame = false;
    try {
      _schedulerPhase = SchedulerPhase.transientCallbacks;
      final Map callbacks = _transientCallbacks;
      _transientCallbacks = {};
      callbacks.forEach((int id, _FrameCallbackEntry callbackEntry) {
        if (!_removedIds.contains(id))
          _invokeFrameCallback(callbackEntry.callback, _currentFrameTimeStamp!, callbackEntry.debugStack);
      });
      _removedIds.clear();
    } finally {
      _schedulerPhase = SchedulerPhase.midFrameMicrotasks;
    }
}
Map _transientCallbacks = {};
handleBeginFrame的功能是执行_transientCallbacks中的所有函数。向transientCallbacks中添加回调主要是Ticker.scheduleTick方法,是动画框架的一部分。
void scheduleTick({ bool rescheduling = false }) {
    _animationId = SchedulerBinding.instance!.scheduleFrameCallback(_tick, rescheduling: rescheduling);
}

int scheduleFrameCallback(FrameCallback callback, { bool rescheduling = false }) {
    scheduleFrame();
    _nextFrameCallbackId += 1;
    _transientCallbacks[_nextFrameCallbackId] = _FrameCallbackEntry(callback, rescheduling: rescheduling);
    return _nextFrameCallbackId;
}
handleDrawFrame
void handleDrawFrame() {

    try {
      // 1
      _schedulerPhase = SchedulerPhase.persistentCallbacks;
      for (final FrameCallback callback in _persistentCallbacks)
        _invokeFrameCallback(callback, _currentFrameTimeStamp!);
      // 2
      _schedulerPhase = SchedulerPhase.postFrameCallbacks;
      final List localPostFrameCallbacks =
          List.from(_postFrameCallbacks);
      _postFrameCallbacks.clear();
      for (final FrameCallback callback in localPostFrameCallbacks)
        _invokeFrameCallback(callback, _currentFrameTimeStamp!);
    } finally {
      _schedulerPhase = SchedulerPhase.idle;
      _currentFrameTimeStamp = null;
    }
}
final List _persistentCallbacks = [];
final List _postFrameCallbacks = [];
handleDrawFrame中执行了两种回调函数,persistentCallbacks和 postFrameCallbacks中所有的回调函数。
- Tasks相关的代码
SchedulingStrategy schedulingStrategy = defaultSchedulingStrategy;
static int _taskSorter (_TaskEntry e1, _TaskEntry e2) {
    return -e1.priority.compareTo(e2.priority);
}
final PriorityQueue<_TaskEntry> _taskQueue = HeapPriorityQueue<_TaskEntry>(_taskSorter);

Future scheduleTask(
    TaskCallback task,
    Priority priority, {
    String? debugLabel,
    Flow? flow,
  }) {
    final bool isFirstTask = _taskQueue.isEmpty;
    final _TaskEntry entry = _TaskEntry(
      task,
      priority.value,
      debugLabel,
      flow,
    );
    _taskQueue.add(entry);
    if (isFirstTask && !locked)
      _ensureEventLoopCallback();
    return entry.completer.future;
}

void unlocked() {
    super.unlocked();
    if (_taskQueue.isNotEmpty)
      _ensureEventLoopCallback();
}

void _ensureEventLoopCallback() {
    assert(!locked);
    assert(_taskQueue.isNotEmpty);
    if (_hasRequestedAnEventLoopCallback)
      return;
    _hasRequestedAnEventLoopCallback = true;
    Timer.run(_runTasks);
}

void _runTasks() {
    _hasRequestedAnEventLoopCallback = false;
    if (handleEventLoopCallback())
      _ensureEventLoopCallback();
}

bool handleEventLoopCallback() {
    if (_taskQueue.isEmpty || locked)
      return false;
    final _TaskEntry entry = _taskQueue.first;
    if (schedulingStrategy(priority: entry.priority, scheduler: this)) {
      try {
        _taskQueue.removeFirst();
        entry.run();
      } catch (exception, exceptionStack) {
      }
      return _taskQueue.isNotEmpty;
    }
    return false;
}
task就是自定义的一些任务。task相关的有好几个方法,其实逻辑也很清晰,总结如下:
- 所有的task放在HeapPriorityQueue中,这个执行的优先级比动画的优先级低,保证了如果有动画就不会执行这些task, 确保动画的流程。
- 在非渲染阶段,Task按照优先级从高到低一个个执行,直到都执行完毕。
如果需要较快执行,可以使用Future和Isolate等。
runapp函数中的scheduleWarmUpFrame就是调用的SchedulerBinding的方法,后面单独列出来说明。
GestureBinding
GestureBinding主要处理用户的各种操作:
initInstances初始化方法
mixin GestureBinding on BindingBase implements HitTestable, HitTestDispatcher, HitTestTarget {
    void initInstances() {
    super.initInstances();
    _instance = this;
    window.onPointerDataPacket = _handlePointerDataPacket;
  }
}
GestureBinding用_handlePointerDataPacket来处理window的onPointerDataPacket方法,这个是事件的入口。
_handlePointerDataPacket的事件处理方法流程
void _handlePointerDataPacket(ui.PointerDataPacket packet) {
    _pendingPointerEvents.addAll(PointerEventConverter.expand(packet.data, window.devicePixelRatio));
    if (!locked)
      _flushPointerEventQueue();
}

void _flushPointerEventQueue() {
    while (_pendingPointerEvents.isNotEmpty)
      handlePointerEvent(_pendingPointerEvents.removeFirst());
}

void handlePointerEvent(PointerEvent event) {
    _handlePointerEventImmediately(event);
}

void _handlePointerEventImmediately(PointerEvent event) {
    HitTestResult? hitTestResult;
    if (event is PointerDownEvent || event is PointerSignalEvent || event is PointerHoverEvent) {
      // 1
      hitTestResult = HitTestResult();
      // 2
      hitTest(hitTestResult, event.position);
      // 3
      if (event is PointerDownEvent) {
        _hitTests[event.pointer] = hitTestResult;
      }
    } else if (event is PointerUpEvent || event is PointerCancelEvent) {
      // 4
      hitTestResult = _hitTests.remove(event.pointer);
    } else if (event.down) {
      hitTestResult = _hitTests[event.pointer];
    }
    if (hitTestResult != null ||
        event is PointerAddedEvent ||
        event is PointerRemovedEvent) {
      // 5
      dispatchEvent(event, hitTestResult);
    }
}
_handlePointerDataPacket通过一系列的方法调用,最后调用_handlePointerEventImmediately方法。
- 当event是PointerDownEvent或者PointerHoverEvent时,新建一个HitTestResult对象,它有一个path属性,用来记录事件传递所经过的的节点。
- HitTestResult把GestureBinding也加在了path中。
void hitTest(HitTestResult result, Offset position) {
  result.add(HitTestEntry(this));
}
- 如果event是PointerDownEvent,将这个event加入到
_hitTests中, 为了在event.down-即移动的时候也能获取到它。
final Map _hitTests = {};
- 当event是PointerUpEvent或者PointerCancelEvent时,将这个event从
_hitTests中移除。 - 最后调用
dispatchEvent(event, hitTestResult)方法。
dispatchEvent方法
如果您有印象,RendererBinding中我们提到过dispatchEvent方法。
void dispatchEvent(PointerEvent event, HitTestResult? hitTestResult) {
    _mouseTracker!.updateWithEvent(event,
          () => hitTestResult ?? renderView.hitTestMouseTrackers(event.position));
    super.dispatchEvent(event, hitTestResult);
}
其中重要的调用逻辑renderView.hitTestMouseTrackers(event.position)),会从renderview一直遍历它的child,将沿途的Widget加入到path中。
代码如下:
HitTestResult hitTestMouseTrackers(Offset position) {
    final BoxHitTestResult result = BoxHitTestResult();
    hitTest(result, position: position);
    return result;
}

bool hitTest(HitTestResult result, { required Offset position }) {
    if (child != null)
      child!.hitTest(BoxHitTestResult.wrap(result), position: position);
    result.add(HitTestEntry(this));
    return true;
}


bool hitTest(BoxHitTestResult result, { required Offset position }) {
    if (_size!.contains(position)) {
      if (hitTestChildren(result, position: position) || hitTestSelf(position)) {
        result.add(BoxHitTestEntry(this, position));
        return true;
      }
    }
    return false;
  }
当遍历完renderView的所有widget后,将hitTestResult返回给GestureBinding的dispatchEvent方法,然后遍历path数组,逐个调用handleEvent方法。
void dispatchEvent(PointerEvent event, HitTestResult? hitTestResult) {
    for (final HitTestEntry entry in hitTestResult.path) {
      entry.target.handleEvent(event.transformed(entry.transform), entry);
    }
}

void handleEvent(PointerEvent event, HitTestEntry entry) {
    pointerRouter.route(event);
    if (event is PointerDownEvent) {
      gestureArena.close(event.pointer);
    } else if (event is PointerUpEvent) {
      gestureArena.sweep(event.pointer);
    } else if (event is PointerSignalEvent) {
      pointerSignalResolver.resolve(event);
    }
}
handleEvent方法最后就做了一些路由和手势的处理等。
事件处理的链路介绍完毕。
WidgetsBinding
WidgetsBinding主要处理widget tree的一些逻辑:
initInstances初始化方法
void initInstances() {
    super.initInstances();
    _instance = this;

    // 1
    _buildOwner = BuildOwner();
    buildOwner!.onBuildScheduled = _handleBuildScheduled;
    // 2
    window.onLocaleChanged = handleLocaleChanged;
    window.onAccessibilityFeaturesChanged = handleAccessibilityFeaturesChanged;
}
- 初始化了一个BuildOwner对象,它主要是执行widget tree的build任务;
- 执行了一些window的回调。
至此,第一步WidgetsFlutterBinding.ensureInitialized()所涉及的知识点已经详细的介绍完毕了。接下来我们来进入第二个阶段。
scheduleAttachRootWidget
ensureInitialized的介绍做了很多扩展,让大家对框架有了一个整体的认识。scheduleAttachRootWidget这一步我们只沿着代码流程一步步介绍。
void scheduleAttachRootWidget(Widget rootWidget) {
    Timer.run(() {
      attachRootWidget(rootWidget);
    });
}

void attachRootWidget(Widget rootWidget) {
    _readyToProduceFrames = true;
    _renderViewElement = RenderObjectToWidgetAdapter(
      container: renderView,
      debugShortDescription: '[root]',
      child: rootWidget,
    ).attachToRenderTree(buildOwner!, renderViewElement as RenderObjectToWidgetElement?);
}
scheduleAttachRootWidget异步调用了attachRootWidget方法。
attachRootWidget中初始化了一个RenderObjectToWidgetAdapter对象,构造函数传入了renderView和rootWidget。renderView就是RendererBinding的initInstances方法中初始化的那个对象,rootWidget则是我们写的界面MyApp()。
从构造函数的参数名我们可以看到,renderView是容器,rootWidget是这个容器的child。也就是说renderView是所有的Widget的根。
class RenderObjectToWidgetAdapter extends RenderObjectWidget {
  RenderObjectToWidgetAdapter({
    this.child,
    required this.container,
    this.debugShortDescription,
}) : super(key: GlobalObjectKey(container));
吐槽:RenderObjectToWidgetAdapter其实就是一个RenderObjectWidget子类,加个Adapter有点让人误解。
- RenderObjectToWidgetAdapter对象调用
attachToRenderTree方法,把构造的工具**_buildOwner**传进去。
attachToRenderTree
RenderObjectToWidgetElement attachToRenderTree(BuildOwner owner, [ RenderObjectToWidgetElement? element ]) {
    if (element == null) {
      owner.lockState(() {
        // 1
        element = createElement();
        element!.assignOwner(owner);
      });
      owner.buildScope(element!, () {
        // 2
        element!.mount(null, null);
      });
      // 3
      SchedulerBinding.instance!.ensureVisualUpdate();
    } else {
      element._newWidget = this;
      element.markNeedsBuild();
    }
    return element!;
}
- 创建了一个RenderObjectElement的子类RenderObjectToWidgetElement,并将构造工具buildOwner引用给了它;
RenderObjectToWidgetElement createElement() => RenderObjectToWidgetElement(this);
- element调用
mount方法。 - 先提前告诉Native platform想要刷新界面。
- RenderObjectToWidgetElement
mount
// RenderObjectToWidgetElement
void mount(Element? parent, dynamic newSlot) {
    super.mount(parent, newSlot);
    _rebuild();
}

// RenderObjectElement
void mount(Element? parent, dynamic newSlot) {
    super.mount(parent, newSlot);
    _renderObject = widget.createRenderObject(this);
    attachRenderObject(newSlot);
    _dirty = false;
}

// Element
void mount(Element? parent, dynamic newSlot) {
    _parent = parent;
    _slot = newSlot;
    _lifecycleState = _ElementLifecycle.active;
    _depth = _parent != null ? _parent!.depth + 1 : 1;
    if (parent != null)
      _owner = parent.owner;
    final Key? key = widget.key;
    if (key is GlobalKey) {
      key._register(this);
    }
    _updateInheritance();
  }
- RenderObjectToWidgetElement的
mount方法先调用Element的mount方法。主要的作用就是设置_parent,_slot,_owner,_depth等的值;
简单介绍下:
_parent就是Element树上的父节点,_slot是插槽,可以简单理解为子Element在父节点的位置,_depth是在Element tree上的深度。
- 然后调用RenderObjectElement的
mount方法。创建了一个renderObject,其实就是renderView。然后把这个renderObject挂载到RenderObject Tree上,之前的RenderObject Tree没有内容,所以renderView就是根节点;
Flutter有三棵树,Widget tree, Element Tree和RenderObject Tree。RenderObject Tree是真正渲染出来的内容。
- RenderObjectToWidgetElement
_rebuild
void _rebuild() {
    try {
      _child = updateChild(_child, widget.child, _rootChildSlot);
    } catch (exception, stack) {
    }
}
_rebuild的功能就是Build子Widget,这里就是Build MyApp。
Element? updateChild(Element? child, Widget? newWidget, dynamic newSlot) {
    final Element newChild;
    if (child != null) {
      if (hasSameSuperclass && child.widget == newWidget) {
        if (child.slot != newSlot)
          updateSlotForChild(child, newSlot);
        newChild = child;
      } else if (hasSameSuperclass && Widget.canUpdate(child.widget, newWidget)) {
        if (child.slot != newSlot)
          updateSlotForChild(child, newSlot);
        child.update(newWidget);
        newChild = child;
      } else {
        deactivateChild(child);
        newChild = inflateWidget(newWidget, newSlot);
      }
    } else {
      // 创建Element
      newChild = inflateWidget(newWidget, newSlot);
    }
    return newChild;
  }
updateChild中如果child为null,newWidget不为null, 则会调用newChild = inflateWidget(newWidget, newSlot);。
Element inflateWidget(Widget newWidget, dynamic newSlot) {
    final Key? key = newWidget.key;
    final Element newChild = newWidget.createElement();
    newChild.mount(this, newSlot);
    return newChild;
  }
inflateWidget先创建一个Element,然后这个Element调用mount方法。
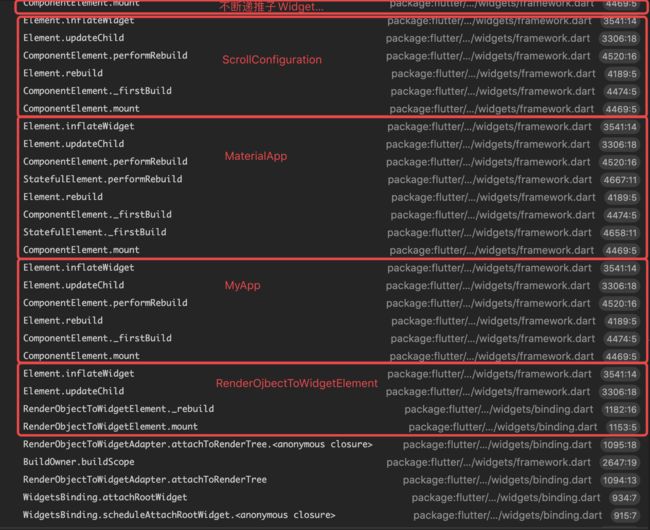
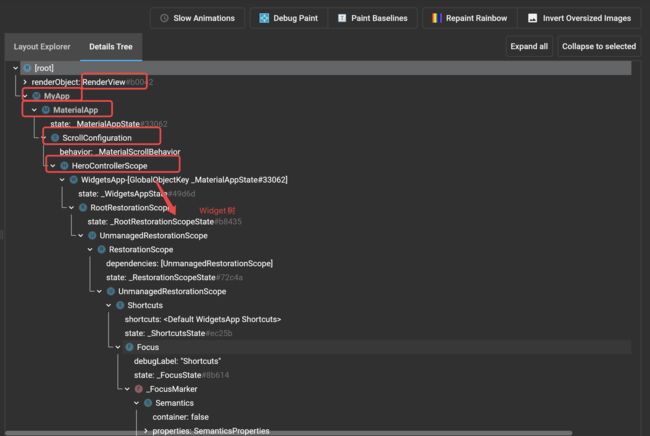
又一个用mount方法,你猜对了, 使用buildOwner对 Widget 树—renderview->MyApp->MaterialApp… 一直Build下去,直到遍历完成。
scheduleWarmUpFrame
scheduleWarmUpFrame是SchedulerBinding的方法:
void scheduleWarmUpFrame() {
    Timer.run(() {
      handleBeginFrame(null);
    });
    Timer.run(() {
      handleDrawFrame();
      if (hadScheduledFrame)
        scheduleFrame();
    });

    lockEvents(() async {
      await endOfFrame;
    });
}
scheduleWarmUpFrame就是调用handleBeginFrame和handleDrawFrame方法绘制一帧呈递给GPU去显示。
这里需要说明的是scheduleWarmUpFrame是立即去绘制的,没有等待Vsyn的通知,因为启动的显示要越快越好。
后面的lockEvents也是为了等待预约帧绘制完成后再去执行其他的任务。
绘制的是什么?绘制的是RenderObject Tree对应的Layer Tree,最后以Scene的形式呈递给GPU显示。


