python 爬虫 简单爬虫教程(requests + selenium )
最近改了实验室之前的爬虫,感觉有些生疏了,故此记录一下,
我将会通过抓取网站 https://nonfungible.com/ 来进行讲解。
目录
- requests + Chrome 浏览器
-
- 使用Chrome 对目标网站信息进行解析
- requests get 请求
- requests 添加头
- requests ip代理
- 使用模拟浏览器获取一些无法解析出来的信息
-
- Chrome driver 的安装和使用(windows macbook )
- 使用beautishape 来解析源码
- selenium 模拟点击
- 设置无头浏览器
- 小技巧
requests + Chrome 浏览器
使用Chrome 对目标网站信息进行解析
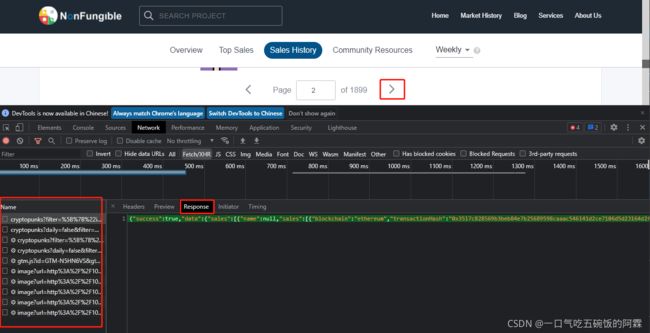
首先 打开使用chrome 浏览器打开目标网页,按下 f12 键打开开发者界面。点击Network 选项。开始前可以点击清除图表清理一下请求信息。

然后,点击下一页图表,你会发现下面出现了一大堆请求信息。

然后,将你想要在网页上爬取的信息复制,在下面的请求信息的Response查找。crlt + f 搜索关键字
这里我通过网页中的 id 9696 进行查找,很幸运 第一个就是我们需要的请求。

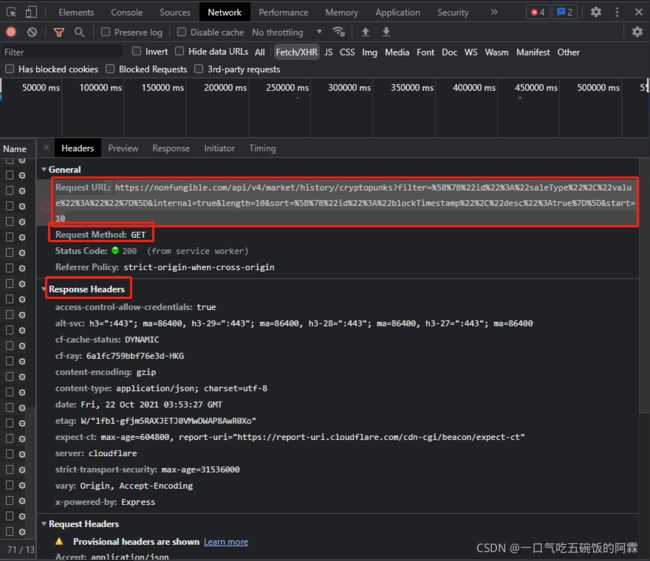
点开header 选项 你可以看到整个请求的所有信息。
Request url 则是请求的代码
Request method 可以知道 这是一个 get 请求

獲得了這些信息就可以開始我們的下一步了。那就是開始請求
requests get 请求
import requests
# ret = requests.get() # 填上get請求鏈接
requests.get('https://nonfungible.com/api/v4/market/history/boredapeclub?filter=%5B%7B%22id%22%3A%22saleType%22%2C%22value%22%3A%22%22%7D%5D&internal=true&length=10&sort=%5B%7B%22id%22%3A%22blockTimestamp%22%2C%22desc%22%3Atrue%7D%5D&start=10')
print(ret.text)
當然 可能還會遇到其他類型的請求像是post之類的
可以參考一下文檔
requests
requests 添加头
import requests
headers = {

"Accept":"application/json",
"Content-Type":"application/json",
"Referer":"https://nonfungible.com/market/history/cyberkongz?filter=saleType%3D&length=10&sort=blockTimestamp%3Ddesc&start=10",
"User-Agent":"Mozilla/5.0 (Windows NT 10.0; Win64; x64) AppleWebKit/537.36 (KHTML, like Gecko) Chrome/94.0.4606.81 Safari/537.36"
}
requests.get('https://nonfungible.com/api/v4/market/history/boredapeclub?filter=%5B%7B%22id%22%3A%22saleType%22%2C%22value%22%3A%22%22%7D%5D&internal=true&length=10&sort=%5B%7B%22id%22%3A%22blockTimestamp%22%2C%22desc%22%3Atrue%7D%5D&start=10',headers = headers)
requests ip代理
有时候因为一段时间内请求数目太多,网站就把你封了。这个时候我们除了在每次请求之前要加上一些等待以外( time.sleep(2.5 + random.random()) ),还可以设置多个ip进行爬取。
import requests

proxies_list = [
    {
     'http': '103.103.3.6:8080','https': '103.103.3.6:8080'},
    {
     'https': '211.24.95.49:47615'},
]

proxies = random.choice(proxies_list)  # 从链接中随机抽一个ip出来

html = requests.get('https://nonfungible.com/api/v4/market/history/boredapeclub?filter=%5B%7B%22id%22%3A%22saleType%22%2C%22value%22%3A%22%22%7D%5D&internal=true&length=10&sort=%5B%7B%22id%22%3A%22blockTimestamp%22%2C%22desc%22%3Atrue%7D%5D&start=10',headers=headers,proxies=proxies)
使用模拟浏览器获取一些无法解析出来的信息
Chrome driver 的安装和使用(windows macbook )
点击下载安装链接
安装命令
pip install selenium
chromedrive = "/usr/local/bin/chromedriver"
driver = webdriver.Chrome(chromedrive,chrome_options=chrome_options)  # macos
driver =
webdriver.Chrome("C:\ProgramFiles\Google\Chrome\Application\chromedriver") # windows
driver.get("https://nonfungible.com/market/history/")  # 类似于 requests.get()
time.sleep(10)
pageSource = driver.page_source  # 获取网页源码
显式等待
  # 设置浏览器:driver  等待时间:20s
   wait = WebDriverWait(driver, 20)
   # 设置判断条件:等待id='kw'的元素加载完成
   input_box = wait.until(EC.presence_of_element_located((By.ID, '__next')))
使用beautishape 来解析源码
from bs4 import BeautifulSoup

pageSource = driver.page_source
soup = BeautifulSoup(pageSource, 'lxml')
selenium 模拟点击

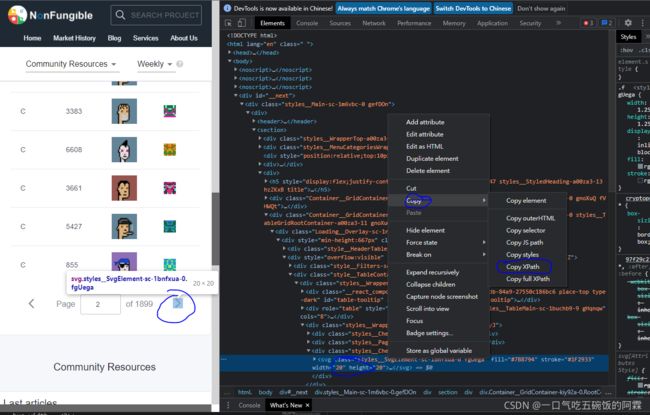
通过右键点击你想要的函数,点击检查跳转到对应的位置 copy xpath 即可获得元素的xpath
然后通过 find_element_by_xxx函数找到你想要点击的元素
最后使用你想要进行的点击动作的函数
实例:
next = driver.find_element_by_xpath("//[@id=\"__next\"]/div/div/section/div[4]/div/div/div[2]/div[2]/div/div[3]/div[3]")
next.click()
附上点击函数参考链接:
设置无头浏览器
# 导入包
from selenium.webdriver.chrome.options import Options
# 规避检测
from selenium.webdriver import ChromeOptions


chrome_options = Options()
chrome_options.add_argument('User-Agent=Mozilla/5.0 (Macintosh; Intel Mac OS X 10_15_7) AppleWebKit/537.36 (KHTML, like Gecko) Chrome/94.0.4606.81 Safari/537.36')
 # chrome_options.add_argument('--no-sandbox')                # 解决DevToolsActivePort文件不存在的报错
 # chrome_options.add_argument('window-size=1920x3000')       # 设置浏览器分辨率
 chrome_options.add_argument('--disable-gpu')               # 谷歌文档提到需要加上这个属性来规避bug
 chrome_options.add_argument('--hide-scrollbars')           # 隐藏滚动条,应对一些特殊页面
 chrome_options.add_argument('blink-settings=imagesEnabled=false')      # 不加载图片,提升运行速度
 # chrome_options.add_argument('--headless')
 # chrome_options.add_argument("--proxy-server=http://59.188.24.24:10152")
 # #实现规避操作
 # options = ChromeOptions()
 # options.add_experimental_option('excludeSwitches', ['enable-automation'])

chromedrive = "/usr/local/bin/chromedriver"
# driver = webdriver.Chrome(chromedrive,chrome_options=chrome_options)  macos
driver = webdriver.Chrome("C:\Program Files\Google\Chrome\Application\chromedriver",chrome_options=chrome_options)
小技巧
很多情况下 我们的网络会出现一些波动,为了让程序变得更加的健壮 我们需要添加一些措施。
while True:
	try:
		<你的代码>
		break
	except Exception as e:
		print("have some problem ",e)
单笔数据写入函数 蛮方便的
输入文件路径 要写的line 和 写入方式即可使用
# 寫入
def myWriteLine(filepath, line, model="a+"):

    with open( filepath , model, newline="", encoding="utf-8") as f:
        csv_write = csv.writer(f)
        x = np.array(line)
        if x.ndim == 1:
            csv_write.writerow(line)
        if x.ndim == 2:
            for l in line :
                csv_write.writerow(l)
保存网页函数
def saveHtml(file_name, file_content):
    #    注意windows文件命名的禁用符,比如 /
    with open(file_name + ".html", 'w', encoding='utf-8') as f:
        #   写文件用bytes而不是str,所以要转码
        f.write(file_content)