PaddlePaddle(4)——简单高效的部署与推理方法(Ⅰ)
转载请注明作者和出处:https://blog.csdn.net/qq_28810395
运行平台: Windows 10
AIstudio官网:https://aistudio.baidu.com/ --飞桨领航团AI达人创造营
根据目前完成工程目标与任务类型出发,选择最合适的模型。
一、在Jetson Nano上基于python部署Paddle Inference
1.准备好一块新鲜出炉的Jetson nano,并配好基础的开发环境
注意:价格可不低哦!
下面讲述一下Jetson系列配置Ubuntu18.04基础配置(换源、远程桌面、开机自连WIFi)步骤:
- 刷机指南
- 远程连接并换源
- 远程桌面连接配置
- 开启风扇
- python及pip相关配置
- 开机自连WiFi
- CUDA、cuDNN、OpenCV等组件基础配置
具体请看Irving.Gao大佬博客,看了良久,突然发现没有板子!(滑稽)
2.安装PaddlePaddle环境
-
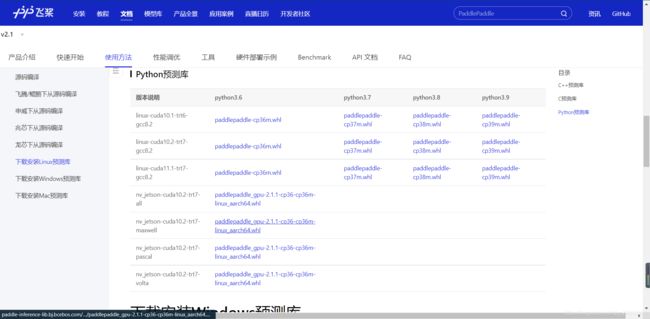
将下载解压后完的预测库传到Jetson nano
-
安装
# 安装whl pip3 install paddlepaddle_gpu-2.1.1-cp36-cp36m-linux_aarch64.whl -
测试
# 打开python3测试
import paddle
paddle.fluid.install_check.run_check()
3.测试Paddle Inference
-
拉取Paddle-Inference-Demo:
#拉取 !git clone https://github.com/PaddlePaddle/Paddle-Inference-Demo.git #解压 !unzip -oq /home/aistudio/Paddle-Inference-Demo-master.zip -
#指令行中测试
cd Paddle-Inference-Demo/python
chmod +x run_demo.sh
./run_demo.sh
4.部署自己的目标检测模型
#这里以Irving.Gao大佬例子测试部署
import cv2
import numpy as np
from paddle.inference import Config
from paddle.inference import PrecisionType
from paddle.inference import create_predictor
import yaml
import time

# ————————————————图像预处理函数———————————————— #

def resize(img, target_size):
    """resize to target size"""
    if not isinstance(img, np.ndarray):
        raise TypeError('image type is not numpy.')
    im_shape = img.shape
    im_size_min = np.min(im_shape[0:2])
    im_size_max = np.max(im_shape[0:2])
    im_scale_x = float(target_size) / float(im_shape[1])
    im_scale_y = float(target_size) / float(im_shape[0])
    img = cv2.resize(img, None, None, fx=im_scale_x, fy=im_scale_y)
    return img

def normalize(img, mean, std):
    img = img / 255.0
    mean = np.array(mean)[np.newaxis, np.newaxis, :]
    std = np.array(std)[np.newaxis, np.newaxis, :]
    img -= mean
    img /= std
    return img

def preprocess(img, img_size):
    mean = [0.485, 0.456, 0.406]
    std = [0.229, 0.224, 0.225]
    img = resize(img, img_size)
    img = img[:, :, ::-1].astype('float32')  # bgr -> rgb
    img = normalize(img, mean, std)
    img = img.transpose((2, 0, 1))  # hwc -> chw
    return img[np.newaxis, :]

# ——————————————————————模型配置、预测相关函数—————————————————————————— #
def predict_config(model_file, params_file):
    '''
    函数功能:初始化预测模型predictor
    函数输入:模型结构文件,模型参数文件
    函数输出:预测器predictor
    '''
    # 根据预测部署的实际情况,设置Config
    config = Config()
    # 读取模型文件
    config.set_prog_file(model_file)
    config.set_params_file(params_file)
    # Config默认是使用CPU预测,若要使用GPU预测,需要手动开启,设置运行的GPU卡号和分配的初始显存。
    config.enable_use_gpu(500, 0)
    # 可以设置开启IR优化、开启内存优化。
    config.switch_ir_optim()
    config.enable_memory_optim()
    config.enable_tensorrt_engine(workspace_size=1 << 30, precision_mode=PrecisionType.Float32,max_batch_size=1, min_subgraph_size=5, use_static=False, use_calib_mode=False)
    predictor = create_predictor(config)
    return predictor

def predict(predictor, img):

    '''
    函数功能:初始化预测模型predictor
    函数输入:模型结构文件,模型参数文件
    函数输出:预测器predictor
    '''
    input_names = predictor.get_input_names()
    for i, name in enumerate(input_names):
        input_tensor = predictor.get_input_handle(name)
        input_tensor.reshape(img[i].shape)
        input_tensor.copy_from_cpu(img[i].copy())
    # 执行Predictor
    predictor.run()
    # 获取输出
    results = []
    # 获取输出
    output_names = predictor.get_output_names()
    for i, name in enumerate(output_names):
        output_tensor = predictor.get_output_handle(name)
        output_data = output_tensor.copy_to_cpu()
        results.append(output_data)
    return results

# ——————————————————————后处理函数—————————————————————————— #
def draw_bbox_image(frame, result, label_list, threshold=0.5):

    for res in result:
        cat_id, score, bbox = res[0], res[1], res[2:]
        if score < threshold:
    	    continue
        for i in bbox:
            int(i)
        xmin, ymin, xmax, ymax = bbox
        cv2.rectangle(frame, (xmin, ymin), (xmax, ymax), (255,0,255), 2)
        print('category id is {}, bbox is {}'.format(cat_id, bbox))
        try:
            label_id = label_list[int(cat_id)]
            # #cv2.putText(图像, 文字, (x, y), 字体, 大小, (b, g, r), 宽度)
            cv2.putText(frame, label_id, (int(xmin), int(ymin-2)), cv2.FONT_HERSHEY_SIMPLEX, 0.5, (255,0,0), 2)
            cv2.putText(frame, str(round(score,2)), (int(xmin-35), int(ymin-2)), cv2.FONT_HERSHEY_SIMPLEX, 0.5, (0,255,0), 2)
        except KeyError:
            pass

if __name__ == '__main__':

    # 从infer_cfg.yml中读出label
    infer_cfg = open('yolov3_r50vd_dcn_270e_coco/infer_cfg.yml')
    data = infer_cfg.read()
    yaml_reader = yaml.load(data)
    label_list = yaml_reader['label_list']
    print(label_list)

    # 配置模型参数
    model_file = "./yolov3_r50vd_dcn_270e_coco/model.pdmodel"
    params_file = "./yolov3_r50vd_dcn_270e_coco/model.pdiparams"
    # 初始化预测模型
    predictor = predict_config(model_file, params_file)

    cap = cv2.VideoCapture(0)
    # 图像尺寸相关参数初始化
    ret, img = cap.read()
    im_size = 224
    scale_factor = np.array([im_size * 1. / img.shape[0], im_size * 1. / img.shape[1]]).reshape((1, 2)).astype(np.float32)
    im_shape = np.array([im_size, im_size]).reshape((1, 2)).astype(np.float32)

    while True:
        ret, frame = cap.read()
        # 预处理
        data = preprocess(frame, im_size)

        time_start=time.time()
        # 预测
        result = predict(predictor, [im_shape, data, scale_factor])
        print('Time Cost:{}'.format(time.time()-time_start) , "s")

        draw_bbox_image(frame, result[0], label_list, threshold=0.1)

        cv2.imshow("frame", frame)
        if cv2.waitKey(1) & 0xFF == ord('q'):
            break
二、自定义数据集、模型搭建训练、安卓部署全流程部署口罩目标检测模型
1. 项目简介
- 该项目使用Labelimg进行数据标注,自定义数据集;
- 使用Paddlex将数据集划分为训练集、测试集;
- 使用PaddleDetection目标检测套件训练模型;
- 最后导出模型,通过PaddleLite生成.nb文件,部署到手机上;
- 安卓部署详细操作;
1)配置系统环境
2)下载PaddleLite-dome
3)下载Android Studio开发环境并配置软件环境
4)dome调试
5)根据dome,加入自己的模型,修改配置,实现自己的dome,并调试
6)将APP打包成可安装程序.apk文件 - 实现飞桨框架深度学习模型从0到1的全流程。
2. 数据标注
个人建议安装Anaconda便于对包环境的管理,在Anaconda环境中安装Labelimg(b站有这类教学视频,若还有不明白的地方可评论区解答)
- 下面讲解安装成功后操作流程
- 新建数据集文件夹:JPEGImages文件存放事先准备好的图片,Annotations文件存放xml标注文件(未标注时此文件为空)
- 打开Labelimg:点击Change Save Dir找到刚刚创建的Annotations文件;点击Open Dir找到JPEGImages文件;快捷键按D,拖拽选中区域,并在弹框内打标签;点击Next Image对下一张图片进行标注(此时会弹出是否保存的提示框,可勾选View->Auto Save mode,默认将每张图片标注完后自动保存)
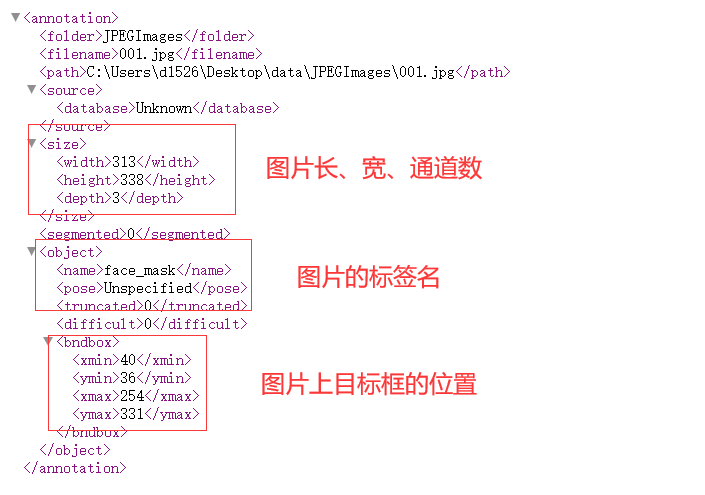
- 上述步骤完成后,Annotations文件中会产生一堆xml文件,格式如下,
- 最后将文件压缩上传到aistudio
3.paddlex划分数据集
-
解压数据集
#将数据集进行解压(此处可换成你自己标注的数据集) !unzip data/data88819/VOC_MASK.zip -d masks -
导入库
# 准备一些可能用到的工具库 import xml.etree.cElementTree as ET import os import cv2 import numpy as np import matplotlib.pyplot as plt import matplotlib.patches as patches import math import paddle.fluid as fluid import time import random -
导入PaddleX
# 导入paddlex !pip install paddlex -
划分数据集
# 使用paddlex进行数据集的划分训练集、验证集、测试集 !paddlex --split_dataset --format VOC --dataset_dir masks/VOC_MASK --val_value 0.2 --test_value 0.1 -
结果
执行完上述代码可以看到,masks/VOC_MASK目录下会自动生成以下文件:

- val_list.txt 验证集列表
- test_list.txt 测试集列表
- labels.txt 标签列表
- train_list.txt 训练集列表
4. PaddleDetection目标检测套件使用,进行模型的创建、训练、导出
- PaddleDetection下载、配置、数据集文件的处理
- 修改模型文件
- 模型训练
- 模型预测效果展示
- 模型导出
基本上就是正常训练流程,没什么特殊!
5.PaddleLite生成.nb模型文件
相关文档连接https://paddle-lite.readthedocs.io/zh/latest/demo_guides/android_app_demo.html
-
准备PaddleLite依赖
# 准备PaddleLite依赖 !pip install paddlelite -
进入路径PaddleDetection/
%cd /home/aistudio/work/PaddleDetection/ -
PaddleLite部署模型
# 准备PaddleLite部署模型
#--valid_targets中参数(arm)用于传统手机,(npu,arm )用于华为带有npu处理器的手机
!paddle_lite_opt \
    --model_file=inference/ssd_mobilenet_v1_300_120e_voc/model.pdmodel \
    --param_file=inference/ssd_mobilenet_v1_300_120e_voc/model.pdiparams \
    --optimize_out=./inference/ssd_mobilenet_v1_300_120e_voc \
    --optimize_out_type=naive_buffer \
    --valid_targets=arm
    #--valid_targets=npu,arm
6.安卓端部署
- 准备Android Studio开发环境(安装系统为Ubuntu 64-bit,Win用户可以安装虚拟机进行操作)
-
快捷键Ctrl+Alt+t打开终端,安装64位所需库
sudo apt-get install libc6:i386 libncurses5:i386 libstdc++6:i386 lib32z1 libbz2-1.0:i386 -
安装java环境(作者使用的是OpenJDK 8 )
查看java版本java --version下载OpenJDK 8
sudo apt-get install openjdk-8-jdk若系统存在多个版本的java,输入对应选项的数字切换Java版本(初次安装则不需要执行下面)
update-alternatives --config java -
安装cmake和ninja环境
# root用户进入命令
sudo su
# root用户退出命令
exit
# 1. Install basic software 参考官方文档,注意权限,应该是root用户 apt update apt-get install -y --no-install-recommends \ gcc g++ git make wget python unzip adb curl # 2. Install cmake 3.10 or above 参考官方文档,注意权限,应该是root用户 wget -c https://mms-res.cdn.bcebos.com/cmake-3.10.3-Linux-x86_64.tar.gz && \ tar xzf cmake-3.10.3-Linux-x86_64.tar.gz && \ mv cmake-3.10.3-Linux-x86_64 /opt/cmake-3.10 && \ ln -s /opt/cmake-3.10/bin/cmake /usr/bin/cmake && \ ln -s /opt/cmake-3.10/bin/ccmake /usr/bin/ccmake # 3. Install ninja-build 此处需退出root用户 sudo apt-get install ninja-build -
Android Studio软件安装流程参考官方视频:
Ubuntu上推荐的设置流程注意:安装过程中会如果出现下面的报错
unable to access android sdk add-on lis,点击cancel跳过,这是因为没有事先安装SDK的原因,我们稍后在Android Studio中进行安装。
- 导入Paddle-Lite-Demo
- 在自己的PC上下载好Paddle-Lite-Demo项目(下面的代码新开一个终端执行,不要在运行Android Studio的终端上操作)
git clone https://gitee.com/paddlepaddle/Paddle-Lite-Demo.git - 在Android Studio中导入PaddleLite-android-demo目录下object_detection_demo项目,如下图所示

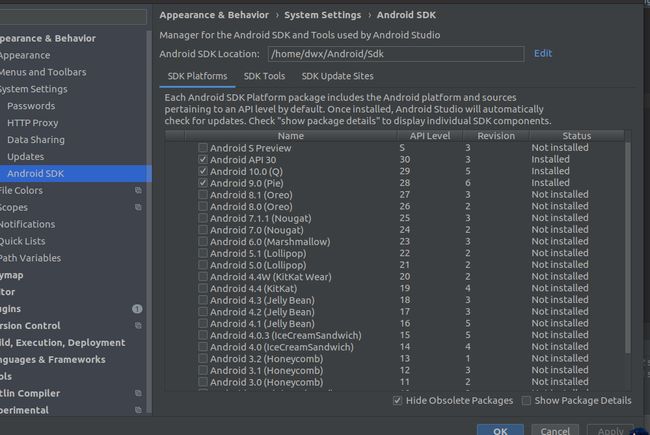
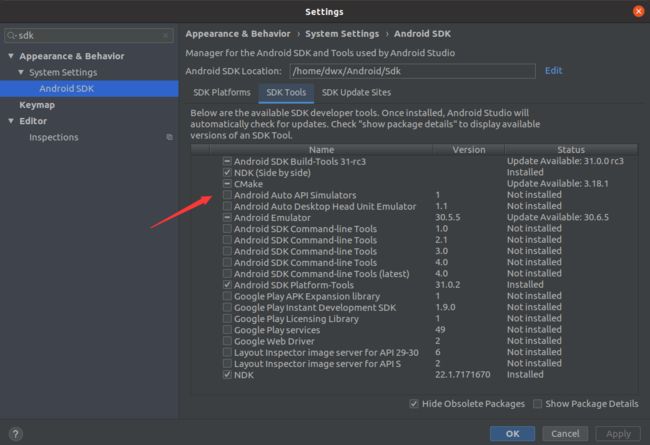
- 配置SDK和NDK
- 模型和标签的拷贝
- 模型拷贝
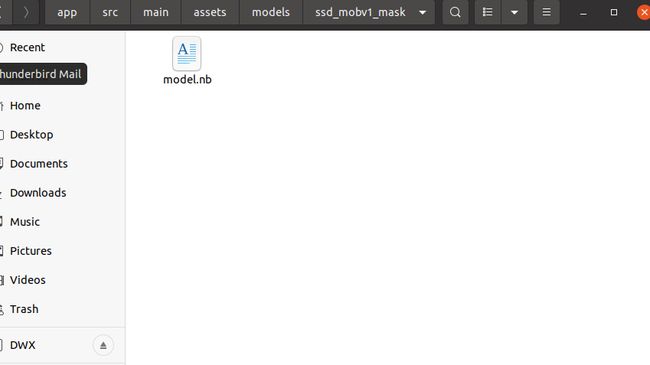
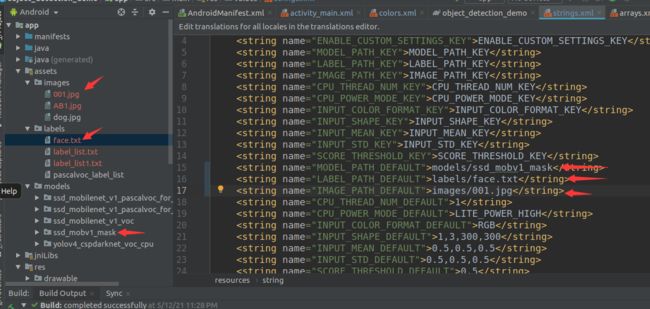
到PaddleLite-android-demo/object_detection_demo/app/src/main/assets/models目录下,新建ssd_mobv1_mask文件夹,将刚刚生成的.nb文件拷贝到该文佳夹下,并重命名为model.nb,如下图所示。(模型文件我挂载项目的data数据集里了,可先尝试一下)
- 标签拷贝
到PaddleLite-android-demo/object_detection_demo/app/src/main/assets/labels目录下,仿照已有.txt文件新建一个face.txt文件(注意label文件中是background+你数据集的label),内容如下background face face_mask - 拷贝一张测试图片
到PaddleLite-android-demo/object_detection_demo/app/src/main/assets/images目录下,拷贝一张项目初始化测试的图片
- 修改项目文件
- 修改PaddleLite-android-demo/object_detection_demo/app/src/main/res/values/strings.xml中对应的参数
- MODEL_DIR_DEFAULT 模型路径
- LABEL_PATH_DEFAULT 标签路径
- IMAGE_PATH_DEFAULT 项目初始化测试图片路径
- 准备手机
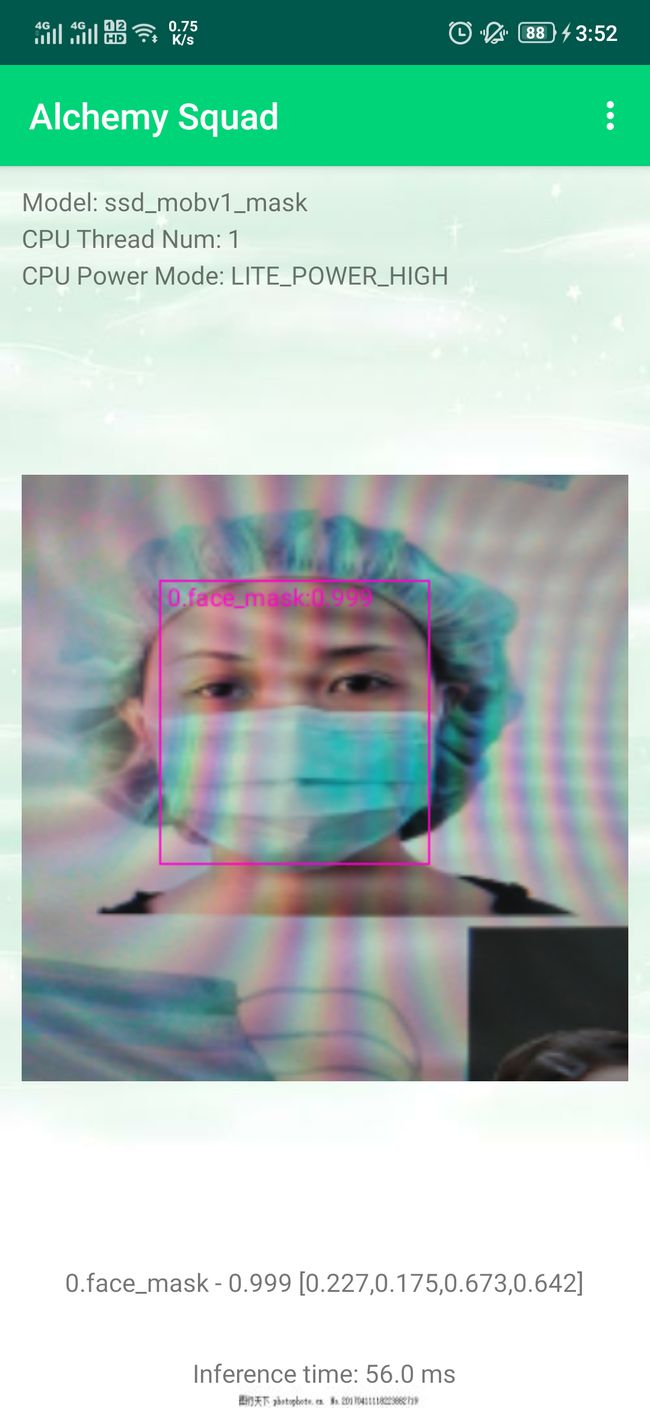
- 效果展示
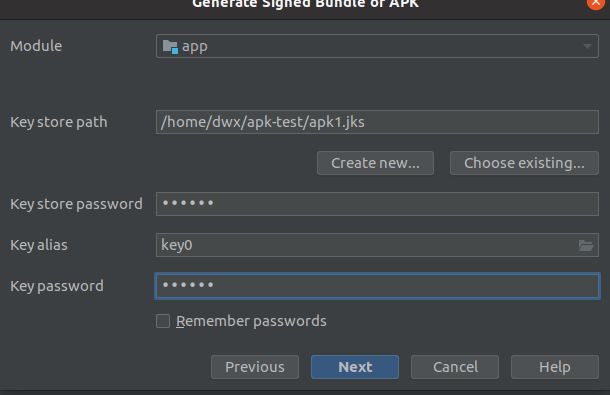
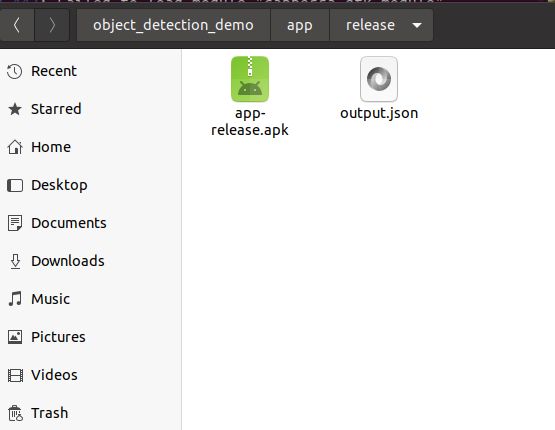
- apk打包
三、 总结
多实践尝试,一步一个脚印解决BUG,会越开越熟练。
详细的做法请查看下面参考信息链接,找原博主问答,这只做笔记记录。
四、参考信息
- https://www.bilibili.com/video/BV1qq4y1X7uZ?p=4
- https://www.bilibili.com/video/BV1qq4y1X7uZ?p=5
- https://aistudio.baidu.com/aistudio/projectdetail/2254840
- https://aistudio.baidu.com/aistudio/projectdetail/2254271
- https://aistudio.baidu.com/aistudio/education/preview/1619796
- https://blog.csdn.net/qq_45779334/article/details/108611797


