假设,我们有一个数据同步的需求:每隔5秒执行一次数据同步。那么我们该如何实现这个数据同步任务呢?
哈喽,大家好,我是小冯。
今天给分享在Spring Boot项目中使用@Scheduled实现定时任务。
快速开始
我们就上面的需求,基于Spring Boot框架,搭建一个简单的数据同步调度任务。
Demo如下。
创建工程
        org.springframework.boot
        spring-boot-starter-web


        org.projectlombok
        lombok
        true
因为我们是基于Spring Boot开发,所以不需要其他依赖。
package com.fengwenyi.demospringbootscheduled;

import org.springframework.boot.SpringApplication;
import org.springframework.boot.autoconfigure.SpringBootApplication;

/**
 * @author Erwin Feng
 * @since 2021-09-29
 */
@SpringBootApplication
public class DemoSpringBootScheduledApplication {

    public static void main(String[] args) {
        SpringApplication.run(DemoSpringBootScheduledApplication.class, args);
    }

}
启用调度注解
package com.fengwenyi.demospringbootscheduled.config;

import org.springframework.context.annotation.Configuration;
import org.springframework.scheduling.annotation.EnableScheduling;

/**
 * @author Erwin Feng
 * @since 2021-09-29
 */
@Configuration
@EnableScheduling
public class ScheduledConfiguration {

}
数据同步任务
package com.fengwenyi.demospringbootscheduled.task;

import lombok.extern.slf4j.Slf4j;
import org.springframework.scheduling.annotation.Scheduled;
import org.springframework.stereotype.Component;

import java.util.concurrent.TimeUnit;

/**
 * @author Erwin Feng
 * @since 2021-10-21
 */
@Component
@Slf4j
public class DemoTask {

    @Scheduled(initialDelay = 5, fixedRate = 5, timeUnit = TimeUnit.SECONDS)
    public void dataSynchronizationTask() {
        log.info("开始执行数据同步任务");
    }

}
执行
通过意思步骤,我们的demo就搭建好了,跑一下,控制台打印日志如下:
2021-10-21 21:44:55.711  INFO 10320 --- [   scheduling-1] c.f.d.task.DemoTask                      : 开始执行数据同步任务
2021-10-21 21:45:00.705  INFO 10320 --- [   scheduling-1] c.f.d.task.DemoTask                      : 开始执行数据同步任务
2021-10-21 21:45:05.715  INFO 10320 --- [   scheduling-1] c.f.d.task.DemoTask                      : 开始执行数据同步任务
2021-10-21 21:45:10.710  INFO 10320 --- [   scheduling-1] c.f.d.task.DemoTask                      : 开始执行数据同步任务
通过打印日志,我们指定,没间隔5秒,就会自动执行“数据同步任务”,这样就简单实现了任务调度。
@Scheduled参数详解
下面我们对 @Scheduled 注解提供配置,做一个说明。
cron
先看一个例子:每5秒执行一次任务。
@Scheduled(cron = "0/5 * * * * ? ")
public void testCron01() {
    log.info("test cron 01 exec");
}
执行:
2021-10-23 02:31:50.030  INFO 18872 --- [   scheduling-1] c.f.d.task.ScheduledTask                 : test cron 1 exec
2021-10-23 02:31:55.009  INFO 18872 --- [   scheduling-1] c.f.d.task.ScheduledTask                 : test cron 1 exec
2021-10-23 02:32:00.005  INFO 18872 --- [   scheduling-1] c.f.d.task.ScheduledTask                 : test cron 1 exec
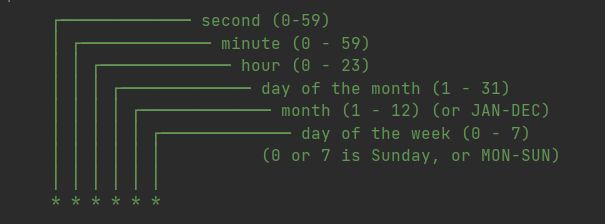
关于cron表达式,下面要做几点说明:
1、结构
 ┌───────────── second (0-59)
 │ ┌───────────── minute (0 - 59)
 │ │ ┌───────────── hour (0 - 23)
 │ │ │ ┌───────────── day of the month (1 - 31)
 │ │ │ │ ┌───────────── month (1 - 12) (or JAN-DEC)
 │ │ │ │ │ ┌───────────── day of the week (0 - 7)
 │ │ │ │ │ │          (0 or 7 is Sunday, or MON-SUN)
 │ │ │ │ │ │
 * * * * * *
spring支持的cron表达式,由6位构成,分别表示:
- 秒
- 分钟
- 小时
- 天(月)
- 月
- 天(星期)
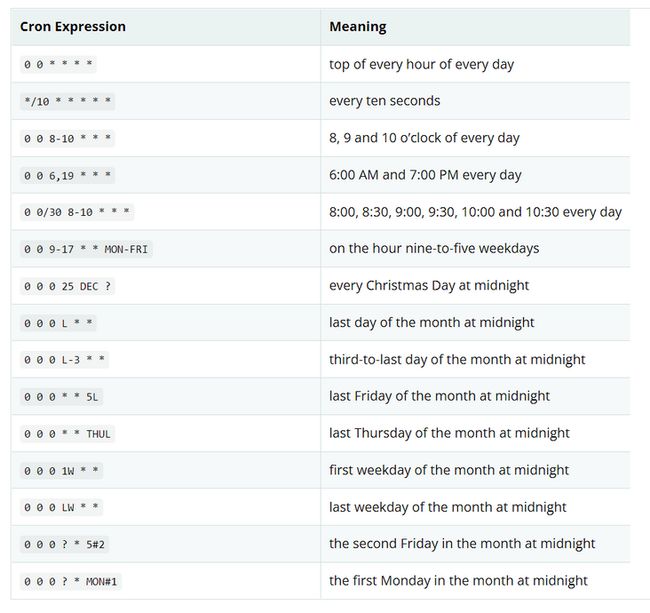
2、Cron表达式示例
通过阅读一些cron示例,更能理解cron表达式的具体含义,我们就以spring官方文档中的示例进行学习。
官方文档:https://docs.spring.io/spring...
星号(*)和问号(?)都表示通配符,其中,?可以用在 天(月) 和 天(星期)上,即第4位和第6位。
L,表示最后,比如一月最后一个星期天。
W,表示工作日(周一到周五)。
#,表示每月中的第几个星期几。5#2:表示每月第2个星期五。MON#1:表示每月第1个星期一。
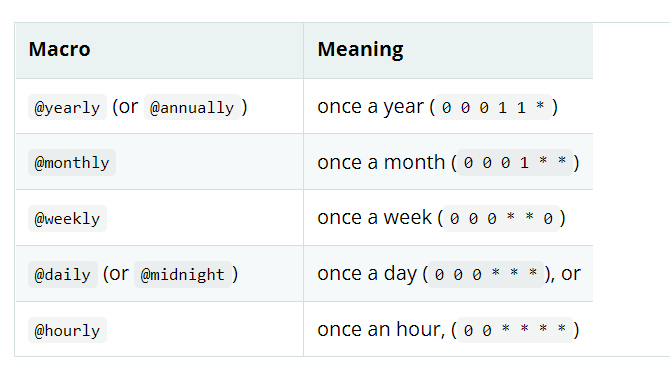
3、Macros
spring为我们提供了几个特别的cron表达式(整年,整月,整周,整天或者整夜,整小时),我们可以直接用。
@Scheduled(cron = "@hourly")
public void testCron02() {
    log.info("test cron 02 exec");
}
zone
时区
fixedDelay
固定间隔,参数类型为long。
fixedDelayString
固定间隔,参数类型为String,同fixedDelay。
fixedRate
固定速率,参数类型为long。
fixedRateString
固定速率,参数类型为long,同fixedRate。
timeUnit
时间单位,从 5.3.10开始
spring boot 2.5.5开始
initialDelay
第一次延时时间,参数类型为long。
initialDelayString
第一次延时时间,参数类型为String。
fixedDelay与fixedRate
区别
fixedDelay,间隔时间,以任务结束时间算起。
fixedRate,间隔时间,以任务开始时间算起。
间隔时间大于任务执行时间
比如一个任务,间隔时间为5秒,任务执行时间是2秒。
假设fixedDelay在第5秒执行第一次,那么第二次会在12秒执行。
而fixedRate在第5秒执行第一次,那么第二次会在10秒执行。
间隔时间小于任务执行时间
比如一个任务,间隔时间为2秒,任务执行时间是5秒。
假设fixedDelay在第2秒执行第一次,那么第二次会在9秒执行。
而fixedRate在第2秒执行第一次,那么第二次会在7秒执行。
配置文件
在实际项目中,执行时间一般写在配置文件中,方便修改,不然,如果要修改,还要改代码。
关于如何写在配置文件中,相信你一定遇到过这个问题。
这部分我们解决这样一个问题,并进行总结。
cron
@Scheduled(cron = "${erwin.cron:0/2 * * * * ?}")
public void cronTaskYmlDemo() {
    log.info("cron yml demo");
}
配置:
erwin:
  cron: 0/10 * * * * ?
如果配置文件没有配,就会使用默认的值。
请注意,值为空,不等于没有配。
fixedDelay
在上面参数解释的时候,我们指定,这个接收的是一个整数,那该如何将解决这个问题。
相信聪明的你,一定也是猜到了。
对,没错,就是它。
@Scheduled(initialDelay = 5, fixedDelayString = "${erwin.fixed-delay:2}", timeUnit = TimeUnit.SECONDS)
public void fixedDelayTaskYmlDemo() {
    log.info("fixedDelay yml demo");
}
配置:
erwin:
fixed-delay: 5简单解释一下,如果在配置文件中没有配置,则每隔2秒执行一次,如果配置了,就每隔5秒执行一次。initialDelay 表示,项目启动后,5秒开始执行第一次任务。
值得注意的是,${erwin.fixed-delay:2},冒号前后不能有空格。
fixedRate
有了上面的经验,相信你一定学会了。我们一起来看示例吧。
@Scheduled(initialDelay = 5, fixedRateString = "${erwin.fixed-rate:2}", timeUnit = TimeUnit.SECONDS)
public void fixedRateTaskYmlDemo() {
    log.info("fixedRate yml demo");
}
配置:
erwin:
  fixed-rate: 5
执行示例:
2021-10-25 20:41:57.394  INFO 19368 --- [   scheduling-1] c.f.d.task.DemoTask                      : fixedRate yml demo
2021-10-25 20:41:59.394  INFO 19368 --- [   scheduling-1] c.f.d.task.DemoTask                      : fixedRate yml demo
2021-10-25 20:42:01.394  INFO 19368 --- [   scheduling-1] c.f.d.task.DemoTask                      : fixedRate yml demo
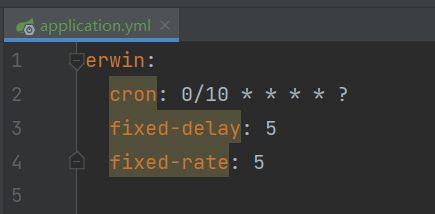
最后的最后,还有一个问题,先看图。
发现问题了吗?
我们在写配置的时候,没有提示,并且这种看上去,也不友好。
那要怎么解决呢?
先引入依赖:
    org.springframework.boot
    spring-boot-configuration-processor
    true
我们不妨写一个属性配置类。
@Getter
@Setter
@Configuration
@ConfigurationProperties("erwin")
public class ErwinProperties {

    private String cron;

    private Long fixedDelay;

    private Long fixedRate;

}
你注意到 erwin 这个了吗?
刚开始写示例的时候,你是不是很好奇,为什么会有这个前缀
哈哈,其实我们早已埋下了伏笔。
最后,再来看看吧。
同时,这时候,你再写配的时候,就会有提示了。
今天分享的内容,就是这些了,咱们下期再见!


