ShardingSphere学习
ShardingSphere学习
- 一.什么是 ShardingSphere
- 二.什是分库分表
- 三.分库分表的方式
-
- 1.垂直分表
- 2.垂直分库
- 3.水平分表
- 4.水平分库
- 5.分库分表应用和问题
- 四.Sharding-JDBC
-
- 1.简介
- 2.Sharding-JDBC 实现水平分表
-
- 2.1.搭建环境
- 2.2.按照水平分表的方式,创建数据库和数据库表
- 2.3.编写代码实现对分库分表后数据的操作
- 2.4.配置 Sharding-JDBC 水平分表策略
- 3.5.编写测试类
- 3.Sharding-JDBC 实现水平分库
-
- 3.1.搭建环境
- 3.2.按照水平分库的方式,创建数据库和数据库表
- 3.3.编写代码实现对分库分表后数据的操作
- 3.4.配置 Sharding-JDBC 水平分库策略
- 3.5.编写测试类
- 4.Sharding-JDBC实现垂直分库
-
- 4.1.搭建环境
- 4.2.创建数据库以及表
- 4.3.编写代码
- 4.4.编写配置
- 4.5.编写测试类
- 5.Sharding-JDBC实现公共表配置
-
- 5.1.搭建环境
- 5.2.创建公共表
- 5.3.编写代码
- 5.4.编写配置
- 5.5.编写测试类
- 6.mysql读写分离
-
- 6.1.配置mysql主从复制
-
- 6.1.1.新增 mysql 实例
- 6.1.2.修改my.ini文件
- 6.1.3.修改server‐id 与uuid
- 6.1.4.注册服务
- 6.1.4.授权主从复制专用账号
- 6.1.5.设置从库向主库同步数据、并检查连接
- 6.1.6.测试
- 6.2.删除mysql服务器
- 6.3、Sharding-JDBC 操作读写分离
一.什么是 ShardingSphere
- 一套开源的分布式数据库中间件解决方案
- 有三个产品:Sharding-JDBC 和 Sharding-Proxy
- 定位为关系型数据库中间件,合理在分布式环境下使用关系型数据库操作
二.什是分库分表
数据库数据量不可控的,随着时间和业务发展,造成表里面数据越来越多,如果再去对数
据库表 curd 操作时候,造成性能问题。
解决方案
方案 1:从硬件上
加内存,加cpu...
方案 2:分库分表

目的
为了解决由于数据量过大而造成数据库性能降低问题。
三.分库分表的方式
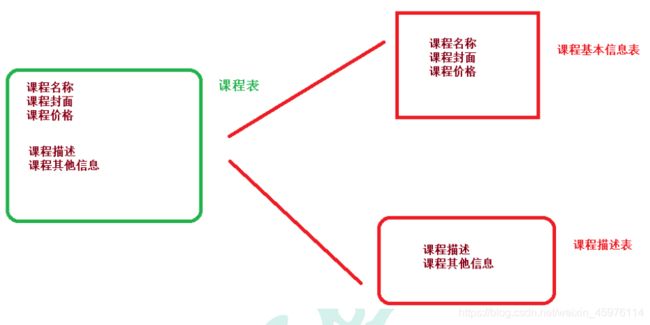
1.垂直分表
(1)操作数据库中某张表,把这张表中一部分字段数据存到一张新表里面,再把这张表另一
部分字段数据存到另外一张表里面
2.垂直分库
(1)把单一数据库按照业务进行划分,专库专表

3.水平分表
将数据库表中的数据进行拆分 比如按照日期进行水平分表
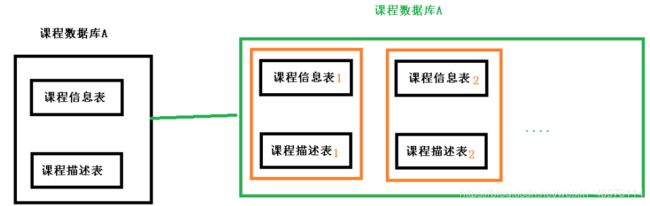
4.水平分库
将数据量庞大的数据库进行水平切分 分为两个数据库 并且数据库中的关联表数据(比如下图的课程基本信息表 与课程描述表)在同一个数据库中

5.分库分表应用和问题
1、应用
- 在数据库设计时候考虑垂直分库和垂直分表
- 随着数据库数据量增加,不要马上考虑做水平切分,首先考虑缓存处理,读写分离,使
用索引等等方式,如果这些方式不能根本解决问题了,再考虑做水平分库和水平分表
2、分库分表问题
- 跨节点连接查询问题(分页、排序)
- 多数据源管理问题
四.Sharding-JDBC
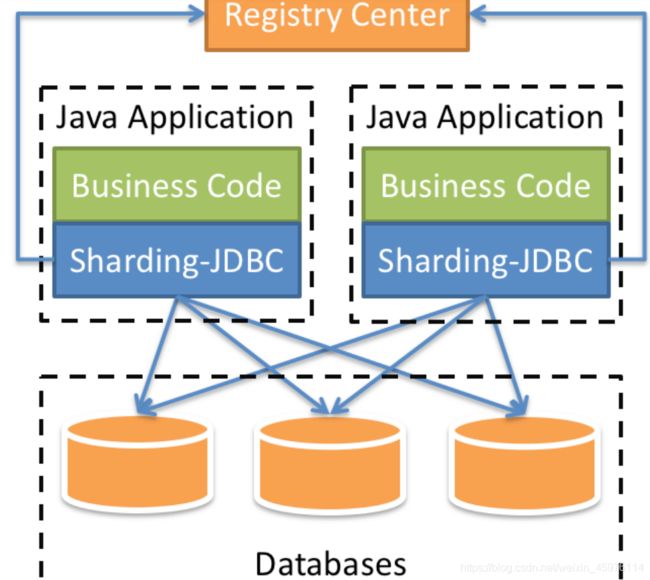
1.简介
1、是轻量级的 java 框架,是增强版的 JDBC 驱动
2、Sharding-JDBC
(1)主要目的是:简化对分库分表之后数据相关操作
2.Sharding-JDBC 实现水平分表
2.1.搭建环境
(1)技术:SpringBoot 2.4.4+ MyBatisPlus + Sharding-JDBC + Druid 连接池
(2)创建 SpringBoot 工程
(3)修改工程 SpringBoot 版本 2.4.4

(4)引入需要的依赖
<project xmlns="http://maven.apache.org/POM/4.0.0" xmlns:xsi="http://www.w3.org/2001/XMLSchema-instance"
         xsi:schemaLocation="http://maven.apache.org/POM/4.0.0 https://maven.apache.org/xsd/maven-4.0.0.xsd">
    <modelVersion>4.0.0modelVersion>
    <parent>
        <groupId>org.springframework.bootgroupId>
        <artifactId>spring-boot-starter-parentartifactId>
        <version>2.4.4version>
        <relativePath/>
    parent>
    <groupId>com.tanggroupId>
    <artifactId>shardingjdbcdemoartifactId>
    <version>0.0.1-SNAPSHOTversion>
    <name>shardingjdbcdemoname>
    <description>使用sharding-jdbc水平分表description>
    <properties>
        <java.version>1.8java.version>
    properties>
    <dependencies>
        <dependency>
            <groupId>org.springframework.bootgroupId>
            <artifactId>spring-boot-starterartifactId>
        dependency>

        <dependency>
            <groupId>org.springframework.bootgroupId>
            <artifactId>spring-boot-starter-testartifactId>
            <scope>testscope>
        dependency>

        <dependency>
            <groupId>com.alibabagroupId>
            <artifactId>druid-spring-boot-starterartifactId>
            <version>1.1.20version>
        dependency>
        <dependency>
            <groupId>mysqlgroupId>
            <artifactId>mysql-connector-javaartifactId>
        dependency>
        <dependency>
            <groupId>org.apache.shardingspheregroupId>
            <artifactId>sharding-jdbc-spring-boot-starterartifactId>
            <version>4.0.0-RC1version>
        dependency>
        <dependency>
            <groupId>com.baomidougroupId>
            <artifactId>mybatis-plus-boot-starterartifactId>
            <version>3.3.1version>
        dependency>

        <dependency>
            <groupId>org.projectlombokgroupId>
            <artifactId>lombokartifactId>
        dependency>
    dependencies>

    <build>
        <plugins>
            <plugin>
                <groupId>org.springframework.bootgroupId>
                <artifactId>spring-boot-maven-pluginartifactId>
            plugin>
        plugins>
    build>

project>
2.2.按照水平分表的方式,创建数据库和数据库表
(1)创建数据库atguigu _db
(2)在数据库创建两张表order_1 和 order_2
(3)约定规则:如果添加订单 id 是偶数把数据添加 order_1,如果奇数添加到order_2
DROP TABLE IF EXISTS `order_1`;
CREATE TABLE `order_1`  (
  `order_id` bigint(20) NOT NULL COMMENT '订单id',
  `price` decimal(10, 2) NOT NULL COMMENT '订单价格',
  `user_id` bigint(20) NOT NULL COMMENT '下单用户id',
  `status` varchar(50) CHARACTER SET utf8 COLLATE utf8_general_ci NOT NULL COMMENT '订单状态',
  PRIMARY KEY (`order_id`) USING BTREE
) ENGINE = InnoDB CHARACTER SET = utf8 COLLATE = utf8_general_ci ROW_FORMAT = DYNAMIC;

-- ----------------------------
-- Table structure for order_2
-- ----------------------------
DROP TABLE IF EXISTS `order_2`;
CREATE TABLE `order_2`  (
  `order_id` bigint(20) NOT NULL COMMENT '订单id',
  `price` decimal(10, 2) NOT NULL COMMENT '订单价格',
  `user_id` bigint(20) NOT NULL COMMENT '下单用户id',
  `status` varchar(50) CHARACTER SET utf8 COLLATE utf8_general_ci NOT NULL COMMENT '订单状态',
  PRIMARY KEY (`order_id`) USING BTREE
) ENGINE = InnoDB CHARACTER SET = utf8 COLLATE = utf8_general_ci ROW_FORMAT = DYNAMIC;
2.3.编写代码实现对分库分表后数据的操作
创建实体类,mapper
Order类
package com.tang.shardingjdbcdemo.entity;

import com.baomidou.mybatisplus.annotation.TableName;
import lombok.Builder;
import lombok.Data;

import java.math.BigDecimal;
import java.math.BigInteger;

@Data
@Builder
@TableName("order")
public class Order {

    private BigDecimal orderId;
    private BigDecimal price;
    private Integer userId;
    private String status;
}
OrderMapper接口
package com.tang.shardingjdbcdemo;

import org.mybatis.spring.annotation.MapperScan;
import org.springframework.boot.SpringApplication;
import org.springframework.boot.autoconfigure.SpringBootApplication;

@SpringBootApplication
@MapperScan(basePackages = "com.tang.shardingjdbcdemo.mapper")
public class ShardingjdbcdemoApplication {


    public static void main(String[] args) {

        SpringApplication.run(ShardingjdbcdemoApplication.class, args);
    }

}
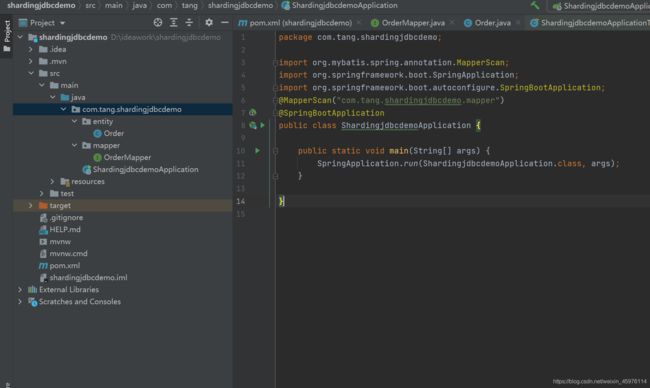
启动类
package com.tang.shardingjdbcdemo;

import org.mybatis.spring.annotation.MapperScan;
import org.springframework.boot.SpringApplication;
import org.springframework.boot.autoconfigure.SpringBootApplication;

@SpringBootApplication
@MapperScan(basePackages = "com.tang.shardingjdbcdemo.mapper")
public class ShardingjdbcdemoApplication {


    public static void main(String[] args) {

        SpringApplication.run(ShardingjdbcdemoApplication.class, args);
    }

}
2.4.配置 Sharding-JDBC 水平分表策略
在项目 application.properties 配置文件中进行配置
# shardingjdbc分片策略
# 配置数据源,给数据源起名称
spring.shardingsphere.datasource.names=m1

# 一个实体类对应两张表,覆盖
spring.main.allow-bean-definition-overriding=true

#指定 course 表分布情况,配置表在哪个数据库里面,表名称都是什么 m1.order_1 ,m1.order_2
spring.shardingsphere.sharding.tables.order.actual-data-nodes=m1.order_$->{1..2}

#配置第一个数据源具体内容,包含连接池,驱动,地址,用户名和密码
spring.shardingsphere.datasource.m1.type=com.alibaba.druid.pool.DruidDataSource
spring.shardingsphere.datasource.m1.driver-class-name=com.mysql.cj.jdbc.Driver
spring.shardingsphere.datasource.m1.url=jdbc:mysql://localhost:3306/atguigu_db?serverTimezone=UTC
spring.shardingsphere.datasource.m1.username=root
spring.shardingsphere.datasource.m1.password=root


# 指定atguigu_order表里面主键cid 生成策略  SNOWFLAKE
spring.shardingsphere.sharding.tables.order.key-generator.column=order_id
spring.shardingsphere.sharding.tables.order.key-generator.type=SNOWFLAKE


# 指定表分片策略  约定order_id值偶数添加到order_1表,如果cid是奇数添加到order_2表
spring.shardingsphere.sharding.tables.order.table-strategy.inline.sharding-column=order_id
spring.shardingsphere.sharding.tables.order.table-strategy.inline.algorithm-expression=order_$->{order_id % 2 + 1}


# 打开sql输出日志
spring.shardingsphere.props.sql.show=true
3.5.编写测试类
package com.tang.shardingjdbcdemo;

import com.baomidou.mybatisplus.core.conditions.query.LambdaQueryWrapper;
import com.baomidou.mybatisplus.core.conditions.query.QueryWrapper;
import com.tang.shardingjdbcdemo.entity.Order;
import com.tang.shardingjdbcdemo.mapper.OrderMapper;
import org.junit.jupiter.api.Test;
import org.springframework.beans.factory.annotation.Autowired;
import org.springframework.boot.test.context.SpringBootTest;
import org.springframework.test.context.junit4.SpringRunner;

import java.math.BigDecimal;
import java.util.List;


@SpringBootTest
class ShardingjdbcdemoApplicationTests {


    @Autowired
    private OrderMapper orderMapper;

    @Test
    void contextLoads() {


        for (int i = 0; i < 10; i++) {

            Order order = Order.builder().price(new BigDecimal(100+i)).status("1").userId(1+i).build();

            int insert = orderMapper.insert(order);
            System.out.println(insert);
        }

    }

    @Test
    public void test() {

        System.out.println(111);
    }

    @Test
    public void testSelect() {

        LambdaQueryWrapper<Order> wrapper = new LambdaQueryWrapper<>();
        wrapper.eq(Order::getOrderId,582672891984740353L);
        Order order = orderMapper.selectOne(wrapper);
        System.out.println(order);
    }


}
3.Sharding-JDBC 实现水平分库
3.1.搭建环境
(1)技术:SpringBoot 2.4.4+ MyBatisPlus + Sharding-JDBC + Druid 连接池
(2)创建 SpringBoot 工程
(3)修改工程 SpringBoot 版本 2.4.4
(4)引入需要的依赖
<project xmlns="http://maven.apache.org/POM/4.0.0" xmlns:xsi="http://www.w3.org/2001/XMLSchema-instance"
         xsi:schemaLocation="http://maven.apache.org/POM/4.0.0 https://maven.apache.org/xsd/maven-4.0.0.xsd">
    <modelVersion>4.0.0modelVersion>
    <parent>
        <groupId>org.springframework.bootgroupId>
        <artifactId>spring-boot-starter-parentartifactId>
        <version>2.4.4version>
        <relativePath/>
    parent>
    <groupId>com.tanggroupId>
    <artifactId>shardingjdbcdemo2artifactId>
    <version>0.0.1-SNAPSHOTversion>
    <name>shardingjdbcdemo2name>
    <description>shardingjdbc实现水平分库description>
    <properties>
        <java.version>1.8java.version>
    properties>
    <dependencies>
        <dependency>
            <groupId>org.springframework.bootgroupId>
            <artifactId>spring-boot-starterartifactId>
        dependency>

        <dependency>
            <groupId>org.springframework.bootgroupId>
            <artifactId>spring-boot-starter-testartifactId>
            <scope>testscope>
        dependency>

        <dependency>
            <groupId>com.alibabagroupId>
            <artifactId>druid-spring-boot-starterartifactId>
            <version>1.1.20version>
        dependency>
        <dependency>
            <groupId>mysqlgroupId>
            <artifactId>mysql-connector-javaartifactId>
        dependency>
        <dependency>
            <groupId>org.apache.shardingspheregroupId>
            <artifactId>sharding-jdbc-spring-boot-starterartifactId>
            <version>4.0.0-RC1version>
        dependency>
        <dependency>
            <groupId>com.baomidougroupId>
            <artifactId>mybatis-plus-boot-starterartifactId>
            <version>3.3.1version>
        dependency>

        <dependency>
            <groupId>org.projectlombokgroupId>
            <artifactId>lombokartifactId>
        dependency>
    dependencies>

    <build>
        <plugins>
            <plugin>
                <groupId>org.springframework.bootgroupId>
                <artifactId>spring-boot-maven-pluginartifactId>
            plugin>
        plugins>
    build>

project>
3.2.按照水平分库的方式,创建数据库和数据库表
(1)创建数据库atguigu _db_1和atguigu _db_2
(2)在每个数据库创建两张表order_1 和 order_2
(3)约定规则:
表规则:如果添加订单 id 是偶数把数据添加 order_1,如果奇数添加到order_2
库规则:user_id为偶数则把数据添加到atguigu _db_1库中 如果为奇数则把数据添加到atguigu _db_2库中
DROP TABLE IF EXISTS `order_1`;
CREATE TABLE `order_1`  (
  `order_id` bigint(20) NOT NULL COMMENT '订单id',
  `price` decimal(10, 2) NOT NULL COMMENT '订单价格',
  `user_id` bigint(20) NOT NULL COMMENT '下单用户id',
  `status` varchar(50) CHARACTER SET utf8 COLLATE utf8_general_ci NOT NULL COMMENT '订单状态',
  PRIMARY KEY (`order_id`) USING BTREE
) ENGINE = InnoDB CHARACTER SET = utf8 COLLATE = utf8_general_ci ROW_FORMAT = DYNAMIC;

-- ----------------------------
-- Table structure for order_2
-- ----------------------------
DROP TABLE IF EXISTS `order_2`;
CREATE TABLE `order_2`  (
  `order_id` bigint(20) NOT NULL COMMENT '订单id',
  `price` decimal(10, 2) NOT NULL COMMENT '订单价格',
  `user_id` bigint(20) NOT NULL COMMENT '下单用户id',
  `status` varchar(50) CHARACTER SET utf8 COLLATE utf8_general_ci NOT NULL COMMENT '订单状态',
  PRIMARY KEY (`order_id`) USING BTREE
) ENGINE = InnoDB CHARACTER SET = utf8 COLLATE = utf8_general_ci ROW_FORMAT = DYNAMIC;
3.3.编写代码实现对分库分表后数据的操作
实体类,mapper 启动类和水平分表一致。这里不在叙述
3.4.配置 Sharding-JDBC 水平分库策略
# shardingjdbc分片策略
# 配置数据源,给数据源起名称
spring.shardingsphere.datasource.names=m1,m2

# 一个实体类对应两张表,覆盖
spring.main.allow-bean-definition-overriding=true

#指定 course 表分布情况,配置表在哪个数据库里面,表名称都是什么 m1.order_1 ,m1.order_2
#spring.shardingsphere.sharding.tables.order.actual-data-nodes=m1.order_$->{1..2}

#指定数据库分布情况,数据库里面表分布情况
# m1  m2    course_1 course_2
spring.shardingsphere.sharding.tables.order.actual-data-nodes=m$->{1..2}.order_$->{1..2}

#配置第一个数据源具体内容,包含连接池,驱动,地址,用户名和密码
spring.shardingsphere.datasource.m1.type=com.alibaba.druid.pool.DruidDataSource
spring.shardingsphere.datasource.m1.driver-class-name=com.mysql.cj.jdbc.Driver
spring.shardingsphere.datasource.m1.url=jdbc:mysql://localhost:3306/atguigu_db_1?serverTimezone=UTC
spring.shardingsphere.datasource.m1.username=root
spring.shardingsphere.datasource.m1.password=root


#配置第二个数据源具体内容,包含连接池,驱动,地址,用户名和密码
spring.shardingsphere.datasource.m2.type=com.alibaba.druid.pool.DruidDataSource
spring.shardingsphere.datasource.m2.driver-class-name=com.mysql.cj.jdbc.Driver
spring.shardingsphere.datasource.m2.url=jdbc:mysql://localhost:3306/atguigu_db_2?serverTimezone=UTC
spring.shardingsphere.datasource.m2.username=root
spring.shardingsphere.datasource.m2.password=root


# 指定atguigu_order表里面主键cid 生成策略  SNOWFLAKE
spring.shardingsphere.sharding.tables.order.key-generator.column=order_id
spring.shardingsphere.sharding.tables.order.key-generator.type=SNOWFLAKE


# 指定表分片策略  约定order_id值偶数添加到order_1表,如果cid是奇数添加到order_2表
spring.shardingsphere.sharding.tables.order.table-strategy.inline.sharding-column=order_id
spring.shardingsphere.sharding.tables.order.table-strategy.inline.algorithm-expression=order_$->{order_id % 2 + 1}


# 指定数据库所有表的分库策略 约定user_id是偶数添加m1,是奇数添加m2
#spring.shardingsphere.sharding.default-database-strategy.inline.sharding-column=user_id
#spring.shardingsphere.sharding.default-database-strategy.inline.algorithm-expression=m$->{user_id % 2 + 1}

# 指定数据库中指定的表采取分库策略 约定user_id是偶数添加m1,是奇数添加m2
spring.shardingsphere.sharding.tables.order.database-strategy.inline..sharding-column=user_id
spring.shardingsphere.sharding.tables.order.database-strategy.inline.algorithm-expression=m$->{user_id % 2 + 1}


# 打开sql输出日志
spring.shardingsphere.props.sql.show=true
3.5.编写测试类
package com.tang.shardingjdbcdemo2;

import com.baomidou.mybatisplus.core.conditions.query.LambdaQueryWrapper;
import com.tang.shardingjdbcdemo2.entity.Order;
import com.tang.shardingjdbcdemo2.mapper.OrderMapper;
import org.junit.jupiter.api.Test;
import org.springframework.beans.factory.annotation.Autowired;
import org.springframework.boot.test.context.SpringBootTest;

import java.math.BigDecimal;

@SpringBootTest
class Shardingjdbcdemo2ApplicationTests {


    @Autowired
    private OrderMapper orderMapper;

    @Test
    void contextLoads() {

    }

    @Test
    public void testInsert(){

        Order order = Order.builder().price(new BigDecimal(100)).status("2").userId(1).build();
        orderMapper.insert(order);
    }

    @Test
    public void testSelect(){

        LambdaQueryWrapper<Order> wrapper = new LambdaQueryWrapper<>();
        wrapper.eq(Order::getOrderId,582689435909357569L);
        wrapper.eq(Order::getUserId,1);
        Order order = orderMapper.selectOne(wrapper);
        System.out.println(order);
    }

}
4.Sharding-JDBC实现垂直分库
垂直分库是指按照业务将表进行分类,分布到不同的数据库上面,每个库可以放在不同的服务器上,它的核心理念是专库专用。接下来看一下如何使用Sharding-JDBC实现垂直分库。
4.1.搭建环境
(1)技术:SpringBoot 2.4.4+ MyBatisPlus + Sharding-JDBC + Druid 连接池
(2)创建 SpringBoot 工程
(3)修改工程 SpringBoot 版本 2.4.4
<parent>
        <groupId>org.springframework.boot</groupId>
        <artifactId>spring-boot-starter-parent</artifactId>
        <version>2.4.4</version>
        <relativePath/> <!-- lookup parent from repository -->
    </parent>
(4)引入需要的依赖
<project xmlns="http://maven.apache.org/POM/4.0.0" xmlns:xsi="http://www.w3.org/2001/XMLSchema-instance"
         xsi:schemaLocation="http://maven.apache.org/POM/4.0.0 https://maven.apache.org/xsd/maven-4.0.0.xsd">
    <modelVersion>4.0.0modelVersion>
    <parent>
        <groupId>org.springframework.bootgroupId>
        <artifactId>spring-boot-starter-parentartifactId>
        <version>2.4.4version>
        <relativePath/>
    parent>
    <groupId>com.tanggroupId>
    <artifactId>shardingjdbcdemo4artifactId>
    <version>0.0.1-SNAPSHOTversion>
    <name>shardingjdbcdemo4name>
    <description>使用shardingjdbc实现垂直切分description>
    <properties>
        <java.version>1.8java.version>
    properties>
    <dependencies>
        <dependency>
            <groupId>org.springframework.bootgroupId>
            <artifactId>spring-boot-starterartifactId>
        dependency>

        <dependency>
            <groupId>org.springframework.bootgroupId>
            <artifactId>spring-boot-starter-testartifactId>
            <scope>testscope>
        dependency>

        <dependency>
            <groupId>com.alibabagroupId>
            <artifactId>druid-spring-boot-starterartifactId>
            <version>1.1.20version>
        dependency>
        <dependency>
            <groupId>mysqlgroupId>
            <artifactId>mysql-connector-javaartifactId>
        dependency>
        <dependency>
            <groupId>org.apache.shardingspheregroupId>
            <artifactId>sharding-jdbc-spring-boot-starterartifactId>
            <version>4.0.0-RC1version>
        dependency>
        <dependency>
            <groupId>com.baomidougroupId>
            <artifactId>mybatis-plus-boot-starterartifactId>
            <version>3.3.1version>
        dependency>

        <dependency>
            <groupId>org.projectlombokgroupId>
            <artifactId>lombokartifactId>
        dependency>
    dependencies>

    <build>
        <plugins>
            <plugin>
                <groupId>org.springframework.bootgroupId>
                <artifactId>spring-boot-maven-pluginartifactId>
            plugin>
        plugins>
    build>

project>
4.2.创建数据库以及表
CREATE DATABASE `user_db` CHARACTER SET 'utf8' COLLATE 'utf8_general_ci';
DROP TABLE IF EXISTS `t_user`;
CREATE TABLE `t_user` (
`user_id` bigint(20) NOT NULL COMMENT '用户id',
`fullname` varchar(255) CHARACTER SET utf8 COLLATE utf8_general_ci NOT NULL COMMENT
'用户姓名',
`user_type` char(1) DEFAULT NULL COMMENT '用户类型',
PRIMARY KEY (`user_id`) USING BTREE
) ENGINE = InnoDB CHARACTER SET = utf8 COLLATE = utf8_general_ci ROW_FORMAT =
Dynamic;
4.3.编写代码
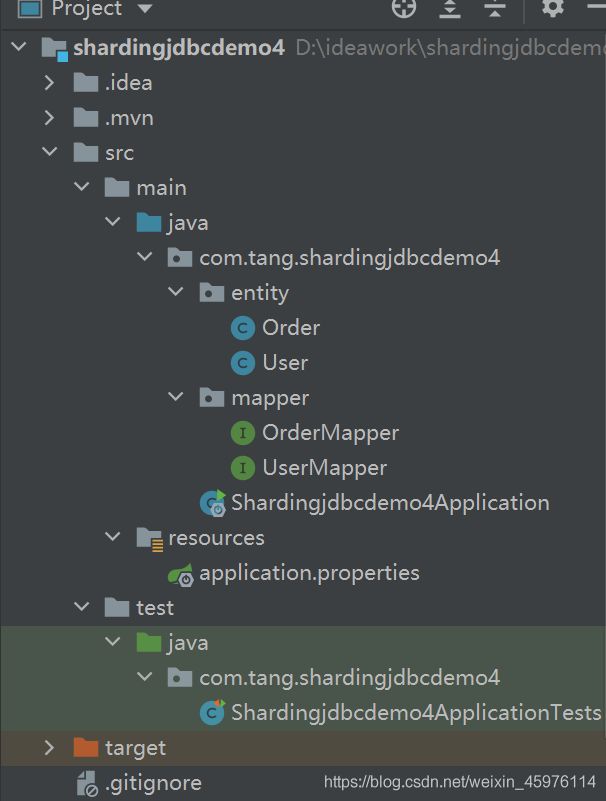
Order
package com.tang.shardingjdbcdemo4.entity;

import com.baomidou.mybatisplus.annotation.TableName;
import lombok.Builder;
import lombok.Data;

import java.math.BigDecimal;

@Data
@Builder
@TableName("order")
public class Order {

    private BigDecimal orderId;
    private BigDecimal price;
    private Integer userId;
    private String status;
}
User
package com.tang.shardingjdbcdemo4.entity;

import com.baomidou.mybatisplus.annotation.TableName;
import lombok.Builder;
import lombok.Data;

import java.math.BigDecimal;

@Data
@Builder
@TableName("t_user")
public class User {

    private BigDecimal userId;
    private String fullname;
    private String userType;
}
OrderMapper
package com.tang.shardingjdbcdemo4.mapper;

import com.baomidou.mybatisplus.core.mapper.BaseMapper;
import com.tang.shardingjdbcdemo4.entity.Order;
import org.springframework.stereotype.Repository;

@Repository
public interface OrderMapper extends BaseMapper<Order> {

}
UserMapper
package com.tang.shardingjdbcdemo4.mapper;

import com.baomidou.mybatisplus.core.mapper.BaseMapper;
import com.tang.shardingjdbcdemo4.entity.Order;
import com.tang.shardingjdbcdemo4.entity.User;
import org.springframework.stereotype.Repository;

@Repository
public interface UserMapper extends BaseMapper<User> {

}
Shardingjdbcdemo4Application
package com.tang.shardingjdbcdemo4;

import org.mybatis.spring.annotation.MapperScan;
import org.springframework.boot.SpringApplication;
import org.springframework.boot.autoconfigure.SpringBootApplication;

@SpringBootApplication
@MapperScan(basePackages = "com.tang.shardingjdbcdemo4.mapper")
public class Shardingjdbcdemo4Application {


    public static void main(String[] args) {

        SpringApplication.run(Shardingjdbcdemo4Application.class, args);
    }

}
4.4.编写配置
application.properties
# shardingjdbc分片策略
# 配置数据源,给数据源起名称
spring.shardingsphere.datasource.names=m0,m1,m2

# 一个实体类对应两张表,覆盖
spring.main.allow-bean-definition-overriding=true

#指定 course 表分布情况,配置表在哪个数据库里面,表名称都是什么 m1.order_1 ,m1.order_2
#spring.shardingsphere.sharding.tables.order.actual-data-nodes=m1.order_$->{1..2}

#指定数据库分布情况,数据库里面表分布情况
# m1  m2    course_1 course_2
spring.shardingsphere.sharding.tables.order.actual-data-nodes=m$->{1..2}.order_$->{1..2}

#配置数据源具体内容,包含连接池,驱动,地址,用户名和密码
spring.shardingsphere.datasource.m0.type=com.alibaba.druid.pool.DruidDataSource
spring.shardingsphere.datasource.m0.driver‐class‐name=com.mysql.cj.jdbc.Driver
spring.shardingsphere.datasource.m0.url=jdbc:mysql://localhost:3306/user_db?useUnicode=true
spring.shardingsphere.datasource.m0.username=root
spring.shardingsphere.datasource.m0.password=root

#配置第一个数据源具体内容,包含连接池,驱动,地址,用户名和密码
spring.shardingsphere.datasource.m1.type=com.alibaba.druid.pool.DruidDataSource
spring.shardingsphere.datasource.m1.driver-class-name=com.mysql.cj.jdbc.Driver
spring.shardingsphere.datasource.m1.url=jdbc:mysql://localhost:3306/atguigu_db_1?serverTimezone=UTC
spring.shardingsphere.datasource.m1.username=root
spring.shardingsphere.datasource.m1.password=root


#配置第二个数据源具体内容,包含连接池,驱动,地址,用户名和密码
spring.shardingsphere.datasource.m2.type=com.alibaba.druid.pool.DruidDataSource
spring.shardingsphere.datasource.m2.driver-class-name=com.mysql.cj.jdbc.Driver
spring.shardingsphere.datasource.m2.url=jdbc:mysql://localhost:3306/atguigu_db_2?serverTimezone=UTC
spring.shardingsphere.datasource.m2.username=root
spring.shardingsphere.datasource.m2.password=root


# 指定course表里面主键cid 生成策略  SNOWFLAKE
spring.shardingsphere.sharding.tables.t_user.key-generator.column=user_id
spring.shardingsphere.sharding.tables.t_user.key-generator.type=SNOWFLAKE

# 指定atguigu_order表里面主键cid 生成策略  SNOWFLAKE
spring.shardingsphere.sharding.tables.order.key-generator.column=order_id
spring.shardingsphere.sharding.tables.order.key-generator.type=SNOWFLAKE


# 指定表分片策略  约定order_id值偶数添加到order_1表,如果cid是奇数添加到order_2表
spring.shardingsphere.sharding.tables.order.table-strategy.inline.sharding-column=order_id
spring.shardingsphere.sharding.tables.order.table-strategy.inline.algorithm-expression=order_$->{order_id % 2 + 1}


# 指定数据库所有表的分库策略 约定user_id是偶数添加m1,是奇数添加m2
#spring.shardingsphere.sharding.default-database-strategy.inline.sharding-column=user_id
#spring.shardingsphere.sharding.default-database-strategy.inline.algorithm-expression=m$->{user_id % 2 + 1}

# 指定数据库中指定的表采取分库策略 约定user_id是偶数添加m1,是奇数添加m2
spring.shardingsphere.sharding.tables.order.database-strategy.inline..sharding-column=user_id
spring.shardingsphere.sharding.tables.order.database-strategy.inline.algorithm-expression=m$->{user_id % 2 + 1}


# 配置user_db数据库里面t_user 专库专表
spring.shardingsphere.sharding.tables.t_user.actual-data-nodes=m$->{0}.t_user
spring.shardingsphere.sharding.tables.t_user.table-strategy.inline.sharding-column=user_id
spring.shardingsphere.sharding.tables.t_user.table-strategy.inline.algorithm-expression=t_user

# 打开sql输出日志
spring.shardingsphere.props.sql.show=true
4.5.编写测试类
Shardingjdbcdemo4ApplicationTests
package com.tang.shardingjdbcdemo4;

import com.tang.shardingjdbcdemo4.entity.User;
import com.tang.shardingjdbcdemo4.mapper.UserMapper;
import org.junit.jupiter.api.Test;
import org.springframework.beans.factory.annotation.Autowired;
import org.springframework.boot.test.context.SpringBootTest;

@SpringBootTest
class Shardingjdbcdemo4ApplicationTests {

    @Autowired
    private UserMapper userMapper;

    @Test
    void contextLoads() {

    }

    @Test
    public void test1(){

        User user = User.builder().userType("1").fullname("测试").build();
        userMapper.insert(user);
    }
}
5.Sharding-JDBC实现公共表配置
公共表属于系统中数据量较小,变动少,而且属于高频联合查询的依赖表。参数表、数据字典表等属于此类型。可以将这类表在每个数据库都保存一份,所有更新操作都同时发送到所有分库执行。接下来看一下如何使用Sharding-JDBC实现公共表。
5.1.搭建环境
(1)技术:SpringBoot 2.4.4+ MyBatisPlus + Sharding-JDBC + Druid 连接池
(2)创建 SpringBoot 工程
(3)修改工程 SpringBoot 版本 2.4.4
<parent>
        <groupId>org.springframework.boot</groupId>
        <artifactId>spring-boot-starter-parent</artifactId>
        <version>2.4.4</version>
        <relativePath/> <!-- lookup parent from repository -->
</parent>
5.2.创建公共表
分别在 user_db、atguigu_db_1、atguigu_db_2中创建 t_dict 表:
CREATE TABLE `t_dict` (
`dict_id` bigint(20) NOT NULL COMMENT '字典id',
`type` varchar(50) CHARACTER SET utf8 COLLATE utf8_general_ci NOT NULL COMMENT '字典类型',
`code` varchar(50) CHARACTER SET utf8 COLLATE utf8_general_ci NOT NULL COMMENT '字典编码',
`value` varchar(50) CHARACTER SET utf8 COLLATE utf8_general_ci NOT NULL COMMENT '字典值',
PRIMARY KEY (`dict_id`) USING BTREE
) ENGINE = InnoDB CHARACTER SET = utf8 COLLATE = utf8_general_ci ROW_FORMAT=Dynamic;
5.3.编写代码
Dict
package com.tang.shardingjdbcdemo5.entity;

import com.baomidou.mybatisplus.annotation.TableName;
import lombok.Builder;
import lombok.Data;

import java.math.BigDecimal;
import java.math.BigInteger;

@Data
@Builder
@TableName("t_dict")
public class Dict {
    private BigDecimal dictId;
    private String type;
    private String code;
    private String value;
}
Order
package com.tang.shardingjdbcdemo5.entity;

import com.baomidou.mybatisplus.annotation.TableName;
import lombok.Builder;
import lombok.Data;

import java.math.BigDecimal;

@Data
@Builder
@TableName("order")
public class Order {

    private BigDecimal orderId;
    private BigDecimal price;
    private Integer userId;
    private String status;
}
User
package com.tang.shardingjdbcdemo5.entity;

import com.baomidou.mybatisplus.annotation.TableName;
import lombok.Builder;
import lombok.Data;

import java.math.BigDecimal;

@Data
@Builder
@TableName("t_user")
public class User {

    private BigDecimal userId;
    private String fullname;
    private String userType;
}
DictMapper
package com.tang.shardingjdbcdemo5.mapper;

import com.baomidou.mybatisplus.core.mapper.BaseMapper;
import com.tang.shardingjdbcdemo5.entity.Dict;
import com.tang.shardingjdbcdemo5.entity.Order;
import org.springframework.stereotype.Repository;

@Repository
public interface DictMapper extends BaseMapper<Dict> {

}
OrderMapper
package com.tang.shardingjdbcdemo5.mapper;

import com.baomidou.mybatisplus.core.mapper.BaseMapper;
import com.tang.shardingjdbcdemo5.entity.Order;
import org.springframework.stereotype.Repository;

@Repository
public interface OrderMapper extends BaseMapper<Order> {

}
UserMapper
package com.tang.shardingjdbcdemo5.mapper;

import com.baomidou.mybatisplus.core.mapper.BaseMapper;
import com.tang.shardingjdbcdemo5.entity.Order;
import org.springframework.stereotype.Repository;

@Repository
public interface OrderMapper extends BaseMapper<Order> {

}
Shardingjdbcdemo5Application
package com.tang.shardingjdbcdemo5;

import org.mybatis.spring.annotation.MapperScan;
import org.springframework.boot.SpringApplication;
import org.springframework.boot.autoconfigure.SpringBootApplication;

@SpringBootApplication
@MapperScan(basePackages = "com.tang.shardingjdbcdemo5.mapper")
public class Shardingjdbcdemo5Application {


    public static void main(String[] args) {

        SpringApplication.run(Shardingjdbcdemo5Application.class, args);
    }

}
5.4.编写配置
# shardingjdbc分片策略
# 配置数据源,给数据源起名称
spring.shardingsphere.datasource.names=m0,m1,m2

# 一个实体类对应两张表,覆盖
spring.main.allow-bean-definition-overriding=true

#指定 course 表分布情况,配置表在哪个数据库里面,表名称都是什么 m1.order_1 ,m1.order_2
#spring.shardingsphere.sharding.tables.order.actual-data-nodes=m1.order_$->{1..2}

#指定数据库分布情况,数据库里面表分布情况
# m1  m2    course_1 course_2
spring.shardingsphere.sharding.tables.order.actual-data-nodes=m$->{1..2}.order_$->{1..2}

#配置数据源具体内容,包含连接池,驱动,地址,用户名和密码
spring.shardingsphere.datasource.m0.type=com.alibaba.druid.pool.DruidDataSource
spring.shardingsphere.datasource.m0.driver‐class‐name=com.mysql.cj.jdbc.Driver
spring.shardingsphere.datasource.m0.url=jdbc:mysql://localhost:3306/user_db?useUnicode=true
spring.shardingsphere.datasource.m0.username=root
spring.shardingsphere.datasource.m0.password=root

#配置第一个数据源具体内容,包含连接池,驱动,地址,用户名和密码
spring.shardingsphere.datasource.m1.type=com.alibaba.druid.pool.DruidDataSource
spring.shardingsphere.datasource.m1.driver-class-name=com.mysql.cj.jdbc.Driver
spring.shardingsphere.datasource.m1.url=jdbc:mysql://localhost:3306/atguigu_db_1?serverTimezone=UTC
spring.shardingsphere.datasource.m1.username=root
spring.shardingsphere.datasource.m1.password=root


#配置第二个数据源具体内容,包含连接池,驱动,地址,用户名和密码
spring.shardingsphere.datasource.m2.type=com.alibaba.druid.pool.DruidDataSource
spring.shardingsphere.datasource.m2.driver-class-name=com.mysql.cj.jdbc.Driver
spring.shardingsphere.datasource.m2.url=jdbc:mysql://localhost:3306/atguigu_db_2?serverTimezone=UTC
spring.shardingsphere.datasource.m2.username=root
spring.shardingsphere.datasource.m2.password=root


# 指定t_user表里面主键cid 生成策略  SNOWFLAKE
spring.shardingsphere.sharding.tables.t_user.key-generator.column=user_id
spring.shardingsphere.sharding.tables.t_user.key-generator.type=SNOWFLAKE

# 配置公共表
spring.shardingsphere.sharding.broadcast-tables=t_dict
spring.shardingsphere.sharding.tables.t_dict.key-generator.column=dict_id
spring.shardingsphere.sharding.tables.t_dict.key-generator.type=SNOWFLAKE


# 指定atguigu_order表里面主键cid 生成策略  SNOWFLAKE
spring.shardingsphere.sharding.tables.order.key-generator.column=order_id
spring.shardingsphere.sharding.tables.order.key-generator.type=SNOWFLAKE


# 指定表分片策略  约定order_id值偶数添加到order_1表,如果cid是奇数添加到order_2表
spring.shardingsphere.sharding.tables.order.table-strategy.inline.sharding-column=order_id
spring.shardingsphere.sharding.tables.order.table-strategy.inline.algorithm-expression=order_$->{order_id % 2 + 1}


# 指定数据库所有表的分库策略 约定user_id是偶数添加m1,是奇数添加m2
#spring.shardingsphere.sharding.default-database-strategy.inline.sharding-column=user_id
#spring.shardingsphere.sharding.default-database-strategy.inline.algorithm-expression=m$->{user_id % 2 + 1}

# 指定数据库中指定的表采取分库策略 约定user_id是偶数添加m1,是奇数添加m2
spring.shardingsphere.sharding.tables.order.database-strategy.inline..sharding-column=user_id
spring.shardingsphere.sharding.tables.order.database-strategy.inline.algorithm-expression=m$->{user_id % 2 + 1}


# 配置user_db数据库里面t_user 专库专表
spring.shardingsphere.sharding.tables.t_user.actual-data-nodes=m$->{0}.t_user
spring.shardingsphere.sharding.tables.t_user.table-strategy.inline.sharding-column=user_id
spring.shardingsphere.sharding.tables.t_user.table-strategy.inline.algorithm-expression=t_user


# 打开sql输出日志
spring.shardingsphere.props.sql.show=true
5.5.编写测试类
Shardingjdbcdemo5ApplicationTests
package com.tang.shardingjdbcdemo5;

import com.baomidou.mybatisplus.core.conditions.query.LambdaQueryWrapper;
import com.tang.shardingjdbcdemo5.entity.Dict;
import com.tang.shardingjdbcdemo5.mapper.DictMapper;
import lombok.Data;
import org.junit.jupiter.api.Test;
import org.springframework.beans.factory.annotation.Autowired;
import org.springframework.boot.test.context.SpringBootTest;

@SpringBootTest
class Shardingjdbcdemo5ApplicationTests {

    @Autowired
    private DictMapper dictMapper;

    @Test
    void contextLoads() {

    }

    @Test
    public void testInsert(){

        Dict dict = Dict.builder().code("AH").type("1").value("安徽").build();
        dictMapper.insert(dict);
    }

    @Test
    public void testSelect(){

        LambdaQueryWrapper<Dict> wrapper = new LambdaQueryWrapper<>();
        wrapper.eq(Dict::getDictId,583601711541649409L);
        Dict dict = dictMapper.selectOne(wrapper);
        System.out.println(dict);
    }

    @Test
    public void testDelete(){

        LambdaQueryWrapper<Dict> wrapper = new LambdaQueryWrapper<>();
        wrapper.eq(Dict::getDictId,583601711541649409L);
        int delete = dictMapper.delete(wrapper);
        System.out.println(delete);
    }

}
当对公共表的数据进行新增修改删除 则拥有该表的所有数据库中的数据都会进行同步
6.mysql读写分离
为了确保数据库产品的稳定性,很多数据库拥有双机热备功能。也就是,第一台数据库服务器,是对外提供增删改业务的生产服务器;第二台数据库服务器,主要进行读的操作。
原理:让主数据库(master)处理事务性增、改、删操作,而从数据库(slave)处理SELECT查询操作。
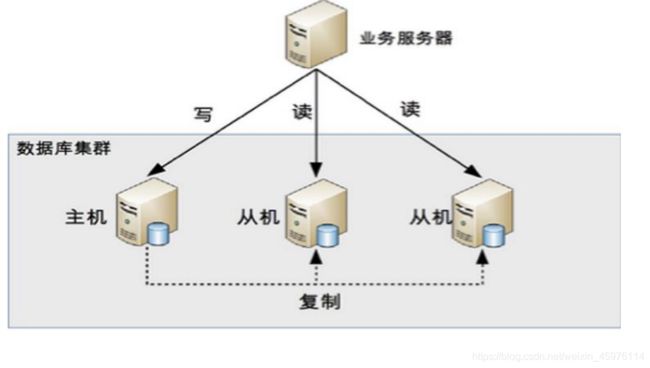
主从复制:当主服务器有写入(insert/update/delete)语句时候,从服务器自动获取
读写分离:insert/update/delete语句操作一台服务器,select操作另一个服务器
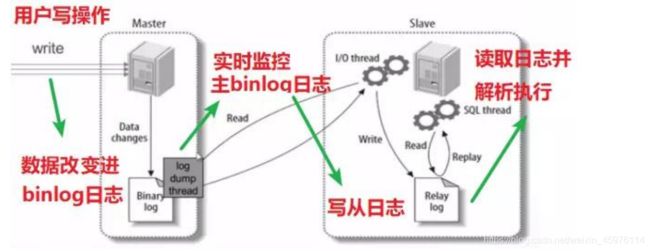
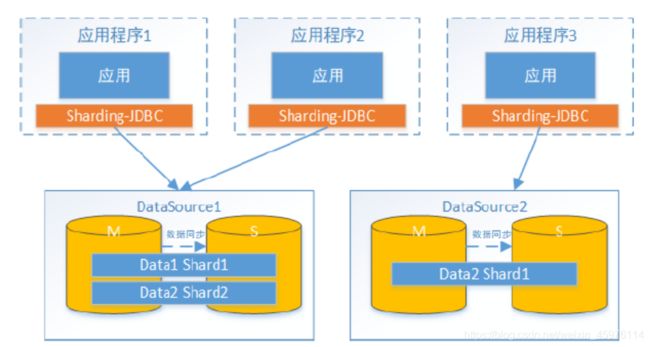
Sharding-JDBC读写分离则是根据SQL语义的分析,将读操作和写操作分别路由至主库与从库。
它提供透明化读写分离,让使用方尽量像使用一个数据库一样使用主从数据库集群。
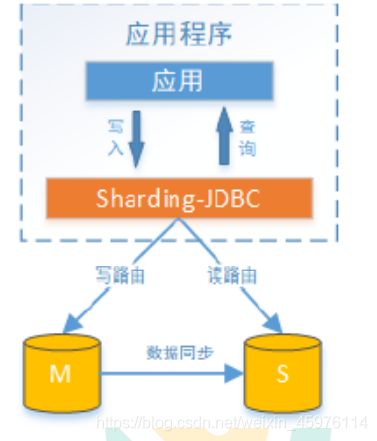
Sharding-JDBC提供一主多从的读写分离配置,可独立使用,也可配合分库分表使用,同一线程且同一数据库连接内,如有写入操作,以后的读操作均从主库读取,用于保证数据一致性。
Sharding-JDBC不提供主从数据库的数据同步功能,需要采用其他机制支持。
6.1.配置mysql主从复制
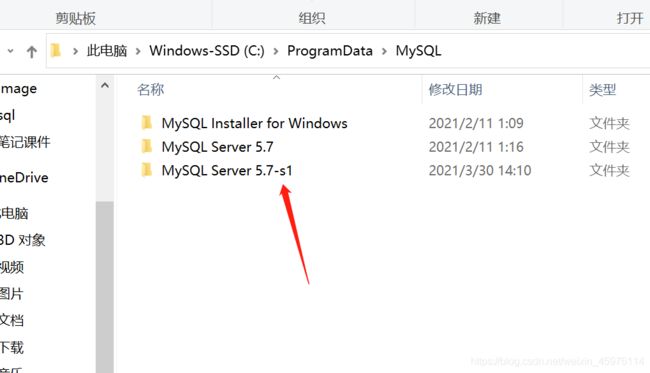
6.1.1.新增 mysql 实例
复制原有 mysql 如:C:\Program Files\MySQL\MySQL Server 5.7(主库) C:\Program Files\MySQL\MySQL Server 5.7-s1(从库)
复制mysql的数据目录 如C:\ProgramData\MySQL\MySQL Server 5.7(主库)
C:\ProgramData\MySQL\MySQL Server 5.7-s1(从库)
6.1.2.修改my.ini文件
主库
# Other default tuning values
# MySQL Server Instance Configuration File
# ----------------------------------------------------------------------
# Generated by the MySQL Server Instance Configuration Wizard
#
#
# Installation Instructions
# ----------------------------------------------------------------------
#
# On Linux you can copy this file to /etc/my.cnf to set global options,
# mysql-data-dir/my.cnf to set server-specific options
# (@localstatedir@ for this installation) or to
# ~/.my.cnf to set user-specific options.
#
# On Windows you should keep this file in the installation directory
# of your server (e.g. C:\Program Files\MySQL\MySQL Server X.Y). To
# make sure the server reads the config file use the startup option
# "--defaults-file".
#
# To run run the server from the command line, execute this in a
# command line shell, e.g.
# mysqld --defaults-file="C:\Program Files\MySQL\MySQL Server X.Y\my.ini"
#
# To install the server as a Windows service manually, execute this in a
# command line shell, e.g.
# mysqld --install MySQLXY --defaults-file="C:\Program Files\MySQL\MySQL Server X.Y\my.ini"
#
# And then execute this in a command line shell to start the server, e.g.
# net start MySQLXY
#
#
# Guildlines for editing this file
# ----------------------------------------------------------------------
#
# In this file, you can use all long options that the program supports.
# If you want to know the options a program supports, start the program
# with the "--help" option.
#
# More detailed information about the individual options can also be
# found in the manual.
#
# For advice on how to change settings please see
# http://dev.mysql.com/doc/refman/5.7/en/server-configuration-defaults.html
#
#
# CLIENT SECTION
# ----------------------------------------------------------------------
#
# The following options will be read by MySQL client applications.
# Note that only client applications shipped by MySQL are guaranteed
# to read this section. If you want your own MySQL client program to
# honor these values, you need to specify it as an option during the
# MySQL client library initialization.
#
[client]

# pipe
# socket=0.0
port=3306

[mysql]
no-beep

default-character-set=utf8


# SERVER SECTION
# ----------------------------------------------------------------------
#
# The following options will be read by the MySQL Server. Make sure that
# you have installed the server correctly (see above) so it reads this
# file.
#
# server_type=3
[mysqld]


#开启日志
log-bin=mysql-bin
#设置服务id,主从不能一致
server-id=1
#设置需要同步的数据库
binlog-do-db=user_db
#屏蔽系统库同步
binlog-ignore-db=mysql
binlog-ignore-db=information_schema
binlog-ignore-db=performance_schema


# The next three options are mutually exclusive to SERVER_PORT below.
# skip-networking

# enable-named-pipe

# shared-memory

# shared-memory-base-name=MYSQL

# The Pipe the MySQL Server will use
# socket=MYSQL

# The TCP/IP Port the MySQL Server will listen on
port=3306

# Path to installation directory. All paths are usually resolved relative to this.
basedir="C:/Program Files/MySQL/MySQL Server 5.7/"

# Path to the database root
datadir=C:/ProgramData/MySQL/MySQL Server 5.7/Data

# The default character set that will be used when a new schema or table is
# created and no character set is defined
character-set-server=utf8

# The default storage engine that will be used when create new tables when
default-storage-engine=INNODB

# Set the SQL mode to strict
sql-mode="STRICT_TRANS_TABLES,NO_AUTO_CREATE_USER,NO_ENGINE_SUBSTITUTION"

# Enable Windows Authentication
# plugin-load=authentication_windows.dll

# General and Slow logging.
log-output=FILE
general-log=0
general_log_file="LAPTOP-I9PVVSF0.log"
slow-query-log=1
slow_query_log_file="LAPTOP-I9PVVSF0-slow.log"
long_query_time=10

# Binary Logging.
# log-bin

# Error Logging.
log-error="LAPTOP-I9PVVSF0.err"

# Server Id.
# server-id=1

# Secure File Priv.
secure-file-priv="C:/ProgramData/MySQL/MySQL Server 5.7/Uploads"

# The maximum amount of concurrent sessions the MySQL server will
# allow. One of these connections will be reserved for a user with
# SUPER privileges to allow the administrator to login even if the
# connection limit has been reached.
max_connections=151

# The number of open tables for all threads. Increasing this value
# increases the number of file descriptors that mysqld requires.
# Therefore you have to make sure to set the amount of open files
# allowed to at least 4096 in the variable "open-files-limit" in
# section [mysqld_safe]
table_open_cache=2000

# Maximum size for internal (in-memory) temporary tables. If a table
# grows larger than this value, it is automatically converted to disk
# based table This limitation is for a single table. There can be many
# of them.
tmp_table_size=16M

# How many threads we should keep in a cache for reuse. When a client
# disconnects, the client's threads are put in the cache if there aren't
# more than thread_cache_size threads from before.  This greatly reduces
# the amount of thread creations needed if you have a lot of new
# connections. (Normally this doesn't give a notable performance
# improvement if you have a good thread implementation.)
thread_cache_size=10

#*** MyISAM Specific options
# The maximum size of the temporary file MySQL is allowed to use while
# recreating the index (during REPAIR, ALTER TABLE or LOAD DATA INFILE.
# If the file-size would be bigger than this, the index will be created
# through the key cache (which is slower).
myisam_max_sort_file_size=100G

# If the temporary file used for fast index creation would be bigger
# than using the key cache by the amount specified here, then prefer the
# key cache method.  This is mainly used to force long character keys in
# large tables to use the slower key cache method to create the index.
myisam_sort_buffer_size=8M

# Size of the Key Buffer, used to cache index blocks for MyISAM tables.
# Do not set it larger than 30% of your available memory, as some memory
# is also required by the OS to cache rows. Even if you're not using
# MyISAM tables, you should still set it to 8-64M as it will also be
# used for internal temporary disk tables.
key_buffer_size=8M

# Size of the buffer used for doing full table scans of MyISAM tables.
# Allocated per thread, if a full scan is needed.
read_buffer_size=0

read_rnd_buffer_size=0

#*** INNODB Specific options ***
# innodb_data_home_dir=0.0

# Use this option if you have a MySQL server with InnoDB support enabled
# but you do not plan to use it. This will save memory and disk space
# and speed up some things.
# skip-innodb

# If set to 1, InnoDB will flush (fsync) the transaction logs to the
# disk at each commit, which offers full ACID behavior. If you are
# willing to compromise this safety, and you are running small
# transactions, you may set this to 0 or 2 to reduce disk I/O to the
# logs. Value 0 means that the log is only written to the log file and
# the log file flushed to disk approximately once per second. Value 2
# means the log is written to the log file at each commit, but the log
# file is only flushed to disk approximately once per second.
innodb_flush_log_at_trx_commit=1

# The size of the buffer InnoDB uses for buffering log data. As soon as
# it is full, InnoDB will have to flush it to disk. As it is flushed
# once per second anyway, it does not make sense to have it very large
# (even with long transactions).
innodb_log_buffer_size=1M

# InnoDB, unlike MyISAM, uses a buffer pool to cache both indexes and
# row data. The bigger you set this the less disk I/O is needed to
# access data in tables. On a dedicated database server you may set this
# parameter up to 80% of the machine physical memory size. Do not set it
# too large, though, because competition of the physical memory may
# cause paging in the operating system.  Note that on 32bit systems you
# might be limited to 2-3.5G of user level memory per process, so do not
# set it too high.
innodb_buffer_pool_size=8M

# Size of each log file in a log group. You should set the combined size
# of log files to about 25%-100% of your buffer pool size to avoid
# unneeded buffer pool flush activity on log file overwrite. However,
# note that a larger logfile size will increase the time needed for the
# recovery process.
innodb_log_file_size=48M

# Number of threads allowed inside the InnoDB kernel. The optimal value
# depends highly on the application, hardware as well as the OS
# scheduler properties. A too high value may lead to thread thrashing.
innodb_thread_concurrency=17

# The increment size (in MB) for extending the size of an auto-extend InnoDB system tablespace file when it becomes full.
innodb_autoextend_increment=64

# The number of regions that the InnoDB buffer pool is divided into.
# For systems with buffer pools in the multi-gigabyte range, dividing the buffer pool into separate instances can improve concurrency,
# by reducing contention as different threads read and write to cached pages.
innodb_buffer_pool_instances=8

# Determines the number of threads that can enter InnoDB concurrently.
innodb_concurrency_tickets=5000

# Specifies how long in milliseconds (ms) a block inserted into the old sublist must stay there after its first access before
# it can be moved to the new sublist.
innodb_old_blocks_time=1000

# It specifies the maximum number of .ibd files that MySQL can keep open at one time. The minimum value is 10.
innodb_open_files=300

# When this variable is enabled, InnoDB updates statistics during metadata statements.
innodb_stats_on_metadata=0

# When innodb_file_per_table is enabled (the default in 5.6.6 and higher), InnoDB stores the data and indexes for each newly created table
# in a separate .ibd file, rather than in the system tablespace.
innodb_file_per_table=1

# Use the following list of values: 0 for crc32, 1 for strict_crc32, 2 for innodb, 3 for strict_innodb, 4 for none, 5 for strict_none.
innodb_checksum_algorithm=0

# The number of outstanding connection requests MySQL can have.
# This option is useful when the main MySQL thread gets many connection requests in a very short time.
# It then takes some time (although very little) for the main thread to check the connection and start a new thread.
# The back_log value indicates how many requests can be stacked during this short time before MySQL momentarily
# stops answering new requests.
# You need to increase this only if you expect a large number of connections in a short period of time.
back_log=80

# If this is set to a nonzero value, all tables are closed every flush_time seconds to free up resources and
# synchronize unflushed data to disk.
# This option is best used only on systems with minimal resources.
flush_time=0

# The minimum size of the buffer that is used for plain index scans, range index scans, and joins that do not use
# indexes and thus perform full table scans.
join_buffer_size=256K

# The maximum size of one packet or any generated or intermediate string, or any parameter sent by the
# mysql_stmt_send_long_data() C API function.
max_allowed_packet=4M

# If more than this many successive connection requests from a host are interrupted without a successful connection,
# the server blocks that host from performing further connections.
max_connect_errors=100

# Changes the number of file descriptors available to mysqld.
# You should try increasing the value of this option if mysqld gives you the error "Too many open files".
open_files_limit=4161

# If you see many sort_merge_passes per second in SHOW GLOBAL STATUS output, you can consider increasing the
# sort_buffer_size value to speed up ORDER BY or GROUP BY operations that cannot be improved with query optimization
# or improved indexing.
sort_buffer_size=256K

# The number of table definitions (from .frm files) that can be stored in the definition cache.
# If you use a large number of tables, you can create a large table definition cache to speed up opening of tables.
# The table definition cache takes less space and does not use file descriptors, unlike the normal table cache.
# The minimum and default values are both 400.
table_definition_cache=1400

# Specify the maximum size of a row-based binary log event, in bytes.
# Rows are grouped into events smaller than this size if possible. The value should be a multiple of 256.
binlog_row_event_max_size=8K

# If the value of this variable is greater than 0, a replication slave synchronizes its master.info file to disk.
# (using fdatasync()) after every sync_master_info events.
sync_master_info=10000

# If the value of this variable is greater than 0, the MySQL server synchronizes its relay log to disk.
# (using fdatasync()) after every sync_relay_log writes to the relay log.
sync_relay_log=10000

# If the value of this variable is greater than 0, a replication slave synchronizes its relay-log.info file to disk.
# (using fdatasync()) after every sync_relay_log_info transactions.
sync_relay_log_info=10000

# Indicates how is the InnoDB Cluster configured as (Classic, Sandbox, Master or Slave).
# innodbclustertypeselection=ClassicMySQLReplication

# Indicates how is the InnoDB Cluster is/will be named.
# innodbclustername="sandboxCluster"

# Indicates how many instances will the InnoDB cluster sandbox will have.
# innodbclusterinstances=0

# Holds the InnoDB Cluster Username.
# innodbclusterusername

# Indicates the InnoDB Cluster URI.
# innodbclusteruri

# Indicates the InnoDB Cluster Port.
# innodbclusterport=3306

# Load mysql plugins at start."plugin_x ; plugin_y".
plugin_load="mysqlx"

# MySQL server's plugin configuration.
loose_mysqlx_port=33060
以上主要是
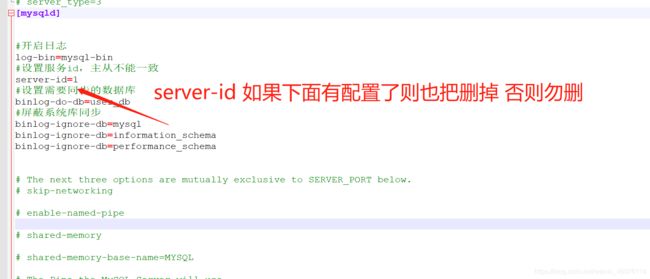
[mysqld]
#开启日志
log‐bin = mysql‐bin
#设置服务id,主从不能一致
server‐id = 1
#设置需要同步的数据库
binlog‐do‐db=user_db
#屏蔽系统库同步
binlog‐ignore‐db=mysql
binlog‐ignore‐db=information_schema
binlog‐ignore‐db=performance_schema
从库
# Other default tuning values
# MySQL Server Instance Configuration File
# ----------------------------------------------------------------------
# Generated by the MySQL Server Instance Configuration Wizard
#
#
# Installation Instructions
# ----------------------------------------------------------------------
#
# On Linux you can copy this file to /etc/my.cnf to set global options,
# mysql-data-dir/my.cnf to set server-specific options
# (@localstatedir@ for this installation) or to
# ~/.my.cnf to set user-specific options.
#
# On Windows you should keep this file in the installation directory
# of your server (e.g. C:\Program Files\MySQL\MySQL Server X.Y). To
# make sure the server reads the config file use the startup option
# "--defaults-file".
#
# To run run the server from the command line, execute this in a
# command line shell, e.g.
# mysqld --defaults-file="C:\Program Files\MySQL\MySQL Server X.Y\my.ini"
#
# To install the server as a Windows service manually, execute this in a
# command line shell, e.g.
# mysqld --install MySQLXY --defaults-file="C:\Program Files\MySQL\MySQL Server X.Y\my.ini"
#
# And then execute this in a command line shell to start the server, e.g.
# net start MySQLXY
#
#
# Guildlines for editing this file
# ----------------------------------------------------------------------
#
# In this file, you can use all long options that the program supports.
# If you want to know the options a program supports, start the program
# with the "--help" option.
#
# More detailed information about the individual options can also be
# found in the manual.
#
# For advice on how to change settings please see
# http://dev.mysql.com/doc/refman/5.7/en/server-configuration-defaults.html
#
#
# CLIENT SECTION
# ----------------------------------------------------------------------
#
# The following options will be read by MySQL client applications.
# Note that only client applications shipped by MySQL are guaranteed
# to read this section. If you want your own MySQL client program to
# honor these values, you need to specify it as an option during the
# MySQL client library initialization.
#
[client]

# pipe
# socket=0.0
port=3307

[mysql]
no-beep

default-character-set=utf8


# SERVER SECTION
# ----------------------------------------------------------------------
#
# The following options will be read by the MySQL Server. Make sure that
# you have installed the server correctly (see above) so it reads this
# file.
#
# server_type=3
[mysqld]


#开启日志
log-bin=mysql-bin
#设置服务id,主从不能一致
server-id=2
#设置需要同步的数据库
replicate_wild_do_table=user_db.%
#屏蔽系统库同步
replicate_wild_ignore_table=mysql.%
replicate_wild_ignore_table=information_schema.%
replicate_wild_ignore_table=performance_schema.%

# The next three options are mutually exclusive to SERVER_PORT below.
# skip-networking

# enable-named-pipe

# shared-memory

# shared-memory-base-name=MYSQL

# The Pipe the MySQL Server will use
# socket=MYSQL

# The TCP/IP Port the MySQL Server will listen on
port=3307

# Path to installation directory. All paths are usually resolved relative to this.
basedir=C:\Program Files\MySQL\MySQL Server 5.7-s1/

# Path to the database root
datadir=C:\ProgramData\MySQL\MySQL Server 5.7-s1\Data

# The default character set that will be used when a new schema or table is
# created and no character set is defined
character-set-server=utf8

# The default storage engine that will be used when create new tables when
default-storage-engine=INNODB

# Set the SQL mode to strict
sql-mode="STRICT_TRANS_TABLES,NO_AUTO_CREATE_USER,NO_ENGINE_SUBSTITUTION"

# Enable Windows Authentication
# plugin-load=authentication_windows.dll

# General and Slow logging.
log-output=FILE
general-log=0
general_log_file="LAPTOP-I9PVVSF0.log"
slow-query-log=1
slow_query_log_file="LAPTOP-I9PVVSF0-slow.log"
long_query_time=10

# Binary Logging.
# log-bin

# Error Logging.
log-error="LAPTOP-I9PVVSF0.err"

# Server Id.
# server-id=1

# Secure File Priv.
secure-file-priv="C:/ProgramData/MySQL/MySQL Server 5.7/Uploads"

# The maximum amount of concurrent sessions the MySQL server will
# allow. One of these connections will be reserved for a user with
# SUPER privileges to allow the administrator to login even if the
# connection limit has been reached.
max_connections=151

# The number of open tables for all threads. Increasing this value
# increases the number of file descriptors that mysqld requires.
# Therefore you have to make sure to set the amount of open files
# allowed to at least 4096 in the variable "open-files-limit" in
# section [mysqld_safe]
table_open_cache=2000

# Maximum size for internal (in-memory) temporary tables. If a table
# grows larger than this value, it is automatically converted to disk
# based table This limitation is for a single table. There can be many
# of them.
tmp_table_size=16M

# How many threads we should keep in a cache for reuse. When a client
# disconnects, the client's threads are put in the cache if there aren't
# more than thread_cache_size threads from before.  This greatly reduces
# the amount of thread creations needed if you have a lot of new
# connections. (Normally this doesn't give a notable performance
# improvement if you have a good thread implementation.)
thread_cache_size=10

#*** MyISAM Specific options
# The maximum size of the temporary file MySQL is allowed to use while
# recreating the index (during REPAIR, ALTER TABLE or LOAD DATA INFILE.
# If the file-size would be bigger than this, the index will be created
# through the key cache (which is slower).
myisam_max_sort_file_size=100G

# If the temporary file used for fast index creation would be bigger
# than using the key cache by the amount specified here, then prefer the
# key cache method.  This is mainly used to force long character keys in
# large tables to use the slower key cache method to create the index.
myisam_sort_buffer_size=8M

# Size of the Key Buffer, used to cache index blocks for MyISAM tables.
# Do not set it larger than 30% of your available memory, as some memory
# is also required by the OS to cache rows. Even if you're not using
# MyISAM tables, you should still set it to 8-64M as it will also be
# used for internal temporary disk tables.
key_buffer_size=8M

# Size of the buffer used for doing full table scans of MyISAM tables.
# Allocated per thread, if a full scan is needed.
read_buffer_size=0

read_rnd_buffer_size=0

#*** INNODB Specific options ***
# innodb_data_home_dir=0.0

# Use this option if you have a MySQL server with InnoDB support enabled
# but you do not plan to use it. This will save memory and disk space
# and speed up some things.
# skip-innodb

# If set to 1, InnoDB will flush (fsync) the transaction logs to the
# disk at each commit, which offers full ACID behavior. If you are
# willing to compromise this safety, and you are running small
# transactions, you may set this to 0 or 2 to reduce disk I/O to the
# logs. Value 0 means that the log is only written to the log file and
# the log file flushed to disk approximately once per second. Value 2
# means the log is written to the log file at each commit, but the log
# file is only flushed to disk approximately once per second.
innodb_flush_log_at_trx_commit=1

# The size of the buffer InnoDB uses for buffering log data. As soon as
# it is full, InnoDB will have to flush it to disk. As it is flushed
# once per second anyway, it does not make sense to have it very large
# (even with long transactions).
innodb_log_buffer_size=1M

# InnoDB, unlike MyISAM, uses a buffer pool to cache both indexes and
# row data. The bigger you set this the less disk I/O is needed to
# access data in tables. On a dedicated database server you may set this
# parameter up to 80% of the machine physical memory size. Do not set it
# too large, though, because competition of the physical memory may
# cause paging in the operating system.  Note that on 32bit systems you
# might be limited to 2-3.5G of user level memory per process, so do not
# set it too high.
innodb_buffer_pool_size=8M

# Size of each log file in a log group. You should set the combined size
# of log files to about 25%-100% of your buffer pool size to avoid
# unneeded buffer pool flush activity on log file overwrite. However,
# note that a larger logfile size will increase the time needed for the
# recovery process.
innodb_log_file_size=48M

# Number of threads allowed inside the InnoDB kernel. The optimal value
# depends highly on the application, hardware as well as the OS
# scheduler properties. A too high value may lead to thread thrashing.
innodb_thread_concurrency=17

# The increment size (in MB) for extending the size of an auto-extend InnoDB system tablespace file when it becomes full.
innodb_autoextend_increment=64

# The number of regions that the InnoDB buffer pool is divided into.
# For systems with buffer pools in the multi-gigabyte range, dividing the buffer pool into separate instances can improve concurrency,
# by reducing contention as different threads read and write to cached pages.
innodb_buffer_pool_instances=8

# Determines the number of threads that can enter InnoDB concurrently.
innodb_concurrency_tickets=5000

# Specifies how long in milliseconds (ms) a block inserted into the old sublist must stay there after its first access before
# it can be moved to the new sublist.
innodb_old_blocks_time=1000

# It specifies the maximum number of .ibd files that MySQL can keep open at one time. The minimum value is 10.
innodb_open_files=300

# When this variable is enabled, InnoDB updates statistics during metadata statements.
innodb_stats_on_metadata=0

# When innodb_file_per_table is enabled (the default in 5.6.6 and higher), InnoDB stores the data and indexes for each newly created table
# in a separate .ibd file, rather than in the system tablespace.
innodb_file_per_table=1

# Use the following list of values: 0 for crc32, 1 for strict_crc32, 2 for innodb, 3 for strict_innodb, 4 for none, 5 for strict_none.
innodb_checksum_algorithm=0

# The number of outstanding connection requests MySQL can have.
# This option is useful when the main MySQL thread gets many connection requests in a very short time.
# It then takes some time (although very little) for the main thread to check the connection and start a new thread.
# The back_log value indicates how many requests can be stacked during this short time before MySQL momentarily
# stops answering new requests.
# You need to increase this only if you expect a large number of connections in a short period of time.
back_log=80

# If this is set to a nonzero value, all tables are closed every flush_time seconds to free up resources and
# synchronize unflushed data to disk.
# This option is best used only on systems with minimal resources.
flush_time=0

# The minimum size of the buffer that is used for plain index scans, range index scans, and joins that do not use
# indexes and thus perform full table scans.
join_buffer_size=256K

# The maximum size of one packet or any generated or intermediate string, or any parameter sent by the
# mysql_stmt_send_long_data() C API function.
max_allowed_packet=4M

# If more than this many successive connection requests from a host are interrupted without a successful connection,
# the server blocks that host from performing further connections.
max_connect_errors=100

# Changes the number of file descriptors available to mysqld.
# You should try increasing the value of this option if mysqld gives you the error "Too many open files".
open_files_limit=4161

# If you see many sort_merge_passes per second in SHOW GLOBAL STATUS output, you can consider increasing the
# sort_buffer_size value to speed up ORDER BY or GROUP BY operations that cannot be improved with query optimization
# or improved indexing.
sort_buffer_size=256K

# The number of table definitions (from .frm files) that can be stored in the definition cache.
# If you use a large number of tables, you can create a large table definition cache to speed up opening of tables.
# The table definition cache takes less space and does not use file descriptors, unlike the normal table cache.
# The minimum and default values are both 400.
table_definition_cache=1400

# Specify the maximum size of a row-based binary log event, in bytes.
# Rows are grouped into events smaller than this size if possible. The value should be a multiple of 256.
binlog_row_event_max_size=8K

# If the value of this variable is greater than 0, a replication slave synchronizes its master.info file to disk.
# (using fdatasync()) after every sync_master_info events.
sync_master_info=10000

# If the value of this variable is greater than 0, the MySQL server synchronizes its relay log to disk.
# (using fdatasync()) after every sync_relay_log writes to the relay log.
sync_relay_log=10000

# If the value of this variable is greater than 0, a replication slave synchronizes its relay-log.info file to disk.
# (using fdatasync()) after every sync_relay_log_info transactions.
sync_relay_log_info=10000

# Indicates how is the InnoDB Cluster configured as (Classic, Sandbox, Master or Slave).
# innodbclustertypeselection=ClassicMySQLReplication

# Indicates how is the InnoDB Cluster is/will be named.
# innodbclustername="sandboxCluster"

# Indicates how many instances will the InnoDB cluster sandbox will have.
# innodbclusterinstances=0

# Holds the InnoDB Cluster Username.
# innodbclusterusername

# Indicates the InnoDB Cluster URI.
# innodbclusteruri

# Indicates the InnoDB Cluster Port.
# innodbclusterport=3306

# Load mysql plugins at start."plugin_x ; plugin_y".
plugin_load="mysqlx"

# MySQL server's plugin configuration.
loose_mysqlx_port=33061
以上主要修改的是
[mysqld]
# 端口号
port=3307
#  设置mysql的安装目录
basedir=C:\Program Files\MySQL\MySQL Server 5.7-s1/
# 设置mysql数据库的数据的存放目录
datadir=C:\ProgramData\MySQL\MySQL Server 5.7-s1\Data

以及

[mysqld]
#开启日志
log‐bin = mysql‐bin
#设置服务id,主从不能一致
server‐id = 2
#设置需要同步的数据库
replicate_wild_do_table=user_db.%
#屏蔽系统库同步
replicate_wild_ignore_table=mysql.%
replicate_wild_ignore_table=information_schema.%
replicate_wild_ignore_table=performance_schema.%
6.1.3.修改server‐id 与uuid
注意server‐id与uuid不能相同
server-id以经在my.ini文件修改过了
uuid修改是在data目录里的auto.cnf 我这里是C:\ProgramData\MySQL\MySQL Server 5.7-s1\Data\auto.cnf
分别打开两个mysql的data目录里的auto.cnf
auto.cnf
[auto]
server-uuid=a82d4bb9-6bc3-11eb-82bd-bc17b8c52cdb
重启主库和从库
修改上述文件使其不相同
6.1.4.注册服务
D:\mysql‐5.7.25‐s1\bin>mysqld install mysqls1 ‐‐defaults‐file="C:\ProgramData\MySQL\MySQL Server 5.7-s1\my.ini"

删除服务命令
sc delete 服务名称
6.1.4.授权主从复制专用账号
#切换至主库bin目录,登录主库
mysql ‐h localhost ‐uroot ‐p
#授权主备复制专用账号
GRANT REPLICATION SLAVE ON *.* TO 'db_sync'@'%' IDENTIFIED BY 'db_sync';
#刷新权限
FLUSH PRIVILEGES;
#确认位点 记录下文件名以及位点
show master status;
6.1.5.设置从库向主库同步数据、并检查连接
#切换至从库bin目录,登录从库
mysql ‐h localhost ‐P3307 ‐uroot ‐p
#先停止同步
STOP SLAVE;
#修改从库指向到主库,使用上一步记录的文件名以及位点
CHANGE MASTER TO
master_host = 'localhost',
master_user = 'db_sync',
master_password = 'db_sync',
master_log_file = 'mysql‐bin.000002',
master_log_pos = 154;
#启动同步
START SLAVE;
#查看从库状态Slave_IO_Runing和Slave_SQL_Runing都为Yes说明同步成功,如果不为Yes,请检查
error_log,然后
排查相关异常。
show slave status\G
#注意 如果之前此备库已有主库指向 需要先执行以下命令清空
STOP SLAVE IO_THREAD FOR CHANNEL '';
reset slave all;
以上配置好了主从复制接下来测试下
6.1.6.测试
首先在主节点 服务器上的user_db中新建一张表stu

然后观察从服务器user_db数据库 发现数据以及同步

6.2.删除mysql服务器
删除服务命令
sc delete 服务名称
删除从服务的文件夹

删除my.ini之前配置的数据
6.3、Sharding-JDBC 操作读写分离
(1)配置读写分离策略
spring.shardingsphere.datasource.s0.type=com.alibaba.druid.pool.DruidDataSource
spring.shardingsphere.datasource.s0.driver-class-name=com.mysql.cj.jdbc.Driver
spring.shardingsphere.datasource.s0.url=jdbc:mysql://localhost:3306/user_db?serverTimezone=UTC
spring.shardingsphere.datasource.s0.username=root
spring.shardingsphere.datasource.s0.password=root

# 主库从库逻辑数据源定义 ds0 为 user_db
spring.shardingsphere.sharding.master-slave-rules.ds0.master-data-source-name=m0
spring.shardingsphere.sharding.master-slave-rules.ds0.slave-data-source-names=s0


spring.shardingsphere.sharding.tables.stu.actual-data-nodes=ds0.stu
(2)编写测试代码
@Test
    public void testAddStu(){

        Student student = Student.builder().age(10).name("李四").build();
        studentMapper.insert(student);
    }

    @Test
    public void testSelectStu(){

        LambdaQueryWrapper<Student> wrapper = new LambdaQueryWrapper<>();
        wrapper.eq(Student::getId,3);
        Student student = studentMapper.selectOne(wrapper);
        System.out.println(student);
    }
发现增删改都是走主数据源 查走的是从数据源