综合架构——ansible批量管理服务
综合架构之ansibe批量管理服务
一、ansible概述及特点
ansible是基于python语言开发的自动化软件工具;是基于SSH远程管理服务,实现远程主机批量管理。(必须要基于SSH才能实现),可以实现批量系统操作配置、批量软件部署服务、批量文件数据分发、批量系统信息收集等。
ansible服务的特点:
- 管理端不需要启动服务程序(无需systemctl)
- 管理端不需要编写配置文件(/etc/ansible/ansible.cfg)
- 受控端不需要安装软件程序(libselinux-python)
受控端selinux服务没有关闭,会影响ansible软件的管理;libselinux-python让selinux开启的状态下,也可以使用ansible程序。 - 受控端不需要启动服务程序
- 服务程序管理操作模块众多(module)
- 利用剧本编写来实现自动化(playbook)
二、部署ansible
管理端172.16.1.61:
-
安装部署软件:
yum install -y ansible -
不需要修改配置文件,但需要编写主机清单文件
/etc/ansible/ansible.cfg 服务配置文件
/etc/ansible/roles 角色目录
/etc/ansible/hosts 主机清单文件★
主机清单文件,用于定义可以管理的主机信息;直接将被管理主机的IP地址写入此文件底部即可;但必须将管理端的公钥分发给被管理端;
- 测试是否可以管理多个主机:
ansible all -a “hostname”
三、ansible命令语法格式
ansible 主机(组)名称/主机地址信息/all -m(指定应用的模块信息) 模块名称 -a(指定动作信息)
 e.g:
e.g:
ansible 172.16.1.31 -m command -a “hostname”
使用ansible,调用command模块中的hostname动作,获取远程主机名,并显示在本机。
四、ansible服务架构信息
 1.主机清单配置
2.软件模块信息
3.基于密钥连接主机
4.主机需要关闭Selinux
5.软件剧本功能
五、ansible的模块
1.命令类型模块
1.1 command模块
默认模块,即使不写也默认生效。在一个远程主机上执行一个命令;

参数解析:
- free_form:默认参数,即使不写也默认生效;使用command模块的时候,-a参数后面写上一个合法的linux命令。
- chdir:在执行命令之前,对目录进行切换。
- creates:条件判断参数,若当指定的文件存在时,就不执行对应命令,比如,如果/testdir/test文件存在,就不执行我们指定的命令。
- removes:条件判断参数,刚好与creates效果相反,若文件存在了,则执行。
注意:
使用command模块在远程主机中执行命令时,不会经过远程主机的shell处理,在使用command模块时,如果需要执行的命令中含有重定向、管道符等操作时,这些符号也会失效,比如”<”, “>”, “|”, “;” 和 “&” 这些符号,如果你需要这些功能,可以参考后面介绍的shell模块。
还有一点需要注意,如果远程节点是 windows 操作系统,则需要使用 win_command模块。
执行ansible时,不加-m默认使用command,可以在/etc/ansible/ansible.cfg中修改。
提升练习:
- 批量远程控制所有主机,在远端主机的/tmp目录下创建a.txt
ansible all -m command -a “chdir=/tmp touch a.txt”
- 批量远程控制所有主机,若远端主机的/tmp目录下不存在b.txt,则创建c.txt文件。
ansible all -m command -a “creates=/tmp/b.txt chdir=/tmp touch c.txt”
必须结合chdir,否则默认创建在远端主机的家目录下;
1.2 shell模块
万能模块,效果和command模块完全一致——在一个远程主机上执行一个命令;但是弥补了command模块的局限性(不能使用管道符、重定向等特殊符号)
参数详解:
参数同command完全一致:chdir、free-form、creates、removes。
e.g: ansible 172.16.1.31 -m shell -a "chdir=/tmp echo hello > a.txt"
1.3 script模块
Runs a local script on a remote node after transferring it.【主要用来执行脚本】
参数与command模块几乎一致。
实践应用:
使用shell来执行一个脚本的流程:
①首先要在管理端创建一个脚本;
②将脚本发送到远程主机;
③在远程主机中修改脚本权限(默认没有执行权限);
④运行ansible命令执行脚本;
由此可知,虽然shell模块是个万能模块,但是对于脚本的执行非常复杂;而script模块可以简化远程执行脚本:
①编写脚本;
②运行ansible命令执行脚本;

2.文件类型模块
2.1 copy模块
copy files to remote locations
用于管理端复制文件到远程主机,并可以设置权限,属组,属主等
参数解析
- src:需要copy的文件的源路径;/tmp和/tmp/不一样。
- dest:需要copy的文件的目标路径
- owner:对copy到远端的文件设置属主
- group:对copy到远端文件设置属组
- mode:对copy到远端的文件设置权限
- backup:对远程主机原文件进行备份;当远程主机上已经有一个文件时,管理端再次复制一个同名文件过来,会直接覆盖掉远程主机上的文件,这将导致误覆盖之后无法恢复的现象,将backup设定为yes后,新文件复制过来发生覆盖之前,会对原文件进行备份。
- content:直接在远程主机被管理文件中添加内容,会覆盖原文件内容
实例
- 复制本机的/etc/rsync.password文件到所有远程主机的/tmp目录中
ansible all -m copy -a “src=/etc/rsync.password dest=/tmp/”
- 在上一题的基础上,重命名为hello.password
ansible all -m copy -a “src=/etc/rsync.password dest=/tmp/hello.password”
- 在上一题的基础上,将复制的文件的属主和属组修改为rsync;
(前提:被管理主机的主机上已有rsync用户)
ansible all -m copy -a “src=/etc/rsync.password dest=/tmp/hello.password owner=rsync group=rsync”
- 在上一题的基础上,将文件的权限修改为755
ansible all -m copy -a “src=/etc/rsync.password dest=/tmp/hello.password owner=rsync group=rsync mode=755”
- 在上一题的基础上,对远程主机原文件进行备份;
ansible all -m copy -a “src=/etc/rsync.password dest=/tmp/hello.password owner=rsync group=rsync mode=755 backup=yes”
![]()
6. 直接在远程文件rsync.password中添加一行信息
ansible 172.16.1.31 -m copy -a "content='oldboy123' dest=/tmp/rsync.password"
2.2 file模块
set attributes of files
用于对文件的处理,创建,删除,权限控制等。
参数解析:
- 基本参数同copy模块:dest、owner、group、mode
- 其他参数:
- state:
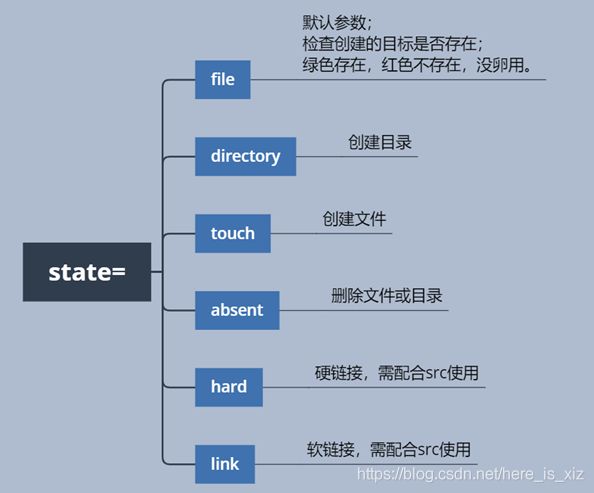
- state:
- recurse:递归;比如递归修改目录的权限、属主属组等信息;
实例:
- 创建目录
ansible 172.16.1.31 -m file -a "state=directory dest=/tmp/test"
- 创建文件loto,并使用copy模块远程注入信息;
ansible 172.16.1.31 -m file -a "state=touch dest=/tmp/loto"
ansible 172.16.1.31 -m copy -a "content='THANKYOU' dest=/tmp/loto"
- 创建硬链接
ansible 172.16.1.31 -m file -a "src=/tmp/loto dest=/tmp/loto_hard state=hard"
![]()
4. 创建软链接
ansible 172.16.1.31 -m file -a "src=/tmp/loto dest=/tmp/loto_soft state=link"
![]()
5. 将远程主机/tmp/test/目录及目录下的所有数据的属主属组改为loto
ansible 172.16.1.31 -m file -a "dest=/tmp/test recurse=yes owner=loto group=loto"
- 删除文件或目录(absent默认可以实现递归删除)
ansible 172.16.1.31 -m file -a "state=absent dest=/tmp/test"
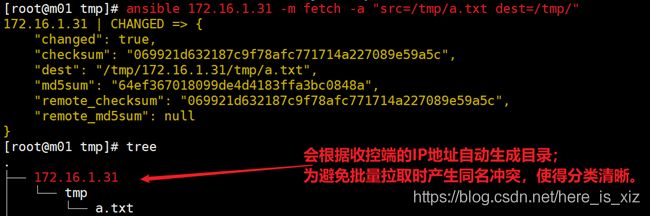
2.3 fetch模块
fetches a file from remote nodes
copy模块是批量分发文件:管理端->多个受控端
fetch模块是批量拉取文件:管理端->多个受控端
参数解析:
src和dest
实践:
拉取远程主机/tmp/a.txt文件至本地/tmp中
3.软件类型模块
yum模块:
Manages packages with the yum package manager
用于对软件包的管理,下载、安装、卸载、升级等操作
参数解析:
- name:指定安装软件名称
- state:状态信息
 实践:
实践:
1.在172.16.1.31和41主机上远程安装iotop软件
ansible 172.16.1.31,172.16.1.41 -m yum -a “name=iotop state=installed”
2.远程卸载172.16.1.41主机上得iotop软件
ansible 172.16.1.41 -m yum -a "name=iotop state=absent"
4.服务类型模块
服务模块,用于对服务进行管理,服务的启动、关闭、开机自启等;
参数解析:
- name:指定管理对象的服务名
- enable:指定是否开机自动
- state:状态信息
 实践
实践
1.远程停止172.16.1.31的httpd服务并设置为下次开机自启;
ansible 172.16.1.31 -m service -a "name=httpd enabled=yes state=stopped"
5.计划任务模块
cron模块
用于指定计划任务,和crontab -e一样
参数解析:
- name #对计划任务进行描述,添加name参数可以避免定时任务的重复添加,根据name为主键,若添加重复记录则不修改定时任务文件;
- minute #分
- hour #时
- day #日
- month #月
- weekday #星期
- name #指定需要执行的任务
- state=absent #删除计划任务,ansible只能删除ansible定义的定时任务,本地手动配置的无法使用ansible删除。
- disabled #注释指定的定时任务,但必须配合job使用
实践:
1.远程为172.16.1.31服务器创建一个定时任务“每天1点自动同步时间”;
ansible 172.16.1.31 -m cron -a "name='ntp time every 01:00 a.m' minute=0 hour=1 job='/usr/sbin/ntpdate ntp1.aliyun.com >/dev/null 2>&1'"
2.删除指定定时任务:
ansible 172.16.1.31 -m cron -a "name='ntp time every 01:00 a.m' state=absent"
6.挂载类型模块
mount模块
实现远程挂载;
参数解析:
- src:需要挂载的设备或文件信息
- path:制定目标挂载点
- state:状态信息
 实践:
实践:
1.在批量管理服务器上,远程控制web01服务器,将172.16.1.31(nfs存储服务器)上的/data目录远程挂载到web01服务器的/mnt目录上;
ansible 172.16.1.7 -m mount -a "src=172.16.1.31:/data path=/mnt fstype=nfs state=mounted"
7.用户相关模块
- user模块:
用于对系统用户的管理,用户的创建、删除、家目录、属组等设置;
参数解析: - name:指定用户名称
- uid:指定用户的UID
- group:指定基本用户组
- groups:指定扩展用户组
- create_home:是否创建家目录,默认是yes,当需要创建虚拟用户时,设为no
- shell=/sbin/nologin:指定用户的登录shell
- password:指定用户的登录密码
- state=absent:删除用户
实践:
1.实现批量创建用户oldfather,并设置其uid为6666;
ansible 172.16.1.7 -m user -a “name=oldfather uid=6666”
2.创建用户oldson,并设置其基本组属于oldfather;
ansible 172.16.1.7 -m user -a “name=oldson group=oldfather”
3.创建用户oldmother,并设置其基本组属于oldfather,扩展组属于oldgrandpa;
ansible 172.16.1.7 -m user -a “name=oldmother group=oldfather groups=oldgrandpa”
- 在所有主机上批量创建虚拟用户:
ansible all -m user -a “name=rsync create_home=no shell=/sbin/nologin”
5.给指定用户创建密码
ansible 172.16.1.7 -m user -a “name=oldson password=123456”
![]()
PS:利用ansible的user模块设置密码信息,需要将密码明文转换为密文!
方法:使用python模块
python -c “from passlib.hash import sha512_crypt; import getpass;
print(sha512_crypt.using(rounds=5000).hash(getpass.getpass()))”需要先pip安装passlib模块
yum install -y python-pip
pip install passlib最后将生成的hash密文添加到password后面即可;但务必注意,由于密文中有$符号,在经过shell编译的时候会发生转义,所以将整个-a后的参数,用一对单引号括起来!


六、剧本playbook
0.1什么是剧本?
把所有操作按照ansible编程语法,放在文件里执行就是playbook。
0.2剧本的组成
演员信息=hosts
剧情=tasks
0.3剧本的编写规范
-
合理的缩进(ansible中不建议用tab缩进,建议两个空格表示一个缩进)
-
冒号的使用方法:使用冒号时,后面要加上一个空格!

-
短横线的应用-(列表功能)后面需要空格
同级元素前加上“- ”

1.一键化部署rsync服务
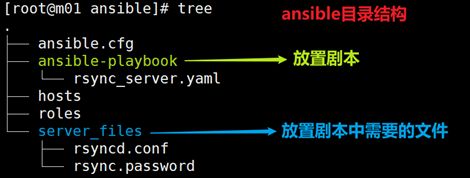
 1.剧本的放置目录:mkdir /etc/ansible/ansible-playbook
2.创建剧本文件:vim rsync_server.yaml
- hosts: 172.16.1.41
  tasks:
    #安装软件
    - name: 01-install rsync
      yum: name=rsync state=installed
------------------------------------------------------------------------
    #在管理端创建rsyncd.conf配置文件,并推到备份服务器的/etc目录下
    - name: 02-create and push rsync configuration file
      copy: src=/etc/ansible/server_files/rsyncd.conf dest=/etc/rsyncd.conf
------------------------------------------------------------------------
    #在备份服务器上远程创建虚拟用户rsync
    - name: 03-create virtual user and group
      user: name=rsync create_home=no shell=/sbin/nologin
------------------------------------------------------------------------
    #创建密码文件并设置其权限
    - name: 04-create password file
      copy: dest=/etc/rsync.password content=rsync_backup:oldboy123 mode=600
------------------------------------------------------------------------
    #创建备份目录并设置其属主属组
    - name: 05-create backup direcory on remote nodes
      file: path=/backup state=directory owner=rsync group=rsync
------------------------------------------------------------------------
    #启动并自启服务
    - name: 06-start service
      service: name=rsyncd state=started enabled=yes

- hosts: 172.16.1.31,172.16.1.7
  tasks:
    #安装软件
    - name: 01-install rsync
      yum: name=rsync state=installed
------------------------------------------------------------------------
    #在用户端创建密码文件并设置权限,实现免交互上传
    - name: 02-create password file to accomplish the no interact push
      copy: content=oldboy123 dest=/etc/rsync.password mode=600
------------------------------------------------------------------------
    #创建测试文件
    - name: 03-create test data
      command: chdir=/tmp/ touch backuptest.txt
------------------------------------------------------------------------
    #客户端实现上传备份
    - name: 04-backup test
      shell: rsync -avz /tmp/backuptest.txt [email protected]::backup --password-file=/etc/rsync.password
3.检查剧本:
ansible-playbook --syntax-check rsync_server.yaml
4.模拟执行剧本:
ansible-playbook -C rsync_server.yaml
5.执行剧本:
ansible-playbook rsync_server.yaml
2.主机清单的配置方法
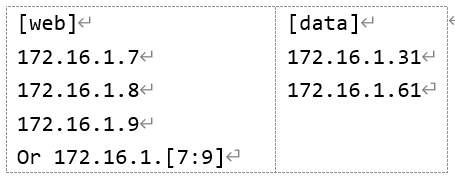
- 分组配置主机信息
操作过程:
e.g.1:
ansible web -a “hostname”
e.g.2:
ansible data -m shell -a “echo helloworld”
- 主机名符号匹配配置(前提:/etc/hosts文件中必须有IP与主机名的对应关系)
[web]
web[01:03] 等同于 172.16.1.[6:9]
- 非标准远程端口配置(适用于SSH端口被修改的情况)
   [web]
	web01:52113 等同于 172.16.1.7:52113
- 主机使用特殊变量信息(适用于没有分发公钥的情况,即使没有将公钥分发给受控端,使用此方式,也可以直接使用ansible)
[web]
172.16.1.7 ansible_ssh_port=22 ansible_ssh_user=root ansible_ssh_pass=123456
- 主机组名嵌入配置
[rsync:children]
rsync_server
rsync_client

[rsync_server]
172.16.1.41

[rsync_client]
172.16.1.31
172.16.1.7

6. 嵌入式变量信息
[web:vars]
ansible_ssh_host=172.16.1.7
ansible_ssh_port=52113
ansible_ssh_user=root
ansible_ssh_pass=123456

[web]
Web01
3.剧本中变量的定义方法
1.直接在剧本文件中编写;【实用】
vars:
  backupdir: /backup
  passfile: rysnc.password
- 如果在剧本中未编写上述vars 变量,可以在命令行中执行变量的定义
ansible-playbook -e backupdir=/backup passfile=rsync.password xxx.yaml
4.剧本中设置注册信息
ansible register捕获命令输出 在playbook中可以使用register将捕获命令的输出保存在临时变量中,然后使用debug模块进行显示输出。
举例,在上述的剧本中,最后一步实现了服务的自启,但是执行完剧本后并没有检验;可以实用netstat -lntup | grep 873命令验证结果;但是命令的输出结果并不会显示在控制端;

可以设置注册信息,结合register捕获,debug输出;

使用register捕获上面shell模块输出的端口信息,并注册到get_server_port变量中。再调用debug模块,将get_server_port中的信息输出
stdout_lines是标准化格式输出,仅为输出整齐美观。

5.剧本中设置判断语句
- 如何指定判断条件:
setup模块:用于收集远程主机的一些基本信息。
E.g.1:收集远程主机的主机名信息:
ansible rsync_client -m setup -a “filter=ansible_hostname”
E.g.2:
	if(rsync_client的角色是nfs)
		touch /tmp/testnfs.txt		--创建/tmp/testnfs.txt文件用作备份测试
		rsync -avz /tmp/testnfs.txt 172.16.1.41::backup –password-file=/etc/{
     {
      passfile }}			--将测试文件上传至备份服务器的backup模块
	if(rsync_client的角色是web)
		touch /tmp/testweb.txt		--创建/tmp/testweb.txt文件用作备份测试
		rsync -avz /tmp/testweb.txt 172.16.1.41::web –password-file=/etc/{
     {
      passfile }}			--将测试文件上传至备份服务器的web模块
- hosts: rsync_client
  tasks:
    - name: create testnfs.txt
      file: dest=/tmp/testnfs.txt state=touch
      when: (ansible_hostname == “nfs01”)
    - name: create testweb.txt
  file: dest=/tmp/testweb.txt state=touch
  when: (ansible_hostname == “web01”)
- name: rsync testnfs.txt to the backup module
  shell: rsync -avz /tmp/testnfs.txt 172.16.1.41::backup –password-file=/etc/{
     {
      passfile }}
  when: (ansible_hostname == “nfs01”)
- name: rsync testweb.txt to the web module
  shell: rsync -avz /tmp/testweb.txt 172.16.1.41::web –password-file=/etc/{
     {
      passfile }}
  when: (ansible_hostname == “web01”)
源码:
[root@m01 ansible-playbook]# cat rsync_server_判断信息.yaml
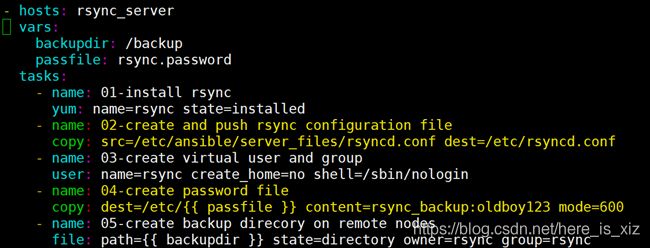
- hosts: rsync_server
vars:
backupdir: /backup
passfile: rsync.password
tasks:
- name: 01-install rsync
yum: name=rsync state=installed
- name: 02-create and push rsync configuration file
copy: src=/etc/ansible/server_files/rsyncd.conf dest=/etc/rsyncd.conf
- name: 03-create virtual user and group
user: name=rsync create_home=no shell=/sbin/nologin
- name: 04-create password file
copy: dest=/etc/{
{
passfile }} content=rsync_backup:oldboy123 mode=600
- name: 05-create backup direcory on remote nodes
file: path={
{
backupdir }} state=directory owner=rsync group=rsync
- name: 06-start service
service: name=rsyncd state=started enabled=yes
- name: 07-check service port info
shell: netstat -lntup | grep 873
register: get_server_port
- name: display port info
debug: msg={
{
get_server_port.stdout_lines }}
- hosts: rsync_client
vars:
passfile: rsync.password
tasks:
- name: 01-install rsync
yum: name=rsync state=installed
- name: 02-create password file to accomplish the no interact push
copy: content=oldboy123 dest=/etc/{
{
passfile }} mode=600
- name: 03-create test file for nfs
file: dest=/tmp/testnfs.txt state=touch
when: (ansible_hostname == "nfs01")
- name: 03-create test file for web
file: dest=/tmp/testweb.txt state=touch
when: (ansible_hostname == "web01")
- name: 04-backup for nfs
shell: rsync -avz /tmp/testnfs.txt [email protected]::backup --password-file=/etc/{
{
passfile }}
when: (ansible_hostname == "nfs01")
- name: 04-backup for web
shell: rsync -avz /tmp/testweb.txt [email protected]::web --password-file=/etc/{
{
passfile }}
when: (ansible_hostname == "web01")
附:setup模块的各种参数 ansible_all_ipv4_addresses:仅显示ipv4的信息。
ansible_devices:仅显示磁盘设备信息。
ansible_distribution:显示是什么系统,例:centos,suse等。
ansible_distribution_major_version:显示是系统主版本。
ansible_distribution_version:仅显示系统版本。
ansible_machine:显示系统类型,例:32位,还是64位。 ansible_eth0:仅显示eth0的信息。
ansible_hostname:仅显示主机名。 ansible_kernel:仅显示内核版本。
ansible_lvm:显示lvm相关信息。 ansible_memtotal_mb:显示系统总内存。
ansible_memfree_mb:显示可用系统内存。 ansible_memory_mb:详细显示内存情况。
ansible_swaptotal_mb:显示总的swap内存。 ansible_swapfree_mb:显示swap内存的可用内存。
ansible_mounts:显示系统磁盘挂载情况。 ansible_processor:显示cpu个数(具体显示每个cpu的型号)。
ansible_processor_vcpus:显示cpu个数(只显示总的个数)。
6.剧本中设置循环语句
当剧本中存在实现类似功能的语句时,可以使用循环来重复执行,以提高效率;如rsync_server.yaml中:创建配置文件和密码文件两个功能可以使用相似的语句实现:
copy:src=/etc/ansible/server_files/rsyncd.conf dest=/etc/ mode=644
copy:src=/etc/ansible/server_files/rsync.password dest=/etc/ mode=600
copy:src=/etc/ansibe/sever_files/{
     {
      item.src }} dest=/etc/ mode={
     {
      item.mode}}
with_items:
  -	{
      src: ‘rsyncd.conf’ , mode: ‘644’}
  -	{
      src: ‘rsync.password’ , mode: ‘600’}
不过,实现此循环时,为了将格式统一,第二条与原语句相比,有了细微变化;原语句使用content将内容直接追加到dest所指的目的目录中;而改后需要现在本地创建一个rsync.password文件,再推到目的主机上。
循环的实现方法在不同的版本的ansible之间存在差异:
[DEPRECATION WARNING]: Invoking “yum” only once while using a loop via
squash_actions is deprecated. Instead of using a loop to supply
multiple items and specifyingname: "{ { item }}", please usename: ['rsync', 'wget', 'cowsay']and remove the loop. This feature will be
removed in version 2.11. Deprecation warnings can be disabled by
setting deprecation_warnings=False in ansible.cfg.

7.剧本中忽略错误语句
默认剧本会检查命令和模块的返回状态,如果遇到错误则中断剧本的执行,可以加入ignore_errors:yes忽略错误
8.剧本中设置标签语句
tags——定义标签,可以指定操作特定的任务
- 指定执行哪个标签任务:
ansible-playbook –tags=t2 xxx.yaml - 跳过指定标签任务:
ansible-playbook –skip-tags=t2 xxx.yaml

9.剧本中设置触发信息
notify: 当被定义的事件发生change后,起到通知作用
handlers: 收到通知后执行的事件
- hosts:rsync_server
  tasks:
    - name: input helloworld to text
  copy: content=helloworld dest=/tmp/text.txt
  notify: restart_crond
  handlers:
  -	name: restart_crond
 	service: name=crond state=restarted
注意:
notify定义在事件的最后;handlers的定义和tasks同级;
handlers中-name的值不可以随便取,必须要和notify通知定义的信息一致;
10.使用剧本一键部署nfs服务
- hosts: nfs
  tasks:
    - name: 01-installing
      yum:
        name: ['nfs-utils','rpcbind']
        state: installed

- hosts: nfs_server
  tasks:
    - name: 02-create virtual user
      user: name=nfsnobody create_home=no shell=/sbin/nologin
    - name: 03-make a directory
      file: dest=/data state=directory owner=nfsnobody group=nfsnobody
    - name: 04-create configuration file
      copy: src=/etc/ansible/server_files/exports dest=/etc/
      notify: restart-nfs
    - name: 05-starting
      service: name={
     {
      item }} state=started enabled=yes
      with_items:
        - nfs
        - rpcbind
  handlers:
    - name: restart-nfs
      service: name=nfs state=restarted

- hosts: nfs_client
  tasks:
    - name: 01-create mount point
      file: dest=/media/data state=directory
    - name: 02-mounting
      mount: src=172.16.1.31:/data path=/media/data fstype=nfs state=mounted
    - name: 03-checking
      shell: df -h | grep /data
      register: get_service_status
    - name: display status
      debug: msg={
     {
      get_service_status.stdout_lines }}
11.剧本合并方法
方法一:2.8之后废除
vim gather.yaml
-	include: rsync_server.yaml
-	include: nfs_server.yaml
方法二:推荐
vim gather.yaml
-	import_playbook: rsync_server.yaml
-	import_playbook: nfs_server.yaml