欢迎访问我的GitHub
这里分类和汇总了欣宸的全部原创(含配套源码): https://github.com/zq2599/blog_demos
本篇概览
- 前文《五分钟搞懂spring-cloud-square》详细介绍了什么是spring-cloud-square,以及三种实现类型的详细概念,爱动手的您已迫不及待想编码体验spring-cloud-square了,本篇咱们就来畅快实战,体验这个spring官方带给我们的smart client
- 如标题所述,接下里咱们会将spring-cloud-square提供的三种client都编码体验,总的来说本篇由以下内容构成:
- 新建maven工程,名为spring-cloud-square-tutorials,这是本篇所有应用的父工程,库版本在此工程中统一管理;
- 创建子工程eureka,作为注册中心
- 创建子工程client,放一些公用的数据结构
- 创建子工程provider,身份是服务提供者,接下来的三个用到spring-cloud-square的子工程,都调用provider的服务
- 创建子工程consumer-okhttp,基于spring-cloud-square的okhttp能力做远程调用
- 创建子工程consumer-retrofit-okhttp,基于spring-cloud-square的retrofit + okhttp能力做远程调用
- 创建子工程consumer-retrofit-webflux,基于spring-cloud-square的retrofit + webflux能力做远程调用
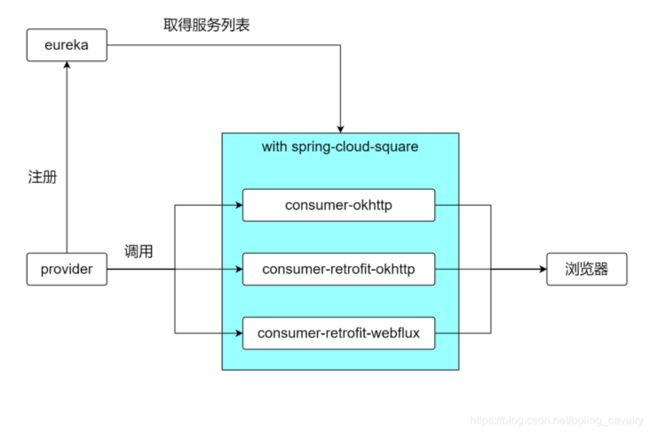
- 上述几个服务的关系如下图:
如何验证
- 代码写完之后,如何验证功能是否符合预期呢?本篇采用单元测试的方式,consumer-okhttp、consumer-retrofit-okhttp、consumer-retrofit-webflux这三个子工程都有自己的单元测试代码,执行通过就意味着代码功能符合预期了
源码下载
- 本篇实战中的完整源码可在GitHub下载到,地址和链接信息如下表所示(https://github.com/zq2599/blo...):
| 名称 | 链接 | 备注 |
|---|---|---|
| 项目主页 | https://github.com/zq2599/blo... | 该项目在GitHub上的主页 |
| git仓库地址(https) | https://github.com/zq2599/blo... | 该项目源码的仓库地址,https协议 |
| git仓库地址(ssh) | [email protected]:zq2599/blog_demos.git | 该项目源码的仓库地址,ssh协议 |
版本信息
- 本篇实战涉及到的主要版本情况如下:
- JDK:1.8.0_291
- IDEA:2021.1.3 (Ultimate Edition)
- maven:3.8.1
- 操作系统:win10 64位
- springboot:2.4.4
- spring-cloud:2020.0.2
- spring-cloud-square:0.4.0-SNAPSHOT
父工程spring-cloud-square-tutorials
- 父工程名为spring-cloud-square-tutorials,其pom.xml如下,除了依赖库的版本在此统一管理,还要注意的是两个仓库的引入(https://repo.spring.io/snapshot和https://repo.spring.io/milestone),引入它们是因为spring-cloud-square还在孵化阶段,没有发布到maven中央仓库:
    4.0.0


        org.springframework.boot
        spring-boot-starter-parent
        2.4.4


    com.bolingcavalry
    spring-cloud-square-tutorials
    1.0-SNAPSHOT


        8
        8
        1.8
        2020.0.2
        0.4.0-SNAPSHOT


    pom
    Demo project for Spring Cloud Square Retrofit Web


        provider
        eureka
        consumer-okhttp
        client
        consumer-retrofit-okhttp
        consumer-retrofit-webflux


                org.springframework.cloud
                spring-cloud-dependencies
                ${spring-cloud.version}
                pom
                import


                org.springframework.cloud
                spring-cloud-dependencies
                ${spring-cloud.version}
                pom
                import


                com.squareup.okhttp3
                okhttp
                3.14.9
                compile


                ch.qos.logback
                logback-classic
                1.1.7


                org.projectlombok
                lombok
                1.16.16


                org.springframework.cloud
                spring-cloud-square-okhttp
                ${square.dependency.version}


                org.springframework.cloud
                spring-cloud-square-retrofit
                ${square.dependency.version}


                org.springframework.cloud
                spring-boot-starter-webflux
                ${square.dependency.version}


                org.springframework.cloud
                spring-cloud-square-retrofit-webclient
                ${square.dependency.version}


                maven-deploy-plugin

                    true


                org.springframework.boot
                spring-boot-maven-plugin


            spring-snapshots
            Spring Snapshots
            https://repo.spring.io/snapshot

                true


            spring-milestones
            Spring Milestones
            https://repo.spring.io/milestone

                false


            spring-snapshots
            Spring Snapshots
            https://repo.spring.io/snapshot

                true


            spring-milestones
            Spring Milestones
            https://repo.spring.io/milestone

                false
注册中心eureka
- eureka应用并没有什么特别之处,pom.xml如下:
        spring-cloud-square-tutorials
        com.bolingcavalry
        1.0-SNAPSHOT

    4.0.0

    eureka


        UTF-8
        com.bolingcavalry.eureka.EurekaApplication


            org.springframework.cloud
            spring-cloud-starter-netflix-eureka-server


                org.springframework.cloud
                spring-cloud-dependencies

                ${spring-cloud.version}
                pom
                import


                org.springframework.boot
                spring-boot-maven-plugin


                            com.netflix.eureka
                            eureka-core


                            com.netflix.eureka
                            eureka-client


                maven-deploy-plugin

                    true
- 中规中矩的配置文件application.yml,端口是8761,后面的应用也要保持一致:
server:
  port: 8761

spring:
  application:
    name: eureka

eureka:
  client:
    registerWithEureka: false
    fetchRegistry: false
  server:
waitTimeInMsWhenSyncEmpty: 0- 启动类EurekaApplication.java,记得用注解EnableEurekaServer开启eureka服务:
package com.bolingcavalry.eureka;

import org.springframework.boot.SpringApplication;
import org.springframework.boot.autoconfigure.SpringBootApplication;
import org.springframework.cloud.netflix.eureka.server.EnableEurekaServer;

@SpringBootApplication
@EnableEurekaServer
public class EurekaApplication {
    public static void main(String[] args) throws Exception {
        SpringApplication.run(EurekaApplication.class, args);
    }
}- eureka应用已经完成,接下来是服务提供者了
服务提供者provider
- -新建名为provider的应用,pom.xml如下,可见是个普通的web工程,会将自己注册到eureka上去:
        spring-cloud-square-tutorials
        com.bolingcavalry
        1.0-SNAPSHOT

    4.0.0

    provider
    jar


            com.bolingcavalry
            client
            ${project.version}


            org.springframework.boot
            spring-boot-starter-web


            org.springframework.cloud
            spring-cloud-context


            org.springframework.cloud
            spring-cloud-starter-netflix-eureka-client


            org.springframework.boot
            spring-boot-starter-test
            test


                org.springframework.boot
                spring-boot-maven-plugin

                    com.bolingcavalry.provider.ProviderApplication


                            repackage
- 配置文件application.yml:
spring:
  application:
    name: provider

server:
  port: 18080

eureka:
  client:
    serviceUrl:
defaultZone: http://localhost:8761/eureka/- 启动类ProviderApplication .java:
package com.bolingcavalry.provider;

import org.springframework.boot.SpringApplication;
import org.springframework.boot.autoconfigure.SpringBootApplication;

@SpringBootApplication
public class ProviderApplication {
    public static void main(String[] args) {
        SpringApplication.run(ProviderApplication.class, args);
    }
}- web服务类,可见对外提供了两个接口hello-str和hello-obj,前者返回字符串,或者返回对象:
package com.bolingcavalry.provider.controller;

import com.bolingcavalry.client.HelloResponse;
import org.springframework.beans.factory.annotation.Autowired;
import org.springframework.cloud.client.ServiceInstance;
import org.springframework.cloud.client.discovery.DiscoveryClient;
import org.springframework.web.bind.annotation.GetMapping;
import org.springframework.web.bind.annotation.RequestParam;
import org.springframework.web.bind.annotation.RestController;
import java.text.SimpleDateFormat;
import java.util.Date;
import java.util.List;
import java.util.Random;

@RestController
public class Hello {

    public static final String HELLO_PREFIX = "Hello World";

    @Autowired
    DiscoveryClient client;

    /**
     * 随机取一个provider实例,返回其描述信息,
     * 如果只有一个provider实例时,返回的就是当前服务信息
     * @return
     */
    private String providerDescription() {
        List instances = client.getInstances("provider");
        ServiceInstance selectedInstance = instances
                .get(new Random().nextInt(instances.size()));

        return String.format("serviceId [%s], host [%s], port [%d]",
                selectedInstance.getServiceId(),
                selectedInstance.getHost(),
                selectedInstance.getPort());
    }

    private String dateStr(){
        return new SimpleDateFormat("yyyy-MM-dd hh:mm:ss").format(new Date());
    }

    @GetMapping("/hello-str")
    public String helloStr() {
        List instances = client.getInstances("provider");
        ServiceInstance selectedInstance = instances
                .get(new Random().nextInt(instances.size()));
        return HELLO_PREFIX
                + " : "
                + providerDescription()
                + ", "
                + dateStr();
    }

    @GetMapping("/hello-obj")
    public HelloResponse helloObj(@RequestParam("name") String name) {
        return new HelloResponse(name, dateStr(), providerDescription());
    }
} - 这个provider应用算是个最朴实无华的web服务了
启动服务
- 现在可以将eureka和provider服务先后启动,这样后面的应用编码完成后可以直接测试
consumer-okhttp,基于spring-cloud-square的okhttp能力
- 接下来要创建的应用consumer-okhttp,使用的是spring-cloud-square三种能力的第一种:okhttp
- pom.xml内容如下,重点是spring-cloud-square-okhttp和spring-cloud-starter-loadbalancer这两个库的引入:
        spring-cloud-square-tutorials
        com.bolingcavalry
        1.0-SNAPSHOT

    4.0.0

    consumer-okhttp
    jar


            com.bolingcavalry
            client
            ${project.version}


            org.springframework.boot
            spring-boot-starter-web


            org.springframework.boot
            spring-boot-starter-test
            test


            org.springframework.boot
            spring-boot-starter-webflux
            test


            org.projectlombok
            lombok


            com.squareup.okhttp3
            okhttp
            compile


            org.springframework.cloud
            spring-cloud-starter-netflix-eureka-client


            org.springframework.cloud
            spring-cloud-square-okhttp
            0.4.0-SNAPSHOT
            compile


            org.springframework.cloud
            spring-cloud-starter-loadbalancer


                org.springframework.boot
                spring-boot-maven-plugin

                    com.bolingcavalry.ConsumerApplication


                            repackage
- 配置文件application.yml,还是常见的那几个配置:应用名、端口、eureka:
spring:
  application:
    name: consumer-okhttp

server:
  port: 18081

eureka:
  client:
    serviceUrl:
defaultZone: http://localhost:8761/eureka/- 启动类:
package com.bolingcavalry.consumer;

import org.springframework.boot.SpringApplication;
import org.springframework.boot.autoconfigure.SpringBootApplication;

@SpringBootApplication
public class OkhttpApplication {
    public static void main(String[] args) {
        SpringApplication.run(OkhttpApplication.class, args);
    }
}- 接下来是重要的配置类OkHttpClientConfig.java,用于实例化OkHttpClient.Builder对象并注册到spring环境:
package com.bolingcavalry.consumer;

import okhttp3.OkHttpClient;
import org.springframework.cloud.client.loadbalancer.LoadBalanced;
import org.springframework.context.annotation.Bean;
import org.springframework.context.annotation.Configuration;

@Configuration
class OkHttpClientConfig{
    @Bean
    @LoadBalanced
    public OkHttpClient.Builder okHttpClientBuilder() {
        return new OkHttpClient.Builder();
    }
}- 然后就可以使用这个Builder来创建OkHttpClient实例了,如下所示,可见入参request的url字段里使用了服务名provider,相当于OkHttpClient内如也能通过服务名取得具体的服务地址,至于是如何获取的,会在后面的文章详细分析,整段代码除了url使用服务名,并没有什么值得关注的地方了,普通的OkHttpClient使用而已:
package com.bolingcavalry.consumer.controller;

import okhttp3.OkHttpClient;
import okhttp3.Request;
import okhttp3.Response;
import org.springframework.beans.factory.annotation.Autowired;
import org.springframework.web.bind.annotation.GetMapping;
import org.springframework.web.bind.annotation.RestController;
import java.io.IOException;

@RestController
public class RemoteHello {
    @Autowired
    private OkHttpClient.Builder builder;

    @GetMapping("/remote-str")
    public String hello() throws IOException {
        // 直接使用服务名
        Request request = new Request.Builder().url("http://provider/hello-str").build();

        // 远程访问
        Response response = builder.build().newCall(request).execute();

        return "get remote response : " + response.body().string();
    }
}- 接下来看看单元测试代码,使用MockMvcRequestBuilders构造http请求,检查返回码和返回内容:
package com.bolingcavalry.consumer.controller;

import com.bolingcavalry.client.Constants;
import lombok.extern.slf4j.Slf4j;
import org.junit.jupiter.api.Test;
import org.springframework.beans.factory.annotation.Autowired;
import org.springframework.boot.test.autoconfigure.web.servlet.AutoConfigureMockMvc;
import org.springframework.boot.test.context.SpringBootTest;
import org.springframework.http.MediaType;
import org.springframework.test.web.servlet.MockMvc;
import org.springframework.test.web.servlet.request.MockMvcRequestBuilders;
import static org.hamcrest.Matchers.containsString;
import static org.springframework.test.web.servlet.result.MockMvcResultHandlers.print;
import static org.springframework.test.web.servlet.result.MockMvcResultMatchers.content;
import static org.springframework.test.web.servlet.result.MockMvcResultMatchers.status;

@SpringBootTest
@AutoConfigureMockMvc
@Slf4j
class RemoteHelloTest {

    @Autowired
    private MockMvc mvc;

    @Test
    void hello() throws Exception {
        String responseString = mvc.perform(MockMvcRequestBuilders.get("/remote-str").accept(MediaType.APPLICATION_JSON))
                .andExpect(status().isOk())
                .andExpect(content().string(containsString(Constants.HELLO_PREFIX)))
                .andDo(print())
                .andReturn()
                .getResponse()
                .getContentAsString();

        log.info("response in junit test :\n" + responseString);
    }
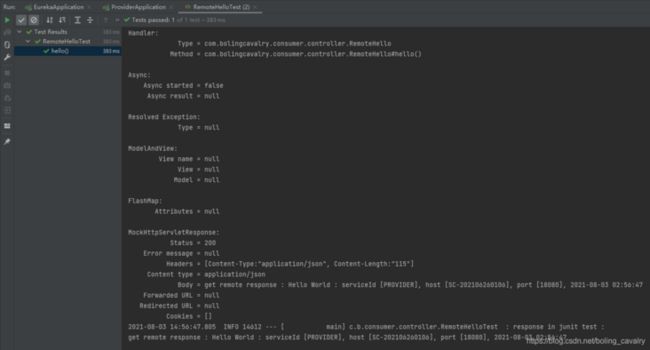
}- 如果eureka和provider都运行起来了,那么此时可以直接运行单元测试类,顺利通过测试,如下图:
consumer-retrofit-okhttp,基于spring-cloud-square的okhttp能力
- 接下来的两个应用都使用了当下热门的retrofit,再搭配Spring Cloud LoadBalance实现服务注册发现,当然了retrofit自身无法完成网络请求处理,要依赖其他库,先看okhttp库的
- 新建应用consumer-retrofit-okhttp,其pom.xml如下,要注意的必须依赖spring-cloud-square-retrofit和spring-cloud-square-okhttp,另外,为了:
        spring-cloud-square-tutorials
        com.bolingcavalry
        1.0-SNAPSHOT

    4.0.0
    consumer-retrofit-okhttp


            com.bolingcavalry
            client
            ${project.version}


            org.springframework.boot
            spring-boot-starter-actuator


            org.springframework.boot
            spring-boot-starter-web


            org.springframework.cloud
            spring-cloud-starter-netflix-eureka-client


            org.springframework.cloud
            spring-cloud-square-retrofit
            0.4.0-SNAPSHOT


            org.springframework.cloud
            spring-cloud-square-okhttp
            0.4.0-SNAPSHOT


            org.springframework.boot
            spring-boot-starter-test
            test


                maven-deploy-plugin

                    true


                org.springframework.boot
                spring-boot-maven-plugin
- 配置文件:
spring:
  application:
    name: consumer-retrofit-okhttp
server:
  port: 18082
eureka:
  client:
    serviceUrl:
defaultZone: http://localhost:8761/eureka/- 启动类:
package com.bolingcavalry.consumer;

import org.springframework.boot.SpringApplication;
import org.springframework.boot.autoconfigure.SpringBootApplication;

@SpringBootApplication
public class RetrofitOkhttpApplication {
    public static void main(String[] args) {
        SpringApplication.run(RetrofitOkhttpApplication.class, args);
    }
}- 配置类,和前一个应用的没啥区别,想想也是,底层可不都是okhttp么:
package com.bolingcavalry.consumer;

import okhttp3.OkHttpClient;
import org.springframework.cloud.client.loadbalancer.LoadBalanced;
import org.springframework.cloud.square.retrofit.EnableRetrofitClients;
import org.springframework.context.annotation.Bean;
import org.springframework.context.annotation.Configuration;

@Configuration
@EnableRetrofitClients
class OkHttpClientConfig{
    @Bean
    @LoadBalanced
    public OkHttpClient.Builder okHttpClientBuilder() {
        return new OkHttpClient.Builder();
    }
}- 接下来,有趣的部分出现了,先定义HelloService.java,里面的注解RetrofitClient指定了对应的服务名provider,在hello方法生,用GET注解指定了provider提供的web接口,而且hello方法的返回值Call
,和provider服务中hello-obj的返回值HelloResponse也是对应的,还有就是hello的入参对应着provider服务中hello-obj的入参,很熟悉吧,确实,和feign太像了:
package com.bolingcavalry.consumer.service;

import com.bolingcavalry.client.HelloResponse;
import org.springframework.cloud.square.retrofit.core.RetrofitClient;
import retrofit2.Call;
import retrofit2.http.GET;
import retrofit2.http.Query;

@RetrofitClient("provider")
public interface HelloService {

    @GET("/hello-obj")
    Call hello(@Query("name") String name);
} - 接下来是调用provider服务中hello-obj接口的代码RemoteHello.java,如下所示,神奇的一幕出现了,刚才咱们只写了HelloService接口,并没有写它的实现,但是通过Autowired注解却能 从spring环境拿到实例直接使用,在hello方法中,并没有见到远程调用的代码,而是执行helloService.hello,就能发起远程调用,拿到provider返回的结果:
package com.bolingcavalry.consumer.controller;

import com.bolingcavalry.client.HelloResponse;
import com.bolingcavalry.consumer.service.HelloService;
import org.springframework.beans.factory.annotation.Autowired;
import org.springframework.web.bind.annotation.GetMapping;
import org.springframework.web.bind.annotation.RequestParam;
import org.springframework.web.bind.annotation.RestController;
import java.io.IOException;

@RestController
public class RemoteHello {
    @Autowired(required = false)
    HelloService helloService;

    @GetMapping("/remote-obj")
    public HelloResponse hello(@RequestParam("name") String name) throws IOException {
        return helloService.hello(name).execute().body();
    }
}- 看到这里,聪明的您一定会觉得欣宸就是个没见过世面的乡巴佬:定义HelloService 接口,无需开发实现类,这玩意在mybatis不就有了嘛,居然敢说"神奇",我觉得您说得对,欣宸确实没见识,大惊小怪的...
- 单元测试类如下,由于返回的是json对象,因此可以用andExpect方法再配合MockMvcResultMatchers,对json进行检查:
package com.bolingcavalry.consumer.controller;

import lombok.extern.slf4j.Slf4j;
import org.junit.jupiter.api.BeforeEach;
import org.junit.jupiter.api.Test;
import org.springframework.beans.factory.annotation.Autowired;
import org.springframework.boot.test.autoconfigure.web.servlet.AutoConfigureMockMvc;
import org.springframework.boot.test.context.SpringBootTest;
import org.springframework.http.MediaType;
import org.springframework.test.web.servlet.MockMvc;
import org.springframework.test.web.servlet.request.MockMvcRequestBuilders;
import org.springframework.test.web.servlet.setup.MockMvcBuilders;
import org.springframework.web.context.WebApplicationContext;

import static org.hamcrest.Matchers.is;
import static org.springframework.test.web.servlet.result.MockMvcResultHandlers.print;
import static org.springframework.test.web.servlet.result.MockMvcResultMatchers.jsonPath;
import static org.springframework.test.web.servlet.result.MockMvcResultMatchers.status;

@SpringBootTest
@AutoConfigureMockMvc
@Slf4j
class RemoteHelloTest {

    private MockMvc mvc;

    @Autowired
    private WebApplicationContext webApplicationContext;

    @BeforeEach
    public void setUp() {
        // 在单元测试的时候,MockHttpServletResponse实例的characterEncoding默认是ISO-8859-1,
        // 得到的字符串打印出来也是乱码,
        // 下面的设置可以解决此问题
        if (null==mvc) {
            mvc = MockMvcBuilders
                    .webAppContextSetup(webApplicationContext)
                    .addFilter((request, response, chain) -> {
                        response.setCharacterEncoding("UTF-8"); // this is crucial
                        chain.doFilter(request, response);
                    }, "/*")
                    .build();
        }
    }

    @Test
    void hello() throws Exception {
        // 请求参数是用户名,实时生成一个
        String name = System.currentTimeMillis() + "程序员A";

        // 请求
        String responseString = mvc.perform(
                MockMvcRequestBuilders
                        .get("/remote-obj")
                        .param("name", name)
                        .accept(MediaType.APPLICATION_JSON)
        )
                .andExpect(status().isOk())                           // 验证状态
                .andExpect(jsonPath("$.name", is(name)))    // 验证json中返回的字段是否含有name
                .andDo(print())
                .andReturn()
                .getResponse()
                .getContentAsString();

        log.info("response in junit test :\n" + responseString);
    }
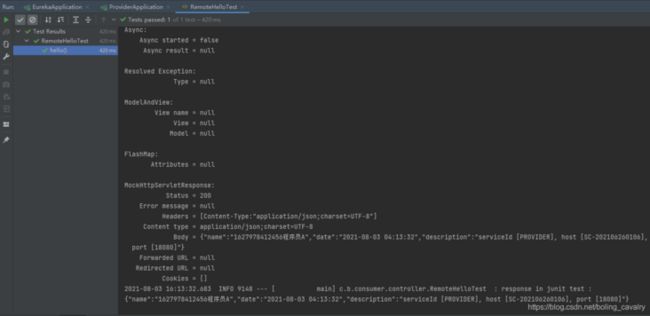
}- 执行单元测试,如下图,顺利通过:
consumer-retrofit-webflux,基于spring-cloud-square的retrofit + webflux
- 最后登场的是consumer-retrofit-webflux,pom.xml如下,依赖库是spring-cloud-square-retrofit + spring-boot-starter-webflux的组合:
        spring-cloud-square-tutorials
        com.bolingcavalry
        1.0-SNAPSHOT

    4.0.0

    consumer-retrofit-webflux


            com.bolingcavalry
            client
            ${project.version}


            org.springframework.boot
            spring-boot-starter-actuator


            org.springframework.boot
            spring-boot-starter-web


            org.springframework.cloud
            spring-cloud-starter-netflix-eureka-client


            org.springframework.cloud
            spring-cloud-square-retrofit
            0.4.0-SNAPSHOT


            org.springframework.cloud
            spring-cloud-square-retrofit-webclient


            org.springframework.boot
            spring-boot-starter-webflux


            org.springframework.boot
            spring-boot-starter-test
            test


                maven-deploy-plugin

                    true


                org.springframework.boot
                spring-boot-maven-plugin
- 配置文件application.yml:
spring:
  application:
    name: consumer-retrofit-webflux

server:
  port: 18083

eureka:
  client:
    serviceUrl:
      defaultZone: http://localhost:8761/eureka/
启动类RetrofitWebfluxApplication.java
package com.bolingcavalry.consumer; import org.springframework.boot.SpringApplication; import org.springframework.boot.autoconfigure.SpringBootApplication; @SpringBootApplication public class RetrofitWebfluxApplication { public static void main(String[] args) { SpringApplication.run(RetrofitWebfluxApplication.class, args); } }- 配置类AppConfiguration.java,使用的注解是EnableRetrofitClients,实例化的Buider对象是WebClient.Builder,和前面的不一样,要格外注意:
package com.bolingcavalry.consumer;

import okhttp3.OkHttpClient;
import org.springframework.cloud.client.loadbalancer.LoadBalanced;
import org.springframework.cloud.square.retrofit.webclient.EnableRetrofitClients;
import org.springframework.context.annotation.Bean;
import org.springframework.context.annotation.Configuration;
import org.springframework.web.reactive.function.client.WebClient;

@Configuration
@EnableRetrofitClients
class AppConfiguration {
    @Bean
    @LoadBalanced
    public WebClient.Builder builder() {
        return WebClient.builder();
    }
}- 接下来是接口定义,注意hello方法的返回值是Mono
,这是weflux风格的返回值,代表异步的0个或一个元素:
package com.bolingcavalry.consumer.service;

import com.bolingcavalry.client.HelloResponse;
import org.springframework.cloud.square.retrofit.core.RetrofitClient;
import reactor.core.publisher.Mono;
import retrofit2.http.GET;
import retrofit2.http.Query;

@RetrofitClient("provider")
public interface HelloService {

    @GET("/hello-obj")
    Mono hello(@Query("name") String name);
} - 最后是单元测试类,和前面的没啥区别:
package com.bolingcavalry.consumer.controller;

import lombok.extern.slf4j.Slf4j;
import org.junit.jupiter.api.BeforeEach;
import org.junit.jupiter.api.Test;
import org.springframework.beans.factory.annotation.Autowired;
import org.springframework.boot.test.autoconfigure.web.servlet.AutoConfigureMockMvc;
import org.springframework.boot.test.context.SpringBootTest;
import org.springframework.http.MediaType;
import org.springframework.test.web.servlet.MockMvc;
import org.springframework.test.web.servlet.request.MockMvcRequestBuilders;
import org.springframework.test.web.servlet.setup.MockMvcBuilders;
import org.springframework.web.context.WebApplicationContext;
import static org.hamcrest.Matchers.is;
import static org.springframework.test.web.servlet.result.MockMvcResultHandlers.print;
import static org.springframework.test.web.servlet.result.MockMvcResultMatchers.jsonPath;
import static org.springframework.test.web.servlet.result.MockMvcResultMatchers.status;

@SpringBootTest
@AutoConfigureMockMvc
@Slf4j
class RemoteHelloTest {

    private MockMvc mvc;

    @Autowired
    private WebApplicationContext webApplicationContext;

    @BeforeEach
    public void setUp() {
        // 在单元测试的时候,MockHttpServletResponse实例的characterEncoding默认是ISO-8859-1,
        // 得到的字符串打印出来也是乱码,
        // 下面的设置可以解决此问题
        if (null==mvc) {
            mvc = MockMvcBuilders
                    .webAppContextSetup(webApplicationContext)
                    .addFilter((request, response, chain) -> {
                        response.setCharacterEncoding("UTF-8"); // this is crucial
                        chain.doFilter(request, response);
                    }, "/*")
                    .build();
        }
    }

    @Test
    void hello() throws Exception {
        // 请求参数是用户名,实时生成一个
        String name = System.currentTimeMillis() + "程序员B";

        // 请求
        String responseString = mvc.perform(
                MockMvcRequestBuilders
                        .get("/remote-obj")
                        .param("name", name)
                        .accept(MediaType.APPLICATION_JSON)
        )
                .andExpect(status().isOk())                           // 验证状态
                .andExpect(jsonPath("$.name", is(name)))    // 验证json中返回的字段是否含有name
                .andDo(print())
                .andReturn()
                .getResponse()
                .getContentAsString();

        log.info("response in junit test :\n" + responseString);
    }
}- 运行单元测试,如下图,顺利通过,并且红框中所示的中文也没有乱码:
- 至此,spring-cloud-square的三种类型,咱们全部编码体验了一遍,聪明的您当然不会只满足于使用它们,接下来文章,咱们就去深入spring-cloud-square源码,研究其实现的细节,欣宸原创,必不会辜负您的期待!
你不孤单,欣宸原创一路相伴
欢迎关注公众号:程序员欣宸
微信搜索「程序员欣宸」,我是欣宸,期待与您一同畅游Java世界...
https://github.com/zq2599/blog_demos


