一文详解Spring Boot的使用
Spring Boot 基础
springboot 是 spring 快速开发脚手架,通过约定大于配置的方式,快速构建和启动 spring 项目 。解决了复杂的配置和混乱的依赖管理。
Spring Boot 特点:
- 快速开发 spring 应用的框架 [ Spring技术栈的大整合 ]
- 内嵌 tomcat 和 jetty容器,不需要单独安装容器,jar包 直接发布一个web应用
- 简化 maven 配置,parent 这种方式,一站式引入需要的各种依赖
- 基于注解的零配置思想
- 和各种流行框架,spring web mvc,mybatis,spring cloud 无缝整合
Spring Boot 基础配置
(1)创建项目
(2)添加依赖
SpringBoot 提供了一个名为 spring-boot-starter-parent 的构件,里面已经对各种常用依赖(并非全部)的版本进行了管理,我们的项目需要以这个项目为父工程,这样我们就不用操心依赖的版本问题了,需要什么依赖,直接引入坐标即可!
<parent>
    <groupId>org.springframework.bootgroupId>
    <artifactId>spring-boot-starter-parentartifactId>
    <version>2.0.0.RELEASEversion>
parent>
(3)添加 web 启动器
为了让 SpringBoot 帮我们完成各种自动配置,我们必须引入 SpringBoot 提供的自动配置依赖,我们称为 启动器 。
<dependency>
    <groupId>org.springframework.bootgroupId>
    <artifactId>spring-boot-starter-webartifactId>
dependency>
自动装配
(4)管理 jdk 版本
修改为自己使用的版本即可
<properties>
    <java.version>11java.version>
properties>
(5)启动类
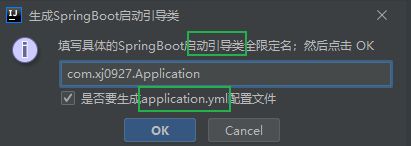
使用 JBLSpringBootAppGen 插件引入 Appliation 启动类和 application.yml 配置文件
@SpringBootApplication
public class Application {

    public static void main(String[] args) {

        SpringApplication.run(Application.class,args);
    }
}
(6)启动 main 线程即可
@SpringBootApplication 注解:
当启动 Application 类,就会完成 IOC 的初始化操作,这个时候就会加载 @SpringBootApplication 注解,这是一个组合注解:
@Target({
     ElementType.TYPE}) //注解位置
@Retention(RetentionPolicy.RUNTIME)//作用域
@Documented
@Inherited
// 以上四个是Java中提供的元注解
@SpringBootConfiguration // 本质上就是一个Configuration注解
@EnableAutoConfiguration // 自动装配的注解
@ComponentScan( //扫描注解(扫描启动类所在包以及子包)
    excludeFilters = {
     @Filter(
    type = FilterType.CUSTOM,
    classes = {
     TypeExcludeFilter.class}
), @Filter(
    type = FilterType.CUSTOM,
    classes = {
     AutoConfigurationExcludeFilter.class}
)}
)
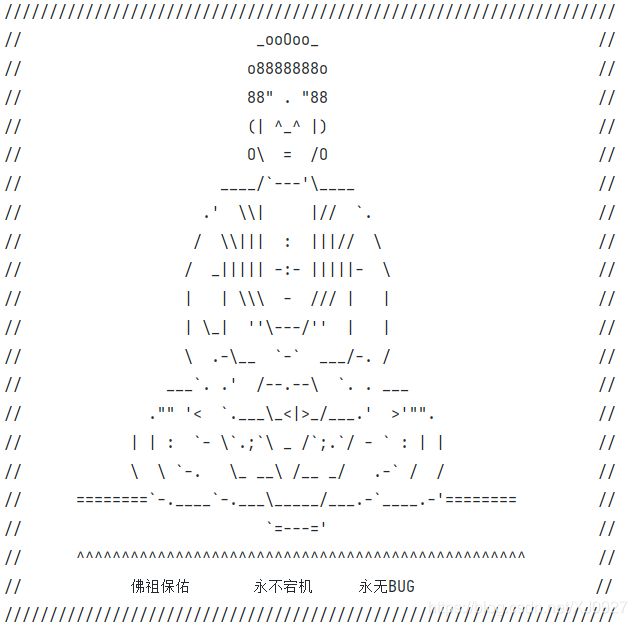
改变banner:
什么是 banner ?
spring Boot启动时显示的字符图案就是banner。
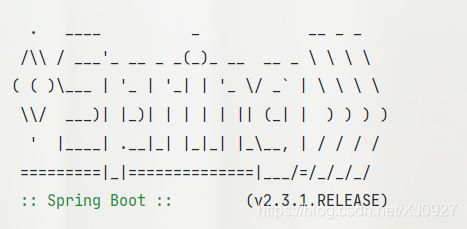
怎么改变?
- 到项目下的 resources 目录下新建一个
banner.txt- 将自己的banner复制到 banner.txt 中
- banner生成网站:https://www.bootschool.net/ascii
Spring Boot整合
Spring MVC整合
(1)修改端口号
在 application.properties 中添加配置,后面就可以使用修改后的端口进行访问了
# 修改端口
server.port=8888
(2)访问静态资源
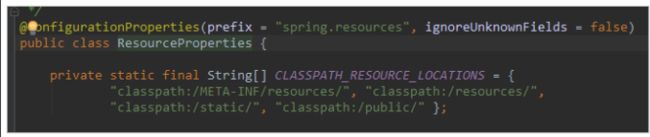
ResourceProperties 的类,里面就定义了静态资源的 默认查找路径:
classpath:/META-INF/resources/classpath:/resources/classpath:/static/classpath:/public只要静态资源放在这些目录中任何一个,SpringMVC 都会帮我们处理。习惯会把静态资源放在
classpath:/resources/static/目录下
比如:

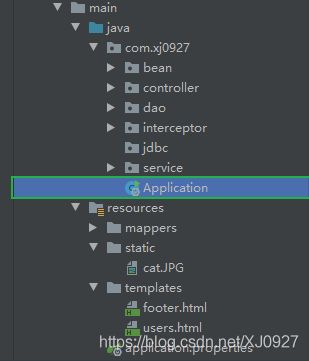
重新启动 Application类 后,直接访问 cat.jpg即可
webapp 目录
在 resources 同级目录下创建一个 webapp目录 ,该目录的类型必须是 ResourcesRoot
(3)添加拦截器
拦截器类:实现
HandlerInterceptor接口
public class LoginInterceptor implements HandlerInterceptor {


    //使用日志对象进行处理
    private Logger logger = LoggerFactory.getLogger(LoginInterceptor.class);

    @Override
    public boolean preHandle(HttpServletRequest request, HttpServletResponse response, Object handler) throws Exception {

        logger.debug("处理器执行前执行!");
        return true;
    }

    @Override
    public void postHandle(HttpServletRequest request, HttpServletResponse response, Object handler, ModelAndView modelAndView) throws Exception {

        logger.debug("处理器执行后执行!");
    }

    @Override
    public void afterCompletion(HttpServletRequest request, HttpServletResponse response, Object handler, Exception ex) throws Exception {

        logger.debug("跳转回执行!");
    }
}
配置
Spring Mvc:实现WebMvcConfigurer接口路径匹配通配符 :
?匹配任何单字符*匹配0或者任意数量的字符/**匹配0或者更多的目录
@Configuration
public class MvcConfig implements WebMvcConfigurer{


    /**
    * @Description:  通过Bean注解,将定义的拦截器注册到Spring容器
    * @Param: []
    * @Return: com.xj0927.interceptor.LoginInterceptor
    * @Author: xj0927
    * @Date Created in 2020/9/28 15:00
    */
    @Bean
    public LoginInterceptor loginInterceptor(){

        return new LoginInterceptor();
    }

    /**
    * @Description: 重写接口中的addInterceptor方法,添加自定义拦截器
    * @Param: [registry]
    * @Return: void
    * @Author: xj0927
    * @Date Created in 2020/9/28 15:01
    */
    @Override
    public void addInterceptors(InterceptorRegistry registry) {

        // 通过registry来注册拦截器,通过addPathPatterns来添加拦截路径
        registry.addInterceptor(this.loginInterceptor()).addPathPatterns("/**");
    }
}
配置日志级别:
默认日志级别为
info以上在
application.properties中进行配置
#设置com.xj0927包的级别为debug
logging.level.com.xj0927=debug
结构如下:

运行查看即可!!!
jdbc整合
环境配置
(1)引入jdbc启动器依赖、MySQL依赖
<dependency>
    <groupId>org.springframework.bootgroupId>
    <artifactId>spring-boot-starter-jdbcartifactId>
dependency>
<dependency>
    <groupId>mysqlgroupId>
    <artifactId>mysql-connector-javaartifactId>
    <version>5.1.46version>
dependency>
(2)配置连接池
在
application.properties中配置,不过后面在结构更简单的yaml格式的application.yml中进行配置
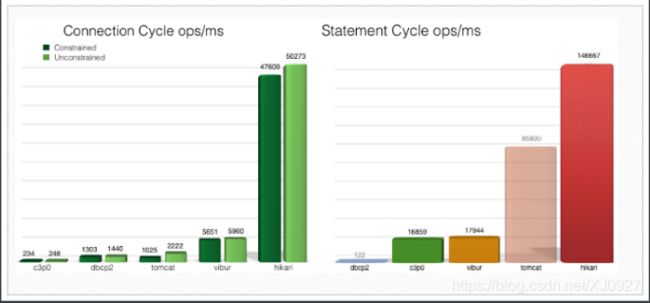
引入jdbc启动器的时候,SpringBoot会自动引入一个连接池HikariCP,相较于之前用的c3p0,
#配置jdbc参数:
spring.datasource.url=jdbc:mysql://localhost:3306/xixi?useUnicode=true&characterEncoding=utf-8&useSSL=false
spring.datasource.username=root
spring.datasource.password=
#下面部分可省略(spring boot可自推断)
spring.datasource.driverClassName=com.mysql.jdbc.Driver
spring.datasource.hikari.idle-timeout=60000
spring.datasource.hikari.maximum-pool-size=30
spring.datasource.hikari.minimum-idle=10
普通mybatis整合
配置环境
(1)引入mybatis启动器
<dependency>
    <groupId>org.mybatis.spring.bootgroupId>
    <artifactId>mybatis-spring-boot-starterartifactId>
    <version>1.3.2version>
dependency>
(2)演示使用
前提:在application.properties配置好数据库连接环境,后面建议使用yaml格式,比较简单。
实体类:
- 字段和属性对应时,会
下划线转驼峰命名
public class User implements Serializable {

    private Long id;

    //自动转换下换线到驼峰命名user_name -> userName
    private String userName;

    private String password;

    private String name;

    private Integer age;

    // 性别,1男性,2女性
    private Integer sex;

    // 出生日期
    private Date birthday;

    // 创建时间
    private Date created;

    // 更新时间
    private Date updated;

    // 备注
    private String note;
}
dao:在一点与tx mayatis和mybatis plus不同,不需要继承Mapper接口
public interface UserDao{

    public List<User> findAll();
}
UserMapper.xml映射文件:在
/resources/mappers文件夹下添加UserMapper.xml文件
- 映射接口中的方法
<mapper namespace="com.xj0927.dao.UserDao">
    <select id="findAll" resultType="com.xj0927.bean.User">
        select * from tb_user
    select>
mapper>
配置
application.properties:
- 别名扫描,配置后
resultType的值就不用写完整路径- 映射文件地址
#mybatis配置:
# mybatis 别名扫描
mybatis.type-aliases-package=com.xj0927.bean
# mapper.xml文件位置,如果没有映射文件,请注释掉
mybatis.mapper-locations=classpath:/mappers/*.xml
启动类
Application:使用
普通mybatis提供的构件即可:org.mybatis.spring.annotation.MapperScan
@SpringBootApplication
@MapperScan("com.xj0927.dao")
public class Application {

    public static void main(String[] args) {

        SpringApplication.run(Application.class,args);
    }
}
另外一种加载接口代理对象的方式,在接口上添加@Mapper注解,但这种方式在接口较多的情况下,每一个都需要添加,比较繁琐,使用上面的方式,直接扫描接口所在的包。
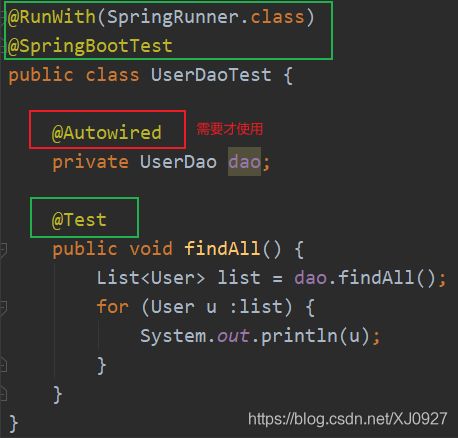
测试:
- 测试需要引入
测试依赖- 测试类上添加
@RunWith(SpringRunner.class)和@SpringBootTest注解- 调用对象上添加
@Autowired注解- 测试的方法上添加
@Test注解
<dependency>
    <groupId>org.springframework.bootgroupId>
    <artifactId>spring-boot-starter-testartifactId>
dependency>
@RunWith(SpringRunner.class)
@SpringBootTest
public class UserDaoTest {


    @Autowired
    private UserDao dao;

    @Test
    public void findAll() {

        List<User> list = dao.findAll();
        for (User u :list) {

            System.out.println(u);
        }
    }
}
tk mybatis 整合
也叫通用mybatis,可以避免重复的CRUD编写。
配置环境
(1)引入启动器依赖
 <dependency>
     <groupId>tk.mybatisgroupId>
     <artifactId>mapper-spring-boot-starterartifactId>
     <version>2.0.2version>
 dependency>
实体类:
- 默认表名 = 类名 字段名 = 属性名
- 使用
@Table(name = "表名")进行表名指定- 使用
@Column(name = "字段名")进行字段指定- 使用
@Transient不进行字段映射
@Table(name = "tb_user")//表名与类不一致时
public class User1 implements Serializable {


    private static final long serialVersionUID = 1L;

    @Id
    @GeneratedValue(strategy = GenerationType.IDENTITY)
    private Long id;

    //自动转换下换线到驼峰命名user_name -> userName
	//@Column(name = "user_name")
    private String userName;

    private String password;

    private String name;

    private Integer age;

    // 性别,1男性,2女性
    private Integer sex;

    // 出生日期
    private Date birthday;

    // 创建时间
    private Date created;

    // 更新时间
    private Date updated;

    // 备注
    private String note;

    @Transient//不进行字段映射
    private String info;
}
dao:继承Mapper接口,不要忘记指定实体对象继承
Mapper后,就继承了Mapper的通用crud方法
public interface UserMapper  extends Mapper<User1> {

        public List<User1> findByUser(User1 user1);
}
(2)配置UserMapper.xml
在/resources/mappers/路径下新建UserMapper.xml文件
<mapper namespace="com.xj0927.dao.UserMapper">
    <select id="findByUser" resultType="com.xj0927.bean.User1">
        SELECT * FROM tb_user
        <where>
            <if test="name != null">
            name like '%${name}%'
            if>
            <if test="note != null">
            or note like '%${note}%'
            if>
        where>
    select>
mapper>
启动类:
此时
@SpringBootApplication使用tx mybatis的构件:tk.mybatis.spring.annotation.MapperScan
@SpringBootApplication
@MapperScan("com.xj0927.dao")//使用tx mybatis时注意换注解
public class Application {

    public static void main(String[] args) {

        SpringApplication.run(Application.class,args);
    }
}
(3)测试
添加
@Test
public void insert(){

    //添加单条数据{是否会使用默认值}
    User1 user1 = new User1();
    user1.setName("麻子");
    user1.setAge(18);
    //        dao.insert(user1);
    dao.insertSelective(user1);
}
删除
@Test
public void delete(){

    //1.根据主键值删除元素
    dao.deleteByPrimaryKey(8);

    //2.根据属性值删除数据
    User1 user1 = new User1();
    user1.setId(9l);
    dao.delete(user1);
}
修改
@Test
public void update(){

    //根据主键值更新
    User1 user1 = new User1();
    user1.setId(9l);
    user1.setName("麻子");
    user1.setAge(15);
    user1.setNote("说明");
    dao.updateByPrimaryKey(user1);
    //        dao.updateByPrimaryKeySelective(user1);
}
查看
 @Test
public void select(){

    //1.根据主键进行查询
    User1 u = dao.selectByPrimaryKey(1);
    System.out.println(u);

    //2.查询所有
    List<User1> list = dao.selectAll();
    list.forEach(System.out::println);

    //3.查询单个数据
    User1 user1 = new User1();
    user1.setName("嘻嘻");
    User1 user2 = dao.selectOne(user1);
    System.out.println(user2);

    //4.根据(属性条件)查询符合条件的总条数
    User1 user3 = new User1();
    user3.setName("张三a");
    int i = dao.selectCount(user3);
    System.out.println(i);
}
Example方法
使用Example方法,加一些限制条件,比如使用Example.selectProperties(属性1,属性2)查询指定字段;
使用example.createCriteria().andLike("name","%a%")模糊查询。
调用crud方法时使用xxxExample(example)即可。
Example example = new Example(User1.class);
example.selectProperties("id","name");
List<User1> list = dao.selectByExample(example);
for (User1 u :list) {

    System.out.println(u);
}
Thymeleaf整合
Thymeleaf是一个跟FreeMarker类似的模板引擎,它可以完全替代JSP。
环境配置
(1)引入启动器
<dependency>
    <groupId>org.springframework.bootgroupId>
    <artifactId>spring-boot-starter-thymeleafartifactId>
dependency>
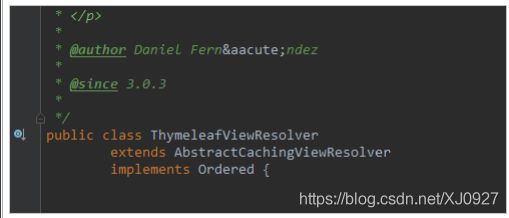
SpringBoot会自动为Thymeleaf注册一个视图解析器:
Thymeleaf也会根据前缀和后缀来确定模板文件的位置:
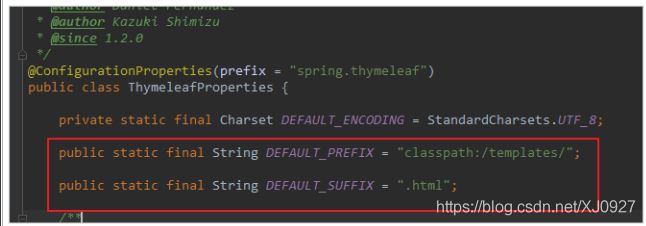
将静态页面文件放入/templates/下,
当通过controller层返回users时,会加上后缀.html,指向users.html文件。
模板缓存
Thymeleaf会在第一次对模板解析之后进行缓存,极大的提高了并发处理能力。但是这给我们开发带来了不便,修改页面后并不会立刻看到效果,我们开发阶段可以关掉缓存使用:
修改页面后按快捷键:
Ctrl + Shift + F9对项目进行rebuild才可以。
# 开发阶段关闭thymeleaf的模板缓存
spring.thymeleaf.cache=false
使用语法
Thymeleaf一款模板引擎,可代替jsp,实现动静结合显示内容。
无网络显示静态内容,有网络用后台得到数据替换静态内容 。
与
SpringBoot完美整合。
表达式
前提:
由controller层储存数据到model attribute中,同时跳转到users[具体路径:resources/templates,由Thymeleaf指定,同时加上后缀.html]
(1)变量表达式
也叫Spring EL表达式,用来获取model attribute中的数据
${session.user.name}
注意:必须使用在th标签之中,这是因为此时渲染到模型中的数据,是采用的Thymeleaf命名空间
<span>${user.id}span>
<span th:text="${user.id}">span>
${user.id}
1
(2)选择(*)表达式
由th:object属性指定object对象,然后使用*{}获取数据
<tr th:each="user : ${users}" th:object="${user}">
同样*{}必须放在th标签之中
<span>*{id}span>
<span th:text="*{id}">span>
*{id}
1
(3)URL表达式
将回话信息添加到url中,
方式一:url表达式 ,使用@{/地址/(参数)}
<a th:href="@{/delete(id=${user.id},name=*{userName})}">deletea>
效果:
http://localhost:8888/delete?id=1&name=zhangsan
方式二:文本替换 ,使用|/地址/参数|
<a th:href="|/update/${user.id}|">updatea>
效果:
http://localhost:8888/update/1
方式三:字符串拼接 ,使用
"`/地址` + 参数"
<a th:href="'/approve/' + ${user.id}">审核a>
效果:
http://localhost:8888/approve/1
常用th标签


(1)条件判断if和unless
if表示条件成立才显示:
<a th:if="*{id > 1}">id大于1才显示a>
unless表示条件不成立才显示:
<a th:unless="*{name == null}">名字不等于空才显示a>
两者结合,使用(if) ? (then) : (else)语法显示
<a th:text="(${user.id} > 1)? '大于':'小于'">a>
(2)for循环
在定义的迭代对象后面加上status[名字自定义]
<tr th:each="user,status: ${list}" th:object="${user}">
status常用属性:
index:当前迭代对象的序号(从0开始)count:当前迭代的序号(从1开始)size:被迭代对象的大小current:当前迭代变量even/odd:布尔值,当前循环是否是偶数/奇数(从0开始计算)first:布尔值,当前循环是否是第一个last:布尔值,当前循环是否是最后一个
<td th:text="${status.index}">td>
<td th:text="${status.count}">td>
<td th:text="${status.size}">td>
<td th:text="${status.current}">td>
<td th:text="${status.index}">td>
<td th:text="${status.even}">td>
(4)内联文本inline
先使用th:inline="text"激活,再使用[[...]]
展示表达式内容:
<td th:inline="text">[[${user.id}]]td>
未展示表达式内容:
<td th:inline="none">[[${user.id}]]td>
(5)内置对象
Thymeleaf提供了一系列Utility对象(内置于Context中),可以通过#直接访问:
常用:
- dates :
java.util.Date**的功能方法类。 - calendars : 类似*#dates*,面向
java.util.Calendar - numbers : 格式化数字的功能方法类
- strings : 字符串对象的功能类,
contains,startWiths,prepending/appending等等。 - objects: 对objects的功能类操作。
bools: 对布尔值求值的功能方法。- arrays:对数组的功能类方法。
- lists: 对
lists功能类方法 - sets
- maps
dates用法:
<td th:text="${#dates.format(#dates.createNow(),'yyyy-MM-dd')}">获取当前日期并进行格式化输出td>
Strings用法:
<span th:text="${#strings.substring(user.name,1,2)}">截取字符串span>
<span th:text="${#strings.length(user.name)}">获得长度span>
<span th:text="${#strings.randomAlphanumeric(2)}">随机字符串span>
<span th:text="${#strings.equals(user.name, 'hello text....')}">比较两个字符串是否相等span>
thymeleaf布局
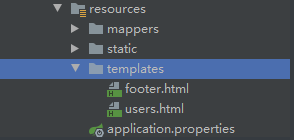
在/resources/templates/目录下创建footer.html:
<html lang="en" xmlns:th="http://www.thymeleaf.org">
<head>
    <meta charset="UTF-8">
    <title>Titletitle>
head>
<body>
    <footer th:fragment="copy(title)">
        © 2020<br>
        <span th:text="${title}">title footerspan>
    footer>
body>
html>
任何地方进行引用都行:
<div th:insert="footer :: copy('哈哈1')">div>
<div th:replace="footer :: copy('哈哈2')">div>
<div th:include="footer :: copy('哈哈3')">div>
在网页中显示的源代码:
<div>
    <footer>
        2020<br>
        <span>哈哈1span>
    footer>
div>

<footer>
    2020<br>
    <span>哈哈2span>
footer>

<div>
    2020<br>
    <span>哈哈3span>
div>
总结:
th:insert:保留自己的主标签,保留th:fragment的主标签。th:replace:不要自己的主标签,保留th:fragment的主标签。th:include:保留自己的主标签,不要th:fragment的主标签。(官方3.0后不推荐)
Mybatis Plus整合
Mybatis-Plus(简称MP)是一个Mybatis的增强工具,在 Mybatis 的基础上只做增强不做改变,避免了我们重复CRUD语句。
添加配置:
(1)引入依赖
<project xmlns="http://maven.apache.org/POM/4.0.0"
         xmlns:xsi="http://www.w3.org/2001/XMLSchema-instance"
         xsi:schemaLocation="http://maven.apache.org/POM/4.0.0 http://maven.apache.org/xsd/maven-4.0.0.xsd">
    <modelVersion>4.0.0modelVersion>

    <groupId>com.xj0927groupId>
    <artifactId>mybatis-plus-demo-quickstartartifactId>
    <version>1.0-SNAPSHOTversion>

    <parent>
        <groupId>org.springframework.bootgroupId>
        <artifactId>spring-boot-starter-parentartifactId>
        <version>2.3.0.RELEASEversion>
        <relativePath/>
    parent>
    <properties>
        <project.build.sourceEncoding>UTF-8project.build.sourceEncoding>
        <project.reporting.outputEncoding>UTF-8project.reporting.outputEncoding>
        <java.version>1.8java.version>
        <mybatisplus.version>3.3.2mybatisplus.version>
        <skipTests>trueskipTests>
    properties>
    <dependencies>
        <dependency>
            <groupId>org.springframework.bootgroupId>
            <artifactId>spring-boot-starterartifactId>
        dependency>
        <dependency>
            <groupId>com.h2databasegroupId>
            <artifactId>h2artifactId>
            <scope>runtimescope>
        dependency>
        <dependency>
            <groupId>com.baomidougroupId>
            <artifactId>mybatis-plus-boot-starterartifactId>
            <version>${mybatisplus.version}version>
        dependency>
        <dependency>
            <groupId>org.assertjgroupId>
            <artifactId>assertj-coreartifactId>
            <scope>testscope>
        dependency>
        <dependency>
            <groupId>org.projectlombokgroupId>
            <artifactId>lombokartifactId>
            <scope>providedscope>
        dependency>
        <dependency>
            <groupId>org.springframework.bootgroupId>
            <artifactId>spring-boot-starter-testartifactId>
            <scope>testscope>
        dependency>
    dependencies>

    <build>
        <plugins>
            <plugin>
                <groupId>org.springframework.bootgroupId>
                <artifactId>spring-boot-maven-pluginartifactId>
            plugin>
        plugins>
    build>

project>
(2)添加配置文件application.yml
yaml格式结构简单,推荐使用
这里使用JBLSpringBootAppGen插件同时引入Appliation启动类和application.yml配置文件
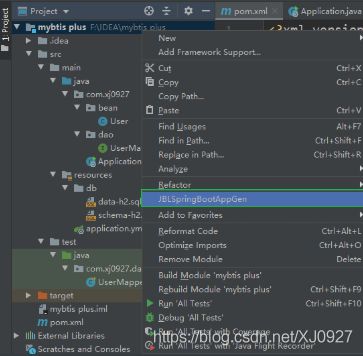
右击项目:选择JBLSpringBootAppGen
演示使用:
这里使用h2基于内存的数据库,此数据库一般测试用,比较方便。
在jvm启动时,自动执行脚本文件加载相应的数据。
(1)建库建表
在resources文件夹下新建文件夹db用于存放数据库表结构文件和表数据文件

schema-h2.sql:表结构文件
DROP TABLE IF EXISTS user1;

CREATE TABLE user1(
    id BIGINT(20) NOT NULL COMMENT '主键ID',
    name VARCHAR(30) NULL DEFAULT NULL COMMENT '姓名',
    age INT(11) NULL DEFAULT NULL COMMENT '年龄',
    email VARCHAR(50) NULL DEFAULT NULL COMMENT '邮箱',
    PRIMARY KEY (id)
);
data-h2.sql:表数据文件
DELETE FROM user1;

INSERT INTO user1(id, name, age, email) VALUES
(1,'lisi', 18, '[email protected]'),
(2,'zhangsan', 20, '[email protected]'),
(3,'wanger', 14, '[email protected]'),
(4,'mazi', 28, '[email protected]');
(2)配置数据库
在application.yml文件中进行配置
注意:名字和值之间有一个空格
#DataSource Config
spring:
  datasource:
    driver-class-name: org.h2.Driver
    #配置数据库表结构
    schema: classpath:db/schema-h2.sql
    #配置数据库表数据
    data: classpath:db/data-h2.sql
    #连接数据库[mem:代表内存,test数据库名字可自定义,账户密码自定义]
    url: jdbc:h2:mem:test
    username: root
    password: 123
#日志输出
logging:
  level:
        com.xj0927: debug
(3)设置类
实体类
@Data //实体类对象
@TableName("user1")//表名与类名不一致时
@Accessors(chain = true)//在set的同时返回对象:便于链式书写
public class User {


//    @TableId("id_")//主键名字不一致
//    @TableId(type = IdType.AUTO)//mysql自增主键策略
    @TableId(type = IdType.ASSIGN_ID)//雪花算法:生成唯一long型的值
    private Long id;

    private String name;
    private Integer age;
    private String email;

    @TableField(exist = false)//表中不存在字段时
    private String info;

//    public  User setId(Long id) {

//        this.id = id;
//        return this;
//    }
}
dao:继承BaseMapper接口(里面包含CRUD方法)
public interface UserMapper extends BaseMapper<User> {
     //指定实体类
}
启动类:添加扫描注解
@MapperScan("接口所在包名")
@SpringBootApplication
@MapperScan("com.xj0927.dao")
public class Application {

    public static void main(String[] args) {

        SpringApplication.run(Application.class, args);
    }
}
测试类:在接口中
ctrl + shift +t进入测试类
@RunWith(SpringRunner.class)
@SpringBootTest
public class UserMapperTest {


    @Autowired //接口对象
    private UserMapper mapper;

    @Test
    public void testSelect1(){

        //调用通用方法进行测试
        List list = mapper.selectList(null);
        list.forEach(System.out::println);
        Assert.assertEquals(4,list.size());//使用断言进行判断
    }
}
内置CRUD
断言使用:
Assert.assertEquals(期待值,结果值);Assert.assertTrue(条件判断);
输出使用:
-
结果集.forEach(System.out::println) -
结果集.forEach( 结果对象 -> {
System.out.println(结果对象);
});
(1)添加
让id自动生成时,在id属性上使用@TableId(type = IdType.ASSIGN_ID)雪花算法生成时,值为long,对应的h2内存数据库的id字段类型为BIGINT
@Test//添加
    public void testInsert(){

        User user = new User();
        user.setName("小红");
        user.setAge(22);
        user.setEmail("[email protected]");
        int result = mapper.insert(user);

        Assert.assertEquals(1,result);
        mapper.selectList(null).forEach(System.out::println);
    }
(2)删除
 @Test
    public void testDelete(){

        //1.根据主键删除
        mapper.deleteById(1);
        mapper.selectList(null).forEach(System.out::println);

//      2.批量删除(使用Wrappers工具类)
//      删除age字段中包含4的数据
        mapper.delete(Wrappers.<User>query().like("age",4));
        mapper.delete(Wrappers.<User>query().gt("age",20));
        mapper.selectList(null).forEach(System.out::println);

        //3.批量删除(直接创建QueryWrapper对象)
        mapper.delete(new QueryWrapper<User>().like("age",4));
        mapper.selectList(null).forEach(System.out::println);

        //4.批量删除(使用lambda表达式调用实体类方法)
        mapper.delete(new QueryWrapper<User>().lambda().like(User::getAge,4));
        mapper.selectList(null).forEach(System.out::println);
    }
(3)修改
如果想要链式设置(set)实体类的属性,可以添加注解@Accessors(chain = true)
效果相当于:
public  User setId(Long id) {
        this.id = id;
        return this;
    }
@Test
    public void testUpdate(){

        //1.根据id修改
        User user = new User();
        user.setId(1l);
        user.setName("小红");
        //修改id为1的数据
        mapper.updateById(user);
        mapper.selectList(null).forEach(System.out::println);

        //2.批量修改(通过setter不需要实体对象)
        mapper.update(null,Wrappers.<User>update().set("age",29).like("id",1));
        mapper.selectList(null).forEach(System.out::println);

        //3.批量修改(通过实体对象)
        mapper.update(new User().setName("李四").setAge(43),Wrappers.<User>update().like("id",1));
        mapper.selectList(null).forEach(System.out::println);
    }
(4)查看
@Test
    public void testSelect(){

        //1.根据id查询
        System.out.println(mapper.selectById(1));

        //2.查询一条数据
        System.out.println(mapper.selectOne(Wrappers.<User>query().eq("age",18)));

        //3.投影查询
        //(只查询指定字段)
        mapper.selectList(Wrappers.<User>query().select("name","age")).forEach(user -> {

            System.out.println(user);
        });
        //查询指定数据
        mapper.selectList(Wrappers.<User>query().eq("age",28)).forEach(user -> {

            System.out.println(user);
        });
    }
分页
内置分页:
(1)设置config类
@Configuration
public class MybatisPlusPageConfig {

    /**
    * @Description: 分页插件
    * @Return: com.baomidou.mybatisplus.extension.plugins.PaginationInterceptor
    * @Author: xj0927
    * @Date Created in 2020/9/29 17:50
    */
    @Bean
    public PaginationInterceptor paginationInterceptor(){

        // 开启count的join优化,只针对left join !!!
        return new PaginationInterceptor().setCountSqlParser(new JsqlParserCountOptimize(true));
    }
}
(2)测试
使用内置分页时,进行查询时需要使用带xxxPage的方法
@Test//baseMapper自带的分页
    public  void testPage(){

        //设置分类规则:参数1表示第几页,参数2表示这页显示数量
        Page<User> page = new Page<>(1,6);

        //1.显示按规则分页后的结果(不加限制条件)
        Page<User> pageResult = mapper.selectPage(page, null);

        //2.显示按规则分页后的结果(加限制条件)
        QueryWrapper<User> w = Wrappers.<User>query().like("age", 2);
        Page<User> pageResult = mapper.selectPage(page, w);

        //总条数
        System.out.println(pageResult.getTotal());
        //当前总页数
        System.out.println(pageResult.getPages());
        //当前页条数
        System.out.println(pageResult.getSize());
    }
自定义xml分页:
(1)创建UserMapper接口
该接口需要继承BaseMapper接口
public interface UserMapper extends BaseMapper<User> {


    /**
    * @Description: 映射的接口方法需要使用@Param定义两个参数:
    *   第1个参数表示分页对象,第2个参数表示分页条件
    * @Param: [page, condition]
    * @Return: com.baomidou.mybatisplus.core.metadata.IPage
    * @Author: xj0927
    * @Date Created in 2020/9/29 18:44
    */
    public IPage<User> selectUserByPage(@Param("p") IPage<User> page, @Param("c") User condition);
}
(2)配置application.yml
#配置mybatis plus
mybatis-plus:
  #别名搜索
  type-aliases-package: com.xj0927.bean
  #加载映射文件
  mapper-locations: classpath:/mappers/*.xml
(3)配置UserMapper.xml映射文件
在resources/mappers文件夹下,创建UserMapper.xml,该文件名一定要与接口名相同
<mapper namespace="com.xj0927.dao.UserMapper">

    <sql id="selectSql">
        SELECT * FROM user1
    sql>

    <select id="selectUserByPage" resultType="com.xj0927.bean.User">
        <include refid="selectSql">include>
        <where>
            <if test="c.age !=null">
                age = #{c.age}
            if>
            <if test="c.email !=null">
                and name like '%${c.name}%'
            if>
        where>
    select>
mapper>
(4)测试
 @Test//自定义xml分页
    public void testPage1(){

        //设置分页规则
        Page<User> page = new Page<>(1,5);

        User user = new User();
        user.setAge(18);
        user.setName("mazi");

        //调用自定义方法
        IPage<User> pr = mapper.selectUserByPage(page, user);

        //总条数
        System.out.println(pr.getTotal());
        //总页数
        System.out.println(pr.getPages());
        //当前页条数
        System.out.println(pr.getSize());
        //当前页数
        System.out.println(pr.getCurrent());
        //分页规则后的所有条数
        List<User> list = pr.getRecords();
        list.forEach(System.out::println);
    }
pageHelper分页:
(1)引入pageHelper依赖
<dependency>
    <groupId>com.github.pagehelpergroupId>
    <artifactId>pagehelperartifactId>
    <version>5.1.11version>
dependency>
(2)设置config类
@Configuration
public class MybatisPlusPageConfig {


    /**
    * @Description: 分页插件
    * @Return: com.baomidou.mybatisplus.extension.plugins.PaginationInterceptor
    * @Author: xj0927
    * @Date Created in 2020/9/29 17:50
    */
    @Bean
    public PaginationInterceptor paginationInterceptor(){

        // 开启 count 的 join 优化,只针对 left join !!!
        return new PaginationInterceptor().setCountSqlParser(new JsqlParserCountOptimize(true));
    }

    //pageHelper的分页插件
    //与上一个分页插件不会冲突
    @Bean
    public PageInterceptor pageInterceptor(){

        return new PageInterceptor();
    }

}
(3)创捷UserMapper接口
public interface UserMapper extends BaseMapper<User> {

        public List<User> selectUserByPage2(User user);
}
(4)配置UserMapper.xml映射文件
<mapper namespace="com.xj0927.dao.UserMapper">
    <sql id="selectSql">
        SELECT * FROM user1
    sql>

    <select id="selectUserByPage2" resultType="com.xj0927.bean.User">
        <include refid="selectSql">include>
        <where>
            <if test="age !=null">
                age = #{age}
            if>
            <if test="name !=null">
                and name like '%${name}%'
            if>
        where>
    select>

mapper>
(5)测试
 @Test
    public void testPage2(){

        //限制条件
        User user = new User();
        user.setAge(28);
        user.setName("mazi");

        //写法一:
        PageInfo<User> page =  PageHelper.startPage(2,5).doSelectPageInfo(() ->{

            mapper.selectUserByPage2(user);
        });

        //写法二:
        //分页规则:参数1表示第几页,参数2表示这页条数
        PageHelper.startPage(2,5);
        PageInfo<User> page1 = new PageInfo<User>(mapper.selectUserByPage2(user));


        List<User> list = page.getList();
        list.forEach(System.out::println);

        //总条数
        System.out.println(page.getTotal());
        //总页数
        System.out.println(page.getPages());
        //当页条数
        System.out.println(page.getSize());
        //每页行数
        System.out.println(page.getPageSize());
        //起始行数
        System.out.println(page.getStartRow());
        //是否是第一页
        System.out.println(page.isIsFirstPage());
        //是否是最后一页
        System.out.println(page.isIsLastPage());
        //是否还有下一页
        System.out.println(page.isHasNextPage());
        //是否还有上一页
        System.out.println(page.isHasPreviousPage());
        //页码列表
        System.out.println(Arrays.toString(page.getNavigatepageNums()));
    }
Servlet整合
方式一:
(1)自定义Servelt类
@WebServlet(name = "servlet_name",urlPatterns = "/first")
public class MyServlet extends HttpServlet {
@Override
protected void doGet(HttpServletRequest req, HttpServletResponse resp) throws ServletException, IOException {
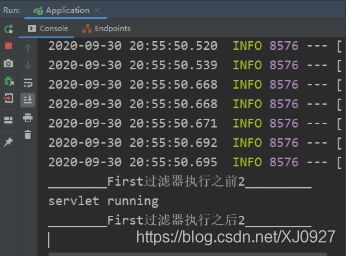
System.out.println("servlet running");
PrintWriter writer = resp.getWriter();
writer.write("success...");
writer.flush();
writer.close();
}
}
(2)启动类中添加@ServletComponentScan()注解
添加后在SpringBoot启动的时候会扫描@WebServlet注解
@SpringBootApplication
@MapperScan("com.xj0927.dao")//这是mabatis的扫描注解,不用管
@ServletComponentScan()//servlet 扫描注解
public class Application {

    public static void main(String[] args) {

        SpringApplication.run(Application.class,args);
    }
}
(3)启动application类测试

方式二:
(1)自定义Servelt类
不添加@WebServlet()注解,放在启动类中实现
public class MyServlet1 extends HttpServlet {

    @Override
    protected void doGet(HttpServletRequest req, HttpServletResponse resp) throws ServletException, IOException {

        System.out.println("servlet running");
        PrintWriter writer = resp.getWriter();
        writer.write("success1...");
        writer.flush();
        writer.close();
    }
}
(2)在启动类application中注册ServletRegistrationBean对象
@SpringBootApplication
@MapperScan("com.xj0927.dao")//mybatis注解
@ServletComponentScan()//servlet 扫描注解
public class Application {
public static void main(String[] args) {
SpringApplication.run(Application.class,args);
}
//注册Servlet对象
@Bean
public ServletRegistrationBean getRegistrationBean(){
// 将要添加的Servlet封装为一个ServletRegistrationBean对象
ServletRegistrationBean reg = new ServletRegistrationBean(new MyServlet1());
// 设置映射信息
reg.setName("servlet_name");
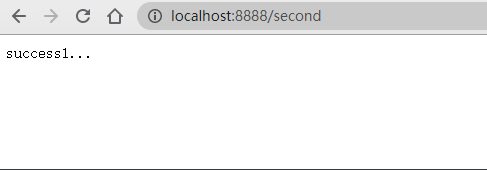
reg.addUrlMappings("/second");
return reg;
}
}
(3)启动application类测试
Filter整合
方式一:
(1)自定义Filter类,在过滤器中添加@WebFilter注解
@WebFilter(urlPatterns = "/second")//需要过滤的请求
public class MyFilter implements Filter {
@Override
public void init(FilterConfig filterConfig) throws ServletException {
System.out.println("----init----");
}
@Override
public void doFilter(ServletRequest servletRequest, ServletResponse servletResponse, FilterChain filterChain) throws IOException, ServletException {
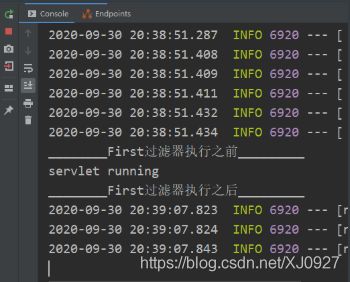
System.out.println("________First过滤器执行之前_________");
filterChain.doFilter(servletRequest,servletResponse);
System.out.println("________First过滤器执行之后_________");
}
@Override
public void destroy() {
System.out.println("----destroy----");
}
}
(2)启动类中加@ServletComponentScan()扫描注解
与整合Servlet时添加的注解相同
@SpringBootApplication
@MapperScan("com.xj0927.dao")//mybatis扫描注解
@ServletComponentScan()//servlet 扫描注解 //Filter扫描注解
public class Application {

    public static void main(String[] args) {

        SpringApplication.run(Application.class,args);
    }
}
(3)启动application类测试
测试前提:一定要有Servlet处理请求
方式二:
(1)自定义Filter类
不添加@WebFilter注解
public class MyFilter1 implements Filter {

    @Override
    public void init(FilterConfig filterConfig) throws ServletException {

        System.out.println("----init2----");
    }

    @Override
    public void doFilter(ServletRequest servletRequest, ServletResponse servletResponse, FilterChain filterChain) throws IOException, ServletException {

        System.out.println("________First过滤器执行之前2_________");
        filterChain.doFilter(servletRequest,servletResponse);
        System.out.println("________First过滤器执行之后2_________");
    }

    @Override
    public void destroy() {

        System.out.println("----destroy2----");
    }
}
(2)在启动类application中注册对象
@SpringBootApplication
@MapperScan("com.xj0927.dao")//tx mybatis扫描注解
@ServletComponentScan()//servlet 扫描注解 //Filter扫描注解
public class Application {

    public static void main(String[] args) {

        SpringApplication.run(Application.class,args);
    }
    //注册Servlet对象
    @Bean
    public ServletRegistrationBean getRegistrationBean(){

        // 将要添加的Servlet封装为一个ServletRegistrationBean对象
        ServletRegistrationBean reg = new ServletRegistrationBean(new MyServlet1());
        // 设置映射信息
        reg.setName("servlet_name");
        reg.addUrlMappings("/second");
        return reg;
    }
}
(3)启动application类测试
Listener整合
方式一:
(1)自定义Listener类,添加注解@WebListener
@WebListener
public class MyListener implements ServletContextListener {

    @Override
    public void contextInitialized(ServletContextEvent servletContextEvent) {

        System.out.println("Listener1 : 初始化了....");
    }

    @Override
    public void contextDestroyed(ServletContextEvent servletContextEvent) {

        System.out.println("Listener1 : 销毁了....");
    }
}
(2)在启动类application中注册FilterRegistrationBean对象
@SpringBootApplication
@MapperScan("com.xj0927.dao")//使用tx mybatis时注意换注解
@ServletComponentScan()//servlet 扫描注解 //Filter扫描注解
public class Application {

    public static void main(String[] args) {

        SpringApplication.run(Application.class,args);
    }


    //注册Servlet对象
    @Bean
    public ServletRegistrationBean getRegistrationBean(){

        // 将要添加的Servlet封装为一个ServletRegistrationBean对象
        ServletRegistrationBean reg = new ServletRegistrationBean(new MyServlet1());
        // 设置映射信息
        reg.setName("servlet_name");
        reg.addUrlMappings("/second");
        return reg;
    }

    //注册Filter对象
    @Bean
    public FilterRegistrationBean getFRegistrationBean(){

        FilterRegistrationBean frb = new FilterRegistrationBean(new MyFilter1());
        frb.addUrlPatterns("/second");
        return frb;
    }
}
方式二:
(1)自定义Listener类
不添加注解@WebListener
public class MyListener2 implements ServletContextListener {

    @Override
    public void contextInitialized(ServletContextEvent servletContextEvent) {

        System.out.println("Listener2 : 初始化了....");
    }

    @Override
    public void contextDestroyed(ServletContextEvent servletContextEvent) {

        System.out.println("Listener1 : 销毁了....");
    }
}
(2)在启动类application中注册ServletListenerRegistrationBean对象
@SpringBootApplication
@MapperScan("com.xj0927.dao")//使用tx mybatis时注意换注解
@ServletComponentScan()//servlet 扫描注解 //Filter扫描注解 //Listener扫描注解
public class Application {

    public static void main(String[] args) {

        SpringApplication.run(Application.class,args);
    }


    //注册Servlet对象
    @Bean
    public ServletRegistrationBean getRegistrationBean(){

        // 将要添加的Servlet封装为一个ServletRegistrationBean对象
        ServletRegistrationBean reg = new ServletRegistrationBean(new MyServlet1());
        // 设置映射信息
        reg.setName("servlet_name");
        reg.addUrlMappings("/second");
        return reg;
    }

    //注册Filter对象
    @Bean
    public FilterRegistrationBean getFRegistrationBean(){

        FilterRegistrationBean frb = new FilterRegistrationBean(new MyFilter1());
        frb.addUrlPatterns("/second");
        return frb;
    }

    //注册Listener对象
    @Bean
    public ServletListenerRegistrationBean getLRegistrationBean(){

        ServletListenerRegistrationBean slr = new ServletListenerRegistrationBean(new MyListener2());
        return slr;
    }
}
Spring Boot文件上传与下载
文件上传:
(1)创建上传的表单
<html lang="en">
<head>
    <meta charset="UTF-8">
    <title>文件上传title>
head>
<body>
    <form action="/upload" method="post" enctype="multipart/form-data">
        <label>photoName:label><input type="text" name="photoName"><br/>
        <label>photo:label><input type="file" name="upload"><br/>
        <input type="submit" value="提交">
    form>
body>
html>
(2)服务端contrtoller处理请求
@RestController("/") //相当于@Controller + @RequestBody
public class MyUploadController {


    @RequestMapping("/upload")
    public String upload(String photoName, MultipartFile upload, HttpServletRequest request) throws IOException {

        System.out.println("photoName:" + photoName + ",文件名称:" + upload.getOriginalFilename());
        String realPath = request.getRealPath("/uploadFile");
        String filename = upload.getOriginalFilename();
        upload.transferTo(new File(realPath,filename));
        return "success";
    }
}
(3)application.properties中配置上传参数
#文件上传设置参数
spring.servlet.multipart.enabled=true
#单个文件上传大小
spring.servlet.multipart.max-file-size=200MB
#一次上传文件总的大小
spring.servlet.multipart.max-request-size=200MB
(4)测试
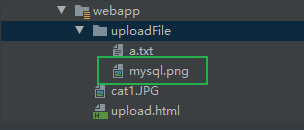
在webapp下新建文件夹uploadFile,并随便创建一个文件a.txt(是什么不重要,有就行),在前端页面选择文件提交上传,成功后,可以在uploadFile下看见该文件
文件下载:
(1)创建上传的表单
这一步的目的主要是告诉服务器,你要下载的文件名称
<html lang="en">
<head>
    <meta charset="UTF-8">
    <title>文件下载title>
head>
<body>
    <form action="/downLoad" method="post" enctype="multipart/form-data">
        <label>name:label><input type="text" name="name">
        <input type="submit" value="下载">
    form>
body>
html>
(2)服务器controller处理请求
@RestController("/") //相当于@Controller + @RequestBody
public class MyUploadDownController {

        @RequestMapping("/downLoad")
    public String down(String name, HttpServletRequest request, HttpServletResponse response) throws UnsupportedEncodingException {

        String realPath = request.getRealPath("/uploadFile");
        //1.要下载的文件地址
        realPath = realPath + "/" + name;
        File file = new File(realPath);
        //2.设置响应的头和客户端保存的文件名
        response.setCharacterEncoding("utf-8");
        response.setContentType("multipart/form-data");
        //attachment 表示以附件的形式响应给客户端
        response.setHeader("Content-Disposition","attachment;fileName=" + file.getName());

        //复制文件
        FileInputStream in = null;
        ServletOutputStream out = null;
        try {

            in = new FileInputStream(file);
            out = response.getOutputStream();
            // 循环读取
            byte[] b = new byte[1024];
            int length = 0;
            while((length = in.read(b)) > 0){

                out.write(b,0,length);
            }
        } catch (FileNotFoundException e) {

            e.printStackTrace();
        } catch (IOException e) {

            e.printStackTrace();
        }finally {

            //关闭流
            try {

                if(in != null){

                    in.close();
                }
                if(out != null){

                    out.flush();
                    out.close();
                }
            } catch (IOException e) {

                e.printStackTrace();
            }
        }
        return "success";
    }
}
(3)测试
输入文件名,即可到服务器指定文件夹下进行查找,然后下载

Spring Boot热部署
(1)什么是SpringBoot热部署?
SpringBoot热部署就是在项目正在运行的时候修改代码, 却不需要重新启动项目。
有了SpringBoot热部署后大大提高了开发效率,因为频繁的重启项目,势必会浪费很多时间, 有了热部署后,不用担心修改代码重启项目了。
(2)SpringBoot热部署的流程
.pom文件中导入spring-boot-devtools依赖:
<dependency>
    <groupId>org.springframework.bootgroupId>
    <artifactId>spring-boot-devtoolsartifactId>
    <scope>runtimescope>
    <optional>trueoptional>
dependency>
pom.xml中添加插件:
<build>
    <plugins>
        <plugin>
            <groupId>org.springframework.bootgroupId>
            <artifactId>spring-boot-maven-pluginartifactId>
            <configuration>
                <fork>truefork>
                <addResources>trueaddResources>
            configuration>
        plugin>
    plugins>
build>
设置
application.properties:
#配置项目热部署
spring.devtools.restart.enabled=true
在
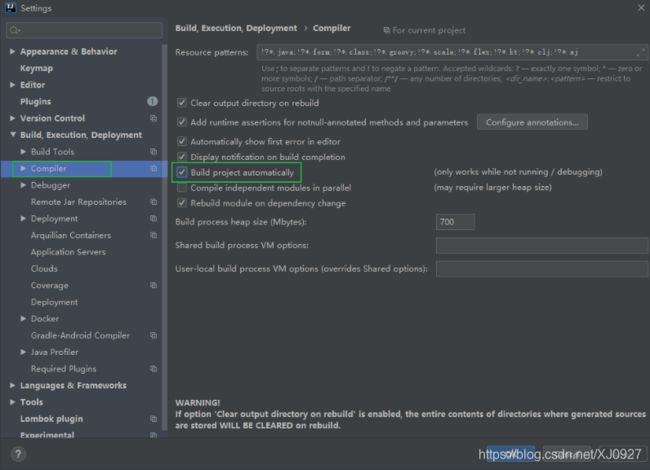
idea中设置自动编译:ctrl+alt+s打开设置(Other Settings的设置是对整个工作空间项目都启作用,而Settings的设置是对整个项目启作用),搜索Compliler,勾选Build project automatically
按住
ctrl + shift + alt + /,出现如下图所示界面,点击Registry:
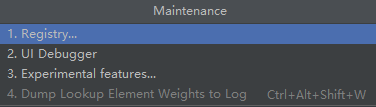
点击进入后,勾选
compiler.automake.allow.when.app.running后关闭即可

通过以上步骤,就完成了SpringBoot项目的热部署功能!!!
(3)对热部署测试是否成功:
@RestController
public class HotAutoController {


    @RequestMapping("/index")
    public String index() {

        return "helloworld!";
    }
}
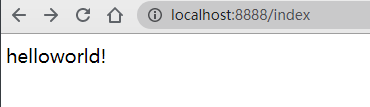
启动项目,通过浏览器输入地址:http://localhost:8888/index 【端口号选择你使用的】
结果如下:
新加请求,在不重新启动项目的情况下测试热部署是否配置成功:
@RestController
public class HotAutoController {


    @RequestMapping("/index")
    public String index() {

        return "helloworld!";
    }

    @RequestMapping("/say")
    public String say(){

        return "I love Java!";
    }
}
测试新加请求是否成功,浏览器输入http://localhost:8080/say后结果如下:

SpringBoot中的异常处理
1. 自定义错误页面:
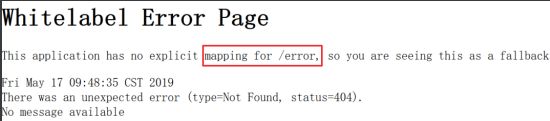
SpringBoot默认的处理异常的机制:SpringBoot默认的已经提供了一套处理异常的机制。
一旦程序中出现了异常 SpringBoot会向/error的url发送请求。在 springBoot中提供了一个叫 BasicExceptionController 来处理/error 请求,然后跳转到默认显示异常的页面来展示异常信息:
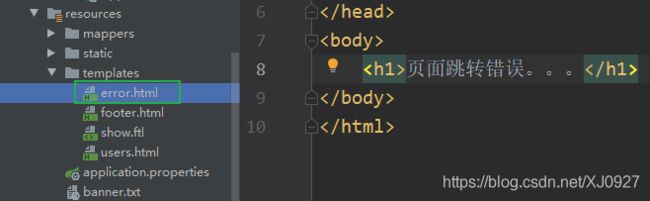
只需要在resources/templates中添加一个error.html页面即可:
随便写一个错误请求,进行测试:

2.@ExceptionHandler处理:
- 针对特定的异常处理
- 异常处理代码和业务代码耦合性比较强
Controller类:
@RestController
public class ExceptionHandlerController {

    //请求1:模拟NullPointerException异常
    @RequestMapping("/show1")
    public String show1(){

        String msg = null;
        msg.length(); //NullPointerException
        return "success";
    }
    /**
    * @Description: 如果当前类中出现了NullPointerException异常就会跳转到本方法对应的view中
    */
    @ExceptionHandler(value = {
     NullPointerException.class})
    public ModelAndView nullPointerException(Exception e){

        ModelAndView view = new ModelAndView();
        //处理的异常请求
        view.addObject("error",e.toString());
        //处理异常的页面
        view.setViewName("error1");
        return view;
    }

    //请求2:模拟ArithmeticException异常
    @RequestMapping("/show2")
    public String show2(){

        int i = 0;
        int b = 100;
        System.out.println(b/i); // ArithmeticException
        return "success";
    }

    /**
     * 如果当前类中出现了ArithmeticException异常就会跳转到本方法对应的view中
     */
    @ExceptionHandler(value = {
     ArithmeticException.class})
    public ModelAndView arithmeticException(Exception e){

        ModelAndView view = new ModelAndView();
        view.addObject("error",e.toString());
        view.setViewName("error2");
        return view;
    }
}
对应的错误处理页面:
分别请求/show1和/show2时,出现异常,跳转到对应页面。
3.@ControllerAdvice处理 :
@ControllerAdvice,它是一个Controller增强器,可对controller中被@RequestMapping注解的方法加一些逻辑处理。最常用的就是异常处理。
需要配合@ExceptionHandler使用。当将异常抛到controller时,可以对异常进行统一处理,规定返回的json格式或是跳转到一个错误页面
自定义异常MyException:
@Data
public class MyException extends RuntimeException{

        private long code;//错误代码
        private String msg;//错误信息

        public MyException(long code, String msg) {

                this.msg = msg;
                this.code = code;
        }
        public MyException(String message) {

                super(message);
        }
}
发生自定义异常后的逻辑处理:
使用
@ControllerAdvice实现业务代码和系统异常处理代码解耦
@ControllerAdvice //全局异常捕捉处理
public class AdviceException {


    @ExceptionHandler(value = {
     MyException.class})
    public ModelAndView MyExceptionHandler(MyException e){

        ModelAndView view = new ModelAndView();
        view.addObject("code",e.getCode());
        view.addObject("msg",e.getMsg());
        //发生异常后跳转的页面
        view.setViewName("error1");
        return view;
    }
}
错误页面:

Controller层:(模拟请求访问时,出现自定义异常)
@RestController
public class ExceptionController {

    @RequestMapping("/test1")
    public String testException() throws Exception{

        throw new MyException(403,"页面错误");
    }
}
测试:访问http://localhost:8888/test1

4.SimpleMappingExceptionResolver处理:
通过系统提供的异常映射处理实现
SimpleMappingExceptionResolver处理的方法中进行地址映射即可
在处理类application中进行对应异常的地址映射:
@SpringBootApplication
@MapperScan("com.xj0927.dao")//mybatis 扫描注解
@ServletComponentScan()//servlet 扫描注解 //Filter扫描注解 //Listener扫描注解
public class Application {

    public static void main(String[] args) {

        SpringApplication.run(Application.class,args);
    }

    /**
     * 异常信息和对应的 处理地址的 映射
     * @return
     */
    @Bean
    public SimpleMappingExceptionResolver getSimpleMappingExceptionResolver(){


        SimpleMappingExceptionResolver mapping = new SimpleMappingExceptionResolver();
        //不同异常跳转不同页面
        Properties p = new Properties();
        p.setProperty("java.lang.NullPointerException","error3");
        p.setProperty("java.lang.ArithmeticException","error4");

        mapping.setExceptionMappings(p);
        return mapping;
    }
}
错误页面:

5.自定义HandlerExceptionResolver全局异常:
只要发生自定义类里面的异常就进行相应的跳转处理。添加
@Component与实现HandlerExceptionResolver
@Component
public class MyHandlerExceptionResolver implements HandlerExceptionResolver {

    @Override
    public ModelAndView resolveException(HttpServletRequest httpServletRequest, HttpServletResponse httpServletResponse, Object o, Exception e) {

        System.out.println("全局的自定义异常处理触发了....");
        ModelAndView model = new ModelAndView();
        if(e instanceof  NullPointerException){

            //跳转页面
            model.setViewName("error5");
            model.addObject("error","空指针异常");
        }else if(e instanceof  ArithmeticException){

            //跳转页面
            model.setViewName("error6");
            model.addObject("error","算数异常");
        }
        return model;
    }
}
SpringBoot中的单元测试
(1)添加spring-boot-starter-test依赖
     org.springframework.boot
     spring-boot-starter-test
     test
(2)在所需测试的类中 ctrl + shift + t进入测试类

(3)测试类中添加注解(绿色部分)
Freemarker整合【未完成】
FreeMarker是一个基于 Java的模板引擎,最初专注于使用 MVC软件架构进行动态网页生成。使用Freemarker 的主要优点是表示层和业务层的完全分离。程序员可以处理应用程序代码,而设计人员可以处理 html 页面设计。最后使用freemarker 可以将这些结合起来,给出最终的输出页面。

环境配置
(1)添加依赖
<dependency>
    <groupId>org.springframework.bootgroupId>
    <artifactId>spring-boot-starter-freemarkerartifactId>
dependency>
【待补充。。。】