2021-03-15零基础入门数据挖掘-心跳信号分类预测
零基础入门数据挖掘-心跳信号分类预测TASK01
- 一、赛题理解
-
- 1.赛题理解
- 2.赛题数据
- 3.评分标准
- 二、baseline学习
-
- 1.导入第三方包:
- 2.读取数据
- 3.数据预处理
-
- 3.1减少内存占用
- 3.2简单预处理
- 4.训练数据/测试数据准备
- 5.模型训练
-
- 5.1
- 5.2cv模型
- 5.3lgb模型
- 5.4
一、赛题理解
1.赛题理解
本次赛题需根据 心电图感应数据 预测 心跳信号所属类别。
是一个多分类问题:
- 正常
- 心律不齐
- 心肌梗塞
- 等
2.赛题数据
字段表:
| field | description |
|---|---|
| id | 为心跳信号分配的唯一标识 |
| heartbeat_signals | 心跳信号序列 |
| label | 心跳信号类别(0\1\2\3) |

3.评分标准
共有4种不同的心跳信号。预测的概率与真实值差值的绝对值越小越好。
计算公式:
针对某一个信号,若真实值为 [ y 1 , y 2 , y 3 , y 4 ] [y_1,y_2,y_3,y_4] [y1,y2,y3,y4],模型预测概率值为 [ a 1 , a 2 , a 3 , a 4 ] [a_1,a_2,a_3,a_4] [a1,a2,a3,a4],则该模型的平均指标 ( a b s − s u m ) (abs-sum) (abs−sum)为:
a b s − s u m = ∑ j = 1 n ∑ i = 1 4 ∣ y i − a i ∣ abs-sum = \sum_{j = 1}^n \sum_{i=1}^4 |y_i - a_i| abs−sum=j=1∑ni=1∑4∣yi−ai∣
其中,n是样本总数,j是样本的index。
二、baseline学习
1.导入第三方包:
import os#operation system
import gc#gabbage collection
import math

import pandas as pd
import numpy as np

import lightgbm as lgb
import xgboost as xgb
from catboost import CatBoostRegressor
from sklearn.linear_model import SGDRegressor, LinearRegression, Ridge#回归
from sklearn.preprocessing import MinMaxScaler#数据归一化


from sklearn.model_selection import StratifiedKFold, KFold#生成交叉验证数据集
from sklearn.metrics import log_loss
from sklearn.model_selection import train_test_split
from sklearn.preprocessing import OneHotEncoder

from tqdm import tqdm
import matplotlib.pyplot as plt
import time
import warnings
warnings.filterwarnings('ignore')
以上各种包的简单介绍如下:
| 模块 | 介绍 |
|---|---|
| os | 与操作系统交互 |
| gc | 依靠garbage collector模块的引用计数技术来进行垃圾回收 |
| math | 一些标准数学函数 |
| pandas | 包含高性能、数据结构和数据分析工具的库 |
| numpy | (Numerical Python) 是 Python 语言的一个扩展程序库,支持大量的维度数组与矩阵运算,此外也针对数组运算提供大量的数学函数库。 |
| lightgbm | (Light Gradient Boosting Machine)是微软的开源分布式高性能Gradient Boosting框架,使用基于决策树的学习算法。 |
| xgboost | Extreme Gradient Boost本质上还是GBDT,但是力争把速度和效率发挥到极致 |
| catboost | CatBoost是Yandex最近开发的一种开源机器学习算法。它可以很容易地与谷歌的TensorFlow和苹果的核心ML等深度学习框架集成。它可以处理各种数据类型,如音频、文本、图像(包括历史数据)。帮助解决当今企业面临的各种问题。最重要的是,它提供了强大的准确性。 |
| sklearn.linear_model | 线性模型,有一些回归的函数和类 |
| sklearn.preprocessing | 数据预处理 |
| sklearn.model_selection | 这个模块主要是对数据的分割,以及与数据划分相关的功能。 |
| sklearn.metrics | 是sklearn用来做模型评估的重要模块,提供了各种评估度量 |
| tqdm | tqdm是Python中专门用于进度条美化的模块,通过在非while的循环体内嵌入tqdm,可以得到一个能更好展现程序运行过程的提示进度条 |
| matplotlib.pyplot | 二维绘制库 |
| time | 这个模块提供各种与时间相关的函数 |
| warnings | Python 通过调用 warnings 模块中定义的 warn() 函数来发出警告。警告消息通常用于提示用户一些错误或者过时的用法,当这些情况发生时我们不希望抛出异常或者直接退出程序。警告消息通常写入 sys.stderr,对警告的处理方式可以灵活的更改,例如忽略或者转变为为异常。警告的处理可以根据警告类别,警告消息的文本和发出警告消息的源位置而变化。对相同源位置的特定警告的重复通常被抑制。 |
2.读取数据
path1 = r'D:\python\JupyterNotebookFile\train.csv'
train = pd.read_csv(path1)
train.head()
path2 = r'D:\python\JupyterNotebookFile\testA.csv'
test=pd.read_csv(path2)
test.head()
3.数据预处理
3.1减少内存占用
def reduce_mem_usage(df):
    start_mem = df.memory_usage().sum() / 1024**2
    print('Memory usage of dataframe is {:.2f} MB'.format(start_mem))

    for col in df.columns:
        col_type = df[col].dtype

        if col_type != object:
            c_min = df[col].min()
            c_max = df[col].max()
            if str(col_type)[:3] == 'int':
                if c_min > np.iinfo(np.int8).min and c_max < np.iinfo(np.int8).max:
                    df[col] = df[col].astype(np.int8)
                elif c_min > np.iinfo(np.int16).min and c_max < np.iinfo(np.int16).max:
                    df[col] = df[col].astype(np.int16)
                elif c_min > np.iinfo(np.int32).min and c_max < np.iinfo(np.int32).max:
                    df[col] = df[col].astype(np.int32)
                elif c_min > np.iinfo(np.int64).min and c_max < np.iinfo(np.int64).max:
                    df[col] = df[col].astype(np.int64)
            else:
                if c_min > np.finfo(np.float16).min and c_max < np.finfo(np.float16).max:
                    df[col] = df[col].astype(np.float16)
                elif c_min > np.finfo(np.float32).min and c_max < np.finfo(np.float32).max:
                    df[col] = df[col].astype(np.float32)
                else:
                    df[col] = df[col].astype(np.float64)
        else:
            df[col] = df[col].astype('category')

    end_mem = df.memory_usage().sum() / 1024**2
    print('Memory usage after optimization is: {:.2f} MB'.format(end_mem))
    print('Decreased by {:.1f}%'.format(100 * (start_mem - end_mem) / start_mem))

    return df
这里定义了一个减少内存使用的函数。把df的所有列迭代一遍,修改数据类型来减少内存。此方法可以减少60%至75%的内存占用。
这个方法是通过把数据分为int和float,
把int详细分为int8/int16/int32/int64;
把float详细分为float16/float32.
这个方法的缺点是会损失数据精度。
代码的bug是:
df[col] = df[col].astype("category")
会导致无法使用fillna函数,直接报错。因为fillna主要是针对object对象的,不能直接针对category对象。所以填充工作必须在节省内存的前面。
补充:
Python3 的六个标准数据类型中:
- 不可变数据(3 个):Number(数字)、String(字符串)、Tuple(元组);
- 可变数据(3 个):List(列表)、Dictionary(字典)、Set(集合)。
Number中,Python3 支持 int、float、bool、complex(复数)。
3.2简单预处理
train_list = []#定义一个列表

for items in train.values:
    train_list.append([items[0]] + [float(i) for i in items[1].split(',')] + [items[2]])

train = pd.DataFrame(np.array(train_list))
train.columns = ['id'] + ['s_'+str(i) for i in range(len(train_list[0])-2)] + ['label']
train = reduce_mem_usage(train)

test_list=[]
for items in test.values:
    test_list.append([items[0]] + [float(i) for i in items[1].split(',')])

test = pd.DataFrame(np.array(test_list))
test.columns = ['id'] + ['s_'+str(i) for i in range(len(test_list[0])-1)]
test = reduce_mem_usage(test)
这部分是对训练集和测试集数据做了相同的处理:
- 把heartbeat_signals中的数据以“,”全部分割开
- 将数据由列表转为dataframe格式
- 给df新的列名
- 减少内存占用处理
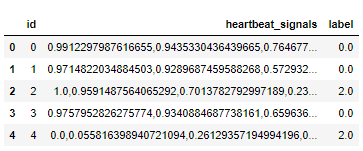
可以看到处理后的train为:

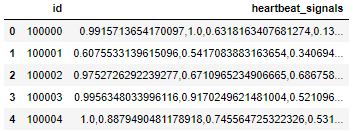
处理后的test为:

4.训练数据/测试数据准备
x_train = train.drop(['id','label'], axis=1)
y_train = train['label']
x_test=test.drop(['id'], axis=1)
把train中的心跳信号全部给x_train,把train中的label给y_train,把test数据集中的id列丢掉。
补充:axis:
- 使用0值表示沿着每一列或行标签\索引值向下执行方法
- 使用1值表示沿着每一行或者列标签模向执行对应的方法
5.模型训练
5.1
def abs_sum(y_pre,y_tru):
    y_pre=np.array(y_pre)
    y_tru=np.array(y_tru)
    loss=sum(sum(abs(y_pre-y_tru)))
    return loss
这个是按照比赛的评价标准来的计算公式函数,算预测值与实际值的差值的绝对值再求和。
5.2cv模型
def cv_model(clf, train_x, train_y, test_x, clf_name):
folds = 5
seed = 2021
kf = KFold(n_splits=folds, shuffle=True, random_state=seed)
test = np.zeros((test_x.shape[0],4))
cv_scores = []
onehot_encoder = OneHotEncoder(sparse=False)
for i, (train_index, valid_index) in enumerate(kf.split(train_x, train_y)):
print('************************************ {} ************************************'.format(str(i+1)))
trn_x, trn_y, val_x, val_y = train_x.iloc[train_index], train_y[train_index], train_x.iloc[valid_index], train_y[valid_index]
if clf_name == "lgb":
train_matrix = clf.Dataset(trn_x, label=trn_y)
valid_matrix = clf.Dataset(val_x, label=val_y)
params = {
'boosting_type': 'gbdt',
'objective': 'multiclass',
'num_class': 4,
'num_leaves': 2 ** 5,
'feature_fraction': 0.8,
'bagging_fraction': 0.8,
'bagging_freq': 4,
'learning_rate': 0.1,
'seed': seed,
'nthread': 28,
'n_jobs':24,
'verbose': -1,
}
model = clf.train(params,
train_set=train_matrix,
valid_sets=valid_matrix,
num_boost_round=2000,
verbose_eval=100,
early_stopping_rounds=200)
val_pred = model.predict(val_x, num_iteration=model.best_iteration)
test_pred = model.predict(test_x, num_iteration=model.best_iteration)
val_y=np.array(val_y).reshape(-1, 1)
val_y = onehot_encoder.fit_transform(val_y)
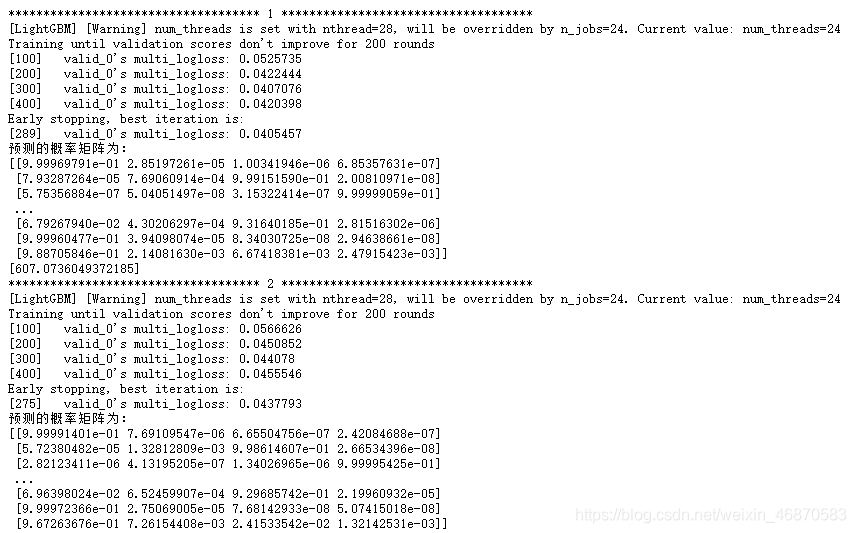
print('预测的概率矩阵为:')
print(test_pred)
test += test_pred
score=abs_sum(val_y, val_pred)
cv_scores.append(score)
print(cv_scores)
print("%s_scotrainre_list:" % clf_name, cv_scores)
print("%s_score_mean:" % clf_name, np.mean(cv_scores))
print("%s_score_std:" % clf_name, np.std(cv_scores))
test=test/kf.n_splits
return test
关于上面程序中的几个函数:
- KFold(K折交叉验证函数)
KFold(n_splits=’warn’, shuffle=False, random_state=None)
参数:
| 参数 | 介绍 |
|---|---|
| n_splits | 将训练集分为 n 份,n份数据,每一份都要作为作为一次验证集来验证训练的结果,一共 n 次循环,其余n-1份数据作为训练集进行训练。 |
| shuffle | 表示是否打乱划分,默认False,即不打乱。bool类型数据 |
| random_state | 表示是否固定随机起点,Used when shuffle == True. |
- OneHotEncoder
独热码,在英文文献中称做 one-hot code, 又称独热编码、一位有效编码,直观来说就是有多少个状态就有多少比特,而且只有一个比特为1,其他全为0的一种码制。
在 sklearn 包中,OneHotEncoder 函数非常实用,它可以实现将分类特征的每个元素转化为一个可以用来计算的值。
其方法是使用N位状态寄存器来对N个状态进行编码,每个状态都有它独立的寄存器位,并且在任意时候,其中只有一位有效。
OneHotEncoder(n_values=’auto’, categorical_features=’all’, dtype=<class ‘numpy.float64’>, sparse=True, handle_unknown=’error’)
参数
| 参数 | 介绍 |
|---|---|
| n_values | 表示每个特征使用几维的数值由数据集自动推断,即几种类别就使用几位来表示。当然也可以自己指定 |
| categorical_features | categorical_features = ‘all’,这个参数指定了对哪些特征进行编码,默认对所有类别都进行编码。也可以自己指定选择哪些特征,通过索引或者 bool 值来指定 |
| dtype | 表示编码数值格式,默认是浮点型。 |
| sparse | 默认sparse参数为True,编码后返回的是一个稀疏矩阵的对象,如果要使用一般要调用toarray()方法转化成array对象。若将sparse参数设置为False,则直接生成array对象,可直接使用 |
| handle_unknown | 这个参数的目的是数据在转化为one-hot编码时,如果遇到一个属性值没有事先指定,程序应该怎么办?如果是error的话,程序就报错停止了,其实不方便处理数据,反而是ignore更好,程序可以继续执行 |
- enumerate
enumerate() 函数用于将一个可遍历的数据对象(如列表、元组或字符串)组合为一个索引序列,同时列出数据和数据下标,一般用在 for 循环当中。
enumerate(sequence, [start=0])
参数
sequence – 一个序列、迭代器或其他支持迭代对象。
start – 下标起始位置。
5.3lgb模型
def lgb_model(x_train, y_train, x_test):
    lgb_test = cv_model(lgb, x_train, y_train, x_test, "lgb")
    return lgb_test
调用上面定义的cv模型。
5.4
lgb_test = lgb_model(x_train, y_train, x_test)
调用上面的LGB模型后,输出如下:
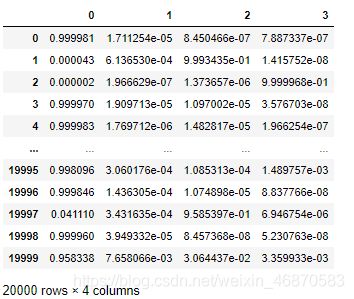
lgb_test为

temp=pd.DataFrame(lgb_test)#转dataframe格式
temp为:
result=pd.read_csv(r'D:\python\JupyterNotebookFile\DataSet\DW03\sample_submit.csv')
result['label_0']=temp[0]
result['label_1']=temp[1]
result['label_2']=temp[2]
result['label_3']=temp[3]
result.to_csv(r'D:\python\JupyterNotebookFile\DataSet\DW03\submit.csv',index=False)
最后按照示例的格式,填入相应的生成的数据。
导出文件,提交天池:

得分: