k8s上部署应用
目录
一、制作项目的镜像
二、抽取生产环境的配置
1、编写生成环境的配置:application-prod.properties
2、为每一个项目准备一个Dockefile
3、编写deploy文件:/deploy/gulimall-xxx-server-deploy.yaml
4、Jenkins编写好Jenkinsfile
①.定义流水线
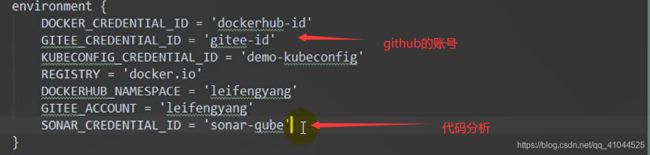
②.添加git地址
③.参数化构建(接受外面给的参数)输入构建的版本和哪个微服务
④.代码质量分析Sonar
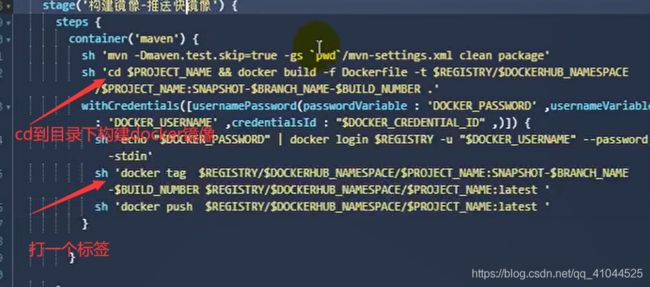
⑤.镜像推送
⑥. 部署到K8s
⑦将我们运行的nginx容器(包含前端页面)打包成镜像
二.使用阿里云镜像取代dockerhub
1. 登录阿里云Docker Registry
2. 从Registry中拉取镜像
3. 将镜像推送到Registry
4.修改Jenkinsfile中的配置
①kubesphere流水线中创建阿里云凭证 aliyun-hub-id
②修改Jenkinsfile中的
③修改deploy中yaml中的相关配置
5.重新部署
三、最终部署
1、nginx部署
①将nginx添加到k8s
https://v2-1.docs.kubesphere.io/docs/zh-CN/configuration/image-registry/
②.创建ingress网关:相当于k8的网关:用域名访问
③.nginx中添加的静态资源没有添加到生成的镜像中
2.Vue后台管理系统
四.告警
一、制作项目的镜像

二、抽取生产环境的配置
1、编写生成环境的配置:application-prod.properties
项目中原来的配置
spring.application.name=gulimall-auth-server
spring.cloud.nacos.discovery.server-addr=127.0.0.1:8848
server.port=20000
spring.thymeleaf.cache=false

spring.redis.host=192.168.35.110
spring.redis.port=6379
spring.session.store-type=redis
server.servlet.session.timeout=30m
线上环境的配置:注意点!!所有的线上端口都改成8080
spring.application.name=gulimall-auth-server
spring.cloud.nacos.discovery.server-addr=nacos-server.gulimall:8848(无状态包装成有状态)
server.port=8080
spring.thymeleaf.cache=false

spring.redis.host=redis.gulimall(有状态服务)
spring.redis.port=6379
spring.session.store-type=redis
server.servlet.session.timeout=30m

spring.cloud.sentinel.transport.dashboard=sentinel-service.gulimall(无状态进行包装)
management.endpoints.web.exposure.include=*

spring.zipkin.base-url=http://sentinel-service.gulimall:9411/
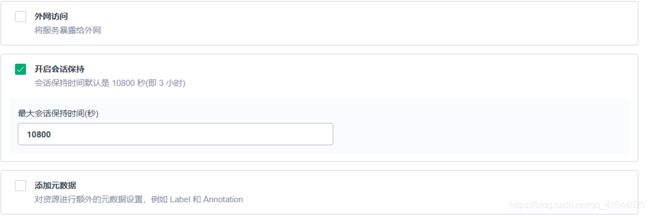
① 注意点:nacos是无状态服务,需要通过端口访问,如果希望通过域名访问需要进行再包装(包含有状态和无状态两种服务:暴露域名可以实现负载均衡)
创建nacos服务指定工作负载
2、为每一个项目准备一个Dockefile
①将所有微服务进行打包
//对父工程进行install(子工程依赖)
mvn clean install -Dmaven.test.skip-true


//对每个子工程进行package
//mvn clean package -Dmaven.test.skip-true(no need )
②.编写dockerfile(每个微服务项目都需要)
FROM java:8
EXPOSE 8080  //线上的环境都修改成8080:docker容器里面的应用的端口为8080,但向外暴露的端口是不一致的

VOLUME /tmp
ADD target/*.jar /app.jar
RUN bash -c 'touch /app.har'  //可以不写,修改每次部署的时间
ENTRYPOINT ["java","-jar","/app.jar","-Xms128m","-Xmx300m","--spring.profiles.active="prod"] //应用生产环境的配置
//1.将项目代码打包成docker镜像上传到docker
docker build -f Dockerfile -t docker.io/fengguoxing/projectname:v1.0 .(.: Dockerfile同目录下的jar包)
//2.启动容器
docker run -d(以后台方式运行) --name hello-admin(我们给镜像起的名字) -p 8080:8080 fengguoxing/projectname:v1.0
3、编写deploy文件:/deploy/gulimall-xxx-server-deploy.yaml
部署到k8s集群k8s的yaml(包含部署配合和无状态的server配置两个文档属性):只需要修改name和对外暴露的端口号
注意点:targetport:访问容器的端口 port : 服务端口 nodeport

kind: Deployment
apiVersion: apps/v1
metadata:
  name: gulimall-auth-server
  namespace: gulimall
  labels:
   app:gulimall-auth-server
spec:
  replicas: 1
  selector:
    matchLabels:
      app:gulimall-auth-server
  template:
    metadata:
      labels:
        app:gulimall-auth-server
    spec:
      containers:
        - name: gulimall-auth-server
          image: $REGISTRY/$DOCKERHUB_NAMESPACE/$APP_NAME:$TAG_NAME  //上传到阿里云中的镜像
          ports:
            - containerPort: 8080
              protocol: TCP
          resources:
            limits:
              cpu: 1000m
              memory: 500Mi
            requests:
              cpu: 10m
              memory: 10Mi
          terminationMessagePath: /dev/termination-log
          terminationMessagePolicy: File
          imagePullPolicy: IfNotPresent
      restartPolicy: Always
      terminationGracePeriodSeconds: 30
  strategy:
    type: RollingUpdate  //滚动更新策略
    rollingUpdate:
      maxUnavailable: 25%
      maxSurge: 25%
  revisionHistoryLimit: 10
  progressDeadlineSeconds: 600

---
kind: Service
apiVersion: v1
metadata:
  name: gulimall-auth-server
  namespace: gulimall
  labels:
    app:gulimall-auth-server
spec:
  ports:
    - name: http
      protocol: TCP
      port: 8080
      targetPort: 8080
      nodePort: 200001
  selector:
   app:gulimall-auth-server
  type: NodePort
  sessionAffinity: None
4、Jenkins编写好Jenkinsfile
①.定义流水线
pipeline {
  agent {
    node {
      label 'maven'
    }
  }
}


②.添加git地址

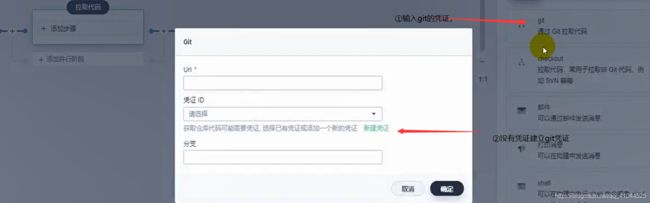
点击编辑按钮可以查看jenkins拉取代码的配置
将下面的逻辑代码添加到Jenkinsfile中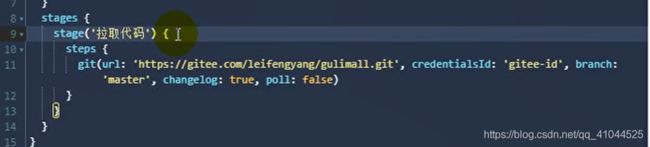
测试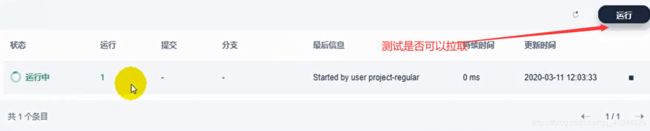
③.参数化构建(接受外面给的参数)输入构建的版本和哪个微服务


将所有的微服务名字填入到可选项


④.代码质量分析Sonar
编写maven-settings.xml(指定镜像和jdk的版本)

父pom文件中添加sonar的jar
    ${PWD}/./target/jacoco.exec
    target/classes


                org.jacoco
                jacoco-maven-plugin
                0.8.2

                true


                    agent-for-ut

                    prepare-agent


                    agent-for-it

                    prepare-agent-integration


                    jacoco-site
                    verify

                    report


                org.springframework.boot
                spring-boot-maven-plugin

                    true


                org.sonarsource.scanner.maven
                sonar-maven-plugin
                3.6.0.1398
编写Jenkinsfile(KubeSphere)


⑤.镜像推送
⑥. 部署到K8s
⑦将我们运行的nginx容器(包含前端页面)打包成镜像
将gatway的地址进行修改

//打包镜像
docker commit -a "fengguoxing" -m(提交信息) "nginxxx" 6434f4f(容器id) xxx:v1(自己取镜像的名字)

//进入dockerhub
docker login -u xxxx -p

//上传镜像
docker push xxx:v1


修改镜像的名字标签
------------
docker tag xxx:v1  xxxx/xxx:v2
二.使用阿里云镜像取代dockerhub

1. 登录阿里云Docker Registry
$ sudo docker login --username=九一九一 registry.cn-hangzhou.aliyuncs.com用于登录的用户名为阿里云账号全名,密码为开通服务时设置的密码。
您可以在访问凭证页面修改凭证密码。
2. 从Registry中拉取镜像
$ sudo docker pull registry.cn-hangzhou.aliyuncs.com/atgulimall-feng/gulimall-nginx:[镜像版本号]3. 将镜像推送到Registry
$ sudo docker login --username=九一九一 registry.cn-hangzhou.aliyuncs.com$ sudo docker tag [ImageId] registry.cn-hangzhou.aliyuncs.com/atgulimall-feng/gulimall-nginx:[镜像版本号]$ sudo docker push registry.cn-hangzhou.aliyuncs.com/atgulimall-feng/gulimall-nginx:[镜像版本号]
4.修改Jenkinsfile中的配置
①kubesphere流水线中创建阿里云凭证 aliyun-hub-id
②修改Jenkinsfile中的

③修改deploy中yaml中的相关配置
5.重新部署(采用项目中的jenkinsfile进行流水线部署)


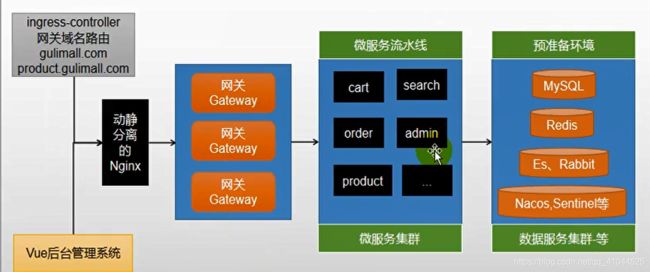
三、最终部署
1、nginx部署
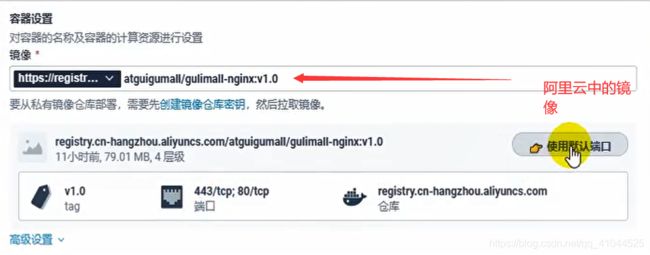
①将nginx添加到k8s
https://v2-1.docs.kubesphere.io/docs/zh-CN/configuration/image-registry/
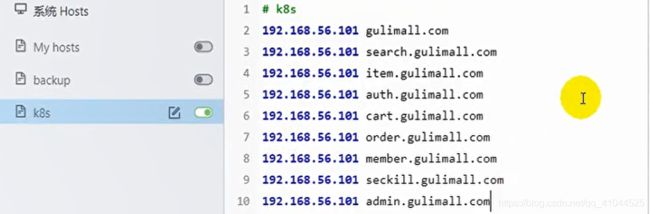
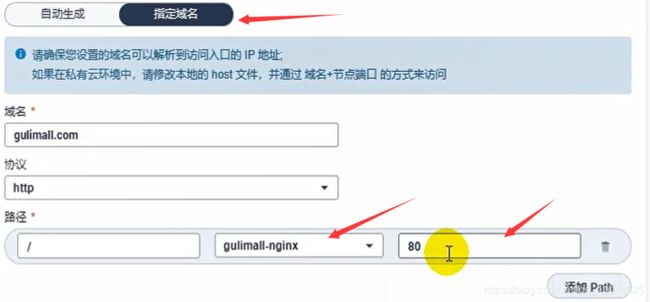
②.创建ingress网关:相当于k8的网关:用域名访问

创建路由规则(所有服务)
③.nginx中添加的静态资源没有添加到生成的镜像中
docker build -t mynginx:v1.2 -f Dockerfile .
docker login --username=九一九一 registry.cn-hangzhou.aliyuncs.com
docker tag [ImageId] registry.cn-hangzhou.aliyuncs.com/atgulimall-feng/gulimall-nginx:[镜像版本号]
docker push registry.cn-hangzhou.aliyuncs.com/atgulimall-feng/gulimall-nginx:[镜像版本号]

2.Vue后台管理系统
打包前端项目

npm run build 
将dist添加到nginx中的usr/share/nginx/html

docker打包nginx中添加的静态资源没有添加到生成的镜像中
docker build -t gulimall-admin-vue-app:v1.0 -f Dockerfile .
docker login --username=九一九一 registry.cn-hangzhou.aliyuncs.com
docker tag [ImageId] registry.cn-hangzhou.aliyuncs.com/atgulimall-feng/gulimall-admin-vue-app:[镜像版本号]
docker push registry.cn-hangzhou.aliyuncs.com/atgulimall-feng/gulimall-admin-vue-app:[镜像版本号]
四.告警

qq邮箱


