Java 总结3 GUI设计
- 基本概念
-
- 3.1 容器
-
- JFrame
- JPanel
- 3.2 布局
-
- FlowLayout(流布局)
- BorderLayout(边框布局 / 默认布局)
- GridLayout(网格布局)
- CardLayout(卡片布局)
- BoxLayout(箱式布局)
- 3.3 事件处理
- Swing 组件
-
- 3.4 按钮
-
- JButton(普通按钮)
- JToggleButton(开关按钮)
- JCheckBox(检查按钮)
- JRadioButton(单选按钮)
- JComboBox(组合框)
- JList(列表)
- 3.5 文本组件
-
- JTextField(文本域)
- JPassWordField(口令输入域)
- JTextArea(文本区)- NULL
- 3.6 菜单组件
-
- JMenuBar(菜单栏) JMenu(菜单) JMenuItem(菜单选项)
- JPopupMenu(弹出式菜单)
- 3.7 对话框
-
- JDialog(对话框)
- JOptionPane(标准对话框)
-
- ConfirmDialog(确认对话框)
- InputDialog(输入对话框)
- MessageDialog(信息对话框)
- OptionDialog(选择对话框)
- JFileChooser(文件选择)
Java图形用户界面设计工具包:AWT 和 Swing
- AWT (Abstract Window Toolkit)
- 这个工具包提供了一套与本地图形界面进行交互的接口,是基于本地方法的 C/C++程序,运行速度快;
- AWT的图形函数与操作系统提供的图形函数有着一一对应的关系,即利用AWT来构建图形用户界面时,实际上是在利用操作系统所提供的图形库;AWT的控件在不同的平台可能表现不同(基于操作系统)
- AWT通过牺牲功能来实现其平台无关性,即AWT所提供的图形功能是各种通用型操作系统所提供的图形功能的交集
- 由于AWT是依靠本地方法来实现其功能的,通常把AWT控件称为重量级控件
- Swing
- 在AWT的基础上构建的一套新的图形界面系统,基于AWT的Java程序;它提供了AWT所能提供的所有功能,并用纯粹的Java代码对AWT的功能进行了大幅度的扩展(平台无关性);而Swing在所有平台表现是一致的
- 由于在Swing中没有使用本地方法来实现图形功能,通常把Swing控件称为轻量级控件
基本概念
- 组件:指构成图形界面的元素,在Java中用类表示
- 基本组件:不包含其它组件的组件称为基本组件或者原子组件
- 容器组件:包含其它组件的组件称为容器组件(容器),又可以进一步分为顶层容器和非顶层容器(中间容器)
3.1 容器
顶层容器:JFrame、JApplet、JDialog、JWindow
顶层容器是可以独立使用的容器,无需依赖于其它容器而存在,并可以包含其它组件
JFrame
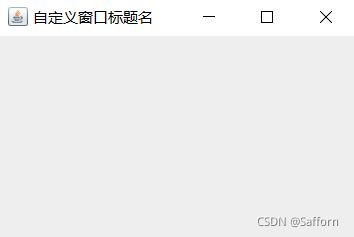
一个带有标题行和控制按钮(最小化、恢复/最大化、关闭)的独立窗口
JFrame frame = new JFrame("自定义窗口标题名"); //创建JFrame对象
frame.setSize(300, 200); //设置窗口大小
frame.setVisible(true); //设置窗口可见
frame.setDefaultCloseOperation(WindowConstants.EXIT_ON_CLOSE); //设置关闭窗口则关闭此进程
JPanel
面板属于中间容器,不能独立存在但可以嵌套,面板必须被添加到其他容器内部
Frame frame = new JFrame("自定义窗口标题名");
JPanel panel = new JPanel();  //创建组件对象
Container contentPane = frame.getContentPane();  //创建内容窗格引用frame的默认窗格
contentPane.setBackground(Color.blue);  //设置frame的背景为蓝色
panel.setBackground(Color.yellow);  //设置组件panel的背景为黄色
contentPane.add(panel, BorderLayout.SOUTH);  //将panel添加进frame的内容窗格,并放在窗口南部
frame.setSize(300, 200);
frame.setVisible(true);

/*
JPanel panel = new JPanel();
Container contentPane = frame.setContentPane(panel); //将panel组件放入frame的内容窗格,代替顶层容器默认的内容窗格
*/
3.2 布局
Java 的主要布局管理器:FlowLayout 、BorderLayout、GridLayout 、CardLayout、BoxLayout、SpringLayout等
FlowLayout(流布局)
对容器中组件进行布局的方式是将组件逐个地安放在容器中的一行上,一行放满后就另起一个新行(随窗口大小变化而变化)
- 构造方法:
public FlowLayout(int align, int hgap, int vgap);- align: 组件的对齐方式,包括
FlowLayout.LEFT左对齐、FlowLayout.RIGHT右对齐和FlowLayout.CENTER居中 三种 - hgap / vgap:设定组件的水平间距 / 垂直间距
- align: 组件的对齐方式,包括
JFrame frame = new JFrame("自定义窗口标题名");
JButton b1 = new JButton("Button1");
JButton b2 = new JButton("Button2");
JButton b3 = new JButton("Button3");
Container contentPane = frame.getContentPane();
contentPane.setLayout(new FlowLayout(FlowLayout.LEFT,20,40));
contentPane.add(b1); contentPane.add(b2); contentPane.add(b3);
frame.setSize(300, 200);
frame.setVisible(true);
frame.setDefaultCloseOperation(WindowConstants.EXIT_ON_CLOSE);
BorderLayout(边框布局 / 默认布局)
顶层容器中内容窗格的默认布局管理器 ,每个由 BorderLayout 管理的容器被划分成北(North)、南(South)、西(West)、东(East)、中(Center)五个区域,在每个区域可以加入一个组件
- 构造方法:
public BorderLayout(int hgap, int vgap);
JFrame frame = new JFrame("BorderLayout");
JButton b1 = new JButton("North");
JButton b2 = new JButton("Center");
JButton b3 = new JButton("East");
JButton b4 = new JButton("South");
JButton b5 = new JButton("West");
Container contentPane = frame.getContentPane();
contentPane.setLayout(new BorderLayout(10,10));
contentPane.add(b1, BorderLayout.NORTH);
contentPane.add(b2, BorderLayout.CENTER);
contentPane.add(b3, BorderLayout.EAST);
contentPane.add(b4, BorderLayout.SOUTH);
contentPane.add(b5, BorderLayout.WEST);
frame.setSize(300, 200);
frame.setVisible(true);
frame.setDefaultCloseOperation(WindowConstants.EXIT_ON_CLOSE);
GridLayout(网格布局)
网格式的布局管理器,将容器空间划分成若干行 乘 若干列的网格,组件依次放入其中,每个组件占据一格
- 构造方法:
public GridLayout(int rows, int cols, int hgap, int vgap);- rows / cols:设定网格的行数 / 列数
- hgap / vgap:设定网格的水平间距 / 垂直间距
JFrame frame = new JFrame("GridLayout");
JButton b1 = new JButton("1");
JButton b2 = new JButton("2");
JButton b3 = new JButton("3");
JButton b4 = new JButton("4");
JButton b5 = new JButton("5");
Container contentPane = frame.getContentPane();
contentPane.setLayout(new GridLayout(3,2,5,5));
contentPane.add(b1); contentPane.add(b2); contentPane.add(b3);
contentPane.add(b4); contentPane.add(b5);
frame.setSize(300, 200);
frame.setVisible(true);
frame.setDefaultCloseOperation(WindowConstants.EXIT_ON_CLOSE);
CardLayout(卡片布局)
将容器中的组件看作是一些卡片,卡片的顺序由组件在容器内放置的顺序决定,这些卡片被层叠地放入容器中,每一时刻容器只能从这些卡片中选择一张来显示
public void show(Container parent, String name);显示名为name的卡片public void first(Container parent);显示第一张卡片public void next(Container parent);显示当前卡片的下一张卡片public void previous(Container parent);显示前一张卡片public void last(Container parent);显示最后一张卡片
BoxLayout(箱式布局)
将容器中的组件按水平方向排成一行或按垂直方向排成一列。当组件排成一行时,每个组件可以有不同的宽度;当组件排成一列时,每个组件可以有不同的高度
- 构造方法:
public BoxLayout(Container target, int axis);- target:设置箱式布局的目标容器
- axis:组建的排列方向,包含
BoxLayout.X_AXIS按水平方向排列、BoxLayout.Y_AXIS按垂直方向排列
JFrame frame = new JFrame("BoxLayout");
Container contentPane = frame.getContentPane();
//水平排列
JPanel panelH = new JPanel();
panelH.setLayout(new BoxLayout(panelH,BoxLayout.X_AXIS));
panelH.add(new JButton("水平排列按钮1"));
panelH.add(new JButton("水平排列按钮2"));
contentPane.add(panelH, BorderLayout.NORTH);
//垂直排列
JPanel panelV = new JPanel();
panelV.setLayout(new BoxLayout(panelV,BoxLayout.Y_AXIS));
panelV.add(new JButton("垂直排列按钮1"));
panelV.add(new JButton("垂直排列按钮2"));
contentPane.add(panelV, BorderLayout.CENTER);
frame.setSize(300, 150);
frame.setVisible(true);
frame.setDefaultCloseOperation(WindowConstants.EXIT_ON_CLOSE);
3.3 事件处理
-
事件:事件是用户在界面上的一个操作(通常使用各种输入设备,如:鼠标、键盘等来完成)
-
当一个事件发生时,该事件用一个事件对象来表示。事件对象有对应的事件类。不同的事件类描述不同类型的用户动作。事件类包含在
java.awt.event和javax.swing.event包中 -
事件处理代码:
public void init_ActionEvent() { JFrame f = new JFrame("Action Event"); JButton b = new JButton("戳我!"); b.addActionListener(new ButtonHandler()); f.getContentPane().add(b, BorderLayout.CENTER); f.setSize(200, 100); f.setVisible(true); } class ButtonHandler implements ActionListener { public void actionPerformed(ActionEvent e) { System.exit(0); } } -
每一类事件有一个相应的事件监听器接口,该接口定义了接收和处理事件的抽象方法。实现该接口的类,就是监听器类。其对象可作为监听器对象向相应的组件注册
-
事件的类名通常为:XXXEvent,对应的事件监听器接口名通常为:XXXListener
-
一个监听器接口定义了一种以上的抽象事件处理方法(事件处理器)
-
事件监听器类实现事件监听器接口,其类名可以自定义。事件监听器类需要自行编写
public class MouseClickHandler implements MouseListener {

	//只关心单击鼠标事件的处理,所以改写mouseClicked()方法
	public void mouseClicked(MouseEvent e) {

		//处理代码
	}
	//其他方法仍要给出实现
	public void mousePressed(MouseEvent e) {
     }
	public void mouseReleased(MouseEvent e) {
     }
	public void mouseEntered(MouseEvent e) {
     }
	public void mouseExited(MouseEvent e) {
     }
- 改进:只关心单击鼠标事件的处理,又想避免编写其他不需要的事件处理方法,所以继承
适配器MouseAdapter,改写mouseClicked()方法
class MouseClickHandler implements MouseAdapter{

	public void mouseClicked(MouseEvent e) {

	//处理代码
	}
}
Swing 组件
3.4 按钮
JButton(普通按钮)
JButton b1 = new JButton();
JButton b2 = new JButton("Open");
JButton b3 = new JButton("Open", new ImageIcon("icon.gif"));  //具有自定义图标的按钮
JToggleButton(开关按钮)
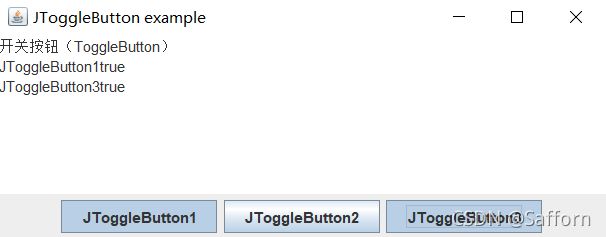
JToggleButton具有两种状态(选中状态和未选中状态)通过isSelected()方法可以获取按钮的当前状态,当返回值为 true 时表示处于选中状态,而返回值为 false 表示处于未选中状态
JFrame f = new JFrame("JToggleButton example");
JPanel p = new JPanel();
JTextArea ta = new JTextArea();
JToggleButton tb1 = new JToggleButton("JToggleButton1");
JToggleButton tb2 = new JToggleButton("JToggleButton2");
JToggleButton tb3 = new JToggleButton("JToggleButton3");

p.add(tb1);  p.add(tb2);  p.add(tb3);
f.getContentPane().add(ta, BorderLayout.CENTER);
f.getContentPane().add(p, BorderLayout.SOUTH);
f.setSize(500, 200);
f.setVisible(true);
ta.append("开关按钮(ToggleButton)\n");
ItemListener il = new ItemListener() {
      //事件监听器:匿名类
    public void itemStateChanged(ItemEvent e) {
      //事件处理器
        JToggleButton tbTemp = (JToggleButton) e.getSource();
        if(tbTemp == tb1)
            ta.append("JToggleButton1"+tb1.isSelected()+'\n');
        else if(tbTemp == tb2)
            ta.append("JToggleButton2"+tb2.isSelected()+'\n');
        else if(tbTemp == tb3)
            ta.append("JToggleButton3"+tb3.isSelected()+'\n');
    }
};
tb1.addItemListener(il);  //注册事件监听器
tb2.addItemListener(il);
tb3.addItemListener(il);
JCheckBox(检查按钮)
JCheckBox 是 JToggleButton 的子类,JCheckBox 可以通过按钮组 ButtonGroup 进行分组,JCheckBox 加入按钮组后只能单选(在同一个按钮组中的按钮只能有一个被选择)
		JFrame f = new JFrame("JCheckBox example");
        JPanel p = new JPanel();
        JTextArea ta = new JTextArea();
        JCheckBox cb1 = new JCheckBox("CheckBox1");
        JCheckBox cb2 = new JCheckBox("CheckBox2");
        JCheckBox cb3 = new JCheckBox("CheckBox3");

        Border etched = BorderFactory.createEtchedBorder();
        Border border = BorderFactory.createTitledBorder(etched, "JCheckBox");
        p.setBorder(border);

        /* 将三个检查框分为一组,只能三选一,将注释中的代码解除注释即可
         * ButtonGroup g = new ButtonGroup();
         * g.add(cb1);  g.add(cb2);  g.add(cb3);  */
        p.add(cb1);  p.add(cb2);  p.add(cb3);
        f.getContentPane().add(ta, BorderLayout.CENTER);
        f.getContentPane().add(p, BorderLayout.SOUTH);
        f.setSize(500, 200);
        f.setVisible(true);
        ta.append("多选检查框(CheckBox): 未分组\n");

        ItemListener il = e -> {
       //lambda expression
            JToggleButton tbTemp = (JToggleButton) e.getSource();
            if(tbTemp == cb1)
                ta.append("JCheckBox1"+cb1.isSelected()+'\n');
            else if(tbTemp == cb2)
                ta.append("JCheckBox2"+cb2.isSelected()+'\n');
            else if(tbTemp == cb3)
                ta.append("JCheckBox3"+cb3.isSelected()+'\n');
        };
        cb1.addItemListener(il);
        cb2.addItemListener(il);
        cb3.addItemListener(il);
JRadioButton(单选按钮)
		JFrame f = new JFrame("JRadioButton");
        JPanel p = new JPanel();
        JTextArea text = new JTextArea();
        JRadioButton rb1 = new JRadioButton("RadioButton1");
        JRadioButton rb2 = new JRadioButton("RadioButton2");
        JRadioButton rb3 = new JRadioButton("RadioButton3");
        // 将三个按钮分在一组,设为三选一
        ButtonGroup g = new ButtonGroup();
        g.add(rb1);  g.add(rb2);  g.add(rb3);
        Border border = BorderFactory.createTitledBorder("单选按钮组");
        p.setBorder(border);
        p.add(rb1);  p.add(rb2);  p.add(rb3);
        f.getContentPane().add(text, BorderLayout.CENTER);
        f.getContentPane().add(p, BorderLayout.SOUTH);
        f.setSize(400, 200);
        f.setVisible(true);
        text.append("单选按钮(RadioButton): 分组\n");

        ItemListener il = e -> {

            JRadioButton rbTemp = (JRadioButton) e.getSource();
            if(rbTemp == rb1)
                text.append("RadioButton1:"+rb1.isSelected()+'\n');
            else if(rbTemp == rb2)
                text.append("RadioButton2:"+rb2.isSelected()+'\n');
            else
                text.append("RadioButton3:"+rb3.isSelected()+'\n');
        };
        rb1.addItemListener(il);
        rb2.addItemListener(il);
        rb3.addItemListener(il);
JComboBox(组合框)
组合框(JComboBox)是一个下拉式菜单,有两种形式:不可编辑和可编辑
- 对于不可编辑的JComboBox,用户只在能在现有的选项列表中进行选择
- 对于可编辑的JComboBox,用户既可以在现有选项中选择,也可以输入新的内容作为可选项
- 通过方法
setEditable(true/false)方法设置是否可编辑,默认是不可编辑的
		JFrame f = new JFrame("JComboBox");
        JPanel p = new JPanel();
        JTextArea text = new JTextArea();
        String[] list = {
     "one", "two", "three"};
        JComboBox<String> cb = new JComboBox<>(list);
        cb.setSelectedIndex(2);
        cb.setEditable(true);  //组合框选项是否可编辑
        p.add(cb);
        f.getContentPane().add(text, BorderLayout.CENTER);
        f.getContentPane().add(p, BorderLayout.SOUTH);
        f.setSize(300, 200);
        f.setVisible(true);

        cb.addActionListener(new ActionListener() {

            public void actionPerformed(ActionEvent e) {

                JComboBox cbTemp = (JComboBox) e.getSource();
                String item = cb.getSelectedItem().toString();
                if(item.equals("one")) text.append("one\n");
                else if(item.equals("two")) text.append("two\n");
                else if(item.equals("three")) text.append("three\n");
                else if(item.equals("qwq")) text.append(item+'\n');
                else text.append("...\n");
            }
        });
利用lambda表达式和switch结构 简化事件监听类的写法
		cb.addActionListener(e -> {

            JComboBox cbTemp = (JComboBox) e.getSource();
            String item = cb.getSelectedItem().toString();
            switch (item) {

                case "one" -> text.append("one\n");
                case "two" -> text.append("two\n");
                case "three" -> text.append("three\n");
                case "qwq" -> text.append(item + '\n');
                default -> text.append("...\n");
            }
        });
JList(列表)
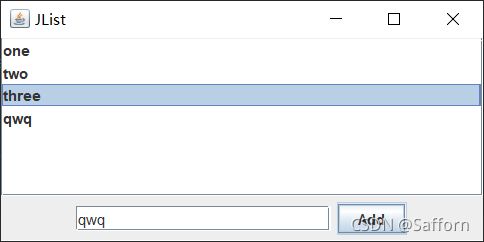
可供用户进行选择的一系列可选项
- 构造方法:
JList();JList(ListModel dataModel);JList(Object[] listData);JList(Vector listData);
		JFrame f = new JFrame("JList");
        JPanel p = new JPanel();
        DefaultListModel<String> listModel = new DefaultListModel<>();
        listModel.addElement("one");
        listModel.addElement("two");
        listModel.addElement("three");
        JList<String> jList = new JList<>(listModel);
        JScrollPane sp = new JScrollPane(jList, JScrollPane.VERTICAL_SCROLLBAR_AS_NEEDED,
                JScrollPane.HORIZONTAL_SCROLLBAR_AS_NEEDED);  //需要时出现滚动条
        Container contentpane = f.getContentPane();
        contentpane.add(sp);  //将滚动条组件添加进内容窗格

        JTextField textField = new JTextField(20);
        JTextArea textArea = new JTextArea();
        textArea.append("TextArea\n");
        JButton button = new JButton("Add");
        button.addActionListener(e -> listModel.addElement(textField.getText()));

        p.add(textField);
        p.add(button);
        contentpane.add(p, BorderLayout.SOUTH);
        f.setDefaultCloseOperation(JFrame.EXIT_ON_CLOSE);
        f.setSize(400, 200);
        f.setVisible(true);
3.5 文本组件
JTextField(文本域)
可显示信息和提供用户输入
- 构造器:
JTextField(String text, int columns);- text:文本框初始内容由text指定
- columns:文本框宽度
JPassWordField(口令输入域)
无回显输入文本框
JTextArea(文本区)- NULL
3.6 菜单组件
JMenuBar(菜单栏) JMenu(菜单) JMenuItem(菜单选项)
菜单栏是窗口中的主菜单,用来包容一组菜单
- JFrame、JApplet和JDialog等类中定义了
setJMenuBar(JMenuBar menu);方法,可以把菜单栏放到窗口的上方 - 菜单栏MenuBar包括多个菜单Menu,每个菜单Menu中包括多个菜单选项MenuItem
        JFrame f = new JFrame("Menu");
        JFileChooser fc = new JFileChooser();
        JMenuBar menuBar = new JMenuBar();  //创建菜单条
        f.setJMenuBar(menuBar);

        JMenu menu = new JMenu("File");  //创建File菜单
        menu.setMnemonic(KeyEvent.VK_F);  //设置快捷键 (Alt+F)
        menuBar.add(menu);

        JMenuItem menuItem = new JMenuItem("Open");  //设置File菜单的选项:Open
        menuItem.setMnemonic(KeyEvent.VK_O);
        menuItem.setAccelerator(KeyStroke.getKeyStroke
                (KeyEvent.VK_O, ActionEvent.ALT_MASK));  //设置快捷键
        menuItem.addActionListener(e -> {

            int select = fc.showDialog(null, "打开");
            if(select == JFileChooser.APPROVE_OPTION) {

                File file = fc.getSelectedFile();
                System.out.println("Opening: "+file.getName());
            } else {

                System.out.println("Open command cancelled");
            }
        });
        menu.add(menuItem);

        menuItem = new JMenuItem("Save", KeyEvent.VK_S);
        menuItem.addActionListener(null);
        menu.add(menuItem);

        menuItem = new JMenuItem("Close", KeyEvent.VK_C);
        menuItem.addActionListener(null);
        menu.add(menuItem);

        f.setDefaultCloseOperation(JFrame.EXIT_ON_CLOSE);
        f.setSize(300, 200);
        f.setVisible(true);
JPopupMenu(弹出式菜单)
弹出式菜单(JPopupMenu)可以根据需要显示在指定位置。
- 构造器:
public JPopupMenu(String label);- label:指定菜单名称
- 调用
show()方法在指定位置显示弹出式菜单
方法声明:public void show(Component invoker, int x,int y);
JPopupMenu pop=new JPopupMenu(“Popup”); //创建弹出式菜单
JMenuItem n=new JMenuItem(“New”); //创建2个菜单项
JMenuItem l=new JMenuItem(“Load”);
pop.add(n); //在弹出式菜单中加入菜单项
Pop.add(l);
3.7 对话框
JDialog(对话框)
可移动窗口,分为有模式对话框和无模式对话框。有模式对话框窗口被关闭之前其他窗口无法接收任何形式输入
- 构造器:
JDialog(Frame owner, String title, boolean modal);- owner:对话框从属对象**(必要)**
- title:对话框标题
- modal:是否设置为有模式对话框
JOptionPane(标准对话框)
包含如下对话框:
- 确认对话框(showConfirmDialog)
- 输入对话框(showInputDialog)
- 信息对话框(showMessageDialog)
- 选项对话框(showOptionDialog)
通过JOptionPane的静态方法 showXXXDialog 显示标准对话框,具体参数有:
ConfirmDialog(确认对话框)
显示问题,要求用户确认(yes / no / cancel)
int select = JOptionPane.showConfirmDialog(frame,"是否关闭程序",
						"Confirm Dialog Title", JOptionPane.YES_NO_CANCEL_OPTION);
if(select == JOptionPane.YES_OPTION)
	textField.setText("YES_OPTION");
if(select == JOptionPane.NO_OPTION)
	textField.setText("NO_OPTION");
if(select == JOptionPane.CLOSED_OPTION)
	textField.setText("CLOSED_OPTION");
InputDialog(输入对话框)
提示用户输入
Object[] possibleValues = {
     "中文", "English", "France"};
        Object selectedValue = JOptionPane.showInputDialog
        		(frame, "Choose", "Input Dialog Title",
                JOptionPane.YES_NO_CANCEL_OPTION, null,
                possibleValues, possibleValues[0]);
        if(selectedValue != null)
            textField.setText(selectedValue.toString());
        else textField.setText("Closed");
MessageDialog(信息对话框)
显示信息,告知用户发生的事件
JOptionPane.showMessageDialog(frame, "登录失败",
	"Message Dialog Dialog", JOptionPane.ERROR_MESSAGE);
OptionDialog(选择对话框)
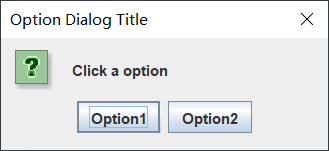
显示选项,要求用户选择
Object[] options = {
     "Option1", "Option2"};
int select = JOptionPane.showOptionDialog(
    f, "Click a option", "Option Dialog Title",
    JOptionPane.YES_NO_OPTION, JOptionPane.QUESTION_MESSAGE,
    null, options, options[0]);
if(select == 0) textField.setText("Option1");
if(select == 1) textField.setText("Option2");
JFileChooser(文件选择)
        JFrame f = new JFrame("JFileChooser");
        JFileChooser fc = new JFileChooser();
        JPanel p = new JPanel();
        JTextField text = new JTextField();
        JButton openButton = new JButton("打开");
        JButton saveButton = new JButton("保存");
        JButton deleteButton = new JButton("删除");

        p.add(openButton);
        p.add(saveButton);
        p.add(deleteButton);

        f.getContentPane().add(p, BorderLayout.CENTER);
        f.getContentPane().add(text, BorderLayout.SOUTH);

        f.setDefaultCloseOperation(WindowConstants.EXIT_ON_CLOSE);
        f.setSize(400, 200);
        f.setVisible(true);

        ActionListener al = e -> {
       //事件监听器:匿名类
            JButton button = (JButton) e.getSource();
            if(button == openButton) {

                int select = fc.showDialog(null, "打开");
                if(select == JFileChooser.APPROVE_OPTION) {

                    File file = fc.getSelectedFile();
                    text.setText("Opening:"+file.getName());
                } else {
       //关闭文件选择对话框的事件处理
                    text.setText("Open command cancelled by user");
                }
            }
            if(button == saveButton) {
      text.setText("Useless Save Button"); }
            if(button == deleteButton) {
      text.setText("Useless Delete Button"); }
        };
        openButton.addActionListener(al);
        saveButton.addActionListener(al);
        deleteButton.addActionListener(al);


