《轻量日志系统Loki》安装文档
《轻量日志系统Loki》安装文档
目录
《轻量日志系统Loki》安装文档
一、概述
1.1 简介
1.2 系统架构
1.3 与ELK比较
二、安装示例
2.1 版本说明
2.2 软件下载
2.2.1 网上下载
2.2.2 提供的安装包
2.3软件安装和部署
2.3.1 安装Promtail
2.3.2 安装Loki
2.3.3 安装Grafana
三、其他
3.1常见问题参考
3.1.1CentOS7查看和关闭防火墙
3.1.2 CentOS7同步时区
3.1.3 yum install和yum localinstall的区别
3.2 logcli相关
3.3 promtail配置官网
3.3 Loki 配置官网
一、概述
1.1 简介
Loki是受Prometheus启发由Grafana Labs团队开源的水平可扩展,高度可用的多租户日志聚合系统。 开发语言: Google Go。它的设计具有很高的成本效益,并且易于操作。使用标签来作为索引,而不是对全文进行检索,也就是说,你通过这些标签既可以查询日志的内容也可以查询到监控的数据签,极大地降低了日志索引的存储。系统架构十分简单,由以下3个部分组成 :
- Loki 是主服务器,负责存储日志和处理查询 。
- promtail 是代理,负责收集日志并将其发送给 loki 。
- Grafana 用于 UI 展示。
只要在应用程序服务器上安装promtail来收集日志然后发送给Loki存储,就可以在Grafana UI界面通过添加Loki为数据源进行日志查询(如果Loki服务器性能不够,可以部署多个Loki进行存储及查询)。作为一个日志系统不关只有查询分析日志的能力,还能对日志进行监控和报警
1.2 系统架构
-
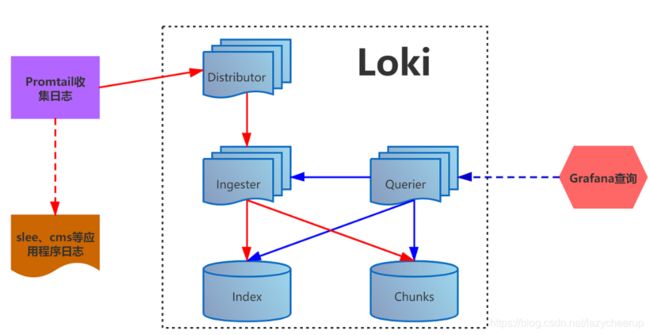
promtail收集并将日志发送给loki的 Distributor 组件
-
Distributor会对接收到的日志流进行正确性校验,并将验证后的日志分批并行发送到Ingester
-
Ingester 接受日志流并构建数据块,压缩后存放到所连接的存储后端
-
Querier 收到HTTP查询请求,并将请求发送至Ingester 用以获取内存数据 ,Ingester 收到请求后返回符合条件的数据 ;
如果 Ingester 没有返回数据,Querier 会从后端存储加载数据并遍历去重执行查询 ,通过HTTP返回查询结果
1.3 与ELK比较
- ELK虽然功能丰富,但规模复杂,资源占用高,操作苦难,很多功能往往用不上,有点杀鸡用牛刀的感觉。
- 不对日志进行全文索引。通过存储压缩非结构化日志和仅索引元数据,Loki 操作起来会更简单,更省成本。
- 通过使用与 Prometheus 相同的标签记录流对日志进行索引和分组,这使得日志的扩展和操作效率更高。
- 安装部署简单快速,且受 Grafana 原生支持。
二、安装示例
2.1 版本说明
| 软件名称 | 软件版本 | 文件名称 |
|---|---|---|
| promtail | v2.0.0 | promtail-linux-amd64.zip |
| loki | v2.0.0 | loki-linux-amd64.zip |
| grafana | 7.1.0-1.x86_64 | grafana-7.1.0-1.x86_64.rpm |
2.2 软件下载
2.2.1 网上下载
- logcli、loki、promtail下载链接:https://github.com/grafana/loki/releases
- grafana下载链接:
- rpm文件下载命令
wget https://dl.grafana.com/oss/release/grafana-7.1.0-1.x86_64.rpm - tar.gz文件下载命令
wget https://dl.grafana.com/oss/release/grafana-7.1.0.linux-amd64.tar.gz
2.2.2 提供的安装包
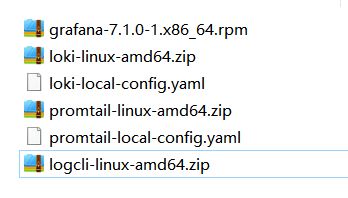
-
promtail-linux-amd64.zip
- promtail-local-config.yaml
-
loki-linux-amd64.zip
- loki-local-config.yaml
-
grafana-7.1.0-1.x86_64.rpm
2.3软件安装和部署
2.3.1 安装Promtail
-
安装服务
# 下载安装包 curl -O -L "https://github.com/grafana/loki/releases/download/v2.0.0/promtail-linux-amd64.zip" # 解压安装包 unzip promtail-linux-amd64.zip # 文件授权 chmod a+x promtail-linux-amd64 # 启动服务 nohup ./promtail-linux-amd64 -config.file=config.yaml > promtailLog.log & # 查看日志 tail -f promtailLog.log # 查看端口 netstat -lnp | grep 9080 # 关闭服务 ps -ef | grep promtail root 77487 1 27 12月08 ? 06:12:35 ./promtail-linux-amd64 -config.file= promtail-local-config.yaml root 101449 101223 0 13:59 pts/2 00:00:00 grep --color=auto promtail kill -9 pid#此处的pid为77487 -
promtail-local-config.yaml配置文件解析-
参考配置文件
# Promtail Server Config server: http_listen_port: 9080 grpc_listen_port: 0 # Positions positions: filename: /tmp/positions.yaml # Loki服务器的地址 clients: - url: http://172.19.80.75:3100/loki/api/v1/push scrape_configs: - job_name: nginx static_configs: - targets: - 127.0.0.1 labels: job: nginx host: 127.0.0.1 #__path__: /var/log/nginx/* __path__: /app/nginx/log/* - job_name: dm-system static_configs: - targets: - 127.0.0.1 labels: job: dm-system host: 127.0.0.1 __path__: /home/merge/logs/dm-system-all* - job_name: dm-customer static_configs: - targets: - 127.0.0.1 labels: job: dm-customer host: 127.0.0.1 __path__: /home/merge/logs/dm-customer-all* -
配置文件解析
-
认证配置
auth_enabled: false -
端口配置
server: http_listen_port: 9080-
Loki服务器的地址(此地址根据实际情况编辑)
# Loki服务器的地址 clients: - url: http://172.19.80.75:3100/loki/api/v1/push -
Positions
# Positions
positions:
  filename: /tmp/positions.yaml
-
-
2.3.2 安装Loki
-
安装服务
# 下载安装包 curl -O -L "https://github.com/grafana/loki/releases/download/v2.0.0/loki-linux-amd64.zip" # 解压安装包 unzip loki-linux-amd64.zip # 文件授权 chmod a+x loki-linux-amd64 # 启动服务 nohup ./loki-linux-amd64 -config.file=loki-local-config.yaml >lokiLog.log 2>&1 & # 查看日志 tail -f lokiLog.log # 查看端口 netstat -lnp | grep 3100 #关闭服务 ps -ef | grep loki root 25510 1 0 12月08 ? 00:12:10 ./loki-linux-amd64 -config.file=loki-local-config.yaml root 35228 35142 0 11:19 pts/1 00:00:00 grep --color=auto loki kill -9 pid#此处的pid为25510 -
loki-local-config.yaml配置文件解析-
参考配置文件
auth_enabled: false server: http_listen_port: 3100 ingester: lifecycler: address: 127.0.0.1 ring: kvstore: store: inmemory replication_factor: 1 final_sleep: 0s chunk_idle_period: 5m chunk_retain_period: 30s max_transfer_retries: 0 schema_config: configs: - from: 2018-04-15 store: boltdb object_store: filesystem schema: v11 index: prefix: index_ period: 168h storage_config: boltdb: directory: /tmp/loki/index filesystem: directory: /tmp/loki/chunks limits_config: enforce_metric_name: false reject_old_samples: true reject_old_samples_max_age: 168h chunk_store_config: max_look_back_period: 0s table_manager: retention_deletes_enabled: false retention_period: 0s-
配置文件解析
-
认证配置
auth_enabled: false -
端口配置
server: http_listen_port: 3100 -
表的保留期配置
#表的保留期 table_manager: retention_deletes_enabled: true #日志保留周期开关,默认为false retention_period: 168h #日志保留周期 -
采集限制配置
limits_config: enforce_metric_name: false reject_old_samples: true reject_old_samples_max_age: 168h ingestion_rate_mb: 30 #修改每用户摄入速率限制,即每秒样本量,默认值为4M ingestion_burst_size_mb: 15 #修改每用户摄入速率限制,即每秒样本量,默认值为6M -
日志回看配置
chunk_store_config: max_look_back_period: 168h #回看日志行的最大时间,只适用于即时日志 -
存储位置配置
storage_config:
#  流文件存储地址
  boltdb:
    directory: /tmp/loki/index
#  索引存储地址
  filesystem:
    directory: /tmp/loki/chunks
-
-
2.3.3 安装Grafana
-
安装服务
#服务安装
yum localinstall grafana-7.1.0-1.x86_64.rpm
#服务启动
service grafana-server start
-
其他命令
#服务状态查看
service grafana-server status
#服务启动
service grafana-server start
#服务重启
service grafana-server restart
#服务关闭
service grafana-server stop
-
安装路径说明
-
/etc/grafana -
/usr/share/grafana:conf文件夹下的defaults.ini可以修改默认端口3000,出于安全考虑建议修改;-
[root@localhost /]# cd /usr/share/grafana [root@localhost grafana]# ls bin conf plugins-bundled public scripts VERSION [root@localhost grafana]# cd conf/ [root@localhost conf]# ls defaults.ini ldap_multiple.toml ldap.toml provisioning sample.ini [root@localhost conf]# vim defaults.ini -
#################################### Server ##############################
[server]
# Protocol (http, https, h2, socket)
protocol = http

# The ip address to bind to, empty will bind to all interfaces
http_addr =

# The http port to use
http_port = 3000

# The public facing domain name used to access grafana from a browser
domain = localhost

# Redirect to correct domain if host header does not match domain
# Prevents DNS rebinding attacks
enforce_domain = false

# The full public facing url
root_url = %(protocol)s://%(domain)s:%(http_port)s/

# Serve Grafana from subpath specified in `root_url` setting. By default it is set to `false` for compatibility reasons.
serve_from_sub_path = false
-
-
-
访问相关
-
访问地址:
http:IP:3000- 默认账号密码
admin/admin - 首次登录会弹出修改密码界面,出于安全考虑,强烈建议修改密码;
- 默认账号密码
-
-
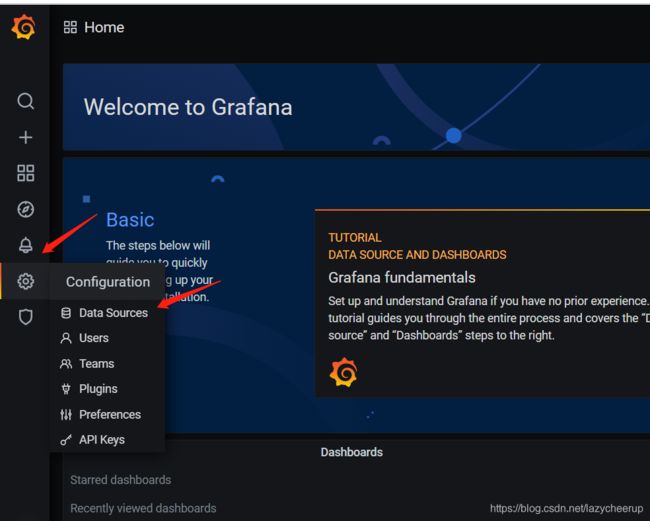
配置Loki数据源
-
点击”Greate a data source""
-
三、其他
3.1常见问题参考
3.1.1CentOS7查看和关闭防火墙
-
查看防火墙状态
- 命令:
firewall-cmd --state
- 命令:
-
停止firewall
- 命令:
systemctl stop firewalld.service
- 命令:
-
禁止firewall开机启动
- 命令:
systemctl disable firewalld.service
- 命令:
3.1.2 CentOS7同步时区
-
设置时间
-
命令:
timedatectl set-time "YYYY-MM-DD HH:MM:SS"- 举例:
timedatectl set-time "2020-12-08 14:39:00"
- 举例:
-
-
设置时区
-
命令:
timedatectl set-timezone Asia/Shanghai -
是否NTP服务器同步
- 命令:
timedatectl set-ntp yes //yes或者no
- 命令:
3.1.3 yum install和yum localinstall的区别
+ `yum install`会去yum仓库查找相应的软件并安装,仓库中的软件都是解决了依赖关系的;
- yum localinstall是用来安装本地rpm包的命令,首先rpm包要先下载到本地,然后在本地目录执行yum localinstall *.rpm,yum会自动搜寻依赖关系并安装而rmp -i *.rpm不会自行解决依赖关系,缺少依赖就会报错;
3.2 logcli相关
-
安装
-
wget https://github.com/grafana/loki/releases/download/v2.0.0/logcli-linux-amd64.zip
unzip logcli-linux-amd64.zip
chmod +x logcli-linux-amd64/logcli-linux-amd64
mv logcli-linux-amd64/logcli-linux-amd64  /usr/sbin/logcli
-
-
使用
-
配置环境变量
export LOKI_ADDR=http://localhost:3100 -
使用
logcli labels job logcli query '{job="varlogs"}' -
具体命令,请自行查询资料
-
3.3 promtail配置官网
https://grafana.com/docs/loki/latest/clients/promtail/configuration/
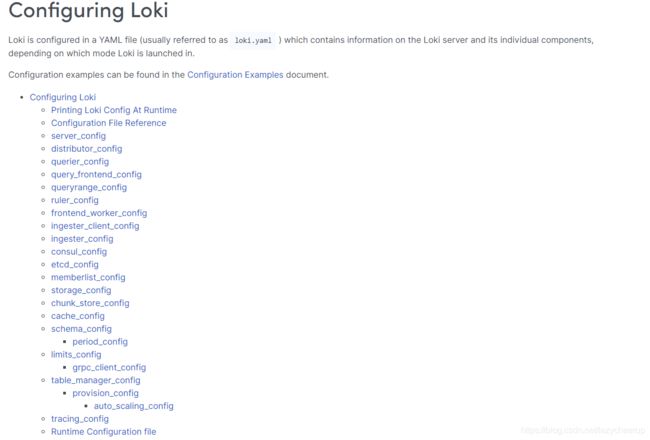
3.3 Loki 配置官网
https://grafana.com/docs/loki/latest/configuration/


