Python flask框架(4)
response & request

请求响应补充&实例化展示
response
view函数的返回值必须为一个reponse对象
Response类
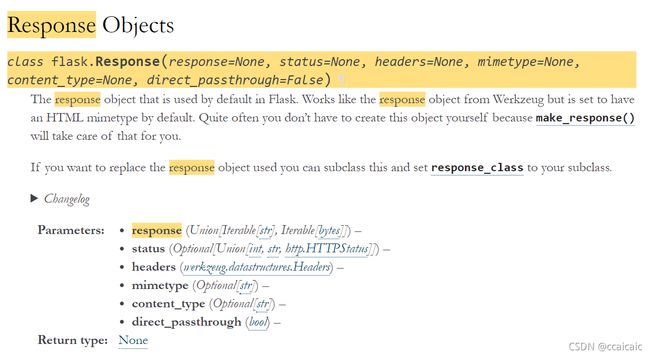
属性介绍:
headers : 请求头,status ;
String类型状态码,如:“200 ok”;
status_code : int 类型,状态码;
data : 需要返回到前端的数据;
set_cookie :设置cookie ;
del_cookie :删除cookie ;
cookie:
Cookie是保存在客户端的纯文本文件,如:txt。客户端就是我们自己的本地电脑。当我们使用自己的电脑通过浏览器进行访问网页的时候,服务器就会生成一个证书并返回给我的浏览器并写入我们的本地电脑。这个证书就是cookie;同时cookie起到保存状态的功能。

当我们访问某个网站时,服务器首先根据浏览器的编号生成一个cookie 返回给客户端。客户端下次再访问时就会将自己本地的cookie 加上url访问地址一同给服务器。服务器读出来以此来辨别用户的状态。
(更详细的解释见百度百科:https://jingyan.baidu.com/article/9f7e7ec0e5e8986f28155419.html)
Response对象创建
类直接创建
@app.route('/test')
def test():
    response= Response(response='hello',status=200,content_type='text/html;charset=utf-8')
     return response
函数创建
关于make_response官方是这样说的:
Sometimes it is necessary to set additional headers in a view. Because views do not have to return response objects but can return a value that is converted into a response object by Flask itself, it becomes tricky to add headers to it. This function can be called instead of using a return and you will get a response object which you can use to attach headers.
也就是说当返回的为int等需要依靠Flask来将其转换为response对象的时候,不太容易去改变响应头,该函数就是为了解决这个问题。
from flask import make_response
@app.route('/test')
def test():
    return make_response('hello')
下边再举一个添加headers的例子:
@app.route('/testre')
def testre():
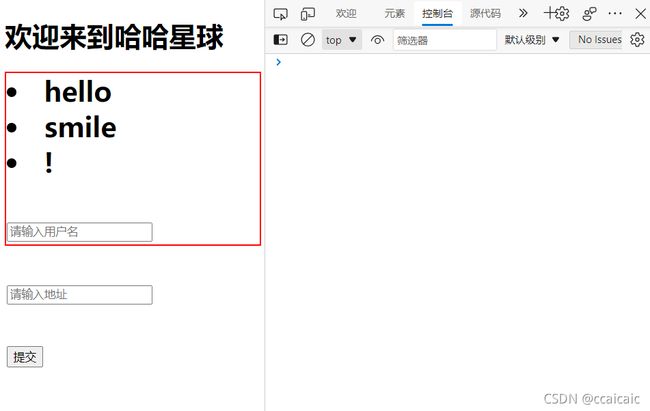
content='''
首页
看到这个的人笑3秒钟
hello
smile
!
'''
response=make_response(content)
#其实这里改成=Response(content)也是可以的,关于这两种方式的区别暂时还没弄明白
#定制自己的请求头
response.headers['myfask']='happy'
return response
app.run(port=8000)
结果如下:

元组创建
包含两个或者三个元素,分别是body内容,status状态码,headers响应头(字典类型),详细见系列文章(3)
自定义类创建
1.必须继承自Response类。
2.实现类方法force_type(cls,rv,environ=None)。
3.必须指定app.response_class为你自定义的Response
一个关于自定义json格式response类的例子见链接:https://cloud.tencent.com/developer/article/1441949
response
首先response是一个对象,可以通过它访问属性
如:
@app.route('/index')
def index():
    print(request.headers)
    print(request.path)   #路由规则:/index
    print(request.fullpath)#会输出/index?
    print(request.base_url)
    print(request.url)

    return 'hh'
与模板的结合使用
render_template()
官方定义:Renders(渲染) a template from the template folder with the given context.
渲染解决的问题:这样既不需要想前面一样将整个html的代码写到函数里了
app=Flask(__name__)
app.config.from_object(config)
@app.route('/register')
def register():#render:渲染
    r=render_template('regis.html')
    return r
app.run()
代码执行的逻辑过程如下,一句话来说就是一个找加返回的过程:

render_template()的返回其实就是html的代码
(关于什么是路由规则表下边有补充)
拿到输入的内容
上边通过界面提交内容后,我们需要拿到它。
先上代码,然后根据运行结果做解释。
#修改
app=Flask(__name__)
app.config.from_object(config)
@app.route('/register')
def register():#render:渲染
    r=render_template('regis.html')
    return r
@app.route('/register2')
def register2():
	print(request.full_path)
	print(request.path)
	print(request.args)
	print(request.args.get('username') )#get是字典方法
	print(request.args.get('address') )#get是字典方法
    return '加入成功'
app.run()
#修改html文件,以下代码含义即提交操作后自动访问/register2
#前提是action定义了
**思考:如果把html中的method改为post会怎么样?答案下文中有

点击提交后:
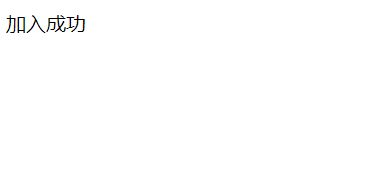
控制台输出:

可以观察到,是带着输入的信息即html中的form表单规定的信息来请求register2的,同时request.args类似字典记录着该值。
注意
对应html文件需要放在当前目录templates文件夹下,这是Flask已经默认定义好的。
一个小插曲:
忘了导入模块,出现以下报错,找了半天原因后来发现控制台其实提示了……:
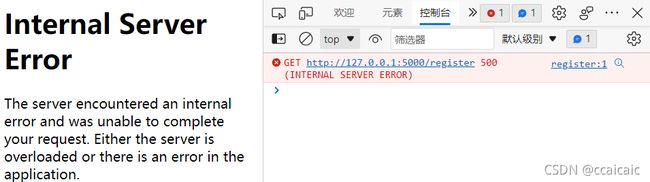
from flask import render_template
补充:路由规则表
print(app.url_map)
输出示例:

第三行是自带的可以不用管;
其他的按顺序表示:请求路径->对应绑定的视图函数名;
**需要注意的一点是这里均默认只支持GET方法,这种情况下如果将html文件中form的method该为post就会报错,解决方法如下:
@app.route('/register',methods=['GET','POST'])

#同时将args取值方式改为request.form.get(……)
参考
1.百度百科
2.https://cloud.tencent.com/developer/article/1441949