![]()
本系列代码地址: https://github.com/JoJoTec/sp...
实现 WeClient 的 NamedContextFactory
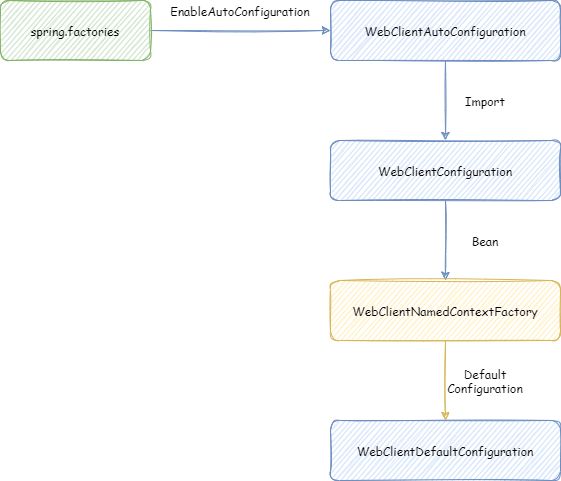
我们要实现的是不同微服务自动配置装载不同的 WebClient Bean,这样就可以通过 NamedContextFactory 实现。我们先来编写下实现这个 NamedContextFactory 整个的加载流程的代码,其结构图如下所示:
# AutoConfiguration
org.springframework.boot.autoconfigure.EnableAutoConfiguration=\
com.github.jojotech.spring.cloud.webflux.auto.WebClientAutoConfiguration
在 spring.factories 定义了自动装载的自动配置类 WebClientAutoConfiguration
@Import(WebClientConfiguration.class)
@Configuration(proxyBeanMethods = false)
public class WebClientAutoConfiguration {
}
WebClientAutoConfiguration 这个自动配置类 Import 了 WebClientConfiguration
@Configuration(proxyBeanMethods = false)
@EnableConfigurationProperties(WebClientConfigurationProperties.class)
public class WebClientConfiguration {
    @Bean
    public WebClientNamedContextFactory getWebClientNamedContextFactory() {
        return new WebClientNamedContextFactory();
    }
}
WebClientConfiguration 中创建了 WebClientNamedContextFactory 这个 NamedContextFactory 的 Bean。在这个 NamedContextFactory 中,定义了默认配置 WebClientDefaultConfiguration。在这个默认配置中,主要是给每个微服务都定义了一个 WebClient
定义 WebClient 的配置类
我们编写下上一节定义的配置,包括:
- 微服务名称
- 微服务地址,服务地址,不填写则为 http://微服务名称
- 连接超时,使用 Duration,这样我们可以用更直观的配置了,例如 5ms,6s,7m 等等
- 响应超时,使用 Duration,这样我们可以用更直观的配置了,例如 5ms,6s,7m 等等
- 可以重试的路径,默认只对 GET 方法重试,通过这个配置增加针对某些非 GET 方法的路径的重试;同时,这些路径可以使用 * 等路径匹配符,即 Spring 中的 AntPathMatcher 进行路径匹配多个路径。例如
/query/order/**
WebClientConfigurationProperties
@Data
@NoArgsConstructor
@ConfigurationProperties(prefix = "webclient")
public class WebClientConfigurationProperties {
    private Map configs;
    @Data
    @NoArgsConstructor
    public static class WebClientProperties {
        private static AntPathMatcher antPathMatcher = new AntPathMatcher();
        private Cache retryablePathsMatchResult = Caffeine.newBuilder().build();
        /**
         * 服务地址,不填写则为 http://serviceName
         */
        private String baseUrl;
        /**
         * 微服务名称,不填写就是 configs 这个 map 的 key
         */
        private String serviceName;
        /**
         * 可以重试的路径,默认只对 GET 方法重试,通过这个配置增加针对某些非 GET 方法的路径的重试
         */
        private List retryablePaths;
        /**
         * 连接超时
         */
        private Duration connectTimeout = Duration.ofMillis(500);
        /**
         * 响应超时
         */
        private Duration responseTimeout = Duration.ofSeconds(8);

        /**
         * 是否匹配
         * @param path
         * @return
         */
        public boolean retryablePathsMatch(String path) {
            if (CollectionUtils.isEmpty(retryablePaths)) {
                return false;
            }
            return retryablePathsMatchResult.get(path, k -> {
                return retryablePaths.stream().anyMatch(pattern -> antPathMatcher.match(pattern, path));
            });
        }
    }
}
粘合 WebClient 与 resilience4j
接下来粘合 WebClient 与 resilience4j 实现断路器以及重试逻辑,WebClient 基于 project-reactor 实现,resilience4j 官方提供了与 project-reactor 的粘合库:
    io.github.resilience4j
    resilience4j-reactor
参考官方文档,我们可以像下面这样给普通的 WebClient 增加相关组件:
增加重试器:
//由于还是在前面弄好的 spring-cloud 环境下,所以还是可以这样获取配置对应的 retry
Retry retry;
try {
    retry = retryRegistry.retry(name, name);
} catch (ConfigurationNotFoundException e) {
    retry = retryRegistry.retry(name);
}

Retry finalRetry = retry;
WebClient.builder().filter((clientRequest, exchangeFunction) -> {
    return exchangeFunction.exchange(clientRequest)
        //核心就是加入 RetryOperator
        .transform(RetryOperator.of(finalRetry));
})
这个 RetryOperator 其实就是使用了 project-reactor 中的 retryWhen 方法实现了 resilience4j 的 retry 机制:
@Override
public Publisher apply(Publisher publisher) {
    //对于 mono 的处理
    if (publisher instanceof Mono) {
        Context context = new Context<>(retry.asyncContext());
        Mono upstream = (Mono) publisher;
        return upstream.doOnNext(context::handleResult)
            .retryWhen(reactor.util.retry.Retry.withThrowable(errors -> errors.flatMap(context::handleErrors)))
            .doOnSuccess(t -> context.onComplete());
    } else if (publisher instanceof Flux) {
        //对于 flux 的处理
        Context context = new Context<>(retry.asyncContext());
        Flux upstream = (Flux) publisher;
        return upstream.doOnNext(context::handleResult)
            .retryWhen(reactor.util.retry.Retry.withThrowable(errors -> errors.flatMap(context::handleErrors)))
            .doOnComplete(context::onComplete);
    } else {
        //不可能是 mono 或者 flux 以外的其他的
        throw new IllegalPublisherException(publisher);
    }
}
可以看出,其实主要填充了:
doOnNext(context::handleResult): 在有响应之后调用,将响应结果传入 retry 的 Context,判断是否需要重试以及重试间隔是多久,并且抛出异常RetryDueToResultExceptionretryWhen(reactor.util.retry.Retry.withThrowable(errors -> errors.flatMap(context::handleErrors))):捕捉异常RetryDueToResultException,根据其中的间隔时间,返回 reactor 的重试间隔:Mono.delay(Duration.ofMillis(waitDurationMillis))doOnComplete(context::onComplete):请求完成,没有异常之后,调用 retry 的 complete 进行清理
增加断路器:
//由于还是在前面弄好的 spring-cloud 环境下,所以还是可以这样获取配置对应的 circuitBreaker
CircuitBreaker circuitBreaker;
try {
    circuitBreaker = circuitBreakerRegistry.circuitBreaker(instancId, finalServiceName);
} catch (ConfigurationNotFoundException e) {
    circuitBreaker = circuitBreakerRegistry.circuitBreaker(instancId);
}

CircuitBreaker finalCircuitBreaker = circuitBreaker;
WebClient.builder().filter((clientRequest, exchangeFunction) -> {
    return exchangeFunction.exchange(clientRequest)
        //核心就是加入 CircuitBreakerOperator
        .transform(CircuitBreakerOperator.of(finalCircuitBreaker));
})
类似的,CircuitBreakerOperator 其实也是粘合断路器与 reactor 的 publisher 中的一些 stage 方法,将结果的成功或者失败记录入断路器,这里需要注意,可能有的链路能走到 onNext,可能有的链路能走到 onComplete,也有可能都走到,所以这两个方法都要记录成功,并且保证只记录一次:
class CircuitBreakerSubscriber extends AbstractSubscriber {

    private final CircuitBreaker circuitBreaker;

    private final long start;
    private final boolean singleProducer;

    private final AtomicBoolean successSignaled = new AtomicBoolean(false);
    private final AtomicBoolean eventWasEmitted = new AtomicBoolean(false);

    protected CircuitBreakerSubscriber(CircuitBreaker circuitBreaker,
        CoreSubscriber downstreamSubscriber,
        boolean singleProducer) {
        super(downstreamSubscriber);
        this.circuitBreaker = requireNonNull(circuitBreaker);
        this.singleProducer = singleProducer;
        this.start = circuitBreaker.getCurrentTimestamp();
    }

    @Override
    protected void hookOnNext(T value) {
        if (!isDisposed()) {
             //正常完成时,断路器也标记成功,因为可能会触发多次(因为 onComplete 也会记录),所以需要 successSignaled 标记只记录一次
            if (singleProducer && successSignaled.compareAndSet(false, true)) {
                circuitBreaker.onResult(circuitBreaker.getCurrentTimestamp() - start, circuitBreaker.getTimestampUnit(), value);
            }
            //标记事件已经发出,就是已经执行完 WebClient 的请求,后面判断取消的时候会用到
            eventWasEmitted.set(true);

            downstreamSubscriber.onNext(value);
        }
    }

    @Override
    protected void hookOnComplete() {
        //正常完成时,断路器也标记成功,因为可能会触发多次(因为 onNext 也会记录),所以需要 successSignaled 标记只记录一次
        if (successSignaled.compareAndSet(false, true)) {
            circuitBreaker.onSuccess(circuitBreaker.getCurrentTimestamp() - start, circuitBreaker.getTimestampUnit());
        }

        downstreamSubscriber.onComplete();
    }

    @Override
    public void hookOnCancel() {
        if (!successSignaled.get()) {
            //如果事件已经发出,那么也记录成功
            if (eventWasEmitted.get()) {
                circuitBreaker.onSuccess(circuitBreaker.getCurrentTimestamp() - start, circuitBreaker.getTimestampUnit());
            } else {
                //否则取消
                circuitBreaker.releasePermission();
            }
        }
    }

    @Override
    protected void hookOnError(Throwable e) {
        //记录失败
        circuitBreaker.onError(circuitBreaker.getCurrentTimestamp() - start, circuitBreaker.getTimestampUnit(), e);
        downstreamSubscriber.onError(e);
    }
}
我们会使用这个库进行粘合,但是不会直接使用上面的代码,因为考虑到:
- 需要在重试以及断路中加一些日志,便于日后的优化
- 需要定义重试的 Exception,并且与断路器相结合,将非 2xx 的响应码也封装成特定的异常
- 需要在断路器相关的 Operator 中增加类似于 FeignClient 中的负载均衡的数据更新,使得负载均衡更加智能
在下面一节我们会详细说明我们是如何实现的有断路器以及重试逻辑和负载均衡数据更新的 WebClient。
微信搜索“我的编程喵”关注公众号,每日一刷,轻松提升技术,斩获各种offer:
![]()
