Cenots7搭建HAProxy+nginx+nfs实现wed高可用性集群
安装环境
实现反向代理和负载均衡和共享储存
| 服务主机 | ip地址 | 安装软件 |
| HAProxy | 192.168.2.212 | haproxy-1.7.8.tar.gz |
| nginx1 | 192.168.2.206 | nginx |
| nginx2 | 192.168.2.195 | nginx |
| nfs | 192.168.2.214 | nfs |
注意注意一定要关闭防火墙和Selinux
每一台都要,不要忘了,实在不行开始做打一次,配置完打一次
关闭防火墙
systemctl stop firewalld.service       //关闭服务
systemctl disable firewalld.service  //设为默认开机不启动
关闭Selinux
setenforce 0               //关闭
/etc/sysconfig/selinux    //进入 selinux文件修改它
SELINUX=disabled //改成 disabled
HAProxy高可用安装部署
一,下载解压
本文章采用的是1.7.8版本haproxy-1.7.8.tar.gz
想下载其它版本去官网找,wget 路径/haproxy-1.7.8.tar.gz(版本名字)
wget https://src.fedoraproject.org/repo/pkgs/haproxy/haproxy-1.7.8.tar.gz/sha512/e1d65c8a4607c01d52628f36f8c7342096267130a0f949474746f571158e4f795281f78765004c214a0527f74ce180760f9cc910d3650d30026776076d721c0c/haproxy-1.7.8.tar.gz[root@localhost /]# tar -zxvf haproxy-1.7.8.tar.gz
二,编译安装
[root@localhost /]# cd haproxy-1.7.8/
[root@localhost haproxy-1.7.8]# uname -r    #查看内核版本
3.10.0-1160.el7.x86_64
[root@localhost haproxy-1.7.8]# make TARGET=linux310 ARCH=x86_64
[root@localhost haproxy-1.7.8]# make install PREFIX=/usr/local/haproxy  #编译安装,路径没有(没有会自己创建)
install -d "/usr/local/haproxy/sbin"
install haproxy  "/usr/local/haproxy/sbin"
install -d "/usr/local/haproxy/share/man"/man1
install -m 644 doc/haproxy.1 "/usr/local/haproxy/share/man"/man1
install -d "/usr/local/haproxy/doc/haproxy"
for x in configuration management architecture cookie-options lua WURFL-device-detection proxy-protocol linux-syn-cookies network-namespaces DeviceAtlas-device-detection 51Degrees-device-detection netscaler-client-ip-insertion-protocol close-options SPOE intro; do \
        install -m 644 doc/$x.txt "/usr/local/haproxy/doc/haproxy" ; \
done
TARGET=linux310 内核版本 例子内核为 kernel 大于2.6.28的可以用:TARGET=linux2628
ARCH=x86_64 系统位
三,创建配置文件
1.79及以后的版本解压后文件内就没有haproxy.cfg文件,需要自行添加,添加到安装目录下
配置直接粘贴 修改ip地址就差不多了
haproxy.cfg (文件名)
[root@localhost haproxy-1.7.8]# cd /usr/local/haproxy/
[root@localhost haproxy]# ls
doc  sbin  share
[root@localhost haproxy]# vim haproxy.cfg
1.编辑配置文件
只需要更改HAPorxy主机的IP地址和Nginx的地址
global
  #日志
  log 127.0.0.1 local0 info
  #最大连接数
  maxconn 10240
  daemon

defaults
  #应用全局的日志配置
  log global
  mode http
  #超时配置
  timeout connect 5000
  timeout client 5000
  timeout server 5000
  timeout check 2000

listen http_front #haproxy的客户页面
  bind 192.168.2.212:8888         #HAProxy自己的IP地址
  mode http
  option httplog
  stats uri /haproxy
  stats auth admin:123456          #控制面板账号密码 账号:admin
  stats refresh 5s
  stats enable

listen webcluster
       bind 0.0.0.0:80     #这不用管,要打也只能打自己的IP
       option httpchk GET /index.html
       balance roundrobin  # 负载均衡模式轮询
       server inst1 192.168.2.195:80 check inter 2000 fall 3
       server inst2 192.168.2.206:80 check inter 2000 fall 3
2.启动服务
用安装包解压后目录里面的haproxy 启动安装目录的haproxy.cfg
/haproxy-1.7.8/haproxy -f /usr/local/haproxy/haproxy.cfg
3.验证是否成功
[root@localhost /]# lsof -i:8888
COMMAND  PID USER   FD   TYPE DEVICE SIZE/OFF NODE NAME
haproxy 4092 root    3u  IPv4  48646      0t0  TCP localhost.localdomain:ddi-tcp-1 (LISTEN)
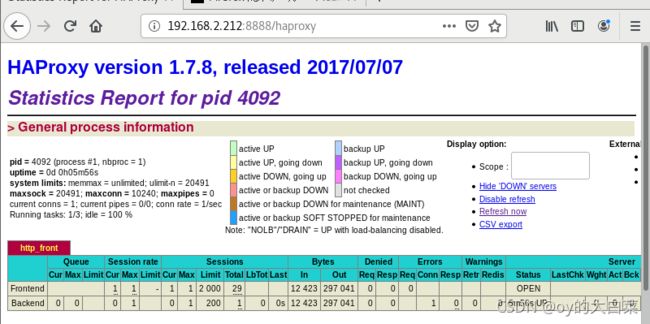
4.访问控制面板
http://192.168.2.212:8888/haproxy 配置文件里都有
Nginx安装
sudo rpm -Uvh http://nginx.org/packages/centos/7/noarch/RPMS/nginx-release-centos-7-0.el7.ngx.noarch.rpm
安装 Nginx
sudo yum install -y nginx启动Nginx和开机自启
sudo systemctl start nginx.service
sudo systemctl enable nginx.service
yum安装nginx网站文件存放默认目录 可以修改index.html文件访问看看,那个50x.html文件不用管
cd /usr/share/nginx/html
测试:给每个Nginx服务器的网页原文件内容删除,添加自己的ip进行测试
[root@localhost ~]# cd /usr/share/nginx/html
[root@localhost html]# vim index.html
oyddbc 192.168.2.195
刷新会访问另一个就是轮询的作用,一直点一直刷一直爽
nfs共享储存
安装nfs软件包
[root@localhost /]# yum install -y rpc-bind nfs-utils创建共享目录文件并添加权限
[root@localhost /]# mkdir /oyddbc
[root@localhost /]# chmod -R 777 /oyddbc
[root@localhost /]# vim /oyddbc/index.html
oyddbaic
修改nfs配置文件,共享给nginx服务器
[root@localhost /]# vim /etc/exports
/oyddbc/ 192.168.2.195(rw,no_root_squash,no_all_squash,sync)
/oyddbc/ 192.168.2.206(rw,no_root_squash,no_all_squash,sync)
保存并生效配置文件
exportfs -r启动rpcbind和nfs服务 ,按顺序启动
[root@localhost /]# systemctl start rpcbind
[root@localhost /]# systemctl start nfs
查看是否可以连接
[root@localhost /]# showmount -e localhost
Export list for localhost:
/oyddbc 192.168.2.206,192.168.2.195
挂载 (出现这种都是正常的)
[root@localhost /]# mount localhost:/oyddbc /mnt
mount.nfs: access denied by server while mounting localhost:/oyddbc注意,注意,在两台nginx敲这个,将共享目录挂载到nginx默认使用的网页目录下
[root@localhost /]# mount -v -t nfs 192.168.2.215:/oyddbc /usr/share/nginx/html
mount.nfs: timeout set for Sun Nov 21 22:30:39 2021
重新进入html目录查看共享情况 (要退出才能刷新)
[root@localhost html]# ls
50x.html  index.html
[root@localhost html]# cd /
[root@localhost /]# cd /usr/share/nginx/html/
[root@localhost html]# ls
index.html
去访问HAProxy,是否是nfs服务器共享的index.html,访问会切换目录不变(直接打HAPorxy的IP地址访问)


