【数据结构初阶】第四篇——双链表(实现+图解)
这篇博客,我要给大家分享双链表的知识,上一篇博客,我给大家分享了有关单链表的知识,单链表相比双链表而言结构比较简单,但事实上,双链表的实现比单链表要方便很多,下面我就来给大家聊一聊双链表的那些事儿~
博客代码已上传至gitee:https://gitee.com/byte-binxin/data-structure/tree/master/List_2.0
目录
- 带头双向链表的结构
- 带头双向链表的接口实现
-
- 初始化双链表
- 打印双链表
- 双链表的销毁
- 双链表的尾插
- 双链表的尾删
- 双链表的头插
- 双链表的头删
- 双链表任意位置查找
- 双链表任意位置之前插入
- 双链表任意位置删除
- 链表和顺序表的对比
- 总结
带头双向链表的结构
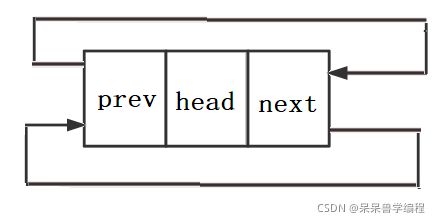
看下面的图,就是我今天要给大家分享有结构——带头双向链表。这里的头是不存放任何数据的,就是一个哨兵卫的头结点。
用代码来表示每一个节点就是这样的:
typedef int LTDataType;
typedef struct ListNode
{

	LTDataType data;
	struct ListNode* prev;//指向前一个节点
	struct ListNode* next;//指向后一个节点
}LTNode;
带头双向链表的接口实现
初始化双链表
在初始化双链表的过程中,我们要开好一个头节点,作为哨兵卫的头节点,然后返回这个节点的指针,接口外面只要用一个节点指针接受这个返回值就好了,具体实现如下:

LTNode* ListInit(LTNode* pHead)
{

	pHead = (LTNode*)malloc(sizeof(LTNode));
	if (pHead == NULL)
	{

		printf("malloc fail\n");
		exit(-1);
	}
	pHead->next = pHead;
	pHead->prev = pHead;
	return pHead;
}
打印双链表
双链表的打印就是遍历一遍双链表,用一个cur节点指针来走,走到head的位置就停下来。
看代码实现:
void ListPrint(LTNode* pHead)
{

	assert(pHead);

	LTNode* cur = pHead->next;
	printf("Head ");
	while (cur != pHead)
	{

		printf("<-> %d ", cur->data);
		cur = cur->next;
	}
	printf("<-> Head\n");
}
双链表的销毁
申请的节点使用完之后都要自己手动释放,以防止内存泄漏这些不好的问题出现。我们实现这个接口,用一级指针接受实参,其实也是遍历一遍链表,看一下代码实现:
void ListDestroy(LTNode* pHead)
{

	assert(pHead);

	LTNode* cur = pHead->next;
	LTNode* next = cur->next;
	while (cur != pHead)
	{

		free(cur);
		cur = next;
		next = cur->next;
	}
	free(pHead);
}
注意:销毁链表是接口外面要记得对链表置空。
双链表的尾插
双链表的尾插首先要开辟一个节点,由于头插和任意位置的插入都会开辟一个节点,所以我们把这个功能封装成一个函数BuyListNode,具体代码实现如下:
LTNode* BuyListNode(LTDataType x)
{

	LTNode* newNode = (LTNode*)malloc(sizeof(LTNode));
	if (newNode == NULL)
	{

		printf("malloc fail\n");
		exit(-1);
	}
	newNode->data = x;
	newNode->next = NULL;
	newNode->prev = NULL;

	return newNode;
}
申请完节点后,我们就要通过改变指针的指向来把这个节点连接上去,棘突步骤如下:
- 先让尾节点的next指向新开辟的节点newNode,然后让newNode的prev指向尾节点
- 让newNode的next指向head,head的prev指向newNode
这样我们就把新开辟的节点尾插上去了。
下面来看一下具体的代码实现:
void ListPushBack(LTNode* pHead, LTDataType x)
{

	assert(pHead);

	LTNode* newNode = BuyListNode(x);
	LTNode* tail = pHead->prev;

	tail->next = newNode;
	newNode->prev = tail;
	newNode->next = pHead;
	pHead->prev = newNode;

}
来测试一下代码:
void TestList1()
{

	LTNode* pList = NULL;
	pList = ListInit(pList);

	ListPushBack(pList, 1);
	ListPushBack(pList, 2);
	ListPushBack(pList, 3);
	ListPushBack(pList, 4);
	ListPushBack(pList, 5);
	ListPrint(pList);

	ListDestroy(pList);
	pList = NULL;
}
双链表的尾删
尾删要考虑链表是否为空,这里链表为空指的是只有一个头节点,如果只有一个头结点我们就不能继续对链表进行删除操作了,所以我们要对参数进行断言防止头被删。
assert(pHead->next != pHead);
尾删具体步骤如下:
- 先找到尾节点,然后找到尾节点的前一个节点tailPrev,然后就可以free掉尾节点了
- 接下来就是改变指针指向,让tailPrev的next指向head,然后让head的prev指向tailPrev即可,这样我们就顺利地完成了尾删
代码实现如下:
void ListPopBack(LTNode* pHead)
{

	assert(pHead);
	assert(pHead->next != pHead);

	LTNode* tail = pHead->prev;
	LTNode* tailPrev = tail->prev;
	free(tail);
	tailPrev->next = pHead;
	pHead->prev = tailPrev;

}
下面我们再来测试一下代码:
void TestList1()
{

	LTNode* pList = NULL;
	pList = ListInit(pList);

	ListPushBack(pList, 1);
	ListPushBack(pList, 2);
	ListPushBack(pList, 3);
	ListPushBack(pList, 4);
	ListPushBack(pList, 5);
	ListPrint(pList);

	ListPopBack(pList);
	ListPopBack(pList);
	ListPopBack(pList);
	ListPrint(pList);
	ListDestroy(pList);
	pList = NULL;
}
双链表的头插
头插就是在head后插一个节点,首先还是要开辟一个节点,然后就是改变指针的指向,具体实现步骤如下:
- 首先记住head的的下一个节点next,然后让newNode的prev指向head,head的next指向newNode
- 让newNode的next指向next,next的prev指向newNode
代码实现如下:
void ListPushFront(LTNode* pHead, LTDataType x)
{

	assert(pHead);

	LTNode* newNode = BuyListNode(x);
	LTNode* first = pHead->next;
	pHead->next = newNode;
	newNode->prev = pHead;
	newNode->next = first;
	first->prev = newNode;

}
测试代码如下:
void TestList1()
{

	LTNode* pList = NULL;
	pList = ListInit(pList);
	ListPushFront(pList, 1);
	ListPushFront(pList, 2);
	ListPushFront(pList, 3);
	ListPushFront(pList, 4);
	ListPrint(pList);

	ListDestroy(pList);
	pList = NULL;
}
双链表的头删
头删同样要考虑链表是否为空,这里链表为空指的是只有一个头节点,如果只有一个头结点我们就不能继续对链表进行删除操作了,所以我们要对参数进行断言防止头被删。
assert(pHead->next != pHead);
头删具体步骤实现如下:
- 先找到要删除的节点,也就是head的下一个firstNode,找到这个节点的下一个next,然后free这个节点
- 接下来就是改变指针的指向,让head的next指向next,让next的prev指向head
代码实现如下:
void ListPopFront(LTNode* pHead)
{

	assert(pHead);
	assert(pHead->next != pHead);

	LTNode* first = pHead->next;
	LTNode* second = first->next;

	free(first);
	pHead->next = second;
	second->prev = pHead;

}
测试代码如下:
void TestList1()
{

	LTNode* pList = NULL;
	pList = ListInit(pList);
	ListPushFront(pList, 1);
	ListPushFront(pList, 2);
	ListPushFront(pList, 3);
	ListPushFront(pList, 4);
	ListPrint(pList);

	ListPopFront(pList);
	ListPopFront(pList);
	ListPopFront(pList);
	ListPrint(pList);

	ListDestroy(pList);
	pList = NULL;
}
双链表任意位置查找
查找无非就是遍历双链表,这是还是直接上代码实现:
LTNode* ListFind(LTNode* pHead, LTDataType x)
{

	assert(pHead);

	LTNode* cur = pHead->next;
	while (cur != pHead)
	{

		if (cur->data == x)
		{

			return cur;
		}
		cur = cur->next;
	}
	return NULL;
}
双链表任意位置之前插入
任意位置插入首先要开辟一个节点,然后就是按照所个位置,改变指针的指向来把这个节点连接上去,看具体代码实现如下:
void ListInsert(LTNode* pHead, LTNode* pos, LTDataType x)
{

	assert(pHead);

	LTNode* posPrev = pos->prev;
	LTNode* newNode = BuyListNode(x);

	posPrev->next = newNode;
	newNode->prev = posPrev;
	newNode->next = pos;
	pos->prev = newNode;
}
这里我们可以在头插和尾插部分复用这个结构,来实现头插尾插,所以更新后的头插尾插代码如下:
//头插
void ListPushFront(LTNode* pHead, LTDataType x)
{

	assert(pHead);
	ListInsert(pHead, pHead->next, x);
}

//尾插
void ListPushBack(LTNode* pHead, LTDataType x)
{

	assert(pHead);
	ListInsert(pHead, pHead, x);
}
双链表任意位置删除
删除就要考虑链表是否为空,防止删除头节点,所以要断言。前面都讲了很多类似的,下面我们直接看这个接口是如何实现的:
//任意位置删除
void ListErase(LTNode* pHead, LTNode* pos)
{

	assert(pHead);
	assert(pHead->next != pHead);

	LTNode* prev = pos->prev;
	LTNode* next = pos->next;

	free(pos);
	prev->next = next;
	next->prev = prev;
}
这里同样可以复用这串代码来实现头删和尾删,具体实现如下:
//头删
void ListPopFront(LTNode* pHead)
{

	assert(pHead);
	assert(pHead->next != pHead);

	ListErase(pHead, pHead->next);
}
//尾删
void ListPopBack(LTNode* pHead)
{

	assert(pHead);
	assert(pHead->next != pHead);

	ListErase(pHead, pHead->prev);

}
链表和顺序表的对比
参考下表:
| 不同点 | 顺序表 | 链表 |
|---|---|---|
| 存储空间上 | 物理上连续 | 逻辑上连续 |
| 随机访问 | 支持 | 不支持 |
| 任意位置插入删除 | 要移动元素,O(N) | 只要改变指针指向 |
| 插入数据 | 要考虑扩容,会带来一定的空间消耗 | 没有容量这个概念,可以按需申请和释放 |
| 缓存利用率 | 高 | 低 |
总结
总的来说,单链表和双链表也算是介绍完了,双链表结构虽然比单链表复杂,但实现起来确比单链表要简单一些。链表这一部分暂告一段落,接下来我会给大家分享有关栈和队列的知识,欢迎大家关注。


