使用 MySQL-MMM 实现(MySQL双主双从)高可用群集
使用 MySQL-MMM 实现(MySQL双主双从)高可用群集
- 一、MySQL-MMM 概述
-
- 1.MySQL-MMM 优缺点
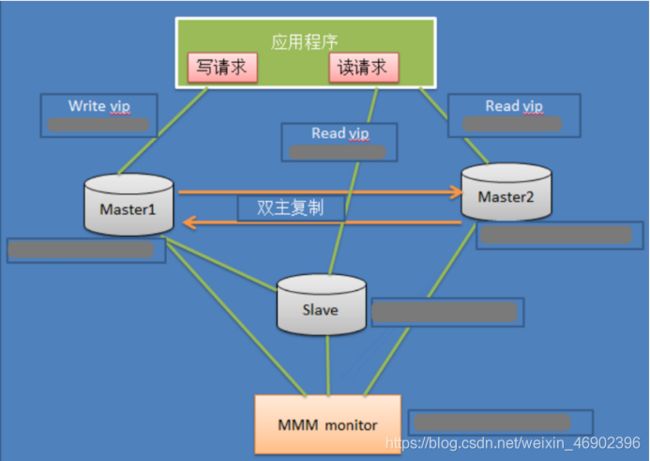
- 2.MySQL-MMM 内部工作架构
- 二、部署 MySQL-MMM 实现(MySQL双主双从)高可用群集
-
- 1.配置时间同步
- 2.配置 Master1,Master2 实现主主复制
- 3.配置 Slave1,Slave2 实现主从复制
- 4.配置 MySQL-MMM 服务
- 5.写入高可用测试
-
- 1)关闭 Master1 的 MySQL 服务
- 2)查看 Monitor 上监控
- 6.读取高可用测试
-
- 1)关闭 Slave2 的 MySQL 服务
- 2)查看 Monitor 上的监控
一、MySQL-MMM 概述
MMM(Master-Master replication manager for MySQL)是一套支持双主故障切换和双主日常管理的脚本程序。 MMM 使用 Perl 语言开发,主要用来监控和管理 MySQL Master-Master(双主)复制,可以说是 MySQL 主主复制管理器。
虽然叫做双主复制,但是业务上同一时刻只运行对一个主进行写入,另一台备选主上提供部分读服务,以加速在主主切换时刻备选主的预热,可以说 MMM 这套脚本程序一方面实现了故障切换的功能,另一方面其内部附加的工具脚本也可以实现多个 Slave 的 Read 负载均衡。
MMM 提供了自动和手动两种方式移除一组服务器中复制延迟较高的服务器的虚拟 IP,同时它还可以备份数据,实现两节点之间的数据同步等。由于 MMM 无法完全的保证数据一致性,所以 MMM 适用于对数据的一致性要求不是很高,但是又想最大程度的保证业务可用性的场景。

1.MySQL-MMM 优缺点
- 优点:高可用性,扩展性好,出现故障自动切换,对于主主同步,在同一时间只提供一台数据库写操作,保证数据的一致性。
- 缺点:Monitor 节点是单点,可以结合 Keepalived 实现高可用,对主机的数量有需求,需要实现读写分离,对程序来说是个挑战。
2.MySQL-MMM 内部工作架构
1)进程类型
mmm_mond:监控进程,负责所有的监控工作,决定和处理所有节点角色活动。此脚本需要在监控机上运行。mmm_agentd:运行在每个 MySQL 服务器上(Master 和 Slave)的代理进程,完成监控的探针工作和执行简单的远端服务设置。mmm_control:一个简单的脚本,提供管理mmm_mond进程的命令。
mysql-mmm的监管端会提供多个虚拟 IP(VIP),包括一个可写的 VIP,多个可读的 VIP;- 通过监管的管理,这些 IP 会绑定在可用的 MySQL 之上;当某一台 MySQL 宕机时,监管会将 VIP 迁移至其它 MySQL。
二、部署 MySQL-MMM 实现(MySQL双主双从)高可用群集
准备工作:
| 主机名 | 操作系统 | IP地址 |
|---|---|---|
| Master1 | CentOS7 | 192.168.1.1 |
| Master2 | CentOS7 | 192.168.1.2 |
| Slave1 | CentOS7 | 192.168.1.3 |
| Slave2 | CentOS7 | 192.168.1.4 |
| Monitor | CentOS7 | 192.168.1.5 |
- 注意:
master1master2slave1slave2需要安装 MySQL 服务:安装
1.配置时间同步
1)配置 Master1 节点的时间服务
[root@Master1 ~]# yum -y install ntp
[root@Master1 ~]# sed -i '/^server/s/^/#/g' /etc/ntp.conf
[root@Master1 ~]# cat <<END >> /etc/ntp.conf
server 127.127.1.0
fudge 127.127.1.0 stratum 8
END
[root@Master1 ~]# systemctl start ntpd
2)配置剩余节点向 Master1 同步时间
[root@Master2 ~]# yum -y install ntpdate
[root@Master2 ~]# /usr/sbin/ntpdate 192.168.1.1
[root@Master2 ~]# echo "/usr/sbin/ntpdate 192.168.1.1" >> /etc/rc.local
[root@Master2 ~]# chmod +x /etc/rc.local
3)配置所有节点的 hosts 文件解析
[root@Master1 ~]# cat <<END >> /etc/hosts
192.168.1.1 master1
192.168.1.2 master2
192.168.1.3 slave1
192.168.1.4 slave2
192.168.1.5 monitor
END
2.配置 Master1,Master2 实现主主复制
1)配置 Master1 实现双主复制
[root@Master1 ~]# cat <<END >> /etc/my.cnf
server-id=1
log-bin=mysql-bin
log-slave-updates
sync_binlog=1
auto_increment_increment=2
auto_increment_offset=1
relay-log=relay1-log-bin
relay-log-index=slave-relay1-bin.index
END
[root@Master1 ~]# systemctl restart mysqld
注解:
sync_binlog=1:主机每次提交事务的时候把二进制日志的内容同步到磁盘上,所以即使服务器崩溃,也会把时间写入到日志中。
[root@Master1 ~]# mysql -uroot -p123123
mysql> grant replication slave on *.* to master@'192.168.1.%' identified by '123123';
mysql> flush privileges;
[root@Master2 ~]# cat <<END >> /etc/my.cnf
server-id=2
log-bin=mysql-bin
log-slave-updates
sync_binlog=1
auto_increment_increment=2
auto_increment_offset=1
relay-log=relay2-log-bin
relay-log-index=slave-relay2-bin.index
END
[root@Master2 ~]# systemctl restart mysqld
[root@Master2 ~]# mysql -uroot -p123123
mysql> change master to
    -> master_host='192.168.1.1',
    -> master_user='master',
    -> master_password='123123';
mysql> start slave;
mysql> show slave status\G
[root@Master2 ~]# mysql -uroot -p123123
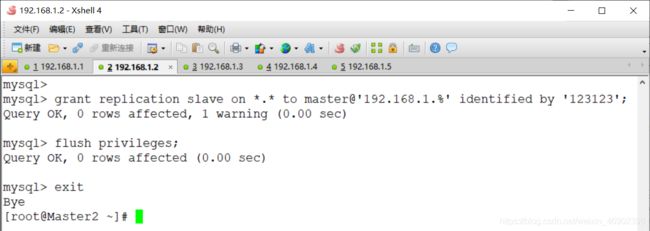
mysql> grant replication slave on *.* to master@'192.168.1.%' identified by '123123';
mysql> flush privileges;
mysql> exit
[root@Master1 ~]# mysql -uroot -p123123
mysql> change master to
    -> master_host='192.168.1.2',
    -> master_user='master',
    -> master_password='123123';
mysql> start slave;
mysql> show slave status\G
3.配置 Slave1,Slave2 实现主从复制
Slave1
[root@Slave1 ~]# cat <<END >> /etc/my.cnf
server-id=3
relay-log=relay3-log-bin
relay-log-index=slave-relay3-bin.index
END
[root@Slave1 ~]# systemctl restart mysqld
Slave2
[root@Slave2 ~]# cat <<END >> /etc/my.cnf
server-id=4
relay-log=relay4-log-bin
relay-log-index=slave-relay4-bin.index
END
[root@Slave2 ~]# systemctl restart mysqld
Slave1 Slave2 操作一致
[root@Slave1 ~]# mysql -uroot -p123123
mysql> change master to
    -> master_host='192.168.1.1',
    -> master_user='master',
    -> master_password='123123',
mysql> start slave;
mysql> show slave status\G
4.配置 MySQL-MMM 服务
1)通过网络源来安装 MySQL-MMM 软件
- 分别在
Master1Master2Slave1Slave2Monitor配置阿里源:
[root@Master1 ~]# wget -O /etc/yum.repos.d/CentOS-Base.repo http://mirrors.aliyun.com/repo/Centos-7.repo
[root@Master1 ~]# yum -y install epel-release
Master1 Master2 Slave1 Slave2:
[root@Master1 ~]# yum -y install mysql-mmm mysql-mmm-agent mysql-mmm-tools
Monitor:
[root@Monitor ~]# yum -y install mysql-mmm mysql-mmm-tools mysql-mmm-monitor
- 在双主双从主机上配置 Agent 指定本机的节点名称:
[root@Master1 ~]# sed -i 's/this db1/this db1/' /etc/mysql-mmm/mmm_agent.conf
[root@Master2 ~]# sed -i 's/this db1/this db2/' /etc/mysql-mmm/mmm_agent.conf
[root@Slave1 ~]# sed -i 's/this db1/this db3/' /etc/mysql-mmm/mmm_agent.conf
[root@Slave2 ~]# sed -i 's/this db1/this db4/' /etc/mysql-mmm/mmm_agent.conf
2)在 Master1 节点上授权 Monitor 节点连接数据库群集
[root@Master1 ~]# mysql -uroot -p123123
# 创建监控账号
mysql> grant replication client on *.* to 'mmm_monitor'@'192.168.1.%' identified by 'monitor';

# 创建代理账号
mysql> grant super,replication client,process on *.* to 'mmm_agent'@'192.168.1.%' identified by 'agent';

# 刷新权限
mysql> flush privileges;

mysql> exit
注解:
replication client:用于执行show master status等命令。这些命令是用来查看复制状态的。replication slave:用于连接主库从库进行读取二进制文件进而实现复制的。super:用于杀死 MySQL 中连接的进程,设置全局变量,重置主从配置的权限。process:具有查看当前运行的 SQL 的权限 ,以及explain执行计划。
3)配置 Monitor 节点上的 MySQL-MMM 的配置文件并复制到各个 MySQL 节点
[root@Monitor ~]# vim /etc/mysql-mmm/mmm_common.conf
active_master_role      writer

<host default>
    cluster_interface       ens33
    pid_path                /var/run/mysql-mmm/mmm_agentd.pid
    bin_path                /usr/libexec/mysql-mmm/
    replication_user        master
    replication_password    123123
    agent_user              mmm_agent
    agent_password          agent
</host>

<host db1>
    ip      192.168.1.1
    mode    master
    peer    db2
</host>

<host db2>
    ip      192.168.1.2
    mode    master
    peer    db1
</host>

<host db3>
    ip      192.168.1.3
    mode    slave
</host>

<host db4>
    ip      192.168.1.4
    mode    slave
</host>

<role writer>
    hosts   db1, db2
    ips     192.168.1.188
    mode    exclusive
</role>

<role reader>
    hosts   db3, db4
    ips     192.168.1.211,192.168.1.233
    mode    balanced
</role>
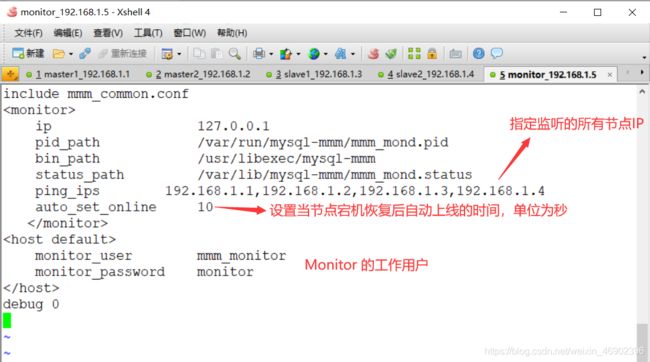
[root@Monitor ~]# vim /etc/mysql-mmm/mmm_mon.conf
include mmm_common.conf
<monitor>
    ip                  127.0.0.1
    pid_path            /var/run/mysql-mmm/mmm_mond.pid
    bin_path            /usr/libexec/mysql-mmm
    status_path         /var/lib/mysql-mmm/mmm_mond.status
    ping_ips        192.168.1.1,192.168.1.2,192.168.1.3,192.168.1.4
    auto_set_online     10
   </monitor>
<host default>
    monitor_user        mmm_monitor
    monitor_password    monitor
</host>
debug 0
[root@Monitor ~]# for i in 1 2 3 4;do scp /etc/mysql-mmm/mmm_common.conf root@192.168.1.$i:/etc/mysql-mmm/;done
4)启动 MySQL-MMM 服务
- 分别在
Master1Master2Slave1Slave2四个节点上启用 MySQL-MMM 服务。
[root@Master1 ~]# systemctl daemon-reload
[root@Master1 ~]# systemctl start mysql-mmm-agent
[root@Master1 ~]# netstat -anpt | grep mmm

5)启动 Monitor 节点上的 MySQL-MMM 服务并查看群集状态
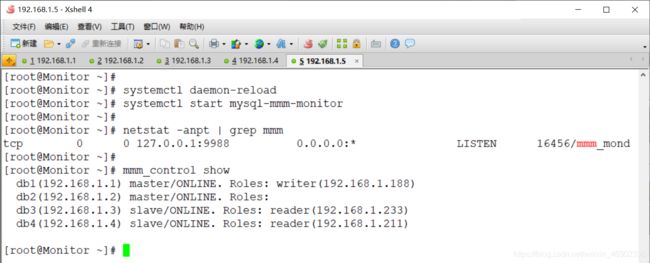
[root@Monitor ~]# systemctl daemon-reload
[root@Monitor ~]# systemctl start mysql-mmm-monitor
[root@Monitor ~]# netstat -anpt | grep mmm
[root@Monitor ~]# mmm_control show							#查看群集状态
ONLINE. Roles:表示在线节点。HARD_OFFLINE:表示ping不通并且(或者) MySQL 连接中断,会导致hard_offline状态。admin_offline:是手动下线的状态。
5.写入高可用测试
1)关闭 Master1 的 MySQL 服务
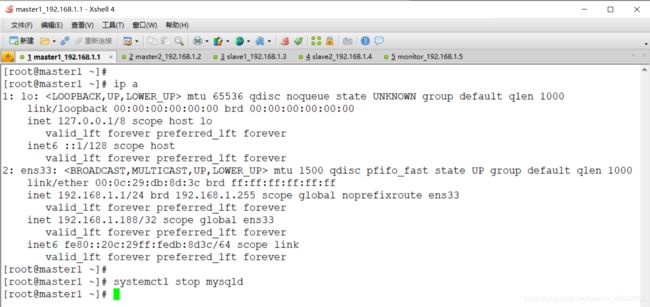
[root@Master1 ~]# ip a
[root@Master1 ~]# systemctl stop mysqld
2)查看 Monitor 上监控
[root@Monitor ~]# mmm_control show
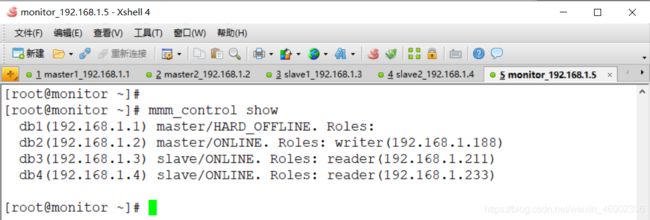
此时 VIP 已经到 Master2 服务器上,整个切换过程大概 10 秒左右

6.读取高可用测试
1)关闭 Slave2 的 MySQL 服务
[root@Slave2 ~]# systemctl stop mysqld
2)查看 Monitor 上的监控
[root@Monitor ~]# mmm_control show

此时两个读 VIP 都绑定到了 Slave1 上,从而实现了容错机制

如果想实现读写分离需在 Slave 上配置:
[root@Slave1 ~]# sed -i '/\[mysqld]/a super_read_only=1' /etc/my.cnf
read_only=1:开启数据库服务的只读服务,但是只有低于super(root) 权限的普通用于才会受此限制(不好使)super_read_only=1:开启数据库服务的只读服务,限定具有root权限的用户的权限。
验证:
[root@Master1 ~]# mysql -uroot -p123123
mysql> grant all on *.* to client@'192.168.1.%' identified by '123123';
mysql> flush privileges;
mysql> exit
[root@Client ~]# yum -y install mariadb
[root@Client ~]# mysql -uclient -p123123 -h192.168.1.211


