基于迁移学习的PyTorch图像分类
在这篇文章中,我们将讨论PyTorch中的图像分类。我们将使用CalTech256数据集的一个子集对10只动物的图像进行分类。我们将介绍数据集准备、数据增强和构建分类器的步骤。我们使用迁移学习来使用底层图像特征,如边缘、纹理等。这些是通过预先训练的模型ResNet50学习的,然后训练我们的分类器学习我们的数据集图像中更高层次的细节,如眼睛、腿等。ResNet50已经在ImageNet上接受了数百万张图片的训练。
数据集的准备
CalTech256数据集有30607张图片,分为256个不同的标签类和另一个“杂波”类。
训练整个数据集需要几个小时。因此,我们将研究包含10种动物的数据集的一个子集——熊、黑猩猩、长颈鹿、大猩猩、美洲驼、鸵鸟、豪猪、臭鼬、三角龙和斑马。这样我们可以更快地进行实验。这些代码也可以用来训练整个数据集。
这些文件夹中的图片数量从81张(臭鼬)到212张(大猩猩)不等。我们使用这些类别中的前60张图片进行训练。接下来的10张图片用于验证,其余的用于下面的实验测试。
最后我们有600张训练图像,100张验证图像,409张测试图像和10类动物。
如果你想复制实验,请按照下面的步骤
- 下载CalTech256数据集
- 创建三个名为train、valid和test的目录。
- 在列车和测试目录中分别创建10个子目录。子目录应该命名为熊,黑猩猩,长颈鹿,大猩猩,美洲驼,鸵鸟,豪猪,臭鼬,三角龙和斑马
- 将Caltech256数据集中熊的前60张图像移动到目录train/bear。对每只动物重复这个步骤。
- 将Caltech256数据集中bear的下10张图像移动到valid/bear目录。对每只动物重复这个步骤。
- 将bear的剩余图像(即未包含在train或有效文件夹中的图像)复制到test/bear目录。对每只动物重复这个步骤。
数据增加
可对训练集中的图像通过多种方式进行修改,以在训练过程中包含更多的变化。这种方法使训练后的模型更加一般化,能够很好地处理不同类型的测试数据。此外,输入数据的大小也不同。在将成批的数据用于训练之前,需要将它们标准化为固定的大小和格式。
首先,每个输入图像都要经过一系列的转换。我们试图通过在转换中引入一些随机性来插入一些变化。在每个epoch,对每个图像应用一组变换。当我们针对多个epochs进行训练时,模型可以看到输入图像的更多变化,每个epoch的变换都有一个新的随机变化。这导致了数据的扩充,然后模型试图推广更多。
下面我们看到一个三角龙图像转换的例子。

让我们回顾一下用于数据增强的转换。
变换RandomResizedCrop以随机大小对输入图像进行裁剪(缩放范围为原始大小的0.8到1.0,默认范围为0.75到1.33的随机长宽比)。裁剪的图像然后调整大小为256×256。
RandomRotation将图像以-15到15度的随机角度旋转。
RandomHorizontalFlip随机水平翻转图像,默认概率为50%。
CenterCrop从中心获得224×224图像。
ToTensor将数值范围为0-255的PIL Image转换为一个浮点张量,并通过将其除以255将其归一化为0-1。
归一化使用一个3通道张量,并通过该通道的输入均值和标准差对每个通道进行归一化。以3个元素向量的形式输入均值和标准差向量。张量中的每个通道被归一化为T = (T - mean)/(标准差)
上面所有的转换都使用Compose链接在一起。
# Applying Transforms to the Data
image_transforms = {

    'train': transforms.Compose([
        transforms.RandomResizedCrop(size=256, scale=(0.8, 1.0)),
        transforms.RandomRotation(degrees=15),
        transforms.RandomHorizontalFlip(),
        transforms.CenterCrop(size=224),
        transforms.ToTensor(),
        transforms.Normalize([0.485, 0.456, 0.406],
                             [0.229, 0.224, 0.225])
    ]),
    'valid': transforms.Compose([
        transforms.Resize(size=256),
        transforms.CenterCrop(size=224),
        transforms.ToTensor(),
        transforms.Normalize([0.485, 0.456, 0.406],
                             [0.229, 0.224, 0.225])
    ]),
    'test': transforms.Compose([
        transforms.Resize(size=256),
        transforms.CenterCrop(size=224),
        transforms.ToTensor(),
        transforms.Normalize([0.485, 0.456, 0.406],
                             [0.229, 0.224, 0.225])
    ])
}
注意,对于验证和测试数据,我们不执行RandomResizedCrop、RandomRotation和RandomHorizontalFlip转换。相反,我们只是将验证图像的大小调整为256×256,并裁剪出中心224×224,以便能够将它们与预先训练的模型一起使用。最后,将图像转换为一个张量,通过ImageNet中所有图像的均值和标准差进行归一化。
数据加载
接下来,让我们看看如何使用上述定义的转换并加载用于训练的数据。
# Load the Data
# Set train and valid directory paths
train_directory = 'train'
valid_directory = 'test'
# Batch size
bs = 32
# Number of classes
num_classes = 10
# Load Data from folders
data = {

    'train': datasets.ImageFolder(root=train_directory, transform=image_transforms['train']),
    'valid': datasets.ImageFolder(root=valid_directory, transform=image_transforms['valid']),
    'test': datasets.ImageFolder(root=test_directory, transform=image_transforms['test'])
}
# Size of Data, to be used for calculating Average Loss and Accuracy
train_data_size = len(data['train'])
valid_data_size = len(data['valid'])
test_data_size = len(data['test'])
# Create iterators for the Data loaded using DataLoader module
train_data = DataLoader(data['train'], batch_size=bs, shuffle=True)
valid_data = DataLoader(data['valid'], batch_size=bs, shuffle=True)
test_data = DataLoader(data['test'], batch_size=bs, shuffle=True)
# Print the train, validation and test set data sizes
train_data_size, valid_data_size, test_data_size
我们首先设置训练和验证数据目录以及批处理大小。然后我们使用DataLoader加载它们。注意,前面讨论的图像转换是在使用DataLoader加载数据时应用到数据的。数据的顺序也被打乱了。torchvision,transform包和DataLoader是PyTorch非常重要的特性,它们使得数据增强和加载过程非常容易。
迁移学习
收集感兴趣领域的图像并从零开始训练分类器是非常困难和耗时的。因此,我们使用一个预先训练的模型作为我们的基础,并改变最后几层,以便我们可以分类图像根据我们想要的类。这有助于我们获得良好的结果,即使是一个小的数据集,因为基本的图像特征已经在预先训练的模型中学习,从一个更大的数据集,如ImageNet。

正如我们在上面的图像中看到的,内层与预先训练的模型保持一致,只有最后的层被更改以适应我们的类数量。在这项工作中,我们使用预先训练的·ResNet50·模型。
# Load pretrained ResNet50 Model
resnet50 = models.resnet50(pretrained=True)
Canziani等人列出了许多用于各种实际应用的预训练模型,分析了获得的准确性和每个模型所需的推理时间。ResNet50是那些在准确性和推理时间之间有很好的权衡的模型之一。当一个模型在PyTorch中加载时,它的所有参数的’ requires_grad字段默认设置为true。这意味着对参数值的每一次更改都将被存储,以便在用于训练的反向传播图中使用。这增加了内存需求。由于我们的预训练模型中的大多数参数已经被训练,我们将requires_grad字段重置为false。
# Freeze model parameters
for param in resnet50.parameters():
    param.requires_grad = False
接下来,我们用一组小的顺序层替换ResNet50模型的最后一层。ResNet50最后一个全连接层的输入被馈送到一个线性层。它有256个输出,然后这些输出被送入ReLU和Dropout层。接着是一个256×10线性层,它有10个输出,对应于我们的CalTech子集中的10个类。
# Change the final layer of ResNet50 Model for Transfer Learning
fc_inputs = resnet50.fc.in_features
resnet50.fc = nn.Sequential(
    nn.Linear(fc_inputs, 256),
    nn.ReLU(),
    nn.Dropout(0.4),
    nn.Linear(256, 10),
    nn.LogSoftmax(dim=1) # For using NLLLoss()
)
因为我们将在GPU上进行训练,所以我们为GPU准备好了模型。
# Convert model to be used on GPU
resnet50 = resnet50.to('cuda:0')
接下来,我们定义用于训练的损失函数和优化器。PyTorch提供了多种损失函数。我们使用负损失似然函数,因为它是有用的分类多个类别。PyTorch也支持多个优化器。我们使用Adam优化器。Adam是最受欢迎的优化器之一,因为它可以为每个参数单独调整学习速率。
# Define Optimizer and Loss Function
loss_func = nn.NLLLoss()
optimizer = optim.Adam(resnet50.parameters())
训练
对固定的一组epoch进行训练,在每个epoch对每幅图像进行一次处理。训练数据加载器用于批量加载数据。在本例中,我们给出的批大小为32。这意味着每批最多可以有32个图像。
对于每批,输入图像通过模型传递,即前向传递,以得到输出。然后使用提供的loss_criterion或代价函数,利用ground truth和计算出的输出来计算损失。利用后向函数计算了相对于可训练参数的损失梯度。注意,在迁移学习中,我们只需要计算一小组参数的梯度,这些参数属于模型末尾新添加的几个层。对模型的汇总函数调用可以显示实际参数的数量和可训练参数的数量。这种方法的优点是,我们现在只需要训练大约十分之一的模型参数。

梯度计算使用自动梯度(autograd)和反向传播(backpropagation),在图中使用链式法则进行微分。PyTorch在向后传递中累积所有渐变。因此,在训练循环的开始时将它们归零是必要的。这是通过使用优化器的zero_grad函数实现的。最后,在向后传递中计算梯度后,使用优化器的步长函数更新参数。
for epoch in range(epochs):
        epoch_start = time.time()
        print("Epoch: {}/{}".format(epoch+1, epochs))
        # Set to training mode
        model.train()
        # Loss and Accuracy within the epoch
        train_loss = 0.0
        train_acc = 0.0
        valid_loss = 0.0
        valid_acc = 0.0
        for i, (inputs, labels) in enumerate(train_data_loader):
            inputs = inputs.to(device)
            labels = labels.to(device)
            # Clean existing gradients
            optimizer.zero_grad()
            # Forward pass - compute outputs on input data using the model
            outputs = model(inputs)
            # Compute loss
            loss = loss_criterion(outputs, labels)
            # Backpropagate the gradients
            loss.backward()
            # Update the parameters
            optimizer.step()
            # Compute the total loss for the batch and add it to train_loss
            train_loss += loss.item() * inputs.size(0)
            # Compute the accuracy
            ret, predictions = torch.max(outputs.data, 1)
            correct_counts = predictions.eq(labels.data.view_as(predictions))
            # Convert correct_counts to float and then compute the mean
            acc = torch.mean(correct_counts.type(torch.FloatTensor))
            # Compute total accuracy in the whole batch and add to train_acc
            train_acc += acc.item() * inputs.size(0)
            print("Batch number: {:03d}, Training: Loss: {:.4f}, Accuracy: {:.4f}".format(i, loss.item(), acc.item()))
验证
随着训练次数的增加,模型容易对数据进行过拟合,导致其对新测试数据的性能较差。维护一个单独的验证集是很重要的,这样我们就可以在正确的点停止训练,防止过拟合。在训练循环之后的每个epoch中立即进行验证。因为我们在验证过程中不需要任何梯度计算,所以它是在torch.no_grad()块中完成的。
对于每个验证batch,输入和标签被转移到GPU(如果cuda可用,否则它们被转移到CPU)。
# Validation - No gradient tracking needed
        with torch.no_grad():
            # Set to evaluation mode
            model.eval()
            # Validation loop
            for j, (inputs, labels) in enumerate(valid_data_loader):
                inputs = inputs.to(device)
                labels = labels.to(device)
                # Forward pass - compute outputs on input data using the model
                outputs = model(inputs)
                # Compute loss
                loss = loss_criterion(outputs, labels)
                # Compute the total loss for the batch and add it to valid_loss
                valid_loss += loss.item() * inputs.size(0)
                # Calculate validation accuracy
                ret, predictions = torch.max(outputs.data, 1)
                correct_counts = predictions.eq(labels.data.view_as(predictions))
                # Convert correct_counts to float and then compute the mean
                acc = torch.mean(correct_counts.type(torch.FloatTensor))
                # Compute total accuracy in the whole batch and add to valid_acc
                valid_acc += acc.item() * inputs.size(0)
                print("Validation Batch number: {:03d}, Validation: Loss: {:.4f}, Accuracy: {:.4f}".format(j, loss.item(), acc.item()))
        # Find average training loss and training accuracy
        avg_train_loss = train_loss/train_data_size
        avg_train_acc = train_acc/float(train_data_size)
        # Find average training loss and training accuracy
        avg_valid_loss = valid_loss/valid_data_size
        avg_valid_acc = valid_acc/float(valid_data_size)
        history.append([avg_train_loss, avg_valid_loss, avg_train_acc, avg_valid_acc])
        epoch_end = time.time()
        print("Epoch : {:03d}, Training: Loss: {:.4f}, Accuracy: {:.4f}%, nttValidation : Loss : {:.4f}, Accuracy: {:.4f}%, Time: {:.4f}s".format(epoch, avg_train_loss, avg_train_acc*100, avg_valid_loss, avg_valid_acc*100, epoch_end-epoch_start))
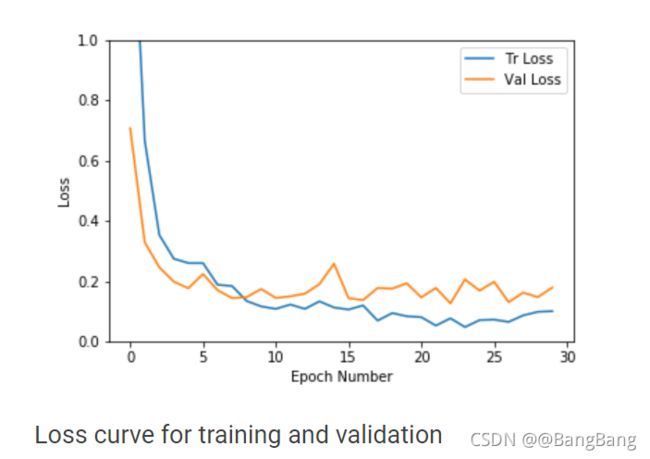
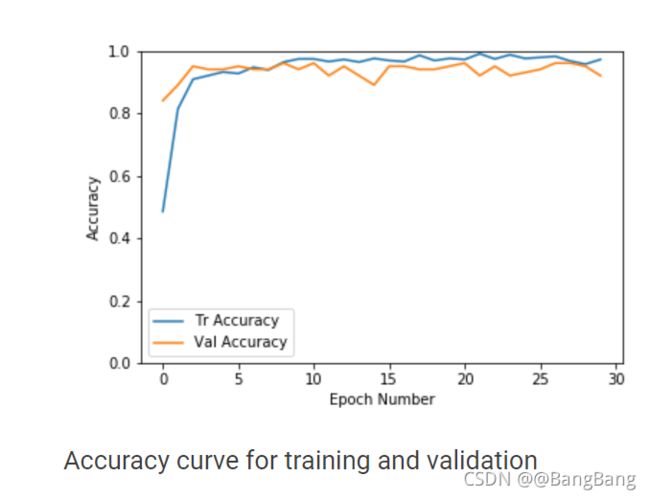
正如我们在上面的图中所看到的,对于这个数据集,验证和训练损失都很快得到收敛。精度也很快提高到0.9的范围。随着epoch数的增加,训练损失进一步减小,导致过拟合,但验证结果没有明显改善。因此我们选择了具有较高精度和较低损耗的epoch模型。为了防止过度拟合训练数据,我们最好早点停止。在我们的案例中,我们选择了具有96%验证准确性的epoch#8。
early stopping过程也可以自动化。一旦损失低于给定的阈值,并且验证准确性没有在给定的epoch集合中提高,我们就可以停止
推理
一旦我们有了模型,我们可以对单个测试图像进行推理,或者对整个测试数据集进行推理,以获得测试精度。测试集精度计算类似于验证代码,但它是在测试数据集上进行的。为此,我们在Python notebook包含了computeTestSetAccuracy函数。让我们在下面讨论如何找到给定测试图像的输出类。
输入图像首先经过验证/测试数据所需的所有转换。然后将得到的张量转换为一个四维张量,并通过模型,该模型输出不同类别的对数概率。模型输出的指数为我们提供了类概率。然后选择概率最高的类作为输出类。
选择概率最高的类作为输出类。
def predict(model, test_image_name):
    transform = image_transforms['test']
    test_image = Image.open(test_image_name)
    plt.imshow(test_image)
    test_image_tensor = transform(test_image)
    if torch.cuda.is_available():
        test_image_tensor = test_image_tensor.view(1, 3, 224, 224).cuda()
    else:
        test_image_tensor = test_image_tensor.view(1, 3, 224, 224)
    with torch.no_grad():
        model.eval()
        # Model outputs log probabilities
        out = model(test_image_tensor)
        ps = torch.exp(out)
        topk, topclass = ps.topk(1, dim=1)
        print("Output class :  ", idx_to_class[topclass.cpu().numpy()[0][0]])
在409幅图像的测试集上,准确率达到92.4%。
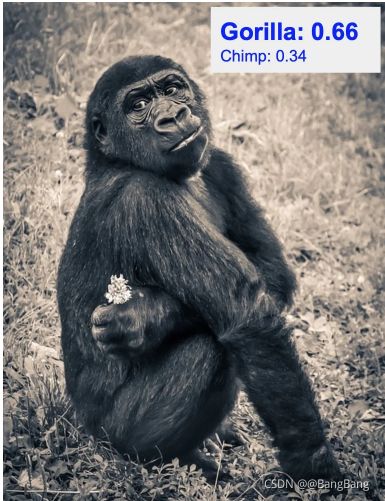
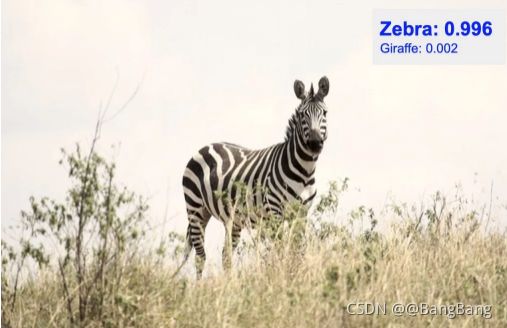
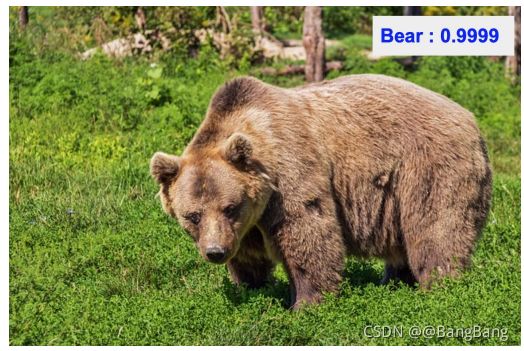
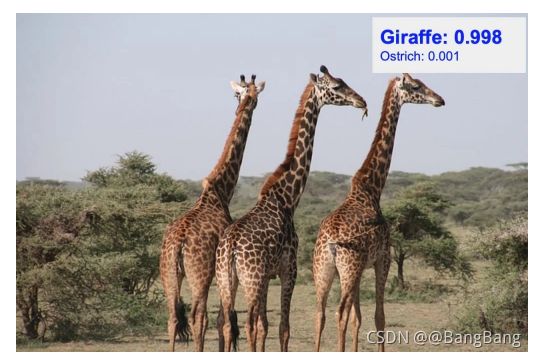
下面是一些未在训练或验证中使用的新测试数据的分类结果。最可能的预测类别和它们的概率得分覆盖在右上方。如下所示,概率最高的类通常是正确的类。还要注意的是,概率第二高的类通常是所有剩下的9个类中外表最接近实际类的动物。
我们刚刚看到了如何使用经过1000类ImageNet训练的预训练模型。它非常有效地将图像分类为我们感兴趣的10个不同类别。
我们在一个小数据集上展示了分类结果。在未来的帖子中,我们将应用同样的迁移学习方法在更困难的数据集解决更困难的现实生活问题。请继续关注!
源码地址: https://github.com/yuanxinshui/DeepLearnCV/blob/main/Image-Classification-in-PyTorch/image_classification_using_transfer_learning_in_pytorch.ipynb
参考
https://learnopencv.com/image-classification-using-transfer-learning-in-pytorch/
