【OpenCV3编程入门学习笔记】——第4章 OpenCV数据结构与基本绘图
第4章 OpenCV数据结构与基本绘图
文章目录
- 第4章 OpenCV数据结构与基本绘图
-
- 前言
- 4.1 基础图像容器Mat
-
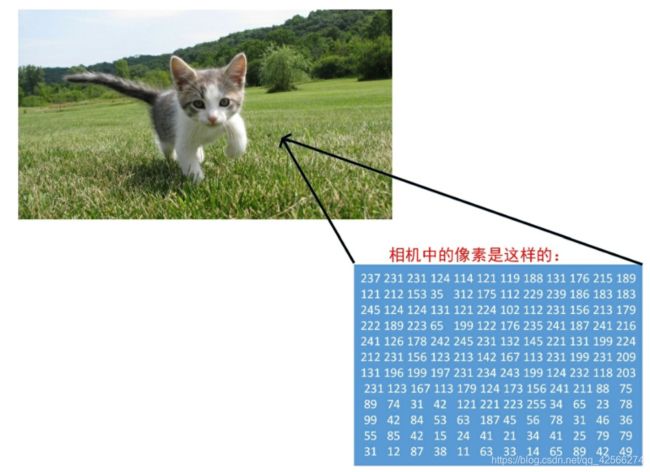
- 4.1.1 数字图像存储概述
- 4.1.2 Mat结构的使用
- 4.1.3 像素值的存储方式
- 4.1.4 显示创建Mat对象的七种方法
-
- 【方法一】使用Mat()构造函数
- 【方法二】在C/C++中通过构造函数进行初始化
- 【方法三】为已存在的IplImage指针创建信息头
- 【方法四】利用Create()函数
- 【方法五】采用Matlab式的初始化方式
- 【方法六】对小矩阵使用逗号分隔式初始化函数
- 【方法七】为已存在的对象创建信息头
- 4.1.5 OpenCV中的格式化输出方法
-
- 【风格一】OpenCV默认风格
- 【风格二】python风格
- 【风格三】逗号分隔风格(Comma separated values,CSV)
- 【风格四】Numpy风格
- 【风格五】C语言风格
- 4.1.6 输出其他常用数据结构
-
- 1.定义和输出二维点
- 2.定义和输出三维点
- 3.定义和输出基于Mat的std::vector
- 4.定义和输出std::vector
- 4.1.7 示例程序:基础图象容器Mat类的使用
- 4.2 常用数据结构和函数
-
- 4.2.1 点的表示:Point类
- 4.2.2 颜色的表示:Scalar类
- 4.2.3 尺寸的表示:Size类
- 4.2.4 矩形的表示:Rect()
- 4.2.5 颜色空间转换:cvtColor()函数
- 4.2.6 其他常用的知识点
- 4.3 基本图形的绘制
-
- 4.3.1 DrawEllipse()函数的写法
- 4.3.2 DrawFilledCircle()函数的写法
- 4.3.3 DrawPolygon()函数的写法
- 4.3.4 DrawLine()函数的写法
- 4.3.5 main()函数的写法
- 4.3.6 全部代码
- 4.4 本章小结
前言
笔记系列
参考书籍:OpenCV3编程入门
作者:毛星云
版权方:电子工业出版社
出版日期:2015-02
笔记仅供本人参考使用,不具备共通性
笔记中代码均是OpenCV+Qt的代码,并非用vs开发,请勿混淆
本章核心函数/类清单
| 函数/类名称 | 说明 | 对应讲解章节 |
|---|---|---|
| Mat::mat() | Mat类的构造函数 | 4.1.4 |
| Mat::Creat() | Mat类的成员函数,可用于Mat类的初始化操作 | 4.1.1 |
| Point类 | 用于表示点的数据结构 | 4.2.1 |
| Scalar类 | 用于表示颜色的数据结构 | 4.2.2 |
| Size类 | 用于表示尺寸的数据结构 | 4.2.3 |
| Rect类 | 用于表示矩形的数据结构 | 4.2.4 |
| cvtColor | 用于颜色空间转换 | 4.2.5 |
4.1 基础图像容器Mat
4.1.1 数字图像存储概述
4.1.2 Mat结构的使用
-
Mat类的好处
- 1.不必手动为其开辟空间
- 2.不必在不需要时立即将其空间释放
- 上述两点好处对比OpenCV1.0时代的代码来说,方便了太多
- 注意:此处说的是手动开辟空间并非必须,但这种方式是依旧存在的----大多是OpenCV函数仍然会手动地为输入数据开辟空间
- 当传递一个已经存在的Mat对象时,开辟好的矩阵空间会被重用.也就是说,我们每次都是使用大小正好的内存来完成任务
-
Mat是一个类,由两个数据部分组成
- 矩阵头(包括矩阵尺寸,存储方法,存储地址等信息)
- 指向存储所有像素值的矩阵的指针(根据所选存储方法的不同,该矩阵可以是不同的维数)
-
矩阵头的尺寸是常数值,但存储像素值的矩阵本身会以图象的大小不同而不同(通常都比矩阵头大上数个数量级),因此,在程序中传递图像并创建副本时,大的内存开销是由矩阵造成的
-
OpenCV是一个图像处理库,囊括了大量的图像处理函数,为了解决问题通常要使用库中的多个函数,因此传递图像(并创建副本)是常有的事,但基于上一条的原因,所以不到万不得已,尽量不要进行大图像的复制,因为这会降低程序的运行速度
-
当然OpenCV也设法解决了上面的问题-----引用计数机制
- 其思路为:让每个Mat对象都有自己的信息头,但是共享一个矩阵
- 这个方法通过让矩阵指针指向同一地址而实现
- 拷贝构造函数时,程序只复制信息头和矩阵指针,而不复制矩阵
-
来看下面这段代码
-
Mat A,C;//仅创建信息头部分 A = imread("1.jpg",CV_LOAD_IMAGE_COLOR);//为矩阵开辟内存,并将图片存入 Mat B(A);//使用拷贝构造函数 C = A;//使用赋值运算符 -
上面代码中的A、B、C三个对象最终都指向同一个数据矩阵
-
虽然A、B、C三个对象的信息头不一样,但是通过任何一个对象所作的改变也会影响到其他对象
-
-
矩阵指针指向同一个数据矩阵的不同Mat对象只是访问相同数据的不同途径而已
-
OpenCV还可以创建只引用一部分数据的信息头,如下
-
//创建一个感兴趣区域(ROI),它是只包含边界信息的信息头
Mat D(A,Rect(10,10,100,100));//使用矩形界定
Mat E = A(Range::all(),Range(1,3));//使用行和列来界定
-
-
当矩阵属于多个Mat对象时,由最后使用它的对象来清理
- 通过上面的说的计数机制
- 无论什么时候复制一个Mat对象的信息头,都会增加矩阵的引用次数
- 反之,当一个信息头被释放后,引用次数就会减一
- 当引用次数归零时,就说明没有对象引用该矩阵了,矩阵就会被执行清理程序
- 通过上面的说的计数机制
-
复制矩阵本身的方法
-
可以用clone()函数或者copyTo()函数
-
Mat F = A.clone(); Mat G; A.copyTo(G); -
通过上面的操作,现在对F和G做出改变就不会影响到A,B,C三个对象所指向的矩阵了
-
-
-
总结:
- OpenCV函数中输出图像的内存分配是自动完成的(如果不特别指定的话)
- 使用OpenCV的C++接口时不需要考虑内存释放的问题
- 赋值运算符和拷贝构造函数只复制信息头
- 函数clone()或者函数copyTo()会把图像的矩阵也复制一份
4.1.3 像素值的存储方式
- 存储像素值需要制定颜色空间和数据类型
颜色空间- 是指针对一个给定的颜色,如何组合颜色原色以对其编码
- 最简单的颜色空间是灰度级空间,它只处理白色和黑色,对他们进行组合便可以产生不同程度的灰色
- 对于彩色方式有更多种类的颜色空间,无论哪种方式都是把颜色分成三个或者四个基本元素,通过组合基本元素可以产生所有的颜色
- RGB颜色空间是最常用的彩色空间
- 它的基色是红(Red)绿(Green)蓝(Blue)
- 有时为了控制透明度还会加入第四个元素Alpha(A)
- 颜色系统有很多
RGB是最常见的,因为其基色是人眼内部构成颜色的方式HSV和HLS把颜色分解成色调、饱和度和亮度/透明的- 这是描述颜色更自然的方式,比如可以通过抛弃最后一个元素,是算法对输入图像的光照条件不敏感
YCrCB在JPEG图像格式中广泛使用CIE L*a*b*是一种在感知上均匀的颜色空间,它适合用来度量两个颜色之间的距离
数据类型- 每个组成元素(即元素空间的每一个颜色)都有自己的定义域,而定义域取决于其数据类型,如何存储一个元素决定了我们在其定义域上能够控制的精度
- 最小的数据类型是char
- 占一个字节
- 可以是有符号型(0255之间),也可以是无符号型(-127+128之间)
- 使用三个char型已经可以表示1600万种可能的颜色(RGB的颜色空间)
- 如果使用float型(4字节)或double型(8字节)可以给出更加精细的颜色分辨能力
- 增加元素的尺寸的同时也会增加所占内存空间的大小
4.1.4 显示创建Mat对象的七种方法
-
可以通过Mat的运算符"<<"来查看图像矩阵的实际值,但是该方法只对二维矩阵有效果
-
Mat不单是一个非常有用的图像类容器,同时也是一个通用的矩阵类,我们可以用它来创建和操作多为矩阵
-
创建Mat对象的方法有:
【方法一】使用Mat()构造函数
-
最简单的方法
-
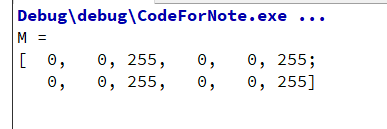
Mat M(2,2,CV_8UC3,Scalar(0,0,255)); cout<<"M = "<<endl<<""<<M<<endl<<endl; //Qt Creator中如果要使用cout,需要像VS里面那样,#includ,同时using namespace std; -
上述代码运行效果(Qt Creator中)
-
对于二维通道图像
-
首先要定义其尺寸,即行数和列数
-
然后需要指定存储元素的数据类型和每个矩阵点的通道数(CV_8UC3)
-
对此,可以依据下面的规则来定义
-
CV_[The number of bits per item][Signed or Unsigned][Type Prefix]C[The channel number] -
即:
-
CV_[位数][带符号与否][类型前缀]C[通道数] -
比如
- CV_8UC3表示使用8位的unsignerd char型,每个像素由三个元素组成三通道
- CV_32FC2表示使用32位的单精度浮点型,每个像素由两个元素组成双通道
-
CV_32FC3参数的含义
-
-
-
【方法二】在C/C++中通过构造函数进行初始化
-
int sz[3] = {2,2,2}; Mat M(3,sz,CV_8UC(2),Scalar::all(0)); //cout<<"M = "< -
上面的例子演示了如何创建一个超过两维的矩阵
-
首先指定位数3(Mat构造函数的第一个参数)
-
然后,传递一个指向一个数组的指针sz(Mat构造函数的第二个参数)
- 这个数组里面包含了每个维度的尺寸
- 这个参数不能写成
&sz,因为在C语言中,数组名就是指向该数组的第一个数组元素的地址
-
后面两个参数与方法一中的相同,不再赘叙
-
cout<<"M = "<-
这句代码是不能写在此处的,因为用Mat的"<<"字符来查看矩阵元素只对二维矩阵有效果
-
如果写了这句代码,则系统会报错
-
OpenCV: terminate handler is called! The last OpenCV error is: OpenCV(3.4.13) Error: Assertion failed (m.dims <= 2) in FormattedImpl, file D:\opencv\opencv-3.4.13\modules\core\src\out.cpp, line 86 -
上述错误信息中,有这么一句:
(m.dims <= 2)就是在提醒开发者,只有维度小于等于2的矩阵才可以cout出来
-
-
【方法三】为已存在的IplImage指针创建信息头
-
(1) IplImage 转 Mat: IplImage* image = cvLoadImage( "1.jpg"); Mat mat=cvarrToMat(image); (2)Mat转IplImage: Mat img = imread("test.jpg"); IplImage* ipl_img = cvCreateImage(cvSize(img.cols, img.rows),IPL_DEPTH_8U,img.channels()); memcpy(ipl_img->imageData, img.data, ipl_img->height * ipl_img->widthStep); -
书上写的方法如下,但因为我装的OpenCV版本过高(3.4.13),这些方法都失效了
-
IplImage* image = cvLoadImage( "1.jpg"); Mat mat(image); -
OPENCV 3.4.*版本 mat转IplIMage报错问题的解决方案
【方法四】利用Create()函数
-
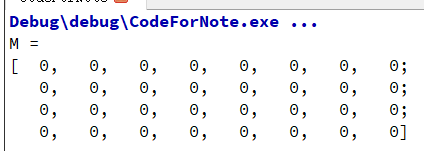
Mat M(2,2,CV_32FC3,Scalar(0,0,255)); M.create(4,4,CV_8UC(2)); cout<<"M = "<<endl<<""<<M<<endl<<endl; -
需要注意的是,此创建方法不能为矩阵设初值,只是在改变尺寸的时候重新为矩阵数据开辟内存而已
【方法五】采用Matlab式的初始化方式
-
Mat E = Mat::eye(4,4,CV_64F); cout<<"E = "<<endl<<""<<E<<endl<<endl; Mat O = Mat::ones(2,2,CV_32F); cout<<"O = "<<endl<<""<<O<<endl<<endl; Mat Z = Mat::zeros(3,3,CV_8UC1); cout<<"Z = "<<endl<<""<<Z<<endl<<endl; -
结果如下:
E =
[1, 0, 0, 0;
0, 1, 0, 0;
0, 0, 1, 0;
0, 0, 0, 1]
O =
[1, 1;
1, 1]
Z =
[ 0, 0, 0;
0, 0, 0;
0, 0, 0]
-
Mat::ones() 和 Mat::zeros()
【方法六】对小矩阵使用逗号分隔式初始化函数
-
Mat C = (Mat_<double>(3,3)<<0,-1,0,-1,5,-1,0,-1,0); cout<<"C = "<<endl<<""<<C<<endl<<endl; -
结果如下:
C =
[0, -1, 0;
-1, 5, -1;
0, -1, 0]
如过输入的元素不够矩阵的总元素,则会如下
C =
[0, -1, 0;
-1, 5, -1;
2.143248128504563e-312, 1.958064995486337e-306, 0]
如上:未输入元素会变成不可预知的值
【方法七】为已存在的对象创建信息头
-
使用成员函数clone()或者copyTo()为一个已经存在的Mat对象创建一个新的信息头
-
Mat C = (Mat_<double>(3,3)<<0,-1,0,-1,5,-1,0,0,0); cout<<"C = "<<endl<<""<<C<<endl<<endl; Mat RowClone = C.row(1).clone(); cout<<"RowClone = "<<endl<<""<<RowClone<<endl<<endl; -
结果如下:
C =
[0, -1, 0;
-1, 5, -1;
0, 0, 0]
RowClone =
[-1, 5, -1]
4.1.5 OpenCV中的格式化输出方法
-
首先先定义一个R矩阵,使用Randu()函数产生的随机数来填充矩阵,当然需要给定一个上限和下限来确保随机值在期望的范围内
-
    Mat r = Mat(10,3,CV_8UC3);
    randu(r,Scalar::all(0),Scalar::all(255));
【风格一】OpenCV默认风格
-
cout<<"r (OpenCV default style)="<<endl<<r<<";"<<endl<<endl; -
效果如下
-
r (OpenCV default style)=
[ 91, 2, 79, 179, 52, 205, 236, 8, 181;
239, 26, 248, 207, 218, 45, 183, 158, 101;
102, 18, 118, 68, 210, 139, 198, 207, 211;
181, 162, 197, 191, 196, 40, 7, 243, 230;
45, 6, 48, 173, 242, 125, 175, 90, 63;
90, 22, 112, 221, 167, 224, 113, 208, 123;
214, 35, 229, 6, 143, 138, 98, 81, 118;
187, 167, 140, 218, 178, 23, 43, 133, 154;
150, 76, 101, 8, 38, 238, 84, 47, 7;
117, 246, 163, 237, 69, 129, 60, 101, 41];
【风格二】python风格
-
cout<<"r (python style) ="<<endl<<format(r,Formatter::FMT_PYTHON)<<";"<<endl<<endl; -
效果如下
-
r (python style) =
[[[ 91, 2, 79], [179, 52, 205], [236, 8, 181]],
[[239, 26, 248], [207, 218, 45], [183, 158, 101]],
[[102, 18, 118], [ 68, 210, 139], [198, 207, 211]],
[[181, 162, 197], [191, 196, 40], [ 7, 243, 230]],
[[ 45, 6, 48], [173, 242, 125], [175, 90, 63]],
[[ 90, 22, 112], [221, 167, 224], [113, 208, 123]],
[[214, 35, 229], [ 6, 143, 138], [ 98, 81, 118]],
[[187, 167, 140], [218, 178, 23], [ 43, 133, 154]],
[[150, 76, 101], [ 8, 38, 238], [ 84, 47, 7]],
[[117, 246, 163], [237, 69, 129], [ 60, 101, 41]]];
【风格三】逗号分隔风格(Comma separated values,CSV)
-
cout<<"r (CSV) ="<<endl<<format(r,Formatter::FMT_CSV)<<";"<<endl<<endl; -
效果如下
-
r (CSV) =
91, 2, 79, 179, 52, 205, 236, 8, 181
239, 26, 248, 207, 218, 45, 183, 158, 101
102, 18, 118, 68, 210, 139, 198, 207, 211
181, 162, 197, 191, 196, 40, 7, 243, 230
45, 6, 48, 173, 242, 125, 175, 90, 63
90, 22, 112, 221, 167, 224, 113, 208, 123
214, 35, 229, 6, 143, 138, 98, 81, 118
187, 167, 140, 218, 178, 23, 43, 133, 154
150, 76, 101, 8, 38, 238, 84, 47, 7
117, 246, 163, 237, 69, 129, 60, 101, 41
;
【风格四】Numpy风格
-
cout<<"r (Numpy) ="<<endl<<format(r,Formatter::FMT_NUMPY)<<";"<<endl<<endl; -
效果如下
-
r (Numpy) =
array([[[ 91, 2, 79], [179, 52, 205], [236, 8, 181]],
[[239, 26, 248], [207, 218, 45], [183, 158, 101]],
[[102, 18, 118], [ 68, 210, 139], [198, 207, 211]],
[[181, 162, 197], [191, 196, 40], [ 7, 243, 230]],
[[ 45, 6, 48], [173, 242, 125], [175, 90, 63]],
[[ 90, 22, 112], [221, 167, 224], [113, 208, 123]],
[[214, 35, 229], [ 6, 143, 138], [ 98, 81, 118]],
[[187, 167, 140], [218, 178, 23], [ 43, 133, 154]],
[[150, 76, 101], [ 8, 38, 238], [ 84, 47, 7]],
[[117, 246, 163], [237, 69, 129], [ 60, 101, 41]]], dtype=‘uint8’);
【风格五】C语言风格
-
cout<<"r (C) ="<<endl<<format(r,Formatter::FMT_C)<<";"<<endl<<endl; -
效果如下
-
r © =
{ 91, 2, 79, 179, 52, 205, 236, 8, 181,
239, 26, 248, 207, 218, 45, 183, 158, 101,
102, 18, 118, 68, 210, 139, 198, 207, 211,
181, 162, 197, 191, 196, 40, 7, 243, 230,
45, 6, 48, 173, 242, 125, 175, 90, 63,
90, 22, 112, 221, 167, 224, 113, 208, 123,
214, 35, 229, 6, 143, 138, 98, 81, 118,
187, 167, 140, 218, 178, 23, 43, 133, 154,
150, 76, 101, 8, 38, 238, 84, 47, 7,
117, 246, 163, 237, 69, 129, 60, 101, 41};
4.1.6 输出其他常用数据结构
- OpenCV同样支持使用运算符"<<"来打印其他常用的OpenCV数据结构
1.定义和输出二维点
-
Point2f p(6,2); cout << "[Two-dimensional point] p = "<<p<<";\n"<<endl; -
效果如下:
-
[Two-dimensional point] p = [6, 2];
2.定义和输出三维点
-
Point3f p(6,2,8); cout << "[Three-dimensional point] p = "<<p<<";\n"<<endl; -
效果如下:
-
[Three-dimensional point] p = [6, 2, 8];
3.定义和输出基于Mat的std::vector
-
vector<float> v; v.push_back(3); v.push_back(5); v.push_back(7); cout << "[Mat-based std::vector] shortvec = "<<endl<<Mat(v)<<";\n"<<endl; -
效果如下:
-
[Mat-based std::vector] shortvec =
[3;
5;
7];
4.定义和输出std::vector
-
vector<Point2f> points(20); for(size_t i = 0; i < points.size(); ++i) { points[i] = Point2f((float)(i*5),(float)(i%7)); } cout << "[Two-dimensional point vector]"<<points<<";"; -
效果如下:
-
[Two-dimensional point vector][0, 0;
5, 1;
10, 2;
15, 3;
20, 4;
25, 5;
30, 6;
35, 0;
40, 1;
45, 2;
50, 3;
55, 4;
60, 5;
65, 6;
70, 0;
75, 1;
80, 2;
85, 3;
90, 4;
95, 5];
4.1.7 示例程序:基础图象容器Mat类的使用
- 代码是从书本配套源码移植过来的,我的OpenCV一直不能支持中文,所以输出界面乱七八糟,就不截图了
- 文件:main.cpp
#include 4.2 常用数据结构和函数
4.2.1 点的表示:Point类
-
Point类数据结构表示了二维坐标系下的点,即由其图标x和y指定的2D点
-
用法如下
-
    Point point;
    point.x = 10;
    point.y = 8;
    //或者也可以这样使用
    Point point2 = Point(10,8);
-
-
此外,在OpenCV中有如下定义
-
typedef Point_<int> Point2i; typedef Point2i Point; typedef Point_<float> Point2f -
因此,point_、Point2i、Point互相等价,Point_、Point2f互相等价
-
4.2.2 颜色的表示:Scalar类
-
Scalar()类表示具有四个元素的数组,它在OpenCV中被大量用于传递像素值,如RGB颜色值
-
RGB颜色值为三个参数,其实对于Scalar函数来说,如果用不到第四个参数,则不需要写出来
-
若只写三个参数,OpenCV会认为我们就想要表示三个参数
-
比如下面的例子
-
Scalar(a,b,c); -
如此定义的话,那么定义的RGB颜色值:红色分量为c,绿色分量为b,蓝色分量为a
-
-
Scalar类的源头为
Scalar_类,而Scalar_类是Vec4x的一个变种 -
我们常用的Scalar其实就是Scalar_
-
这就是为什么很多参数输入又可以是Mat,又可以是Scalar的原因
4.2.3 尺寸的表示:Size类
-
Size的源代码如下
-
typedef Size_<int> Size2i; typedef Size2i Size; -
其中
Size_是个模板类,在这里Size_表示其类体内部的模板所代表的类型为int -
这里两句代码的意思,就是首先给已知的数据类型
Size_起个新名字----Size2i -
接着又给已知的数据类型Size2i起个新名字----Size
-
综上,Size_、Size2i、Size这三个类型名等价
-
-
继续回溯,找到
Size_模板类的定义-
template<typename _Tp> class Size_ { public: typedef _Tp value_type; //! default constructor //默认构造函数 Size_(); Size_(_Tp _width, _Tp _height); Size_(const Size_& sz); Size_(const Point_<_Tp>& pt); Size_& operator = (const Size_& sz); //! the area (width*height) //区域(长*高) _Tp area() const; //! true if empty bool empty() const; //! conversion of another data type. //转化为另外一种数据模型 template<typename _Tp2> operator Size_<_Tp2>() const; _Tp width; //!< the width//宽度 _Tp height; //!< the height//高度 }; -
可以看到
Size_模板内部重载了一些构造函数,其中用的频率最高的是-
Size_(_Tp _width, _Tp _height); -
参数在代码的末尾也有模板
-
_Tp width; //!< the width//宽度 _Tp height; //!< the height//高度 -
也就是说,程序员可以用XXXX.width和XXXXX.height来分别表示矩形尺寸的宽和高
-
-
4.2.4 矩形的表示:Rect()
-
Rect类的成员变量有x、y、width、height,它们分别表示左上角点的坐标和矩形的宽和高
-
Rect常用的成员函数有
- Size()----返回值为Size
- area()----返回值为矩形的面积
- contains()----(Point)判断点是否在矩形内
- inside(Rect)----判断另一个矩形是都在该矩形内
- tl()----返回左上角点坐标
- br()----返回右下角点坐标
-
如果想求两个矩阵的交集和并集,可以用如下格式
-
Rect rect = rect1 & rect2;
Rect rect = rect2 | rect2;
-
-
如果想让矩形进行平移操作和缩放操作,可以这样写
-
Rect rectShift = rect + point;
Rect rectScale = rect + size;
-
4.2.5 颜色空间转换:cvtColor()函数
-
cvtColor()函数是OpenCV里的颜色空间转换函数,可以实现RGB颜色向HSV、HSI等颜色空间的转换,也可以转换为灰度图像
-
函数原型如下
-
void cvtColor( InputArray _src, OutputArray _dst, int code, int dcn )-
第一个参数:InputArray _src
- 输入图像
-
第二个参数:OutputArray _dst
- 输出图像
-
第三个参数:int code
-
颜色空间转换的标识符,详情见下表(OpenCV3版)
-
转换类型
标识符列表 RGB<–>BGR COLOR_BGR2BGRA、COLOR_RGB2BGRA、COLOR_BGRA2RGBA、COLOR_BGR2BGRA、COLOR_BGRA2BGR RGB<–>5X5 COLOR_BGR5652RGBA、COLOR_BGR2RGBA等 RGB<–>Gray COLOR_RGB2GRAY、COLOR_GRAY2RGB、COLOR_RGBA2GRAY、COLOR_GRAY2RGBA RGB<–>CIEXYZ COLOR_BGR2XYZ、COLOR_RGB2XYZ、COLOR_XYZ2BGR、COLOR_XYZ2RGB RGB<–>YCrCb(YUY) JPEG COLOR_RGB2YCrCb、COLOR_BGR2YCrCb、COLOR_YCrCb2BGR、COLOR_YCrCb2RGB、COLOR_RGB2YUV(可将YCrCb用YUV) RGB<–>HSV COLOR_BGR2HSV、COLOR_RGB2HSV、COLOR_HSV2BGR、COLOR_HLS2RGB RGB<–>HLS COLOR_BGR2HLS、COLOR_RGB2HLS、COLOR_HLS2BGR、COLOR_HLS2RGB RGB<–>CIE L*a*b COLOR_BGR2Lab、COLOR_RGB2Lab、COLOR_Lab2BGR、COLOR_Lab2RGB RGB<–>CIE L*u*v COLOR_BGR2Luv、COLOR_RGB2Luv、COLOR_Luv2BGR、COLOR_Luv2RGB RGB<–>Bayer COLOR_BayerBG2BGR、COLOR_BayerGB2BGR、COLOR_BayerRG2BGR、COLOR_BayerGR2BGR、COLOR_BayerBG2RGB、COLOR_BayerGB2RGB、COLOR_BayerRG2RGB、COLOR_BayerGR2RGB(在CCD和CMOS上常用的Bayer模式) YUV420<–>RGB COLOR_YUV420sp2BGR、COLOR_YUV420sp2RGB
-
-
-
第四个参数:int dcn
- 目标图像的通道数,若是参数为0,表示目标图像取源图像的通道数
-
-
调用示例
-
文件:main.cpp
-
#include "mainwindow.h" #include#include #include #include using namespace cv; using namespace std; int main(int argc, char *argv[]) { QApplication a(argc, argv); MainWindow w; Mat mat = imread("D:/Study/StudyDocuments/Study-Documents-2021/Year-2021/Study_Note/Study_Source/OpenCVsource/Final.jpg"); imshow("original image",mat); Mat dstimage; cvtColor(mat,dstimage,COLOR_BGR2GRAY);//转换为灰度图 Mat toimg; cvtColor(dstimage,toimg,COLOR_GRAY2BGR);//转换为BGR彩图(其实转换出来还是灰图,只是它的编码方式改变了而已) imshow("Effect picture",dstimage); imshow("Effect picture2",toimg); return a.exec(); } -
运行效果如下:
-
4.2.6 其他常用的知识点
-
Matx
- 一个轻量级的Mat,必须在使用前规定好大小,比如一个2*3的float型的Matx,可以声明为Matx23f
-
Vec
-
Matx的一个派生类
-
是一个一维的Matx,跟vector很相似
-
OpenCV中的定义如下
-
template<typename _Tp, int cn> class Vec : public Matx<_Tp, cn, 1>{...}
typedef Vec<uchar, 2> Vec2b;
-
-
-
Range
- 为了使OpenCV的使用更像MATLAB而产生的
- 比如Range::all()其实就是MATLAB里的符号
- Range(a,b)其实就是MATLAB中的a:b,注意这里的a和b都应为整形
-
OpenCV中防止内存溢出的函数有alignPtr,alignSize,allocate,deallocate,fastMalloc,fastFree等
-
里的一些函数使用起来很方便,有: - 计算向量角度的函数fastAtan2
- 计算立方根的函数cubeRoot
- 向上取整函数cvCeil
- 向下取整函数cvFloor
- 四舍五入函数cvRound
- 判断自变量是否无穷大cvIsInf
- 判断自变量是否不是一个数cvIsNaN
-
显示文字相关的函数有:
- getTextSize
- cvInitFont
- putText
-
作图相关的函数有:
- circle
- clipLine
- ellipse
- ellipse2Poly
- line
- rectangle
- polylines
- 类Linelterator
-
填充相关的函数有
- fillConvexPoly
- fillPoly
-
OpenCV中的RNG()函数的作用为初始化随机数状态的生成器
4.3 基本图形的绘制
- 本节我们将学习如何用Point在图像中定义2D点、如何使用Scalar表示颜色值
- 会涉及到的绘制函数如下:
- 用于绘制直线的line函数
- 用于绘制椭圆的ellipse函数
- 用于绘制圆的circle函数
- 用于绘制填充的多边形的fillPoly函数
- 下面会通过一个程序示例来学习掌握OpenCV中各种函数的用法
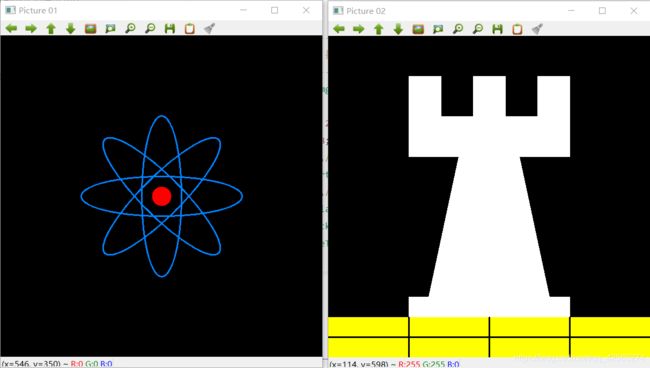
- 该程序的原型为OpenCV官方的示例程序,主要的脉络是定义了几个自定义的绘制函数,然后调用这些自定义的函数绘制两幅图----一副化学原子示例图和一副组合图
4.3.1 DrawEllipse()函数的写法
-
void DrawEllipse(Mat img,double angle) { int thickness = 2;//线宽(实心) int lineType = 8;//线型(8为联通线型) ellipse(img,//画布 Point(WINDOW_WIDTH/2,WINDOW_WIDTH/2),//椭圆中心点 Size(WINDOW_WIDTH/4,WINDOW_WIDTH/16),//椭圆大小(位于Size参数包含的那么大矩形中) angle,//旋转角度 0,//扩展弧度,从0度开始 360,//到360度结束 Scalar(255,129,0),//蓝色 thickness,//线宽 lineType);//线型(8为联通线型) } -
该函数调用了OpenCV中的ellipse函数,从而将椭圆画到img画布上
-
线型的含义详见第八章8.1.2节的表8.3
4.3.2 DrawFilledCircle()函数的写法
-
void DrawFilledcircle(Mat img,Point center) { int thickness = -1;//线宽(实心) int lineType = 8;//线型(8为联通线型) circle(img,//画布 center,//圆心 WINDOW_WIDTH/32,//半径 Scalar(0,0,255),//红色 thickness,//线宽 lineType);//线型(8为联通线型) } -
函数DrawFilledCircle()调用了OpenCV中的circle函数,从而将圆画到img画布上
4.3.3 DrawPolygon()函数的写法
-
void DrawPolygon(Mat img) { int lineType = 8;//线型(8为联通线型) //创建一些点 Point rookPoints[1][20]; rookPoints[0][0] = Point(WINDOW_WIDTH/4,7*WINDOW_WIDTH/8); rookPoints[0][1] = Point(3*WINDOW_WIDTH/4,7*WINDOW_WIDTH/8); rookPoints[0][2] = Point(3*WINDOW_WIDTH/4,13*WINDOW_WIDTH/16); rookPoints[0][3] = Point(11*WINDOW_WIDTH/16,13*WINDOW_WIDTH/16); rookPoints[0][4] = Point(19*WINDOW_WIDTH/32,3*WINDOW_WIDTH/8); rookPoints[0][5] = Point(3*WINDOW_WIDTH/4,3*WINDOW_WIDTH/8); rookPoints[0][6] = Point(3*WINDOW_WIDTH/4,WINDOW_WIDTH/8); rookPoints[0][7] = Point(26*WINDOW_WIDTH/40,WINDOW_WIDTH/8); rookPoints[0][8] = Point(26*WINDOW_WIDTH/40,WINDOW_WIDTH/4); rookPoints[0][9] = Point(22*WINDOW_WIDTH/40,WINDOW_WIDTH/4); rookPoints[0][10] = Point(22*WINDOW_WIDTH/40,WINDOW_WIDTH/8); rookPoints[0][11] = Point(18*WINDOW_WIDTH/40,WINDOW_WIDTH/8); rookPoints[0][12] = Point(18*WINDOW_WIDTH/40,WINDOW_WIDTH/4); rookPoints[0][13] = Point(14*WINDOW_WIDTH/40,WINDOW_WIDTH/4); rookPoints[0][14] = Point(14*WINDOW_WIDTH/40,WINDOW_WIDTH/8); rookPoints[0][15] = Point(WINDOW_WIDTH/4,WINDOW_WIDTH/8); rookPoints[0][16] = Point(WINDOW_WIDTH/4,3*WINDOW_WIDTH/8); rookPoints[0][17] = Point(13*WINDOW_WIDTH/32,3*WINDOW_WIDTH/8); rookPoints[0][18] = Point(5*WINDOW_WIDTH/16,13*WINDOW_WIDTH/16); rookPoints[0][19] = Point(WINDOW_WIDTH/4,13*WINDOW_WIDTH/16); const Point *ppt[1] = {rookPoints[0]}; int npt[] = {20}; fillPoly( img, ppt,//多边形的顶点集 npt,//多边形的顶点数目 1,//要绘制的多边形数量 Scalar(255,255,255),//Scalar lineType);//线型 } -
函数DrawPolygon()调用了OpenCV中的fillPoly函数,从而将凹多边形画到img画布上
4.3.4 DrawLine()函数的写法
void DrawLine(Mat img,Point start,Point end)
{
    int thickness = 2;//线宽
    int lineType = 8;//线型
    line(       img,//画布
                start,//开始处
                end,//结束处
                Scalar(0,0,0),//黑线
                thickness,//线宽
                lineType);//线型
}
- 函数DrawLine()调用了OpenCV中的line函数,从而将线画到img画布上
4.3.5 main()函数的写法
-
//-----------------------------【预编译相关】---------------------------- #include#include #include #include using namespace cv; #define WINDOW_WIDTH 600 #define WINDOW_NAME1 "Picture 01" #define WINDOW_NAME2 "Picture 02" //-----------------------------【调用函数声明】---------------------------- void DrawEllipse(Mat img,double angle);//画椭圆 void DrawFilledcircle(Mat img,Point center);//画实心圆 void DrawPolygon(Mat img);//画凹多边形 void DrawLine(Mat img,Point start,Point end);//划线 //------------------------------【main函数】------------------------------ int main(int argc, char *argv[]) { QCoreApplication a(argc, argv); //创建空白的Mat图像 Mat atomImage = Mat::zeros(WINDOW_WIDTH,WINDOW_WIDTH,CV_8UC3); Mat rookImage = Mat::zeros(WINDOW_WIDTH,WINDOW_WIDTH,CV_8UC3); //-----------------------<1>绘制化学中的原子示例图--------------------- //【1】先绘制出椭圆 DrawEllipse(atomImage,90); DrawEllipse(atomImage,0); DrawEllipse(atomImage,45); DrawEllipse(atomImage,-45); //【2】再绘制圆心 DrawFilledcircle(atomImage,Point(WINDOW_WIDTH/2,WINDOW_WIDTH/2)); //-----------------------<2>绘制组合图------------------------------- //【2.1】先绘制出凹多边形 DrawPolygon(rookImage); //【2.2】绘制矩形 rectangle(rookImage, Point(0,7*WINDOW_WIDTH/8), Point(WINDOW_WIDTH,WINDOW_WIDTH), Scalar(0,255,255), -1, 8); //【2.3】绘制线段 DrawLine(rookImage,Point(0,15*WINDOW_WIDTH/16), Point(WINDOW_WIDTH,15*WINDOW_WIDTH/16)); DrawLine(rookImage,Point(WINDOW_WIDTH/4,7*WINDOW_WIDTH/8), Point(WINDOW_WIDTH/4,WINDOW_WIDTH)); DrawLine(rookImage,Point(WINDOW_WIDTH/2,7*WINDOW_WIDTH/8), Point(WINDOW_WIDTH/2,WINDOW_WIDTH)); DrawLine(rookImage,Point(3*WINDOW_WIDTH/4,7*WINDOW_WIDTH/8), Point(3*WINDOW_WIDTH/4,WINDOW_WIDTH)); //-----------------------<3>显示绘制的图像------------------------------- imshow(WINDOW_NAME1,atomImage); moveWindow(WINDOW_NAME1,0,200); imshow(WINDOW_NAME2,rookImage); moveWindow(WINDOW_NAME2,WINDOW_WIDTH,200); waitKey(0); return a.exec(); }
4.3.6 全部代码
-
//-----------------------------【预编译相关】---------------------------- #include#include #include #include using namespace cv; #define WINDOW_WIDTH 600 #define WINDOW_NAME1 "Picture 01" #define WINDOW_NAME2 "Picture 02" //-----------------------------【调用函数声明】---------------------------- void DrawEllipse(Mat img,double angle);//画椭圆 void DrawFilledcircle(Mat img,Point center);//画实心圆 void DrawPolygon(Mat img);//画凹多边形 void DrawLine(Mat img,Point start,Point end);//划线 //------------------------------【main函数】------------------------------ int main(int argc, char *argv[]) { QCoreApplication a(argc, argv); //创建空白的Mat图像 Mat atomImage = Mat::zeros(WINDOW_WIDTH,WINDOW_WIDTH,CV_8UC3); Mat rookImage = Mat::zeros(WINDOW_WIDTH,WINDOW_WIDTH,CV_8UC3); //-----------------------<1>绘制化学中的原子示例图--------------------- //【1】先绘制出椭圆 DrawEllipse(atomImage,90); DrawEllipse(atomImage,0); DrawEllipse(atomImage,45); DrawEllipse(atomImage,-45); //【2】再绘制圆心 DrawFilledcircle(atomImage,Point(WINDOW_WIDTH/2,WINDOW_WIDTH/2)); //-----------------------<2>绘制组合图------------------------------- //【2.1】先绘制出凹多边形 DrawPolygon(rookImage); //【2.2】绘制矩形 rectangle(rookImage, Point(0,7*WINDOW_WIDTH/8), Point(WINDOW_WIDTH,WINDOW_WIDTH), Scalar(0,255,255), -1, 8); //【2.3】绘制线段 DrawLine(rookImage,Point(0,15*WINDOW_WIDTH/16), Point(WINDOW_WIDTH,15*WINDOW_WIDTH/16)); DrawLine(rookImage,Point(WINDOW_WIDTH/4,7*WINDOW_WIDTH/8), Point(WINDOW_WIDTH/4,WINDOW_WIDTH)); DrawLine(rookImage,Point(WINDOW_WIDTH/2,7*WINDOW_WIDTH/8), Point(WINDOW_WIDTH/2,WINDOW_WIDTH)); DrawLine(rookImage,Point(3*WINDOW_WIDTH/4,7*WINDOW_WIDTH/8), Point(3*WINDOW_WIDTH/4,WINDOW_WIDTH)); //-----------------------<3>显示绘制的图像------------------------------- imshow(WINDOW_NAME1,atomImage); moveWindow(WINDOW_NAME1,0,200); imshow(WINDOW_NAME2,rookImage); moveWindow(WINDOW_NAME2,WINDOW_WIDTH,200); waitKey(0); return a.exec(); } //-----------------------------【DrawEllipse()函数】--------------------------------- // 描述:自定义的绘制函数,实现了绘制不同角度,相同尺寸的椭圆 //---------------------------------------------------------------------------------- void DrawEllipse(Mat img,double angle) { int thickness = 2;//线宽 int lineType = 8;//线型(8为联通线型) ellipse(img,//画布 Point(WINDOW_WIDTH/2,WINDOW_WIDTH/2),//椭圆中心点 Size(WINDOW_WIDTH/4,WINDOW_WIDTH/16),//椭圆大小(位于Size参数包含的那么大矩形中) angle,//旋转角度 0,//扩展弧度,从0度开始 360,//到360度结束 Scalar(255,129,0),//蓝色 thickness,//线宽 lineType);//线型(8为联通线型) } //-----------------------------【DrawFilledcircle()函数】--------------------------------- // 描述:自定义的绘制函数,实现了绘制实心圆 //---------------------------------------------------------------------------------- void DrawFilledcircle(Mat img,Point center) { int thickness = -1;//线宽(实心) int lineType = 8;//线型(8为联通线型) circle(img,//画布 center,//圆心 WINDOW_WIDTH/32,//半径 Scalar(0,0,255),//红色 thickness,//线宽 lineType);//线型(8为联通线型) } //-----------------------------【DrawPolygon()函数】--------------------------------- // 描述:自定义的绘制函数,实现了画凹多边形 //---------------------------------------------------------------------------------- void DrawPolygon(Mat img) { int lineType = 8;//线型(8为联通线型) //创建一些点 Point rookPoints[1][20]; rookPoints[0][0] = Point(WINDOW_WIDTH/4,7*WINDOW_WIDTH/8); rookPoints[0][1] = Point(3*WINDOW_WIDTH/4,7*WINDOW_WIDTH/8); rookPoints[0][2] = Point(3*WINDOW_WIDTH/4,13*WINDOW_WIDTH/16); rookPoints[0][3] = Point(11*WINDOW_WIDTH/16,13*WINDOW_WIDTH/16); rookPoints[0][4] = Point(19*WINDOW_WIDTH/32,3*WINDOW_WIDTH/8); rookPoints[0][5] = Point(3*WINDOW_WIDTH/4,3*WINDOW_WIDTH/8); rookPoints[0][6] = Point(3*WINDOW_WIDTH/4,WINDOW_WIDTH/8); rookPoints[0][7] = Point(26*WINDOW_WIDTH/40,WINDOW_WIDTH/8); rookPoints[0][8] = Point(26*WINDOW_WIDTH/40,WINDOW_WIDTH/4); rookPoints[0][9] = Point(22*WINDOW_WIDTH/40,WINDOW_WIDTH/4); rookPoints[0][10] = Point(22*WINDOW_WIDTH/40,WINDOW_WIDTH/8); rookPoints[0][11] = Point(18*WINDOW_WIDTH/40,WINDOW_WIDTH/8); rookPoints[0][12] = Point(18*WINDOW_WIDTH/40,WINDOW_WIDTH/4); rookPoints[0][13] = Point(14*WINDOW_WIDTH/40,WINDOW_WIDTH/4); rookPoints[0][14] = Point(14*WINDOW_WIDTH/40,WINDOW_WIDTH/8); rookPoints[0][15] = Point(WINDOW_WIDTH/4,WINDOW_WIDTH/8); rookPoints[0][16] = Point(WINDOW_WIDTH/4,3*WINDOW_WIDTH/8); rookPoints[0][17] = Point(13*WINDOW_WIDTH/32,3*WINDOW_WIDTH/8); rookPoints[0][18] = Point(5*WINDOW_WIDTH/16,13*WINDOW_WIDTH/16); rookPoints[0][19] = Point(WINDOW_WIDTH/4,13*WINDOW_WIDTH/16); const Point *ppt[1] = {rookPoints[0]}; int npt[] = {20}; fillPoly( img, ppt,//多边形的顶点集 npt,//多边形的顶点数目 1,//要绘制的多边形数量 Scalar(255,255,255),//Scalar lineType);//线型 } //-----------------------------【DrawLine()函数】--------------------------------- // 描述:自定义的绘制函数,实现了画线 //---------------------------------------------------------------------------------- void DrawLine(Mat img,Point start,Point end) { int thickness = 2;//线宽 int lineType = 8;//线型 line( img,//画布 start,//开始处 end,//结束处 Scalar(0,0,0),//黑线 thickness,//线宽 lineType);//线型 } -
实现效果如下
4.4 本章小结
-
本章核心函数/类清单
-
函数/类名称 说明 对应讲解章节 Mat::mat() Mat类的构造函数 4.1.4 Mat::Creat() Mat类的成员函数,可用于Mat类的初始化操作 4.1.1 Point类 用于表示点的数据结构 4.2.1 Scalar类 用于表示颜色的数据结构 4.2.2 Size类 用于表示尺寸的数据结构 4.2.3 Rect类 用于表示矩形的数据结构 4.2.4 cvtColor 用于颜色空间转换 4.2.5
-


