透明动画不生效
原本想着让一个布局layout1从不可见到可见过渡的,可运行完咋没反应,layout还是不可见,奇怪了。然后发现为了让布局默认不可见,我就在xml里把layout1的alpha设置为0了,结果下边这个动画的透明度是在0的基础上变的,所以变来变去还是0.赶紧把布局里的alpha=0删了.
            val anima=AlphaAnimation(0f,1f).apply {
                duration=2222
                fillAfter=true
            }
            layout1.startAnimation(anima)
1字母默认大写的问题
以前了布局文件里定义一个text为字母的时候,它显示出来的默认就是大写,比较烦人。
今天写的时候就想着肯定有地方设置的,结果还真找到了textAllCaps设置为false就不会自动大写了。
怎么找到的? 输入text完事看系统提示的那些方法,也就这个看着最像。
当然如果要所有的都默认小写,那在主题里设置这个属性为false即可。
2如何获取系统的资源文件值?
比如如下的代码,com.android.internal 这是源码里的代码片段,我们要复制出来肯定挂了。
 public boolean onIsMultiPane() {
        boolean preferMultiPane = getResources().getBoolean(
                com.android.internal.R.bool.preferences_prefer_dual_pane);
        return preferMultiPane;
    }
我们要使用的时候咋办,根据名字先获取id值。
int id=Resources.getSystem().getIdentifier("preferences_prefer_dual_pane","bool", "android");
boolean preferMultiPane = getResources().getBoolean(id);
3根据class实例化一个对象
比如如下的方法
一种是直接new一个无参对象出来,一种是new一个带参数的对象出来。
        public  T create(@NonNull Class modelClass) {
            if (AndroidViewModel.class.isAssignableFrom(modelClass)) {
                //noinspection TryWithIdenticalCatches
                try {
                    return modelClass.getConstructor(Application.class).newInstance(mApplication);
                }
  //catch 删了
            }
            return modelClass.newInstance();
        }
4 editTextView的知识
今天看帖子,发现还有这种操作,原来可以修改edittextview的显示内容,但不影响实际值。
输入abc,控件上显示的是大写的ABC, 而实际上打印下结果还是小写的,感觉不错啊。
        et_phone.transformationMethod=object :ReplacementTransformationMethod(){
            override fun getOriginal(): CharArray {
                return  charArrayOf( 'a', 'b', 'c', 'd', 'e', 'f', 'g', 'h', 'i', 'j','k','l','m','n','o','p','q','r','s','t','u','v','w','x','y','z' )

            }

            override fun getReplacement(): CharArray {
                return charArrayOf( 'A', 'B', 'C', 'D', 'E', 'F', 'G', 'H', 'I', 'J','K','L','M','N','O','P','Q','R','S','T','U','V','W','X','Y','Z')
            }
        }
还有3个系统提供的,看名字就大概知道干啥的了,后两个是上边ReplacementTransformationMethod的实现类
- PasswordTransformationMethod 密码性质的,用点点代替
private static char DOT = '\u2022'; - SingleLineTransformationMethod//
ORIGINAL = new char[] { '\n', '\r' }; REPLACEMENT = new char[] { ' ', '\uFEFF' }; - HideReturnsTransformationMethod//
ORIGINAL = new char[] { '\r' }; REPLACEMENT = new char[] { '\uFEFF' };
点击按钮切换密码状态就非常容易实现了
        btn.setOnClickListener {
            editText.apply {
                val selection = this.selectionEnd
                val hasTransformationMethod = transformationMethod is PasswordTransformationMethod
                if (!hasTransformationMethod) {
                    this.transformationMethod = PasswordTransformationMethod.getInstance()
                } else {
                    this.transformationMethod = null;
                }
                if (selection > 0) {
                    this.setSelection(selection)
                }
            }
        }
5 activity背景透明
有时候比如我们要执行侧滑关闭页面的时候,这时候应该可以看到下边的界面的,那咋办?让背景透明即可。
主题里添加下边的代码即可,也就是
@1让背景透明,默认是黑色的,
@2把背景颜色设置为透明。
- true
- @android:color/transparent
这时候你会发现进去都能看到底层了。当然不是我们要的效果了,我们需要在activity的xml布局的背景设置颜色的,或者在代码里设置也行。
6 以空格分割字符串
有时候搜索的时候用户输入搜索内容中间加了空格,我们需要处理下,咋办? split(“ ”)?no ,no你都不知道用户中间弄了几个空格。
String old="hello eheh llsl ";
String[] arr=old.trim().split("\s+"); //首先去掉两端的空格,然后开始
7 Math.hypot(x, y)
Returns sqrt(x2 +y2) without intermediate overflow or underflow.
8 activity的布局到底啥样?
看这里介绍的不错 https://www.jianshu.com/p/65295b2cb047
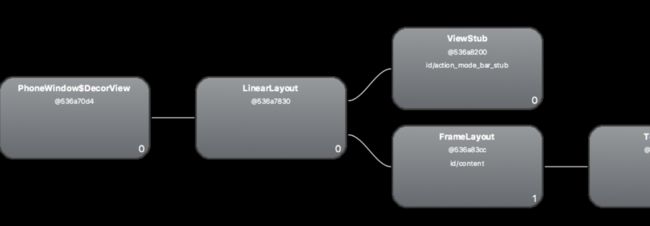
我们平时获取decorView是这样的 window.decorView as FrameLayout
然后下边套个线性布局,线性布局里有2个view,分别是如下的代码
到platform下找布局,到sources下找源码
名字screen_simple.xml
看到还有一个名字差不多的screen_simple_overlay_action_mode.xml
至于viewstub加载的就是一个自定义控件,一个viewgroup
我们平时setcontentview就是加载到那个id="@android:id/content"的frameLayout上的
今天打印了下id/content 的parent的log,结果发现好像不太对。
代码和日志如下.
感觉多了好几层。。。
val p1=findViewById(android.R.id.content).parent as ViewGroup
        val p2=p1.parent as ViewGroup
        val p3=p2.parent as ViewGroup
        println("left======0=====${p1}==========${p1.childCount}")
        println("left======1=====${p2}==========${p2.childCount}")
        println("left======2=====${p3}==========${p3.childCount}")
        val p4=p3.parent as ViewGroup?
        println("left======3=====${p4}=========")

 //left======0=====android.support.v7.widget.FitWindowsLinearLayout{1c0de56 V.E...... ......ID 0,0-1024,768 #7f08000d app:id/action_bar_root}==========2
    //left======1=====android.widget.FrameLayout{2616f00 V.E...... ......ID 0,0-1024,768}==========1
    //left======2=====android.widget.LinearLayout{d4e7339 V.E...... ......ID 0,0-1024,768}==========2
    //left======3=====com.charliesong.demo0327.draghelper.LeftEdgeTouchCloseLayout{8989d7e V.E...... ......ID 0,0-1024,768 #7f080089 app:id/edgetouchid}=========
其中那个自定义view是我加载decorview下的
        (window.decorView as FrameLayout).apply {
            var originalView = this.getChildAt(0)
            originalView.setBackgroundColor(Color.WHITE)
            this.removeView(originalView)
            var addView = com.charliesong.demo0327.draghelper.LeftEdgeTouchCloseLayout(this@BaseActivity)
            addView.id= R.id.edgetouchid

            addView.addView(originalView, originalView.layoutParams)
            this.addView(addView,
                    android.widget.FrameLayout.LayoutParams.MATCH_PARENT, android.widget.FrameLayout.LayoutParams.MATCH_PARENT)
        }
研究开始
看下源码在AppCompatDelegateImplV9 里能看到setContentView的实现方法,可以看到我们的布局是被加载到了android.R.id.content的view里的
    public void setContentView(int resId) {
        ensureSubDecor();
        ViewGroup contentParent = (ViewGroup) mSubDecor.findViewById(android.R.id.content);
        contentParent.removeAllViews();
        LayoutInflater.from(mContext).inflate(resId, contentParent);
        mOriginalWindowCallback.onContentChanged();
    }
id/content的view,是通过一个变量为mSubDecor的viewgroup来find的,那么找下这个东西咋来的,找到如下的代码 mSubDecor = createSubDecor()
if (!mWindowNoTitle) {
            if (mIsFloating) {
                // If we're floating, inflate the dialog title decor
                subDecor = (ViewGroup) inflater.inflate(
                        R.layout.abc_dialog_title_material, null);
//
 } else if (mHasActionBar) {
// Now inflate the view using the themed context and set it as the content view
                subDecor = (ViewGroup) LayoutInflater.from(themedContext)
                        .inflate(R.layout.abc_screen_toolbar, null);
//
 } else {
            if (mOverlayActionMode) {
                subDecor = (ViewGroup) inflater.inflate(
                        R.layout.abc_screen_simple_overlay_action_mode, null);
            } else {
                subDecor = (ViewGroup) inflater.inflate(R.layout.abc_screen_simple, null);
            }


        if (mDecorContentParent == null) {
            mTitleView = (TextView) subDecor.findViewById(R.id.title);
        }
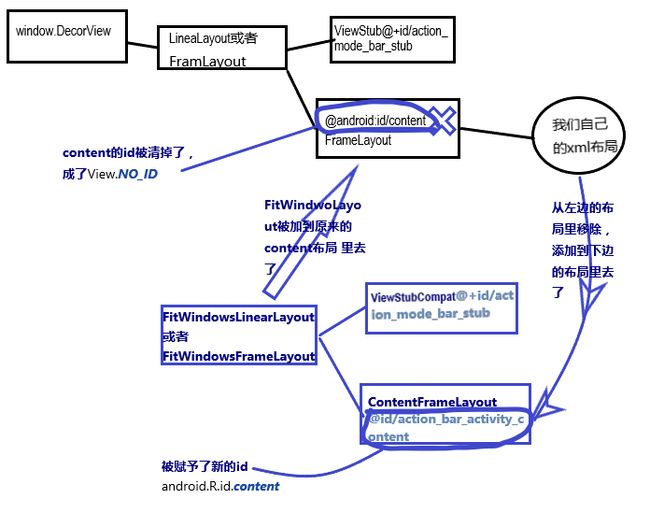
  //下边这一堆代码的功能就是把在原来content的布局里添加里一层新的FitWindowLineaLayout或者Framlayout,而把原来content的id也清掉了,FitWindowLineaLayout里的那个framlayout被赋予了新的id叫content,还把最原始的content里的view添加到现在的content布局里。下边画了一张图,可以参考下。
        // Make the decor optionally fit system windows, like the window's decor
        ViewUtils.makeOptionalFitsSystemWindows(subDecor);

        final ContentFrameLayout contentView = (ContentFrameLayout) subDecor.findViewById(
                R.id.action_bar_activity_content);

        final ViewGroup windowContentView = (ViewGroup) mWindow.findViewById(android.R.id.content);
        if (windowContentView != null) {
            // There might be Views already added to the Window's content view so we need to
            // migrate them to our content view
            while (windowContentView.getChildCount() > 0) {
                final View child = windowContentView.getChildAt(0);
                windowContentView.removeViewAt(0);
                contentView.addView(child);
            }

            // Change our content FrameLayout to use the android.R.id.content id.
            // Useful for fragments.
            windowContentView.setId(View.NO_ID);
            contentView.setId(android.R.id.content);

            // The decorContent may have a foreground drawable set (windowContentOverlay).
            // Remove this as we handle it ourselves
            if (windowContentView instanceof FrameLayout) {
                ((FrameLayout) windowContentView).setForeground(null);
            }
        }

        // Now set the Window's content view with the decor
        mWindow.setContentView(subDecor);
从上边可以看到,在v7包下,也就是appcompat下,以前的布局进行了处理,中间加了一层
abc_screen_simple_overlay_action_mode或者abc_screen_simple
布局结构 如下,简单看下名字短的这个
include的,这个id为action_bar_activity_content的之后id会被改成android.R.id.content的
好难过,画了一张图,哈哈
黑色的是原来的布局结构,蓝色的是appcompat主题下做的修改,也就是在在原本的content【Framlayout】和我们的布局之间又插入了一层布局。原本id/content被清除了,赋予给了新的contentFramLayout了。具体看上边mSubDecor初始化的java代码
9 自定义id
或者如果你最低版本大于等于17的时候可以这样View.generateViewId()
RadioButton 没法单选
测试cardview,就里边弄了个RadioGroup,包含2个RadioButton,
我默认给其中一个设置为选中android:checked="true",结果测试点击另一个发现默认的还是选中状态,我靠,见鬼了。感觉自己写的没错啊
吓得我赶紧去搜,才发现这玩意需要id的,没有id引起的原因,赶紧加上id,就好了,记录下。平时都有id的,这个还真没注意。
webview相关
我们用webview加载一个网页,完事点击一个连接,打印url发现长这样
http://192.168.0.131:12345/%E5%AD%97%E5%85%B8_2.6.15.seller.apk
这时候,如果我们要展示文件的名字,总不能就直接显示百分号吧?
如下拿到传递过来的url执行如下的代码,这时候打印url2就会发现中文正常显示了。这个类是用来解码的。
val url2=URLDecoder.decode(url,"UTF-8")
刚开始弄错了,这个是用来编码的,就是把中文转换成%那种
URLEncoder.encode(url,"utf-8");
其他:我印象中好久以前用过这两个类进行过emoji表情的处理,就是系统输入法的表情直接插入到文本里,然后这样转换下传给后台, 之后再从后台获取,再进行解码好像就可以了。。
thread ,looper
如何在主线程执行代码,以及判断是否在主线程
    public boolean isMainThread() {
        return Looper.getMainLooper().getThread() == Thread.currentThread();
    }

mMainHandler = new Handler(Looper.getMainLooper());


