最近了解了iOS 13新增功能之Sign In with Apple,Sign In with Apple是跨平台的,可以支持iOS、macOS、watchOS、tvOS、JS。本文主要内容为Sign In with Apple在iOS上的基础使用。详情参考WWDC 2019
- 审核备注
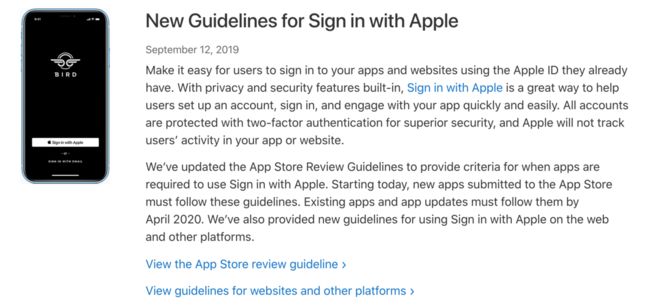
New Guidelines for Sign in with Apple
We’ve updated the App Store Review Guidelines to provide criteria for when apps are required to use Sign in with Apple. Starting today, new apps submitted to the App Store must follow these guidelines. Existing apps and app updates must follow them by April 2020. We’ve also provided new guidelines for using Sign in with Apple on the web and other platforms.
September 12, 2019
也就是说,所有已接入其它第三方登录的 App,Sign In with Apple 将被要求作为一种登录选择,否则就不给过。从今天开始(2019-9-12),提交到App Store的新应用必须遵循这些准则,现有应用程序和应用程序更新必须在2020年4月之前进行。详情参考App Store审核指南
-
开发Sign In with Apple的注意事项
需要在苹果后台打开该选项,并且重新生成Profiles配置文件,并安装到Xcode,如下图
服务端验证需要的文件,一个是私钥文件,一个是config.json文件
-
创建用于客户端身份验证的私钥
返回Certificates, Identifiers & Profiles主屏幕,从侧面导航中选择Keys
单击Configure按钮,然后选择你先前创建的Primary App ID,保存之后,Apple将为你生成一个新的私钥,并让你仅下载一次,请确保你保存了此文件,因为以后你将无法再次将其取回!你下载的文件将以.p8结尾,可以将其重命名为key.txt以便在后续步骤中更轻松地使用
创建config.json新文件,格式、内容和参数说明如下
{
    "client_id": "实际上被称为“Service ID”,您将在“Identifiers”部分创建它,其实就是应用的bundleID",
    "team_id": "后台账号的teamID",
    "redirect_uri": "重定向url,网页登录需要,只是客服端登录可以不写",
    "key_id": "在苹果后台获取,如下图",
    "scope": "设置我们要从用户那里收集什么信息,我们可以设置email和name,或者也可以不写
}
- web使用Sign In with Apple的相关配置,不需要web登录的,以下配置可以忽略
-
创建Services ID
在下一步中,你将定义用户在登录流程中将看到的应用程序的名称,并定义成为OAuth的标识符client_id,确保还选中Sign In with Apple复选框
-
创建web Authentication Configuration,定义应用程序的重定向URL
-
iOS使用Sign In with Apple在Xcode的准备工作
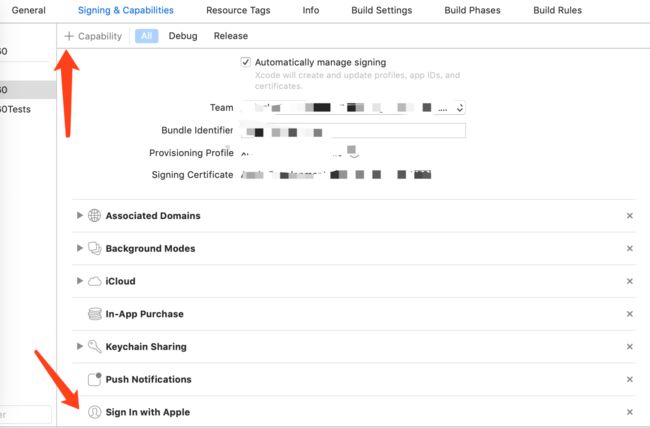
在Xcode11 Signing & Capabilities中添加Sign In With Apple,如下图
iOS Sign In with Apple流程
- 导入系统头文件#import
,添加Sign In with Apple登录按钮,设置ASAuthorizationAppleIDButton相关布局,并添加按钮点击响应事件 - 获取授权码
- 验证
- 导入系统头文件
#import,添加Sign In with Apple登录按钮,设置ASAuthorizationAppleIDButton相关布局,并添加按钮点击响应事件。当然苹果也允许自定义苹果登录按钮的样式,样式要求详见这个文档:Human Interface Guidelines
- (void)configUI{
    // 使用系统提供的按钮,要注意不支持系统版本的处理
    if (@available(iOS 13.0, *)) {
        // Sign In With Apple Button
        ASAuthorizationAppleIDButton *appleIDBtn = [ASAuthorizationAppleIDButton buttonWithType:ASAuthorizationAppleIDButtonTypeDefault style:ASAuthorizationAppleIDButtonStyleWhite];
        appleIDBtn.frame = CGRectMake(30, self.view.bounds.size.height - 180, self.view.bounds.size.width - 60, 100);
        //    appleBtn.cornerRadius = 22.f;
        [appleIDBtn addTarget:self action:@selector(didAppleIDBtnClicked) forControlEvents:UIControlEventTouchUpInside];
        [self.view addSubview:appleIDBtn];
    }

    // 或者自己用UIButton实现按钮样式
    UIButton *addBtn = [UIButton buttonWithType:UIButtonTypeCustom];
    addBtn.frame = CGRectMake(30, 80, self.view.bounds.size.width - 60, 44);
    addBtn.backgroundColor = [UIColor orangeColor];
    [addBtn setTitle:@"Sign in with Apple" forState:UIControlStateNormal];
    [addBtn addTarget:self action:@selector(didCustomBtnClicked) forControlEvents:UIControlEventTouchUpInside];
    [self.view addSubview:addBtn];
}

// 自己用UIButton按钮调用处理授权的方法
- (void)didCustomBtnClicked{
    // 封装Sign In with Apple 登录工具类,使用这个类时要把类对象设置为全局变量,或者直接把这个工具类做成单例,如果使用局部变量,和IAP支付工具类一样,会导致苹果回调不会执行
    self.signInApple = [[SignInApple alloc] init];
    [self.signInApple handleAuthorizationAppleIDButtonPress];
}

// 使用系统提供的按钮调用处理授权的方法
- (void)didAppleIDBtnClicked{
    // 封装Sign In with Apple 登录工具类,使用这个类时要把类对象设置为全局变量,或者直接把这个工具类做成单例,如果使用局部变量,和IAP支付工具类一样,会导致苹果回调不会执行
    self.signInApple = [[SignInApple alloc] init];
    [self.signInApple handleAuthorizationAppleIDButtonPress];
}

// 处理授权
- (void)handleAuthorizationAppleIDButtonPress{
    NSLog(@"////////");

    if (@available(iOS 13.0, *)) {
        // 基于用户的Apple ID授权用户,生成用户授权请求的一种机制
        ASAuthorizationAppleIDProvider *appleIDProvider = [[ASAuthorizationAppleIDProvider alloc] init];
        // 创建新的AppleID 授权请求
        ASAuthorizationAppleIDRequest *appleIDRequest = [appleIDProvider createRequest];
        // 在用户授权期间请求的联系信息
        appleIDRequest.requestedScopes = @[ASAuthorizationScopeFullName, ASAuthorizationScopeEmail];
        // 由ASAuthorizationAppleIDProvider创建的授权请求 管理授权请求的控制器
        ASAuthorizationController *authorizationController = [[ASAuthorizationController alloc] initWithAuthorizationRequests:@[appleIDRequest]];
        // 设置授权控制器通知授权请求的成功与失败的代理
        authorizationController.delegate = self;
        // 设置提供 展示上下文的代理,在这个上下文中 系统可以展示授权界面给用户
        authorizationController.presentationContextProvider = self;
        // 在控制器初始化期间启动授权流
        [authorizationController performRequests];
    }else{
        // 处理不支持系统版本
        NSLog(@"该系统版本不可用Apple登录");
    }
}
- 注意:封装Sign In with Apple 登录工具类,使用这个类时要把类对象设置为全局变量,或者直接把这个工具类做成单例,如果使用局部变量,和IAP支付工具类一样,会导致苹果回调不会执行
- 已经使用Sign In with Apple登录过app的用户
如果设备中存在iCloud Keychain凭证或者AppleID凭证,提示用户直接使用TouchID或FaceID登录即可,代码如下
// 如果存在iCloud Keychain 凭证或者AppleID 凭证提示用户
- (void)perfomExistingAccountSetupFlows{
    NSLog(@"///已经认证过了/////");

    if (@available(iOS 13.0, *)) {
        // 基于用户的Apple ID授权用户,生成用户授权请求的一种机制
        ASAuthorizationAppleIDProvider *appleIDProvider = [[ASAuthorizationAppleIDProvider alloc] init];
        // 授权请求AppleID
        ASAuthorizationAppleIDRequest *appleIDRequest = [appleIDProvider createRequest];
        // 为了执行钥匙串凭证分享生成请求的一种机制
        ASAuthorizationPasswordProvider *passwordProvider = [[ASAuthorizationPasswordProvider alloc] init];
        ASAuthorizationPasswordRequest *passwordRequest = [passwordProvider createRequest];
        // 由ASAuthorizationAppleIDProvider创建的授权请求 管理授权请求的控制器
        ASAuthorizationController *authorizationController = [[ASAuthorizationController alloc] initWithAuthorizationRequests:@[appleIDRequest, passwordRequest]];
        // 设置授权控制器通知授权请求的成功与失败的代理
        authorizationController.delegate = self;
        // 设置提供 展示上下文的代理,在这个上下文中 系统可以展示授权界面给用户
        authorizationController.presentationContextProvider = self;
        // 在控制器初始化期间启动授权流
        [authorizationController performRequests];
    }else{
        // 处理不支持系统版本
        NSLog(@"该系统版本不可用Apple登录");
    }
}
- 获取授权码
获取授权码需要在代码中实现两个代理回调ASAuthorizationControllerDelegate、ASAuthorizationControllerPresentationContextProviding分别用于处理授权登录成功和失败、以及提供用于展示授权页面的Window,代码如下
#pragma mark - delegate
//@optional 授权成功地回调
- (void)authorizationController:(ASAuthorizationController *)controller didCompleteWithAuthorization:(ASAuthorization *)authorization API_AVAILABLE(ios(13.0)){
    NSLog(@"授权完成:::%@", authorization.credential);
    NSLog(@"%s", __FUNCTION__);
    NSLog(@"%@", controller);
    NSLog(@"%@", authorization);

    if ([authorization.credential isKindOfClass:[ASAuthorizationAppleIDCredential class]]) {
        // 用户登录使用ASAuthorizationAppleIDCredential
        ASAuthorizationAppleIDCredential *appleIDCredential = authorization.credential;
        NSString *user = appleIDCredential.user;
        // 使用过授权的,可能获取不到以下三个参数
        NSString *familyName = appleIDCredential.fullName.familyName;
        NSString *givenName = appleIDCredential.fullName.givenName;
        NSString *email = appleIDCredential.email;

        NSData *identityToken = appleIDCredential.identityToken;
        NSData *authorizationCode = appleIDCredential.authorizationCode;

        // 服务器验证需要使用的参数
        NSString *identityTokenStr = [[NSString alloc] initWithData:identityToken encoding:NSUTF8StringEncoding];
        NSString *authorizationCodeStr = [[NSString alloc] initWithData:authorizationCode encoding:NSUTF8StringEncoding];
        NSLog(@"%@\n\n%@", identityTokenStr, authorizationCodeStr);

        // Create an account in your system.
        // For the purpose of this demo app, store the userIdentifier in the keychain.
        //  需要使用钥匙串的方式保存用户的唯一信息
//        [YostarKeychain save:KEYCHAIN_IDENTIFIER(@"userIdentifier") data:user];

    }else if ([authorization.credential isKindOfClass:[ASPasswordCredential class]]){
        // 这个获取的是iCloud记录的账号密码,需要输入框支持iOS 12 记录账号密码的新特性,如果不支持,可以忽略
        // Sign in using an existing iCloud Keychain credential.
        // 用户登录使用现有的密码凭证
        ASPasswordCredential *passwordCredential = authorization.credential;
        // 密码凭证对象的用户标识 用户的唯一标识
        NSString *user = passwordCredential.user;
        // 密码凭证对象的密码
        NSString *password = passwordCredential.password;

    }else{
        NSLog(@"授权信息均不符");

    }
}

// 授权失败的回调
- (void)authorizationController:(ASAuthorizationController *)controller didCompleteWithError:(NSError *)error API_AVAILABLE(ios(13.0)){
    // Handle error.
    NSLog(@"Handle error:%@", error);
    NSString *errorMsg = nil;
    switch (error.code) {
        case ASAuthorizationErrorCanceled:
            errorMsg = @"用户取消了授权请求";
            break;
        case ASAuthorizationErrorFailed:
            errorMsg = @"授权请求失败";
            break;
        case ASAuthorizationErrorInvalidResponse:
            errorMsg = @"授权请求响应无效";
            break;
        case ASAuthorizationErrorNotHandled:
            errorMsg = @"未能处理授权请求";
            break;
        case ASAuthorizationErrorUnknown:
            errorMsg = @"授权请求失败未知原因";
            break;

        default:
            break;
    }

    NSLog(@"%@", errorMsg);
}

// 告诉代理应该在哪个window 展示内容给用户
- (ASPresentationAnchor)presentationAnchorForAuthorizationController:(ASAuthorizationController *)controller API_AVAILABLE(ios(13.0)){
    NSLog(@"88888888888");
    // 返回window
    return [UIApplication sharedApplication].windows.lastObject;
}
在授权登录成功回调中,我们可以拿到以下几类数据
- UserID:Unique, stable, team-scoped user ID,苹果用户唯一标识符,该值在同一个开发者账号下的所有App下是一样的,开发者可以用该唯一标识符与自己后台系统的账号体系绑定起来(这与国内的微信、QQ、微博等第三方登录流程基本一致)
- Verification data:
Identity token, code,验证数据,用于传给开发者后台服务器,然后开发者服务器再向苹果的身份验证服务端验证,本次授权登录请求数据的有效性和真实性,详见Sign In with Apple REST API - Account information:Name, verified email,苹果用户信息,包括全名、邮箱等,注意:如果玩家登录时拒绝提供真实的邮箱账号,苹果会生成虚拟的邮箱账号,而且记录过的苹果账号再次登录这些参数拿不到
- 验证
关于验证的这一步,需要传递授权码给自己的服务端,自己的服务端调用苹果API去校验授权码Generate and validate tokens。如果验证成功,可以根据userIdentifier判断账号是否已存在,若存在,则返回自己账号系统的登录态,若不存在,则创建一个新的账号,并返回对应的登录状态给App - 推荐验证步骤为:
- 服务端拿authorizationCode去苹果后台验证,验证地址https://appleid.apple.com/auth/token,苹果返回id_token,与客户端获取的identityToken值一样,格式如下
{
    "access_token": "一个token",
    "token_type": "Bearer",
    "expires_in": 3600,
    "refresh_token": "一个token",
    "id_token": "结果是JWT,字符串形式,identityToken"
}
另外授权code是有时效性的,且使用一次即失效
- 服务器拿到相应结果后,其中id_token是JWT数据,解码id_token,得到如下内容
{
    "iss":"https://appleid.apple.com",
    "aud":"这个是你的app的bundle identifier",
    "exp":1567482337,
    "iat":1567481737,
    "sub":"这个字段和客户端获取的user字段是完全一样的",
    "c_hash":"8KDzfalU5kygg5zxXiX7dA",
    "auth_time":1567481737
}
其中aud与你app的bundleID一致,sub就是授权用户的唯一标识,与手机端获得的user一致,服务器端通过对比sub字段信息是否与手机端上传的user信息一致来确定是否成功登录
该token的有效期是10分钟,具体后端验证参考附录
附:原文参考链接
附:官方示例代码 Swift 版
附:What the Heck is Sign In with Apple?
附:Sign In with Apple 从登陆到服务器验证
附:苹果授权登陆后端验证
附:[官方文档] Generate and validate tokens
附:[官方文档] App Store审核指南
附:SignInAppleDemo
- 服务端验证原文参考链接
附:服务端验证<1>
附:服务端验证<2>


