pandas plot绘图详解:一文教会你各种绘图
pandas.DataFrame.plot绘图详解
- 一、介绍
-
- 1.1 参数介绍
- 1.2 其他常用说明
- 二、举例说明
-
- 2.1 折线图 line
- 2.2 条型图 bar
- 2.3 直方图 hist
- 2.4 箱型图 box
- 2.5 区域图 area
- 2.6 散点图 scatter
- 2.7 蜂巢图 hexbin
- 2.8 饼型图 pie
- 三、其他格式
-
- 3.1 设置显示中文标题
- 3.2 设置坐标轴显示负号
- 3.3 使用误差线 yerr 进行绘图
- 3.4 使用 layout 将目标分成多个子图
- 3.5 使用 table 绘制表,上图下表
- 3.6 使用 colormap 设置图的区域颜色
一、介绍
使用pandas.DataFrame的plot方法绘制图像会按照数据的每一列绘制一条曲线,默认按照列columns的名称在适当的位置展示图例,比matplotlib绘制节省时间,且DataFrame格式的数据更规范,方便向量化及计算。
DataFrame.plot( )函数:
DataFrame.plot(x=None, y=None, kind='line', ax=None, subplots=False,
                sharex=None, sharey=False, layout=None, figsize=None,
                use_index=True, title=None, grid=None, legend=True,
                style=None, logx=False, logy=False, loglog=False,
                xticks=None, yticks=None, xlim=None, ylim=None, rot=None,
                fontsize=None, colormap=None, position=0.5, table=False, yerr=None,
                xerr=None, stacked=True/False, sort_columns=False,
                secondary_y=False, mark_right=True, **kwds)
1.1 参数介绍
- x和y:表示标签或者位置,用来指定显示的索引,默认为None
- kind:表示绘图的类型,默认为line,折线图
- line:折线图
- bar/barh:柱状图(条形图),纵向/横向
- pie:饼状图
- hist:直方图(数值频率分布)
- box:箱型图
- kde:密度图,主要对柱状图添加Kernel 概率密度线
- area:区域图(面积图)
- scatter:散点图
- hexbin:蜂巢图
- ax:子图,可以理解成第二坐标轴,默认None
- subplots:是否对列分别作子图,默认False
- sharex:共享x轴刻度、标签。如果ax为None,则默认为True,如果传入ax,则默认为False
- sharey:共享y轴刻度、标签
- layout:子图的行列布局,(rows, columns)
- figsize:图形尺寸大小,(width, height)
- use_index:用索引做x轴,默认True
- title:图形的标题
- grid:图形是否有网格,默认None
- legend:子图的图例
- style:对每列折线图设置线的类型,list or dict
- logx:设置x轴刻度是否取对数,默认False
- logy
- loglog:同时设置x,y轴刻度是否取对数,默认False
- xticks:设置x轴刻度值,序列形式(比如列表)
- yticks
- xlim:设置坐标轴的范围。数值,列表或元组(区间范围)
- ylim
- rot:轴标签(轴刻度)的显示旋转度数,默认None
- fontsize : int, default None#设置轴刻度的字体大小
- colormap:设置图的区域颜色
- colorbar:柱子颜色
- position:柱形图的对齐方式,取值范围[0,1],默认0.5(中间对齐)
- table:图下添加表,默认False。若为True,则使用DataFrame中的数据绘制表格
- yerr:误差线
- xerr
- stacked:是否堆积,在折线图和柱状图中默认为False,在区域图中默认为True
- sort_columns:对列名称进行排序,默认为False
- secondary_y:设置第二个y轴(右辅助y轴),默认为False
- mark_right : 当使用secondary_y轴时,在图例中自动用“(right)”标记列标签 ,默认True
- x_compat:适配x轴刻度显示,默认为False。设置True可优化时间刻度的显示
1.2 其他常用说明
- color:颜色
- s:散点图大小,int类型
- 设置x,y轴名称
- ax.set_ylabel(‘yyy’)
- ax.set_xlabel(‘xxx’)
二、举例说明
2.1 折线图 line
1. 基本用法
ts = pd.Series(np.random.randn(1000), index=pd.date_range("1/1/2000", periods=1000))
ts = ts.cumsum()
ts.plot();
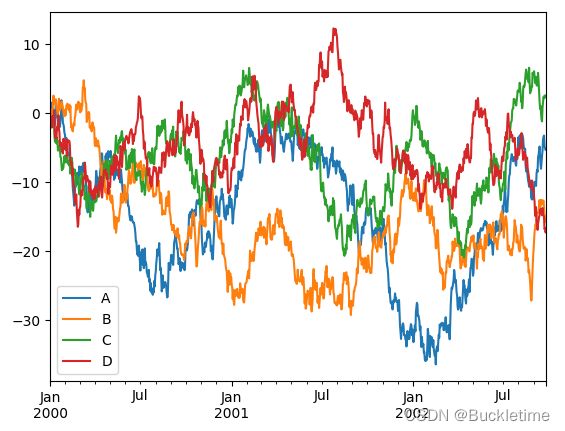
2. 展示多列数据
df = pd.DataFrame(np.random.randn(1000, 4), index=pd.date_range("1/1/2000", periods=1000), columns=list("ABCD"))
df = df.cumsum()
df.plot()
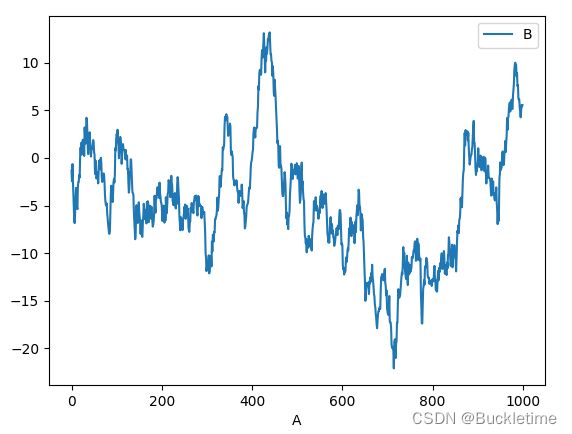
df3 = pd.DataFrame(np.random.randn(1000, 2), columns=["B", "C"]).cumsum()
df3["A"] = pd.Series(list(range(1000)))
df3.plot(x="A", y="B")
ts = pd.Series(np.random.randn(1000), index=pd.date_range('1/1/2000', periods=1000))
df = pd.DataFrame(np.random.randn(1000, 4), index=ts.index, columns=list('ABCD'))
df = df.cumsum()
print(df)
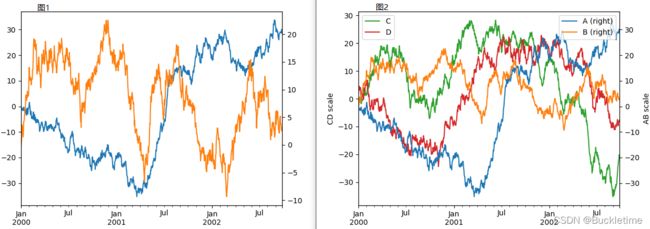
# 图1:其中A列用左Y轴标注,B列用右Y轴标注,二者共用一个X轴
df.A.plot()  # 对A列作图,同理可对行做图
df.B.plot(secondary_y=True)  # 设置第二个y轴(右y轴)
# 图2
ax = df.plot(secondary_y=['A', 'B'])  # 定义column A B使用右Y轴。
# ax(axes)可以理解为子图,也可以理解成对黑板进行切分,每一个板块就是一个axes
ax.set_ylabel('CD scale')   # 主y轴标签
ax.right_ax.set_ylabel('AB scale')  # 第二y轴标签
ax.legend(loc='upper left')  # 设置图例的位置
ax.right_ax.legend(loc='upper right')   # 设置第二图例的位置
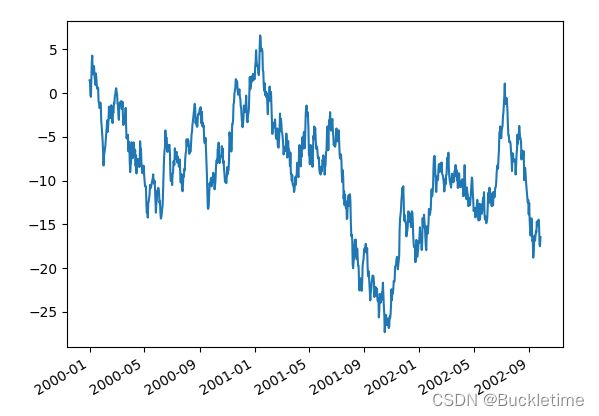
ts = pd.Series(np.random.randn(1000), index=pd.date_range("1/1/2000", periods=1000))
ts = ts.cumsum()
ts.plot(x_compat=True)
df = pd.DataFrame(np.random.randn(1000, 4), index=pd.date_range('1/1/2000', periods=1000),
                  columns=list('ABCD')).cumsum()
df.A.plot(color='red')
df.B.plot(color='blue')
df.C.plot(color='yellow')
2.2 条型图 bar
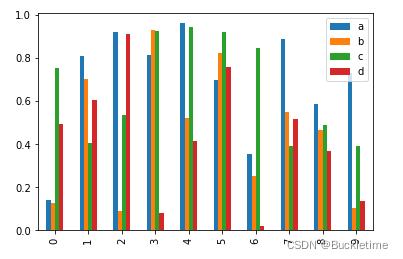
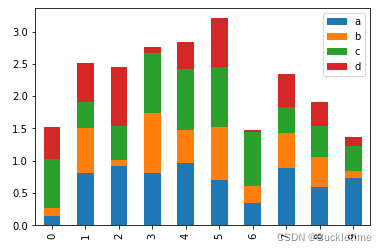
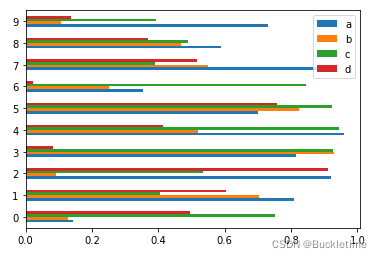
DataFrame.plot.bar() 或者 DataFrame.plot(kind=‘bar’)
1. 基本用法
df2 = pd.DataFrame(np.random.rand(10, 4), columns=["a", "b", "c", "d"])
df2.plot.bar()
df2.plot.bar(stacked=True)
df2.plot.barh()
df2.plot.bar(rot=0) # 0表示水平显示
2.3 直方图 hist
1. 基本使用
df3 = pd.DataFrame(
    {
        "a": np.random.randn(1000) + 1,
        "b": np.random.randn(1000),
        "c": np.random.randn(1000) - 1,
    },
    columns=["a", "b", "c"],
)
# alpha设置透明度
df3.plot.hist(alpha=0.5)
# 设置坐标轴显示负号
plt.rcParams['axes.unicode_minus']=False

2. 直方图可以使用堆叠,stacked=True。可以使用参数 bins 更改素材箱大小
df3.plot.hist(alpha=0.5,stacked=True, bins=20)
data = pd.Series(np.random.randn(1000))
data.hist(by=np.random.randint(0, 4, 1000), figsize=(6, 4))
2.4 箱型图 box
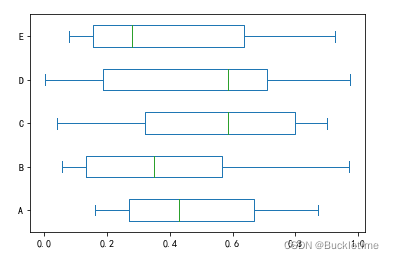
箱型图,用来可视化每列中值的分布
.1. 基本使用
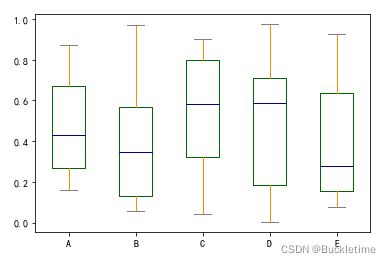
示例:这里有一个箱形图,代表对[0,1]上的均匀随机变量的10个观察结果进行的五次试验。
df = pd.DataFrame(np.random.rand(10, 5), columns=["A", "B", "C", "D", "E"])
df.plot.box();
color是dict类型,包含的键分别是 boxes, whiskers, medians and caps
color = {
    "boxes": "DarkGreen",
    "whiskers": "DarkOrange",
    "medians": "DarkBlue",
    "caps": "Gray",
}
df.plot.box(color=color, sym="r+")
3. 可以使用参数 vert=False,指定水平方向显示,默认为True表示垂直显示
df.plot.box(vert=False)
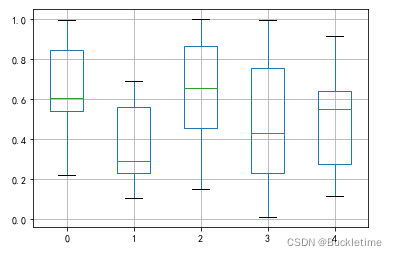
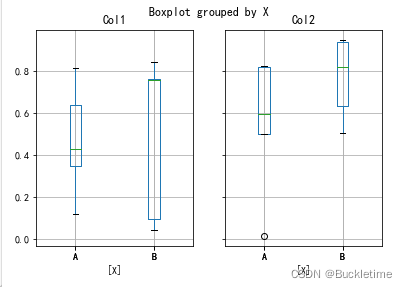
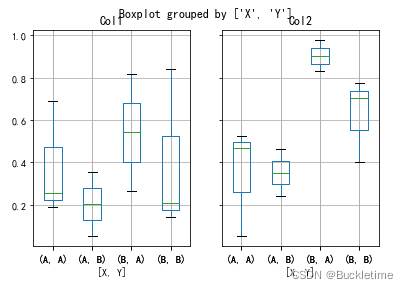
4. 可以使用boxplot()方法,绘制带有网格的箱型图
df = pd.DataFrame(np.random.rand(10, 5))
bp = df.boxplot()
df = pd.DataFrame(np.random.rand(10, 2), columns=["Col1", "Col2"])
df["X"] = pd.Series(["A", "A", "A", "A", "A", "B", "B", "B", "B", "B"])
bp = df.boxplot(by="X")
df = pd.DataFrame(np.random.rand(10, 3), columns=["Col1", "Col2", "Col3"])
df["X"] = pd.Series(["A", "A", "A", "A", "A", "B", "B", "B", "B", "B"])
df["Y"] = pd.Series(["A", "B", "A", "B", "A", "B", "A", "B", "A", "B"])
bp = df.boxplot(column=["Col1", "Col2"], by=["X", "Y"])
2.5 区域图 area
默认情况下,区域图为堆叠。要生成区域图,每列必须全部为正值或全部为负值。
1. 基本使用
df = pd.DataFrame(np.random.rand(10, 4), columns=["a", "b", "c", "d"])
df.plot.area()
2.6 散点图 scatter
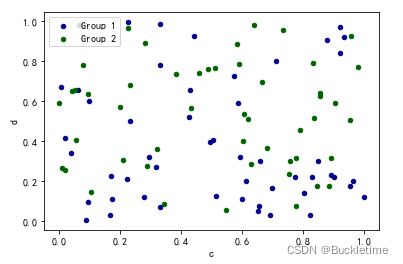
散点图需要x和y轴的数字列。 这些可以由x和y关键字指定。
1. 基本使用
df = pd.DataFrame(np.random.rand(50, 4), columns=["a", "b", "c", "d"])
df["species"] = pd.Categorical(
    ["setosa"] * 20 + ["versicolor"] * 20 + ["virginica"] * 10
)
df.plot.scatter(x="a", y="b")
ax = df.plot.scatter(x="a", y="b", color="DarkBlue", label="Group 1")
df.plot.scatter(x="c", y="d", color="DarkGreen", label="Group 2", ax=ax)
3. 使用参数 c 可以作为列的名称来为每个点提供颜色,参数s可以指定散点大小
df.plot.scatter(x="a", y="b", c="c", s=50)
df.plot.scatter(x="a", y="b", c="species", cmap="viridis", s=50)
df.plot.scatter(x="a", y="b", s=df["c"] * 200)
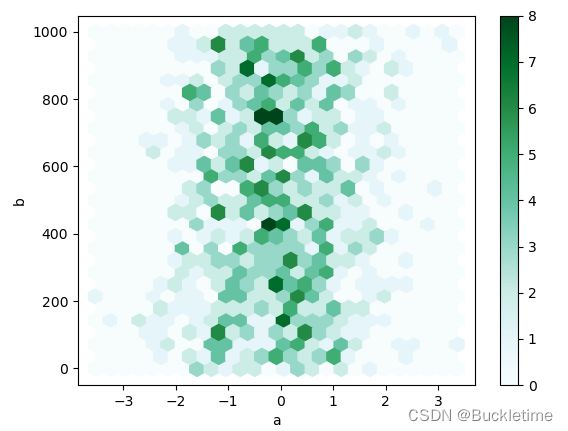
2.7 蜂巢图 hexbin
如果数据过于密集而无法单独绘制每个点,则 蜂巢图可能是散点图的有用替代方法。
df = pd.DataFrame(np.random.randn(1000, 2), columns=["a", "b"])
df["b"] = df["b"] + np.arange(1000)
df.plot.hexbin(x="a", y="b", gridsize=25)
2.8 饼型图 pie
如果您的数据包含任何NaN,则它们将自动填充为0。 如果数据中有任何负数,则会引发ValueError
1. 基本使用
series = pd.Series(3 * np.random.rand(4), index=["a", "b", "c", "d"], name="series")
series.plot.pie(figsize=(6, 6))

2. 如果指定subplot =True,则将每个列的饼图绘制为子图。 默认情况下,每个饼图中都会绘制一个图例; 指定legend=False隐藏它。
df = pd.DataFrame(
    3 * np.random.rand(4, 2), index=["a", "b", "c", "d"], columns=["x", "y"]
)
df.plot.pie(subplots=True, figsize=(8, 4))
series.plot.pie(
    labels=["AA", "BB", "CC", "DD"],
    colors=["r", "g", "b", "c"],
    autopct="%.2f",
    fontsize=20,
    figsize=(6, 6),
)
三、其他格式
3.1 设置显示中文标题
df = pd.DataFrame(np.random.rand(5, 3), columns=["a", "b", "c"])
df.plot.bar(title='中文标题测试',rot=0)
# 默认不支持中文 ---修改RC参数,指定字体
plt.rcParams['font.sans-serif'] = 'SimHei'
3.2 设置坐标轴显示负号
df3 = pd.DataFrame(
    {
        "a": np.random.randn(1000) + 1,
        "b": np.random.randn(1000),
        "c": np.random.randn(1000) - 1,
    },
    columns=["a", "b", "c"],
)
df3.plot.hist(alpha=0.5)
# 设置坐标轴显示负号
plt.rcParams['axes.unicode_minus']=False
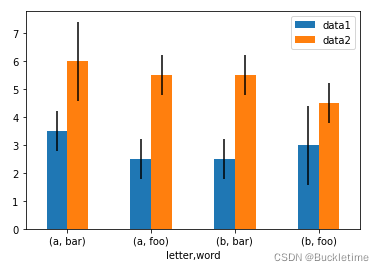
3.3 使用误差线 yerr 进行绘图
示例1:使用与原始数据的标准偏绘制组均值
ix3 = pd.MultiIndex.from_arrays([['a', 'a', 'a', 'a', 'b', 'b', 'b', 'b'], ['foo', 'foo', 'bar', 'bar', 'foo', 'foo', 'bar', 'bar']], names=['letter', 'word'])
df3 = pd.DataFrame({'data1': [3, 2, 4, 3, 2, 4, 3, 2], 'data2': [6, 5, 7, 5, 4, 5, 6, 5]}, index=ix3)
# 分组
gp3 = df3.groupby(level=('letter', 'word'))
means = gp3.mean()
errors = gp3.std()
means.plot.bar(yerr=errors,rot=0)
mins = gp3.min()
maxs = gp3.max()
errors = [[means[c] - mins[c], maxs[c] - means[c]] for c in df3.columns]
means.plot.bar(yerr=errors,capsize=4, rot=0)
3.4 使用 layout 将目标分成多个子图
df = pd.DataFrame(np.random.randn(1000, 4), index=pd.date_range("1/1/2000", periods=1000), columns=list("ABCD"))
df = df.cumsum()
df.plot(subplots=True, layout=(2, 3), figsize=(6, 6), sharex=False)
3.5 使用 table 绘制表,上图下表
使用 table=True,绘制表格。图下添加表
fig, ax = plt.subplots(1, 1, figsize=(7, 6.5))
df = pd.DataFrame(np.random.rand(5, 3), columns=["a", "b", "c"])
ax.xaxis.tick_top()  # 在上方展示x轴
df.plot(table=True, ax=ax)
3.6 使用 colormap 设置图的区域颜色
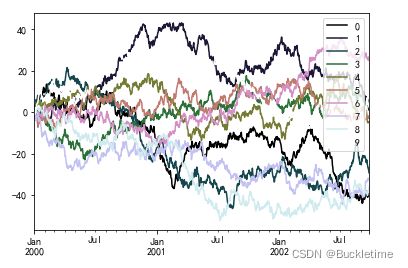
在绘制大量列时,一个潜在的问题是,由于默认颜色的重复,很难区分某些序列。 为了解决这个问题,DataFrame绘图支持使用colormap参数,该参数接受Matplotlib的colormap或一个字符串,该字符串是在Matplotlib中注册的一个colormap的名称。 在这里可以看到默认matplotlib颜色映射的可视化。
df = pd.DataFrame(np.random.randn(1000, 10), index=pd.date_range("1/1/2000", periods=1000))
df = df.cumsum()
df.plot(colormap="cubehelix")
参考文章:https://blog.csdn.net/h_hxx/article/details/90635650

