iOS开发底层探究之路
在对Objective-C底层的探究过程中,已经探究过objc_class 结构中的isa及bits,那么本篇文章我们来见见这个cache是个啥玩意:
struct objc_class : objc_object {
    // Class ISA;
    Class superclass;
    cache_t cache;             // formerly cache pointer and vtable
    class_data_bits_t bits;    // class_rw_t * plus custom rr/alloc flags

    class_rw_t *data() const {
        return bits.data();
    }
}
以及cache_t结构体类型的cache源码:
struct cache_t {
#if CACHE_MASK_STORAGE == CACHE_MASK_STORAGE_OUTLINED
    explicit_atomic _buckets;
    explicit_atomic _mask;
#elif CACHE_MASK_STORAGE == CACHE_MASK_STORAGE_HIGH_16
    explicit_atomic _maskAndBuckets;
    mask_t _mask_unused;

    // How much the mask is shifted by.
    static constexpr uintptr_t maskShift = 48;

    // Additional bits after the mask which must be zero. msgSend
    // takes advantage of these additional bits to construct the value
    // `mask << 4` from `_maskAndBuckets` in a single instruction.
    static constexpr uintptr_t maskZeroBits = 4;

    // The largest mask value we can store.
    static constexpr uintptr_t maxMask = ((uintptr_t)1 << (64 - maskShift)) - 1;

    // The mask applied to `_maskAndBuckets` to retrieve the buckets pointer.
    static constexpr uintptr_t bucketsMask = ((uintptr_t)1 << (maskShift - maskZeroBits)) - 1;

    // Ensure we have enough bits for the buckets pointer.
    static_assert(bucketsMask >= MACH_VM_MAX_ADDRESS, "Bucket field doesn't have enough bits for arbitrary pointers.");
#elif CACHE_MASK_STORAGE == CACHE_MASK_STORAGE_LOW_4
    // _maskAndBuckets stores the mask shift in the low 4 bits, and
    // the buckets pointer in the remainder of the value. The mask
    // shift is the value where (0xffff >> shift) produces the correct
    // mask. This is equal to 16 - log2(cache_size).
    explicit_atomic _maskAndBuckets;
    mask_t _mask_unused;

    static constexpr uintptr_t maskBits = 4;
    static constexpr uintptr_t maskMask = (1 << maskBits) - 1;
    static constexpr uintptr_t bucketsMask = ~maskMask;
#else
#error Unknown cache mask storage type.
#endif

#if __LP64__
    uint16_t _flags;
#endif
    uint16_t _occupied;
// 省略下方方法
}
其中,在不同运行环境解释为:
-
CACHE_MASK_STORAGE_OUTLINED模拟器或者macOS -
CACHE_MASK_STORAGE_HIGH_1664位真机 -
CACHE_MASK_STORAGE_LOW_4非64位真机
struct bucket_t {
private:
    // IMP-first is better for arm64e ptrauth and no worse for arm64.
    // SEL-first is better for armv7* and i386 and x86_64.
#if __arm64__
    explicit_atomic _imp;
    explicit_atomic _sel;
#else
    explicit_atomic _sel;
    explicit_atomic _imp;
#endif
void set(SEL newSel, IMP newImp, Class cls);
}
上面源码分析可以看出:
- 类底层结构体中的
cache是cache_t结构体类型的,在cache_t结构体中,在不同的运行环境下,内部的结构也不一样,在模拟器或macOS下内部属性有_buckets和_mask,在真机下将_buckets和_mask存放在一起,为了节省内存,以_maskAndBuckets属性存放。 -
_buckets中存放的是bucket_t类型的数据,从bucket_t结构中可以看出只有属性_imp和_sel,所以可以看出cache就是用来存放方法的。
cache例子分析
首先在可编译源码工程中创建一个LGPerson类,并添加属性及方法:
@interface LGPerson : NSObject
@property (nonatomic, copy) NSString *lgName;
@property (nonatomic, strong) NSString *nickName;
- (void)sayHello;
- (void)sayCode;
- (void)sayMaster;
- (void)sayNB;
@end
#import "LGPerson.h"
@implementation LGPerson
- (void)sayHello{
    NSLog(@"LGPerson say : %s",__func__);
}
- (void)sayCode{
    NSLog(@"LGPerson say : %s",__func__);
}
- (void)sayMaster{
    NSLog(@"LGPerson say : %s",__func__);
}
- (void)sayNB{
    NSLog(@"LGPerson say : %s",__func__);
}
@end
main.m 文件main入口函数中创建实例并方法调用:

如图,断点停在22行,在对象p调用实例方法之前,我们利用lldb打印当前pClass相关类信息,因为实例方法存放在类信息里面:
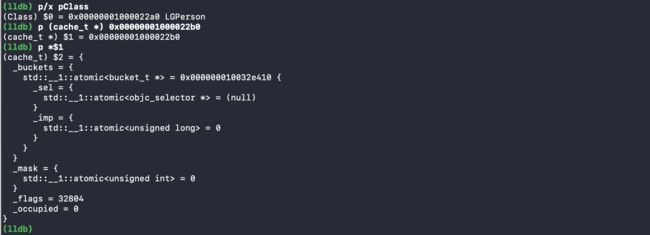
通过对当前
pClass类指针偏移16位的地址进行打印,我们得到当前类的cache信息,其中_occupied = 0,_mask = 0 ,好,我们继续下一个断点,来到了23行,此时只进行了sayHello方法的调用,我们再次打印当前类的cache信息:
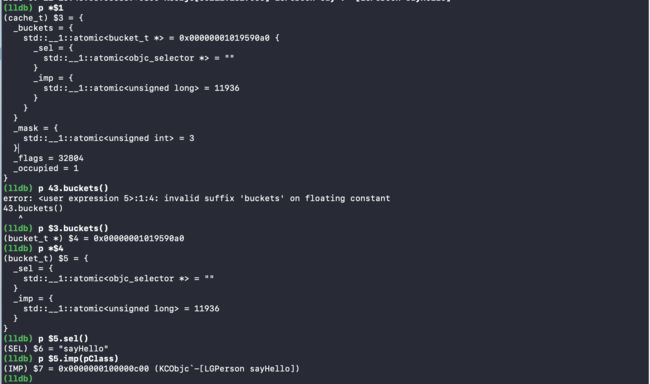
可以看到:
- 此时
cache信息中_occupied = 1,那我们可以猜测这个属性是否就是表示当前方法调用的数量? -
_mask此时值为3 - 通过
cache_t结构体中的函数buckets(),我们可以获得buckets()指针地址,打印当前地址信息,得到一个bucket_t结构体数据$5,再通过bucket_t结构体中的sel()和imp(Class)两个函数方法我们可以打印出刚刚调用的sayHello方法的方法名及方法实现函数的地址信息。
好,接下来我们再调用第二个方法sayCode,再继续查看当前类的cahce信息:

- 此时
cache信息中的_occupied = 2,那是否就证实我们上面所说的调用方法个数呢?下面继续探究!嘻嘻 -
_mask值不变依旧为3 - 因为
buckets是数组,所以可以按地址偏移的方式进行遍历打印,也可以调用数组buckets()下标[0][1]...的方式获取。如上打印情况,偏移一位打印出$15 bucket_t结构体信息,继而打印sel及imp信息,发现正是第二个方法sayCode。
继续接着第三个方法sayMaster方法调用,那么此时再打印类信息又会是怎样的:
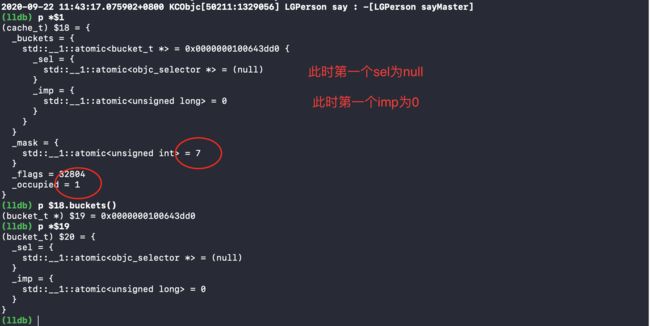
上图可以看出,在调用第三个方法之后,
cache信息有了很大变化:
- 此时
_occupied = 1,_mask = 7,首先这个_occupied = 1就推翻了我们之前的猜想_occupied为 调用方法的个数;_mask由先前的3变成了现在的7 - 此时
buckets第一个位置的bucket_t的sel为null且imp = 0,那么我们利用上面所说的地址偏移或者下标打印是否还能打印出第三个方法的sel和imp信息?
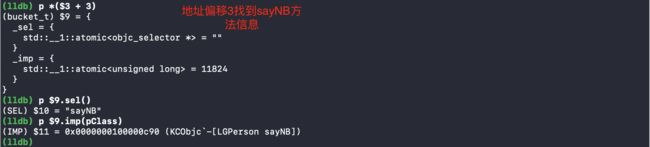
 第三个方法调用结果打印
地址偏移1,刚好就找到了sayMaster的sel和imp,而且发现其余位置打印出来的sel都为null,imp都为0。
最后调用第四个方法sayNB,来看看结果又是怎样的:

继续利用
地址偏移,最后找到sayNB方法sel和imp 信息:
从上面两个打印结果看出:
-
_occupied = 2,当我们调用第四个方法后,又加了1,然而经过第三个方法我们又证明了_occupied与我们调用的方法数不想等,其实从字面意思上看得出_occupied是占用的意思,这到底代表啥呢? -
_mask = 7,此时与第三个方法调用之后没啥改变,_mask又是啥呢? - 通过地址偏移,遍历打印,我们发现在
buckets数组中有些的确存储了实例方法的sel及imp信息,但是有些是没存储任何方法信息(sel为null,imp为0),以及是否buckets中存储的方法信息一定是按方法调用先后顺序来存储的?
接下来我们通过分析cache缓存方法的源码来一探究竟。
cache 源码分析
拓展:查看源码原则,一般属性只有存储信息的作用,能改变信息的一般我们认准函数方法,函数方法才大有可能是改变信息的地方。
首先我们来看文章开始cache_t源码中隐藏的函数方法部分:
public:
    static bucket_t *emptyBuckets();

    struct bucket_t *buckets();
    mask_t mask();
    mask_t occupied();
    void incrementOccupied();
    void setBucketsAndMask(struct bucket_t *newBuckets, mask_t newMask);
    void initializeToEmpty();

    unsigned capacity();
    bool isConstantEmptyCache();
    bool canBeFreed();
    void reallocate(mask_t oldCapacity, mask_t newCapacity, bool freeOld);
    void insert(Class cls, SEL sel, IMP imp, id receiver);

    static void bad_cache(id receiver, SEL sel, Class isa) __attribute__((noreturn, cold));
从上面所有函数方法中探究,前四个函数,查看源码,发现只是简单的获取cache的相对应的属性。我们发现第五个函数incrementOccupied():
void cache_t::incrementOccupied()
{
    _occupied++;
}
可以看出此函数正式改变(增加)_occupied 值的,那我们就从此函数入手,全局搜索incrementOccupied(),发现只有void cache_t::insert(Class cls, SEL sel, IMP imp, id receiver) 方法中找到此函数的调用位置:

从参数上来看,insert 方法可以理解为向cache中插入方法的sel及imp信息,全局搜索发现只有在cache_fill方法中进行了cache->insert调用:
void cache_fill(Class cls, SEL sel, IMP imp, id receiver)
{
    runtimeLock.assertLocked();

#if !DEBUG_TASK_THREADS
    // Never cache before +initialize is done
    if (cls->isInitialized()) {
        cache_t *cache = getCache(cls);
#if CONFIG_USE_CACHE_LOCK
        mutex_locker_t lock(cacheUpdateLock);
#endif
        cache->insert(cls, sel, imp, receiver); //向cache插入方法sel、imp信息
    }
#else
    _collecting_in_critical();
#endif
}
全局搜索cache_fill,发现在cache_fill方法之前,还进行了Cache中的sel与imp 查找:
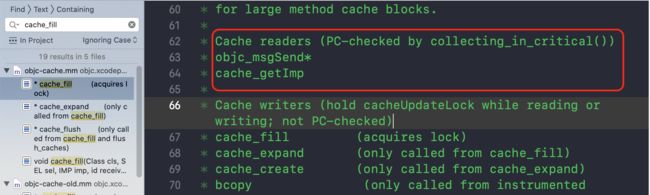
insert方法分析
下面着重分析 cache 缓存方法的核心函数insert源码:

我们可以将上面三个断点作为insert方法的三个阶段:
- 阶段一:
mask_t newOccupied = occupied() + 1;不管当前的cache是否已经初始化过,newOccupied都为当前的_occupied值加上1,表示当前cache内存所占用个数。 - 阶段二:
初始化及扩容阶段- 先判断当前
cache是否是空的(未初始化),小概率事件判断,此时capacity()函数返回0,oldCapacity = 0,capacity = 0。如果cache为空,进入if,capacity赋值为宏定义4,reallocate去内存请求cache空间。 - 如果当前
cache已经初始化过了,newOccupied = _occupied + 1,capacity()函数返回当前的cache容量大小,判断当前的newOccupied + CACHE_END_MARKER(1) <= capacity / 4 * 3是否满足 ,如果<=,继续下面的存储,如果>,则进入下一步的对cache扩容 - 对当前
cache的容量大小扩大两倍,此时有最大值MAX_CACHE_SIZE(2^15),然后重新初始化当前的cache,并对原有的cahce存储信息进行清理。接着进行下面存储工作。
- 先判断当前
- 阶段三:真正的方法信息
sel、imp存储步骤,bucket_t存放sel、imp,buckets存放bucket_t,所以cache缓存方法实质就是将bucket_t通过hash算法插入到buckets中的过程。
reallocate 初始化方法分析
ALWAYS_INLINE
void cache_t::reallocate(mask_t oldCapacity, mask_t newCapacity, bool freeOld)
{
    bucket_t *oldBuckets = buckets();
    bucket_t *newBuckets = allocateBuckets(newCapacity);

    // Cache's old contents are not propagated.
    // This is thought to save cache memory at the cost of extra cache fills.
    // fixme re-measure this

    ASSERT(newCapacity > 0);
    ASSERT((uintptr_t)(mask_t)(newCapacity-1) == newCapacity-1);

    setBucketsAndMask(newBuckets, newCapacity - 1);

    if (freeOld) {
        cache_collect_free(oldBuckets, oldCapacity);
    }
}
首先去内存中申请buckets内存空间,allocateBuckets函数:
bucket_t *allocateBuckets(mask_t newCapacity)
{
    // Allocate one extra bucket to mark the end of the list.
    // This can't overflow mask_t because newCapacity is a power of 2.
    bucket_t *newBuckets = (bucket_t *)
        calloc(cache_t::bytesForCapacity(newCapacity), 1);

    bucket_t *end = cache_t::endMarker(newBuckets, newCapacity);

#if __arm__   //真机
    // End marker's sel is 1 and imp points BEFORE the first bucket.
    // This saves an instruction in objc_msgSend.
    end->set((SEL)(uintptr_t)1, (IMP)(newBuckets - 1), nil);
#else          //模拟器或macOS(当前环境)
    // End marker's sel is 1 and imp points to the first bucket.
    end->set((SEL)(uintptr_t)1, (IMP)newBuckets, nil);
#endif

    if (PrintCaches) recordNewCache(newCapacity);

    return newBuckets;
}
通过calloc 函数去内存中申请newCapacity 大小的容量的newBuckets,此方法返回的newBuckets只是一个临时变量。setBucketsAndMask就是 将newBuckets保存在cache中:
-
CACHE_MASK_STORAGE_OUTLINED模拟器或macOS_buckets.store(newBuckets, memory_order::memory_order_release); // ensure other threads see new buckets before new mask _mask.store(newMask, memory_order::memory_order_release); _occupied = 0; -
CACHE_MASK_STORAGE_HIGH_1664位真机uintptr_t buckets = (uintptr_t)newBuckets; uintptr_t mask = (uintptr_t)newMask; ASSERT(buckets <= bucketsMask); ASSERT(mask <= maxMask); _maskAndBuckets.store(((uintptr_t)newMask << maskShift) | (uintptr_t)newBuckets, std::memory_order_relaxed); _occupied = 0; -
CACHE_MASK_STORAGE_LOW_432位真机uintptr_t buckets = (uintptr_t)newBuckets; unsigned mask = (unsigned)newMask; ASSERT(buckets == (buckets & bucketsMask)); ASSERT(mask <= 0xffff); // The shift amount is equal to the number of leading zeroes in // the last 16 bits of mask. Count all the leading zeroes, then // subtract to ignore the top half. uintptr_t maskShift = __builtin_clz(mask) - (sizeof(mask) * CHAR_BIT - 16); ASSERT(mask == (0xffff >> maskShift)); _maskAndBuckets.store(buckets | maskShift, memory_order::memory_order_relaxed); _occupied = 0; ASSERT(this->buckets() == newBuckets); ASSERT(this->mask() == newMask);
对比可以看出,真机环境下,bucket和mask的位置存储,并将occupied占用设置为0,模拟器或者macOS下,正常存储bucket和mask,并将occupied占用设置为0。
最后判断是否需要清理oldBuckets,如果需要则调用cache_collect_free将旧的buckets清理掉。

hash 算法存储sel、imp
static inline mask_t cache_hash(SEL sel, mask_t mask)
{
    return (mask_t)(uintptr_t)sel & mask;
}
cache_hash通过(SEL sel, mask_t mask) 中的sel & mask,把得到的作为下标在buckets获取当前的bucket_t,如果当前的bucket中的sel == 0 ,说明当前位置暂无插入任何sel、imp,即插入当前的sel及imp,并且_occupied占用加1;如果当前bucket中的sel与要插入的sel相等,说明已经存在了当前的sel,就直接返回,避免重复插入;如果当前bucket已经存在sel,即已经保存了别的方法的sel及imp信息,那就通过cache_next哈希冲突方法重新查找别的位置进行插入。
#if __arm__  ||  __x86_64__  ||  __i386__
// objc_msgSend has few registers available.
// Cache scan increments and wraps at special end-marking bucket.
#define CACHE_END_MARKER 1
static inline mask_t cache_next(mask_t i, mask_t mask) {
    return (i+1) & mask;
}

#elif __arm64__
// objc_msgSend has lots of registers available.
// Cache scan decrements. No end marker needed.
#define CACHE_END_MARKER 0
static inline mask_t cache_next(mask_t i, mask_t mask) {
    return i ? i-1 : mask;
}
至此,cache源码分析告一段落!
问题解释及LGPerson例子解释
-
_mask: 是指掩码数据,用于在哈希算法或者哈希冲突算法中计算哈希下标,其中mask等于capacity - 1,所以例子中刚开始未调用方法时,_mask = 0,调用第一个方法时候capacity大小为4,_mask = 4 - 1 = 3,当调用第三个方法时,此时cache容量扩大了,capacity大小为8,_mask = 8 - 1 = 7。 -
_occupied: 表示哈希表中bucket的占用大小(即可以理解为当前cache的buckets中已经存储了bucket_t的的个数),一开始未调用方法_occupied = 0,调用第一个时,增加1,调用第二个时,增加1变为2,此时当调用第三个方法时,由于此时newOccupied = _occupied + 1 = 3,占用大于capacity的四分之三,所以需要扩容,同时清理之前存储的,及_occupied = 0,然后插入第三那个方法,增加_occupied值。所以得出结论,_occupied即为当前buckets中所占用的bucket_t个数。 - 因为
sel-imp的存储是通过哈希算法计算下标的,其计算的下标有可能已经存储了sel,所以又需要通过哈希冲突算法重新计算哈希下标,所以导致下标是随机的,并不是固定的,也不是按方法调用顺序来存放的。