Flappy Bird是13年红极一时的小游戏,其简单有趣的玩法和变态的难度形成了强烈反差,引发全球玩家竞相把玩,欲罢不能!遂选择复刻这个小游戏,在实现的过程中向大家演示Compose工具包的UI组合、数据驱动等重要思想。
Ⅰ.拆解游戏
不记得这个游戏或完全没玩过的朋友,可以点击下面的链接,体验一下Flappy Bird的玩法。
为拆解游戏,笔者也录了一段游戏过程。
反复观看这段GIF,可以发现游戏的一些规律:
- 远处的建筑和近处的土壤是静止不动的
- 小鸟一直在上下移动,伴随着翅膀和身体的飞翔姿态
- 管道和路面则不断地向左移动,营造出小鸟向前飞翔的视觉效果
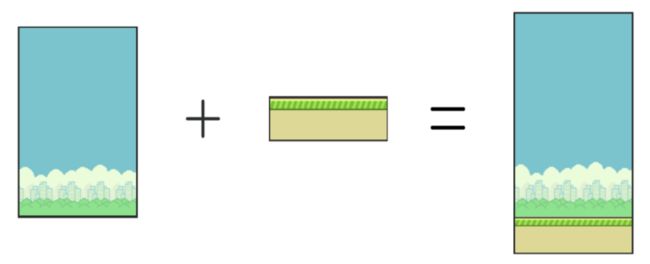
通过截图、切图、填充像素和简单的PS,可以拿到各元素的图片。 
Ⅱ.复刻画面
各方卡司已就位,接下来开始布置整个画面。暂不实现元素的移动效果,先把静态的整体效果搭建好。
ⅰ.布置远近景
静止不动的建筑远景最为简单,封装到可组合函数FarBackground里,内部放置一张图片即可。
@Composable
fun FarBackground(modifier: Modifier) {
    Column {
        Image(
            painter = painterResource(id = R.drawable.background),
            contentScale = ContentScale.FillBounds,
            contentDescription = null,
            modifier = modifier.fillMaxSize()
        )
    }
}
远景的下面由分割线、路面和土壤组成,封装到NearForeground函数里。通过Modifier的fraction参数控制路面和土壤的比例,保证在不同尺寸屏幕上能按比例呈现游戏界面。
@Composable
fun NearForeground(...) {
    Column( modifier ) {
        // 分割线
        Divider(
            color = GroundDividerPurple,
            thickness = 5.dp
        )

        // 路面
        Box(modifier = Modifier.fillMaxWidth()) {
            Image(
                painter = painterResource(id = R.drawable.foreground_road),
                ...
                modifier = modifier
                    .fillMaxWidth()
                    .fillMaxHeight(0.23f)
                )
            }
        }

        // 土壤
        Image(
            painter = painterResource(id = R.drawable.foreground_earth),
           ...
            modifier = modifier
                .fillMaxWidth()
                .fillMaxHeight(0.77f)
        )
    }
}
将整个游戏画面抽象成GameScreen函数,通过Column竖着排列远景和前景。考虑到移动的小鸟和管道需要呈现在远景之上,所以在远景的外面包上一层Box组件。
@Composable
fun GameScreen( ... ) {
    Column( ...  ) {
        Box(modifier = Modifier
            .align(Alignment.CenterHorizontally)
            .fillMaxWidth()
        ) {
            FarBackground(Modifier.fillMaxSize())
        }

        Box(modifier = Modifier
            .align(Alignment.CenterHorizontally)
            .fillMaxWidth()
        ) {
            NearForeground(
                modifier = Modifier.fillMaxSize()
            )
        }
    }
}
ⅱ.摆放管道
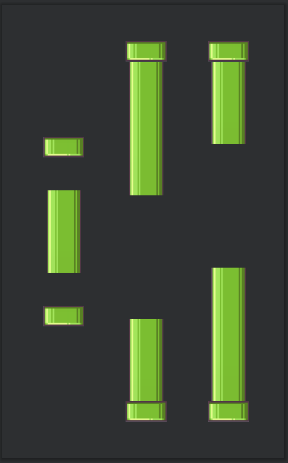
仔细观察管道,会发现一些管道具备朝上朝下、高度随机的特点。为此将管道的视图分拆成盖子和柱子两部分:
- 盖子和柱子的放置顺序决定管道的朝向
- 柱子的高度则控制着管道整体的高度 这样的话,只使用盖子和柱子两张图片,就可以灵活实现各种形态的管道。
先来组合盖子PipeCover和柱子PipePillar的可组合函数。
@Composable
fun PipeCover() {
    Image(
        painter = painterResource(id = R.drawable.pipe_cover),
        contentScale = ContentScale.FillBounds,
        contentDescription = null,
        modifier = Modifier.size(PipeCoverWidth, PipeCoverHeight)
    )
}

@Composable
fun PipePillar(modifier: Modifier = Modifier, height: Dp = 90.dp) {
    Image(
        painter = painterResource(id = R.drawable.pipe_pillar),
        contentScale = ContentScale.FillBounds,
        contentDescription = null,
        modifier = modifier.size(50.dp, height)
    )
}
管道的可组合函数Pipe可以根据照朝向和高度的参数,组合成对应的管道。
@Composable
fun Pipe(
    height: Dp = HighPipe,
    up: Boolean = true
) {
    Box( ... ) {
        Column {
            if (up) {
                PipePillar(Modifier.align(CenterHorizontally), height - 30.dp)
                PipeCover()
            } else {
                PipeCover()
                PipePillar(Modifier.align(CenterHorizontally), height - 30.dp)
            }
        }
    }
}
另外,管道都是成对出现、且无论高度如何中间的间距是固定的。所以我们再实现一个管道组的可组合函数PipeCouple。
@Composable
fun PipeCouple( ... ) {
    Box(...) {
        GetUpPipe(height = upHeight,
            modifier = Modifier
                .align(Alignment.TopEnd)
        )

        GetDownPipe(height = downHeight,
            modifier = Modifier
                .align(Alignment.BottomEnd)
        )
    }
}
将PipeCouple添加到FarBackground的下面,管道就放置完毕了。
@Composable
fun GameScreen( ... ) {
    Column(...) {
        Box(...) {
            FarBackground(Modifier.fillMaxSize())

            // 管道对添加远景上去
            PipeCouple(
                modifier = Modifier.fillMaxSize()
            )
        }
        ...
    }
}
ⅲ.放置小鸟
小鸟通过Image组件即可实现,默认情况下放置到布局的Center方位。
@Composable
fun Bird( ... ) {
    Box( ... ) {
        Image(
            painter = painterResource(id = R.drawable.bird_match),
            contentScale = ContentScale.FillBounds,
            contentDescription = null,
            modifier = Modifier
                .size(BirdSizeWidth, BirdSizeHeight)
                .align(Alignment.Center)
        )
    }
}
视觉上小鸟呈现在管道的前面,所以Bird可组合函数要添加到管道组函数的后面。
@Composable
fun GameScreen( ... ) {
    Column(...) {
        Box(...) {
            ...
            PipeCouple( ... )
            // 将小鸟添加到远景上去
            Bird(
                modifier = Modifier.fillMaxSize(),
                state = viewState
            )
        }
    }
}
至此,各元素都放置完了。接下来着手让小鸟,管道和路面这些动态元素动起来。
Ⅲ.状态管理和架构
Compose中Modifier#offset()函数可以更改视图在横纵方向上的偏移值,通过不断地调整这个偏移值,即可营造出动态的视觉效果。无论是小鸟还是管道和路面,它们的移动状态都可以依赖这个思路。
那如何管理这些持续变化的偏移值数据?如何将数据反映到画面上?
Compose通过State驱动可组合函数进行重组,进而达到画面的重绘。所以我们将这些数据封到ViewState中,交由ViewModel框架计算和更新,Compose订阅State之后驱动所有元素活动起来。除了个元素的偏移值数据,State中还要存放游戏分值,游戏状态等额外信息。
data class ViewState(
    val gameStatus: GameStatus = GameStatus.Waiting,
    // 小鸟状态
    val birdState: BirdState = BirdState(),
    // 管道组状态
    val pipeStateList: List = PipeStateList,
    var targetPipeIndex: Int = -1,
    // 路面状态
    val roadStateList: List = RoadStateList,
    var targetRoadIndex: Int = -1,
    // 分值数据
    val score: Int = 0,
    val bestScore: Int = 0,
)

enum class GameStatus {
    Waiting,
    Running,
    Dying,
    Over
}
用户点击屏幕会触发游戏开始、重新开始、小鸟上升等动作,这些视图上的事件需要反向传递给ViewModel处理和做出响应。事件由Clickable数据类封装,再转为对应的GameAction发送到ViewModel中。
data class Clickable(
    val onStart: () -> Unit = {},
    val onTap: () -> Unit = {},
    val onRestart: () -> Unit = {},
    val onExit: () -> Unit = {}
)

sealed class GameAction {
    object Start : GameAction()
    object AutoTick : GameAction()
    object TouchLift : GameAction()
    object Restart : GameAction()
}
前面说过,可以不断调整下Offset数据使得视图动起来。具体实现可以通过LaunchedEffect启动一个定时任务,定期发送一个更新视图的动作AutoTick。注意:Compose里获取ViewModel实例发生NoSuchMethodError错误的话,记得按照官方构建的版本重新Sync一下。
setContent {
    FlappyBirdTheme {
        Surface(color = MaterialTheme.colors.background) {
            val gameViewModel: GameViewModel = viewModel()
            LaunchedEffect(key1 = Unit) {
                while (isActive) {
                    delay(AutoTickDuration)
                    gameViewModel.dispatch(GameAction.AutoTick)
                }
            }

            Flappy(Clickable(
                onStart = {
                    gameViewModel.dispatch(GameAction.Start)
                }...
            ))
        }
    }
ViewModel收到Action后开启协程,计算视图的位置、更新对应State,之后发射出去。
class GameViewModel : ViewModel() {
    fun dispatch(...) {
        response(action, viewState.value)
    }

    private fun response(action: GameAction, state: ViewState) {
        viewModelScope.launch {
            withContext(Dispatchers.Default) {
                emit(when (action) {
                    GameAction.AutoTick -> run {
                        // 路面,管道组以及小鸟移动的新State获取
                        ...
                       state.copy(
                            gameStatus = GameStatus.Running,
                            birdState = newBirdState,
                            pipeStateList = newPipeStateList,
                            roadStateList = newRoadStateList
                        )
                    }
                    ...
                })
            }
        }
    }
}
Ⅳ.路面动起来
如果画面上只放一张路面图片,更改X轴Offset的话,剩余的部分会没有路面,无法呈现出不断移动的效果。
思前想后,发现放置两张路面图片可以解决:一张放在屏幕外侧,一张放在屏幕内侧。游戏的过程中同时同方向移动两张图片,当前一张图片移出屏幕后重置其位置,进而营造出道路不断移动的效果。
@Composable
fun NearForeground( ... ) {
    val viewModel: GameViewModel = viewModel()
    Column( ... ) {
        ...
        // 路面
        Box(modifier = Modifier.fillMaxWidth()) {
            state.roadStateList.forEach { roadState ->
                Image(
                    ...
                    modifier = modifier
                        ...
                         // 不断调整路面在x轴的偏移值
                        .offset(x = roadState.offset)
                )
            }
        }
        ...
        if (state.playZoneSize.first > 0) {
            state.roadStateList.forEachIndexed { index, roadState ->
                // 任意路面的偏移值达到两张图片位置差的时候
                // 重置路面位置,重新回到屏幕外
                if (roadState.offset <= - TempRoadWidthOffset) {
                    viewModel.dispatch(GameAction.RoadExit, roadIndex = index)
                }
            }
        }
    }
}
ViewModel收到RoadExit的Action之后通知路面State进行位置的重置。
class GameViewModel : ViewModel() {
    private fun response(action: GameAction, state: ViewState) {
        viewModelScope.launch {
            withContext(Dispatchers.Default) {
                emit(when (action) {
                    GameAction.RoadExit -> run {
                        val newRoadState: List =
                            if (state.targetRoadIndex == 0) {
                                listOf(state.roadStateList[0].reset(), state.roadStateList[1])
                            } else {
                                listOf(state.roadStateList[0], state.roadStateList[1].reset())
                            }

                        state.copy(
                            gameStatus = GameStatus.Running,
                            roadStateList = newRoadState
                        )
                    }
                })
            }
        }
    }
}

data class RoadState (var offset: Dp = RoadWidthOffset) {
    // 移动路面
    fun move(): RoadState = copy(offset = offset - RoadMoveVelocity)
    // 重置路面
    fun reset(): RoadState = copy(offset = TempRoadWidthOffset)
}
Ⅴ.管道动起来
设备屏幕宽度有限,同一时间最多呈现两组管道就可以了。和路面运动的思路类似,只需要放置两组管道,就可以实现管道不停移动的视觉效果。
具体的话,两组管道相隔一段距离放置,游戏中两组管道一起同时向左移动。当前一组管道运动到屏幕外的时候,将其位置重置。
那如何计算管道移动到屏幕外的时机?
画面重组的时候判断管道偏移值是否达到屏幕宽度,YES的话向ViewModel发送管道重置的Action。
@Composable
fun PipeCouple(
    modifier: Modifier = Modifier,
    state: ViewState = ViewState(),
    pipeIndex: Int = 0
) {
    val viewModel: GameViewModel = viewModel()
    val pipeState = state.pipeStateList[pipeIndex]

    Box( ... ) {
        //从State中获取管道的偏移值,在重组的时候让管道移动
        GetUpPipe(height = pipeState.upHeight,
            modifier = Modifier
                .align(Alignment.TopEnd)
                .offset(x = pipeState.offset)
        )
        GetDownPipe(...)

        if (state.playZoneSize.first > 0) {
            ...
            // 移动到屏幕外的时候发送重置Action
            if (pipeState.offset < - playZoneWidthInDP) {
                viewModel.dispatch(GameAction.PipeExit, pipeIndex = pipeIndex)
            }
        }
    }
}
ViewModel收到PipeExit的Action后发起重置管道数据,并将更新发射出去。
class GameViewModel : ViewModel() {
    private fun response(action: GameAction, state: ViewState) {
        viewModelScope.launch {
            withContext(Dispatchers.Default) {
                emit(when (action) {
                    GameAction.PipeExit -> run {
                        val newPipeStateList: List =
                            if (state.targetPipeIndex == 0) {
                                listOf(
                                    state.pipeStateList[0].reset(),
                                    state.pipeStateList[1]
                                )
                            } else {
                                listOf(
                                    state.pipeStateList[0],
                                    state.pipeStateList[1].reset()
                                )
                            }

                        state.copy(
                            pipeStateList = newPipeStateList
                        )
                    }
                })
            }
        }
    }
}
但相比路面,管道还具备高度随机、间距固定的特性。所以重置位置的同时记得将柱子的高度随机赋值,并给另一根柱子赋值剩余的高度。
data class PipeState (
    var offset: Dp = FirstPipeWidthOffset,
    var upHeight: Dp = ValueUtil.getRandomDp(LowPipe, HighPipe),
    var downHeight: Dp = TotalPipeHeight - upHeight - PipeDistance
) {
    // 移动管道
    fun move(): PipeState =
        copy(offset = offset - PipeMoveVelocity)

    // 重置管道
    fun reset(): PipeState {
        // 随机赋值上面管道的高度
        val newUpHeight = ValueUtil.getRandomDp(LowPipe, HighPipe)
        return copy(
            offset = FirstPipeWidthOffset,
            upHeight = newUpHeight,
            // 下面管道的高度由差值赋值
            downHeight = TotalPipeHeight - newUpHeight - PipeDistance
        )
    }
}
需要留意一点的是,如果希望管道组出现的节奏固定,那么管道组之间的横向间距(不是上下管道的间距)始终需要保持一致。为此两组管道初始的Offset数据要遵循一些规则,此处省略计算的过程,大概规则如下。
val FirstPipeWidthOffset = PipeCoverWidth * 2
// 第二组管道的offset等于
// 屏幕宽度 加上 三倍第一组管道offset 的一半
val SecondPipeWidthOffset = (TotalPipeWidth + FirstPipeWidthOffset * 3) / 2

val PipeStateList = listOf(
    PipeState(),
    PipeState(offset = (SecondPipeWidthOffset))
)
Ⅵ.小鸟飞起来
不断调整小鸟图片在Y轴上的偏移值可以实现小鸟的上下移动。但相较于路面和管道,小鸟的需要些特有的处理:
- 监听用户的点击事件,向上调整偏移值实现上升效果
- 在上升和下降的过程中,调整小鸟的
Rotate角度,以演示运动的姿态 - 在触碰到路面的时刻,发送
HitGround的Action停止游戏
@Composable
fun GameScreen(...) {
    ...
    Column(
        modifier = Modifier
            .fillMaxSize()
            .background(ForegroundEarthYellow)
            .run {
                pointerInteropFilter {
                    when (it.action) {
                        // 监听点击事件,触发游戏开始或小鸟上升
                        ACTION_DOWN -> {
                            if (viewState.gameStatus == GameStatus.Waiting)
                                clickable.onStart()
                            else if (viewState.gameStatus == GameStatus.Running)
                                clickable.onTap()
                        }
                        ...
                    }
                    false
                }
            }
    ) { ... }
}
小鸟根据State的Offset数据开始移动和调整姿态,同时在触地的时候告知ViewModel。因为下降的偏移值误差可能导致触地的那刻小鸟位置发生偏差,所以在小鸟下落到路面的临界点后需要手动调整下Offset值。
@Composable
fun Bird(...) {
    ...
    // 根据小鸟上升或下降的状态调整小鸟的Roate角度
    val rotateDegree =
        if (state.isLifting) LiftingDegree
        else if (state.isFalling) FallingDegree
        else PendingDegree

    Box(...) {
        var correctBirdHeight = state.birdState.birdHeight
        if (state.playZoneSize.second > 0) {
            ...
            val fallingThreshold = BirdHitGroundThreshold
            // 小鸟偏移值达到背景边界时发送落地Action
            if (correctBirdHeight + fallingThreshold >= playZoneHeightInDP / 2) {
                viewModel.dispatch(GameAction.HitGround)
                // 修改下offset值避免下落到临界位置的误差
                correctBirdHeight = playZoneHeightInDP / 2 - fallingThreshold
            }
        }

        Image(
            ...
            modifier = Modifier
                .size(BirdSizeWidth, BirdSizeHeight)
                .align(Alignment.Center)
                .offset(y = correctBirdHeight)
                 // 将旋转角度应用到小鸟,展示飞翔姿态
                .rotate(rotateDegree)
        )
    }
}
Ⅶ.碰撞和实时分值
动态的元素都实现好了,下一步开始安排碰撞算法,并将实时分值同步展示到游戏上方。
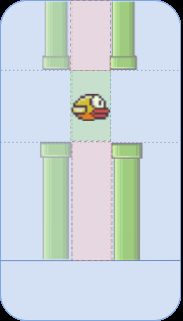
仔细思考,发现当管道组移动到小鸟飞翔区域的时候,计算小鸟是否处在管道区域即可判断是否产生了碰撞。而当管道移动出小鸟飞翔范围的时候,即可判定小鸟成功穿过了管道,开始计分。
如下图所示当管道移动到小鸟飞翔区域的时候,红色部分为危险地带,绿色部分才是安全区域。
@Composable
fun GameScreen(...) {
    ...
    Column(...) {
        Box(...) {
            ...
            // 添加实时展示分值的Text组件
            ScoreBoard(
                modifier = Modifier.fillMaxSize(),
                state = viewState,
                clickable = clickable
            )

            // 遍历两个管道组,检查小鸟的穿过状态
            if (viewState.gameStatus == GameStatus.Running) {
                viewState.pipeStateList.forEachIndexed { pipeIndex, pipeState ->
                    CheckPipeStatus(
                        viewState.birdState.birdHeight,
                        pipeState,
                        playZoneWidthInDP,
                        playZoneHeightInDP
                    ).also {
                        when (it) {
                            // 碰撞到管道的话通知ViewModel,安排坠落
                            PipeStatus.BirdHit -> {
                                viewModel.dispatch(GameAction.HitPipe)
                            }

                            // 成功通过的话通知ViewModel计分
                            PipeStatus.BirdCrossed -> {
                                viewModel.dispatch(GameAction.CrossedPipe, pipeIndex = pipeIndex)
                            }
                        }
                    }

                }
            }
        }
    }
}

@Composable
fun CheckPipeStatus(...): PipeStatus {
    // 管道尚未移动到小鸟运动区域
    if (pipeState.offset - PipeCoverWidth > - zoneWidth / 2 + BirdSizeWidth / 2) {
        return PipeStatus.BirdComing
    } else if (pipeState.offset - PipeCoverWidth < - zoneWidth / 2 - BirdSizeWidth / 2) {
        // 小鸟成功穿过管道
        return PipeStatus.BirdCrossed
    } else {
        val birdTop = (zoneHeight - BirdSizeHeight) / 2 + birdHeightOffset
        val birdBottom = (zoneHeight + BirdSizeHeight) / 2 + birdHeightOffset
        // 管道移动到小鸟运动区域并和小鸟重合
        if (birdTop < pipeState.upHeight || birdBottom > zoneHeight - pipeState.downHeight) {
            return PipeStatus.BirdHit
        }
        return PipeStatus.BirdCrossing
    }
 }
ViewModel收到碰撞HitPipe和穿过管道CrossedPipe的Action后进行坠落或计分的处理。
 class GameViewModel : ViewModel() {
    private fun response(action: GameAction, state: ViewState) {
        viewModelScope.launch {
            withContext(Dispatchers.Default) {
                emit(when (action) {
                    GameAction.HitPipe -> run {
                        // 撞击到管道后快速坠落
                        val newBirdState = state.birdState.quickFall()
                        state.copy(
                            // 并将游戏Status更新为Dying
                            gameStatus = GameStatus.Dying,
                            birdState = newBirdState
                        )
                    }

                    GameAction.CrossedPipe -> run {
                        val targetPipeState = state.pipeStateList[state.targetPipeIndex]
                        // 计算过分值的话跳过,避免重复计分
                        if (targetPipeState.counted) {
                            return@run state.copy()
                        }

                        // 标记该管道组已经统计过分值
                        val countedPipeState = targetPipeState.count()
                        val newPipeStateList = if (state.targetPipeIndex == 0) {
                            listOf(countedPipeState, state.pipeStateList[1])
                        } else {
                            listOf(state.pipeStateList[0], countedPipeState)
                        }

                        state.copy(
                            pipeStateList = newPipeStateList,
                            // 当前分值累加
                            score = state.score + 1,
                            // 最高分取最高分和当前分值的较大值即可
                            bestScore = (state.score + 1).coerceAtLeast(state.bestScore)
                        )
                    }
                })
            }
        }
    }
}
当小鸟碰撞到了管道,立刻将下落的速度提高,并将Rotate角度加大,营造出快速坠落的效果。
@Composable
fun Bird(...) {
    ...
    val rotateDegree =
        if (state.isLifting) LiftingDegree
        else if (state.isFalling) FallingDegree
        else if (state.isQuickFalling) DyingDegree
        else if (state.isOver) DeadDegree
        else PendingDegree
}
Ⅷ.结束分值和重新开始
结束和实时两种分值功能有交叉,统一封装到ScoreBoard可组合函数中,根据游戏状态自由切换。
游戏结束时展示的信息较为丰富,包含本次分值、最高分值,以及重新开始和退出两个按钮。为了方便视图的Preview和提高重组性能,我们将其拆分为单个分值、按钮、分值仪表盘和结束分值四个部分。
Compose的Preview功能很好用,但要留意一点:其Composable函数里不要放入ViewModel逻辑,否则会渲染失败。我们可以拆分UI和ViewModel逻辑,在保证Preview能顺利进行的同时能复用视图部分的代码。
@Composable
fun ScoreBoard(...) {
    when (state.gameStatus) {
        // 开始的状态下展示简单的实时分值
        GameStatus.Running -> RealTimeBoard(modifier, state.score)
        // 结束的话展示丰富的仪表盘
        GameStatus.Over -> GameOverBoard(modifier, state.score, state.bestScore, clickable)
    }
}

// 包含丰富分值和按钮的Box组件
@Composable
fun GameOverBoard(...) {
    Box(...) {
        Column(...) {
            GameOverScoreBoard(
                Modifier.align(CenterHorizontally),
                score,
                maxScore
            )

            Spacer(...)

            GameOverButton(modifier = Modifier.wrapContentSize().align(CenterHorizontally), clickable)
        }
    }
}
丰富分值和按钮的可组合函数的分别实现。
// 展示丰富分值,包括背景边框、当前分值和最高分值
@Composable
fun GameOverScoreBoard(...) {
    Box(...) {
        // Score board background
        Image(
            painter = painterResource(id = R.drawable.score_board_bg),
            ...
        )

        Column(...) {
            LabelScoreField(modifier, R.drawable.score_bg, score)
            Spacer(
                modifier = Modifier
                    .wrapContentWidth()
                    .height(3.dp)
            )
            LabelScoreField(modifier, R.drawable.best_score_bg, maxScore)
        }
    }
}

// 重新开始和退出按钮
@Composable
fun GameOverButton(...) {
    Row(...) {
        // 重新开始按钮
        Image(
            painter = painterResource(id = R.drawable.restart_button),
            ...
            modifier = Modifier
                ...
                .clickable(true) {
                    clickable.onRestart()
                }
        )

        Spacer(...)

        // 退出按钮
        Image(
            painter = painterResource(id = R.drawable.exit_button),
            ...
            modifier = Modifier
                ...
                .clickable(true) {
                    clickable.onExit()
                }
        )
    }
}
再监听重新开始和退出按钮的事件,发送Restart和Exit的Action。Exit的响应比较简单,直接关闭Activity即可。
setContent {
    FlappyBirdTheme {
        Surface(color = MaterialTheme.colors.background) {
            val gameViewModel: GameViewModel = viewModel()
            Flappy(Clickable(
                ...
                onRestart = {
                    gameViewModel.dispatch(GameAction.Restart)
                },
                onExit = {
                    finish()
                }
        ))
        }
    }
}
Restart则要告知ViewModel去重置各种游戏数据,包括小鸟位置、管道和道路的位置、以及分值,但最高分值数据应当保留下来。
 class GameViewModel : ViewModel() {
    private fun response(action: GameAction, state: ViewState) {
        viewModelScope.launch {
            withContext(Dispatchers.Default) {
                emit(when (action) {
                    GameAction.Restart -> run {
                        state.reset(state.bestScore)
                    }
                })
            }
        }
    }
}

data class ViewState(
    ...
    // 重置State数据,最高分值除外
    fun reset(bestScore: Int): ViewState =
        ViewState(bestScore = bestScore)
}
Ⅸ.最终效果
给复刻好的游戏做个Logo:采用小鸟的Icon和特有的蓝色背景作成的Adaptive Icon。
从点击Logo到游戏结束再到重新开始,录制一段完整游戏。
复刻的效果还是比较完整的,但仍然有不少可以优化和扩展的地方:
- 比如增加简易模式的选择。可以从小鸟的升降幅度、管道的间隔、管道移动的速度、连续出现的组数等角度入手
- 增加翅膀扇动的姿态。实现的话也不难,比如将小鸟的翅膀部分扣出来,在飞翔的过程中不断地来回Rotate一定角度
Canvas自定义描画。部分视图元素采用的是图片,其实也可以通过Canvas来实现,顺道强化一下Compose的描画使用
感兴趣的朋友可以Fork一下,试着改改!


