什么是Spring Bean
官方文档中的定义如下:
In Spring, the objects that form the backbone of your application and that are managed by the Spring IoC container are called beans. A bean is an object that is instantiated, assembled, and managed by a Spring IoC container.
翻译成中文如下:
在Spring中,构成应用程序主干并由Spring IoC容器管理的对象称为bean。 Bean是由Spring IoC容器实例化,组装和管理的对象。
从之前关于BeanDefinition和BeanFactory的文章中可以知道,BeanDefinition就是用来描述一个Spring Bean,而BeanFactory就是用来管理Bean的。
Spring Bean实例化的方式
实例化的本质就是根据BeanDefinition来创建Bean实例。下面通过创建Person实例来说明。
@Getter
@Setter
@ToString
class Person{
    private String name;
    private Integer age;
    public Person() {
        this.name = "无参构造函数创建";
        this.age = 0;
    }
    public Person(String name, Integer age) {
        this.name = name;
        this.age = age;
    }
}
构造方法
这是最常见也是用的最多的一种,示例如下:
上面的配置就是使用的无参构造方法创建实例,实际上它还可以在配置中指定构造方法参数和字段属性等。
静态工厂方法
该方法使用指定的静态方法来创建实例。通常需要定义一个静态方法如下:
public class BeanDemo {
    /**
     * 静态工厂
     * @return
     */
    public static Person createPerson(){
        return new Person("静态工厂创建",18);
    }
    /**
     * 指定参数的静态构造方法
     * @param name 名称
     * @return
     */
    public static Person createPerson2(String name){
        return new Person(name,19);
    }
}
配置文件如下:
配置中的class指定的静态方法所在类的名称,而factory-method指的是静态方法的名称。如果的静态工厂方法带有参数,我们可以通过constructor-arg指定静态方法的参数。
实例化工厂方法
该方式和静态工厂方法的方式差不多。该方式只需要先配置号factory实例,然后设置factory-bean和factory-method即可。
public class PersonFactory{
    public Person createPerson(){
        return new Person("实例化工厂创建",18);
    }
}
上面是实例化工厂的代码,下面就是配置文件
Spring Bean的生命周期
Spring Bean交给Spring管理换句话说就是Spring Bean的生命周期由Spring来控制。总体来说,Spring Bean的生命周期其实只有四个:实例化、属性赋值、初始化、销毁。在Spring中对应相关的英文为instantiation、populate、initialization和destruction。在Spring的关于生命周期的源代码中有很多方法和类都含有上面四个英文单词,了解上面的单词有利于源码的阅读。
上面只是总体来说分为4部分,但是复杂的地方就在于Spring提供了很多的扩展点,这些扩展点让Spring Bean的生命周期变的很复杂。
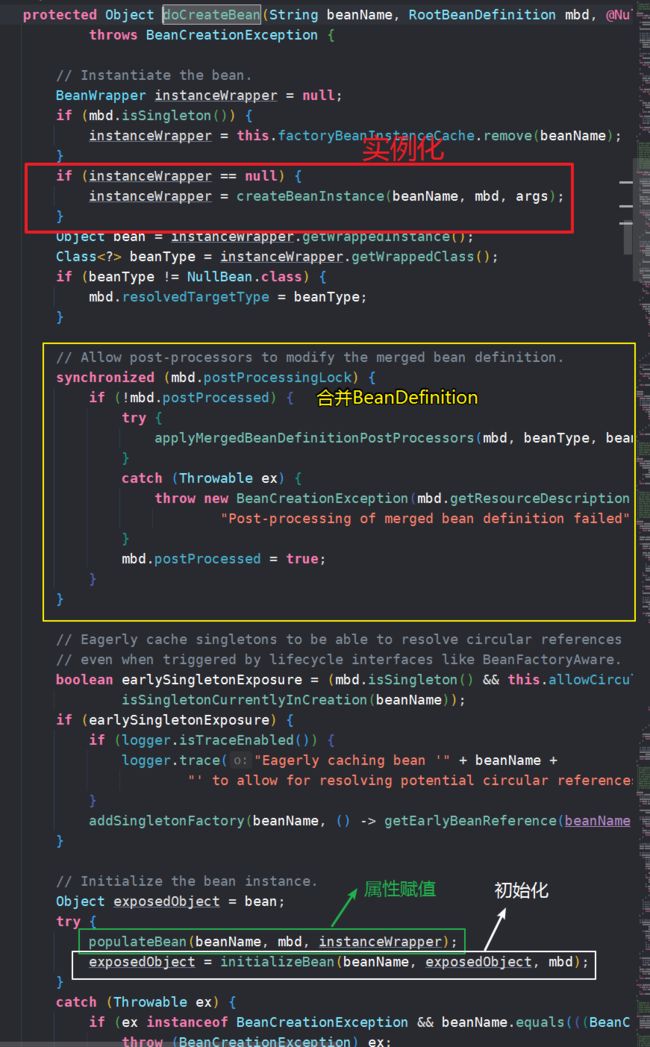
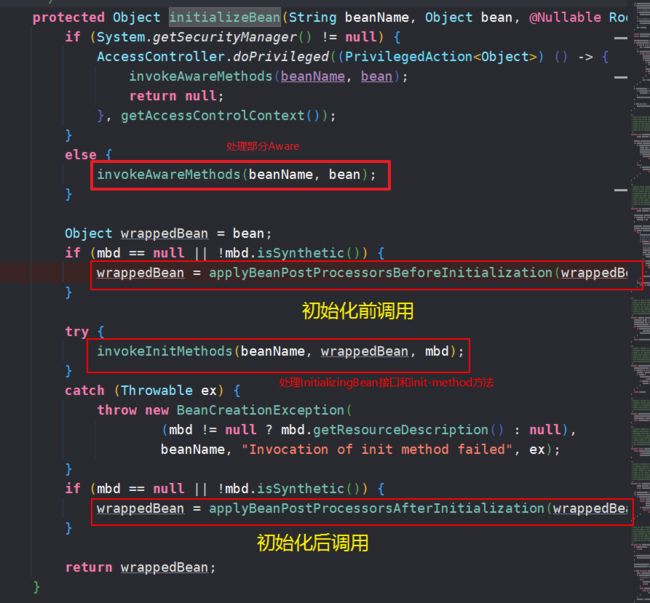
在Spring源码AbstractAutowireCapableBeanFactory中的doCreateBean方法可以看出Spring生命周期中的前三个,生命周期和方法分别对应如下:
createBeanInstance(beanName, mbd, args);//实例化
populateBean(beanName, mbd, instanceWrapper);//属性赋值
initializeBean(beanName, exposedObject, mbd);//初始化
实例化前后-InstantiationAwareBeanPostProcessor
该接口是BeanPostProcessor(可以暂时忽略)的子接口,它主要提供的是实例化之前和之后的回调,以及设置属性或者自动装配之前的回调。该接口主要提供了三个方法提供回调扩展。
postProcessBeforeInstantiation
default Object postProcessBeforeInstantiation(Class beanClass, String beanName) throws BeansException {
   return null;
}
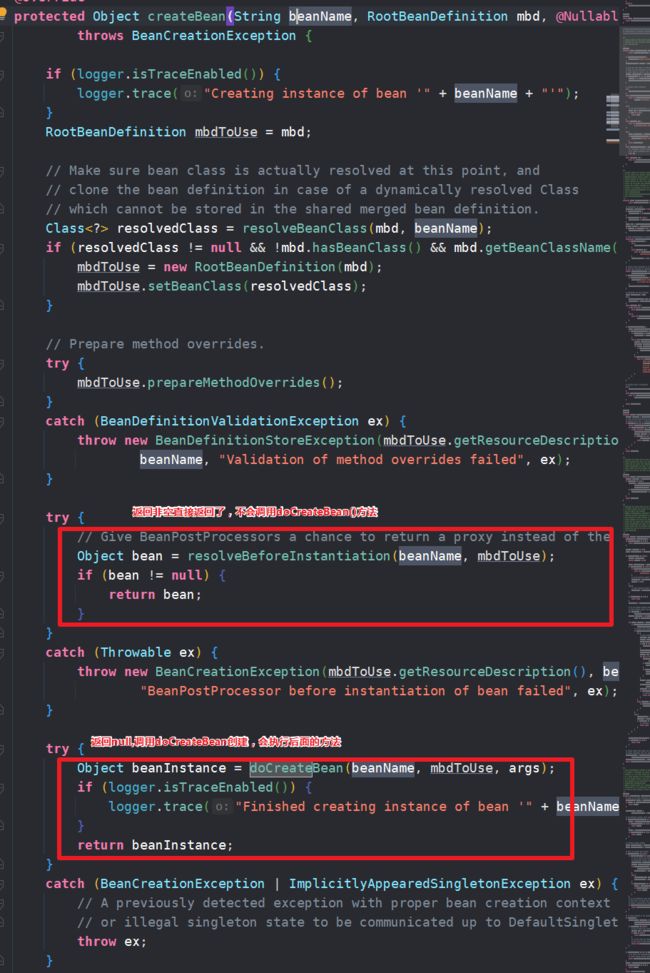
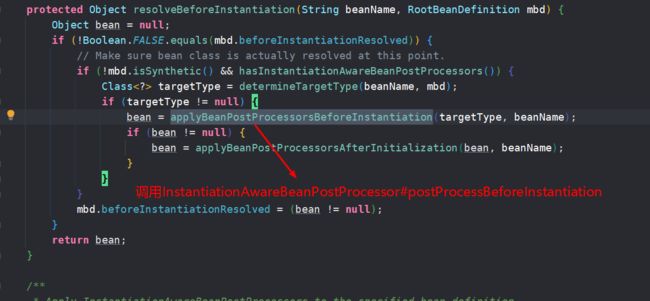
该方法发生在实例化前,简单的说就对象还没有被创建出来。该方法如果返回值为非空,这将导致原本默认的实例化方法不会执行,而后续的postProcessAfterInstantiation和postProcessProperties将不会执行。从AbstractAutowireCapableBeanFactory中的createBean开始调试,可以查看到整个完整过程,下面是部分关键实现代码。
resolveBeforeInstantiation实现如下
applyBeanPostProcessorsBeforeInstantiation实现如下
postProcessAfterInstantiation
default boolean postProcessAfterInstantiation(Object bean, String beanName) throws BeansException {
   return true;
}
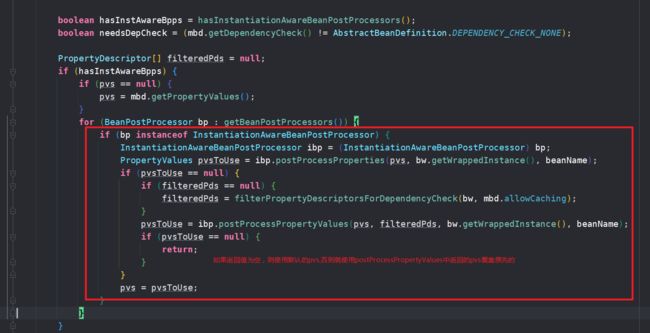
该方法在实例化之后,属性赋值之前被调用。如果该方法返回true,则代表应该进行属性赋值。如果返回false,则不会进行后续的属性赋值操作,同时将跳过postProcessProperties方法。具体实现可以看populateBean内部的实现。
postProcessProperties
default PropertyValues postProcessProperties(PropertyValues pvs, Object bean, String beanName)
      throws BeansException {
   return null;
}
该方法在属性赋值之前调用。如果返回空或者是入参的pvs,则代表将会使用BeanDefinition中定义的值为属性赋值。我们可以修改返回的pvs,从而修改属性的赋值。在populateBean可以看到它的实现。
参考使用示例:
spring-life-cycle.xml定义如下:
示例代码:
public class LifecycleDemo {
    public static void main(String[] args) {
        //创建BeanFactory
        DefaultListableBeanFactory beanFactory = new DefaultListableBeanFactory();
        //读取配置文件
        XmlBeanDefinitionReader reader = new XmlBeanDefinitionReader(beanFactory);
        reader.loadBeanDefinitions("spring-life-cycle.xml");
        //注册 InstantiationAwareBeanPostProcessor
        beanFactory.addBeanPostProcessor(new MyInstantiationAwareBeanPostProcessor());
        //获取Bean并打印
        User user = beanFactory.getBean("user", User.class);
        System.out.println(user);
    }
}

class MyInstantiationAwareBeanPostProcessor implements InstantiationAwareBeanPostProcessor {
    @Override
    public Object postProcessBeforeInstantiation(Class beanClass, String beanName) throws BeansException {
        System.out.println("MyInstantiationAwareBeanPostProcessor#postProcessBeforeInstantiation()");
        return null;
    }
    @Override
    public boolean postProcessAfterInstantiation(Object bean, String beanName) throws BeansException {
        System.out.println("MyInstantiationAwareBeanPostProcessor#postProcessAfterInstantiation()");
        return true;
    }
    @Override
    public PropertyValues postProcessProperties(PropertyValues pvs, Object bean, String beanName) throws BeansException {
        System.out.println("MyInstantiationAwareBeanPostProcessor#postProcessProperties()");
        for (PropertyValue pv : pvs) {
            if (pv.getValue() instanceof TypedStringValue){
                TypedStringValue value = (TypedStringValue) pv.getValue();
                System.out.println(pv.getName() + " = " + value.getValue());
            }
        }
        MutablePropertyValues mvs = new MutablePropertyValues();
        mvs.add("userName", "update_name");
        mvs.add("age", 19);
        return mvs;
    }
}
class User {
    private String userName;
    private Integer age;
    public User() {
        System.out.println("User()");
    }
    public String getUserName() {
        return userName;
    }
    public void setUserName(String userName) {
        System.out.println("setUserName()");
        this.userName = userName;
    }
    public Integer getAge() {
        return age;
    }
    public void setAge(Integer age) {
        System.out.println("setAge()");
        this.age = age;
    }
    @Override
    public String toString() {
        return "User{" +
                "userName='" + userName + '\'' +
                ", age=" + age +
                '}';
    }
}
打印结果如下:
MyInstantiationAwareBeanPostProcessor#postProcessBeforeInstantiation()
User()
MyInstantiationAwareBeanPostProcessor#postProcessAfterInstantiation()
MyInstantiationAwareBeanPostProcessor#postProcessProperties()
userName = tom
age = 18
setUserName()
setAge()
User{userName='update_name', age=19}
初始化前后-BeanPostProcessor
该接口主要提供了初始化前后的扩展。前面分析的InstantiationAwareBeanPostProcessor作为该接口的子接口,也同样具备该功能。接口定义如下:
public interface BeanPostProcessor {
   default Object postProcessBeforeInitialization(Object bean, String beanName) throws BeansException {
      return bean;
   }
   default Object postProcessAfterInitialization(Object bean, String beanName) throws BeansException {
      return bean;
   }
}
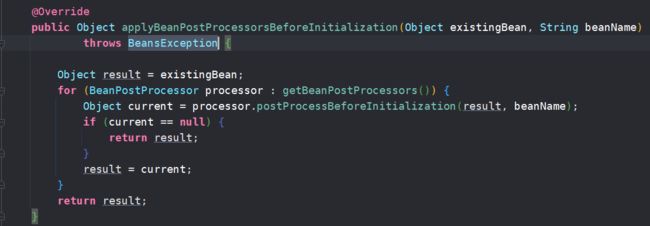
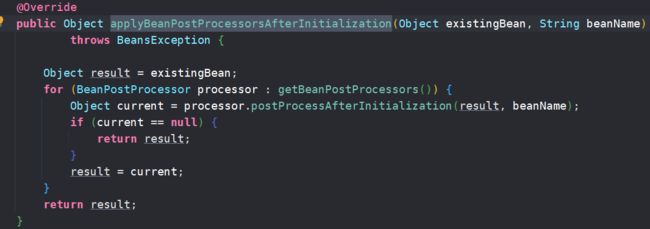
postProcessBeforeInitialization和postProcessAfterInitialization分别提供了初始化前后的回调入口。具体实现可以查看AbstractAutowireCapableBeanFactory中initializeBean的实现。
applyBeanPostProcessorsBeforeInitialization实现如下:
applyBeanPostProcessorsAfterInitialization实现如下
从上面代码实现可以知道,分别在applyBeanPostProcessorsBeforeInitialization和applyBeanPostProcessorsAfterInitialization中对postProcessBeforeInitialization和postProcessAfterInitialization做了调用。需要注意的地方在于,BeanPostProcessor可以注册多个,且执行是有顺序的。如果接口的方法实现返回null,后续的BeanPostProcessor将会被跳过不再执行。
在之前的MyInstantiationAwareBeanPostProcessor中我们增加对postProcessBeforeInitialization和postProcessAfterInitialization的实现,修改代码如下:
class MyInstantiationAwareBeanPostProcessor implements InstantiationAwareBeanPostProcessor {
    @Override
    public Object postProcessBeforeInstantiation(Class beanClass, String beanName) throws BeansException {
        System.out.println("MyInstantiationAwareBeanPostProcessor#postProcessBeforeInstantiation()");
        return null;
    }
    @Override
    public boolean postProcessAfterInstantiation(Object bean, String beanName) throws BeansException {
        System.out.println("MyInstantiationAwareBeanPostProcessor#postProcessAfterInstantiation()");
        return true;
    }
    @Override
    public PropertyValues postProcessProperties(PropertyValues pvs, Object bean, String beanName) throws BeansException {
        System.out.println("MyInstantiationAwareBeanPostProcessor#postProcessProperties()");
        for (PropertyValue pv : pvs) {
            if (pv.getValue() instanceof TypedStringValue){
                TypedStringValue value = (TypedStringValue) pv.getValue();
                System.out.println(pv.getName() + " = " + value.getValue());
            }
        }
        MutablePropertyValues mvs = new MutablePropertyValues();
        mvs.add("userName", "update_name");
        mvs.add("age", 19);
        return mvs;
    }
    //BeanPostProcessor中定义的接口
    @Override
    public Object postProcessBeforeInitialization(Object bean, String beanName) throws BeansException {
        System.out.println("MyInstantiationAwareBeanPostProcessor#postProcessBeforeInitialization()");
        System.out.println(bean);
        if (bean instanceof User){
          ((User) bean).setAge(20);
        }
        return bean;
    }
    //BeanPostProcessor中定义的接口
    @Override
    public Object postProcessAfterInitialization(Object bean, String beanName) throws BeansException {
        System.out.println("MyInstantiationAwareBeanPostProcessor#postProcessAfterInitialization()");
        System.out.println(bean);
        if (bean instanceof User){
          ((User) bean).setAge(21);
            }
        return bean;
    }
}
最后的打印结果如下:
MyInstantiationAwareBeanPostProcessor#postProcessBeforeInstantiation()
User()
MyInstantiationAwareBeanPostProcessor#postProcessAfterInstantiation()
MyInstantiationAwareBeanPostProcessor#postProcessProperties()
userName = tom
age = 18
setUserName()
setAge()
MyInstantiationAwareBeanPostProcessor#postProcessBeforeInitialization()
User{userName='update_name', age=19}
setAge()
MyInstantiationAwareBeanPostProcessor#postProcessAfterInitialization()
User{userName='update_name', age=20}
setAge()
User{userName='update_name', age=21}
在Spring中BeanPostProcessor有很多子集,这些子集提供了非常丰富的功能。例如在Spring中对JSR-250规范中@PostConstruct注解的实现,就是借助了BeanPostProcessor完成的。例如之前的示例,我们为User增加@PostConstruct标记的方法:
@PostConstruct
public void postConstruct(){
    System.out.println("User#postConstruct()");
}
向BeanFactory注册InitDestroyAnnotationBeanPostProcessor实例。nitDestroyAnnotationBeanPostProcessor postProcessor =newInitDestroyAnnotationBeanPostProcessor();
postProcessor.setInitAnnotationType(PostConstruct.class);
beanFactory.addBeanPostProcessor(postProcessor);
执行修改后的代码,打印结果如下:
MyInstantiationAwareBeanPostProcessor#postProcessBeforeInstantiation()
User()
MyInstantiationAwareBeanPostProcessor#postProcessAfterInstantiation()
MyInstantiationAwareBeanPostProcessor#postProcessProperties()
userName = tom
age = 18
setUserName()
setAge()
MyInstantiationAwareBeanPostProcessor#postProcessBeforeInitialization()
User{userName='update_name', age=19}
setAge()
User#postConstruct()
MyInstantiationAwareBeanPostProcessor#postProcessAfterInitialization()
User{userName='update_name', age=20}
setAge()
User{userName='update_name', age=21}
最后输出的结果比之前多了User#postConstruct()。这个就是通过BeanPostProcessor实现的。在使用ApplicationContext时不需要手动注册,因为Spring已经帮你注册了CommonAnnotationBeanPostProcessor。
Aware接口回调
在Spring有很多Aware接口,当容器在创建实现了Aware相关的接口时,会自动的将某些实例注入的被创建的实例中。上面表述不清的话直接看示例。例如现在我定义一个Person实例,该实例需要持有BeanFactory实例。
public class LifecycleDemo2 {
    public static void main(String[] args) {
        AbstractBeanDefinition beanDefinition = BeanDefinitionBuilder.genericBeanDefinition(Person.class).getBeanDefinition();
        DefaultListableBeanFactory beanFactory = new DefaultListableBeanFactory();
        beanFactory.registerBeanDefinition("person",beanDefinition);
        Person person = beanFactory.getBean(Person.class);
        System.out.println(person.getBeanFactory() == beanFactory);
    }
}
class Person implements BeanFactoryAware{
    private BeanFactory beanFactory;
    public BeanFactory getBeanFactory() {
        return beanFactory;
    }
    @Override
    public void setBeanFactory(BeanFactory beanFactory) throws BeansException {
        this.beanFactory = beanFactory;
    }
}
Person只需要实现BeanFactoryAware接口,然后容器会回调setBeanFactory方法,我们就能获取到BeanFactory实例了,而且最后打印的结果返回true也证实了容器给我们注入的BeanFactory就是我们自己手动创建出来的。具体Spring提供了哪些Aware请参考ApplicationContextAware and BeanNameAware官方相关文档。
BeanFactory中Aware实现
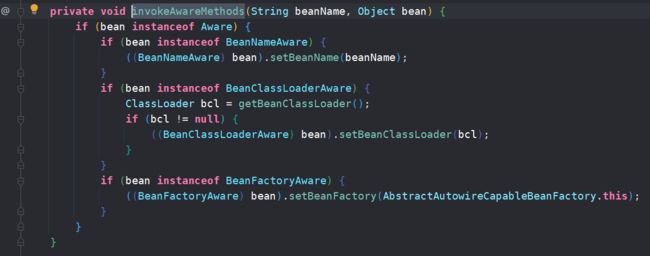
Spring是如何完成回调的呢?在前面的AbstractAutowireCapableBeanFactory中initializeBean源码中标注了一个被调用的方法叫invokeAwareMethods。这个方法的实现如下所示:
整个逻辑很简单,就是判断是不是对应的Aware类型,如果是就调用对应的回调方法。但是这里只有三种,其他的都是在ApplicationContext环境中才有的。通过源码分析可以知道它是如何实现的。
ApplicationContext中Aware实现
查看AbstractApplicationContext、ApplicationContextAwareProcessor代码可以知道如何实现。
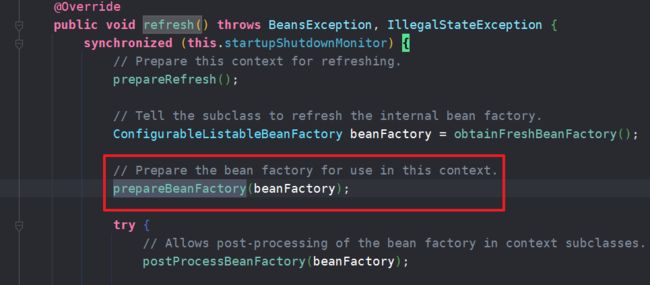
- 在使用ApplicationContext时都需要调用refresh()这个方法,这个方法会执行一个叫prepareBeanFactory(beanFactory)的方法。
- prepareBeanFactory中会创建一个ApplicationContextAwareProcessor实例,而这个ApplicationContextAwareProcessor就是一个BeanPostProcessor的实现,这个新创建的实例会被注册到BeanFactory上。
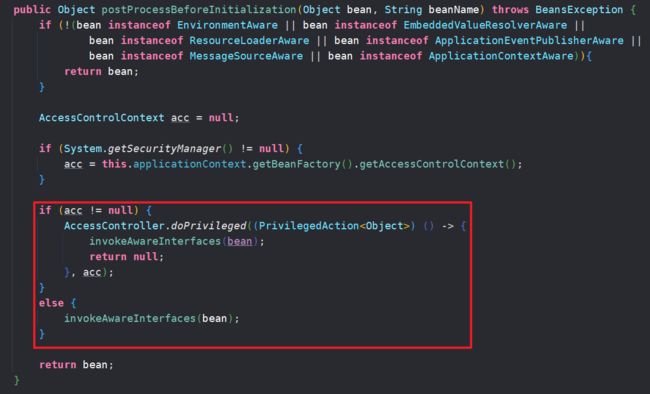
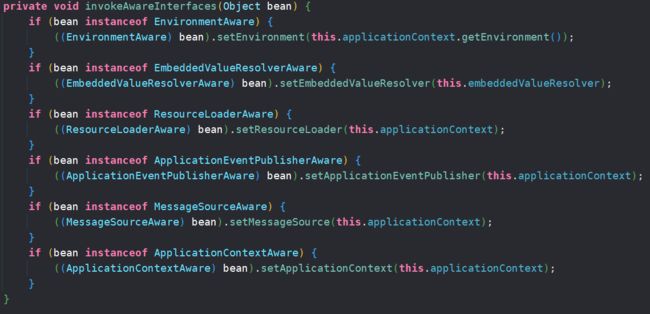
- 在postProcessBeforeInitialization方法中会调用invokeAwareInterfaces来实现Aware回调。
源码如下图所示:
AbstractApplicationContext#refresh方法
AbstractApplicationContext#prepareBeanFactory方法
ApplicationContextAwareProcessor内部实现
从上面的源码实现可以知道这BeanFactory中Aware和ApplicationContext中Aware的实现是不同的。ApplicationContext中Aware的实现是通过BeanPostProcessor实现的,这也说明BeanPostProcessor在Spring中作为扩展点的灵活和重要。
初始化-InitializingBean和init-method
在Spring中我们还可以通过实现InitializingBean或者指定init-method方法来就行初始化。还是在之前的示例中,主要做一下修改:
- User实现InitializingBean接口,并实现afterPropertiesSet()方法。
- User创建initMethod()方法,并在XML配置文件中指定init-method方法。
User类修改
class User implements InitializingBean {
    private String userName;
    private Integer age;
    public User() {
        System.out.println("User()");
    }
    public String getUserName() {
        return userName;
    }
    public void setUserName(String userName) {
        System.out.println("setUserName()");
        this.userName = userName;
    }
    public Integer getAge() {
        return age;
    }
    public void setAge(Integer age) {
        System.out.println("setAge()");
        this.age = age;
    }
    @Override
    public String toString() {
        return "User{" +
                "userName='" + userName + '\'' +
                ", age=" + age +
                '}';
    }
    @PostConstruct
    public void postConstruct(){
        System.out.println("User#postConstruct()");
    }
    //修改处
    @Override
    public void afterPropertiesSet() throws Exception {
        System.out.println("afterPropertiesSet()");
    }
    //修改处
    public void initMethod(){
        System.out.println("initMethod()");
    }
}
spring-life-cycle.xml
最后的打印结果如下:
MyInstantiationAwareBeanPostProcessor#postProcessBeforeInstantiation()
User()
MyInstantiationAwareBeanPostProcessor#postProcessAfterInstantiation()
MyInstantiationAwareBeanPostProcessor#postProcessProperties()
userName = tom
age = 18
setUserName()
setAge()
MyInstantiationAwareBeanPostProcessor#postProcessBeforeInitialization()
User{userName='update_name', age=19}
setAge()
User#postConstruct()
afterPropertiesSet()
initMethod()
MyInstantiationAwareBeanPostProcessor#postProcessAfterInitialization()
User{userName='update_name', age=20}
setAge()
User{userName='update_name', age=21}
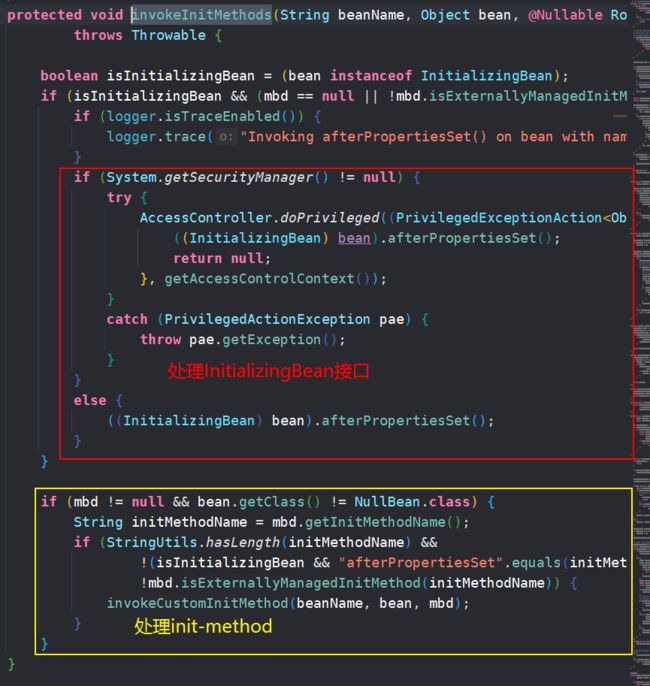
结果输出中可以看到新增afterPropertiesSet()和initMethod()输出。还是查看之前initializeBean()方法的实现,在它内部会调用一个名叫invokeInitMethods的方法,该方法实现如下:
从上图可以看出,这个方法就是用来处理InitializingBean和init-method的。
销毁前置处理-DestructionAwareBeanPostProcessor
该接口同样也是BeanPostProcessor的子扩展,从这里可以看出,BeanPostProcessor确实就是Spring的扩展点,几乎所有的扩展点都是通过其扩展类来实现的。DestructionAwareBeanPostProcessor的定义如下:
public interface DestructionAwareBeanPostProcessor extends BeanPostProcessor {
   //销毁前处理
   void postProcessBeforeDestruction(Object bean, String beanName) throws BeansException;
   //确定给定的bean实例是否需要执行后置处理
   default boolean requiresDestruction(Object bean) {
      return true;
   }
}
简单的说就是requiresDestruction方法用来控制是否要经过postProcessBeforeDestruction方法处理,如果返回false,给定的Bean实例是不会执行postProcessBeforeDestruction方法中的逻辑的。
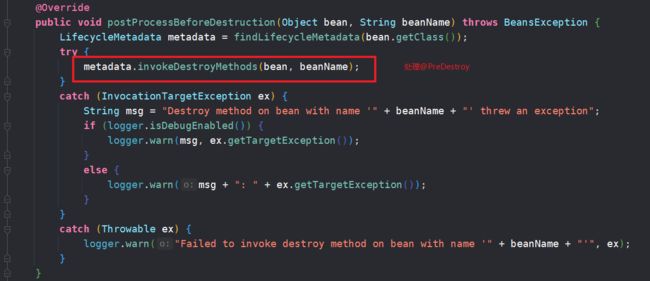
在前面的BeanPostProcessor中提到了InitDestroyAnnotationBeanPostProcessor这个类用来处理@PostConstruct注解,这个类同时还实现了DestructionAwareBeanPostProcessor接口用来处理@PreDestroy注解。
DisposableBean和destroy-method
在Spring中我们一般可以通过下面三种方式定义销毁回调:
- @PreDestory注解
- 实现DisposableBean
- 定义destroy-method
前面已经说了@PreDestory是通过InitDestroyAnnotationBeanPostProcessor来实现的,后面的两种我们可以跟踪AbstractBeanFactory****#****destroyBean(String beanName, Object beanInstance)的实现来查看究竟如何实现。
protected void destroyBean(String beanName, Object bean, RootBeanDefinition mbd) {
   new DisposableBeanAdapter(bean, beanName, mbd, getBeanPostProcessors(), getAccessControlContext()).destroy();
}
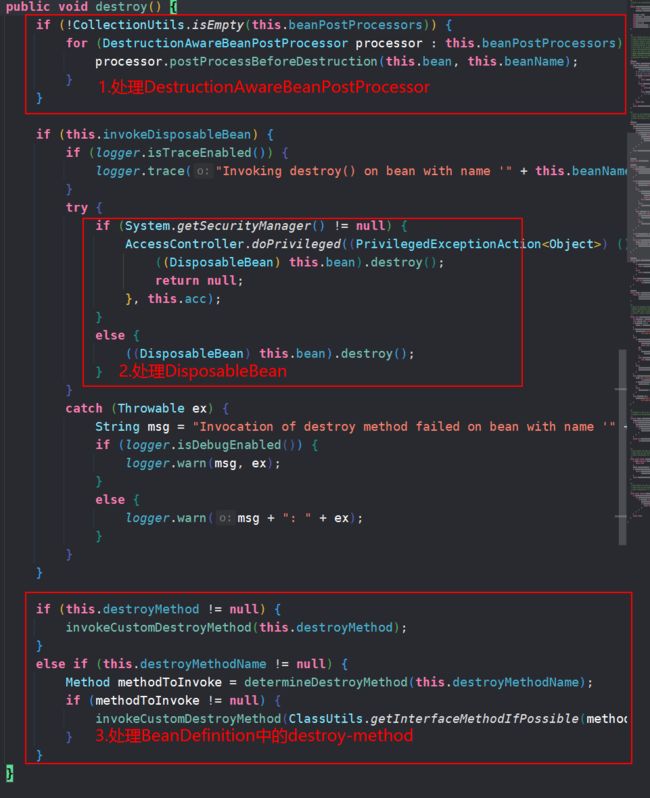
看到最后它就是通过创建一个DisposableBeanAdapter实例,然后调用其destroy方法执行销毁逻辑。而destroy的内部实现如下:
从上面可以看出
第一步会先执行DestructionAwareBeanPostProcessor#postProcessBeforeDestruction()中的逻辑****。
同样DisposableBeanAdapter也可以被注册多个,这些DisposableBeanAdapter被存储在DisposableBeanAdapter中的beanPostProcessors变量中,这个变量是一个List结构。同时在DisposableBeanAdapter中的并不会每个都执行,必须是requiresDestruction方法返回为true时才会被添加到beanPostProcessors这个List中,从DisposableBeanAdapter构造方法中可以得知。
this.beanPostProcessors = filterPostProcessors(postProcessors, bean);
上面就是DisposableBeanAdapter构造方法中为beanPostProcessors赋值的方法,该方法的实现如下:
从源码中可以看出,requiresDestruction返回为true时才会被添加到beanPostProcessors中。
第二步就是处理DisposableBean中destroy****()方法的回调。
第三步处理BeanDefinition中定义的destroyMethod。
生命周期总结
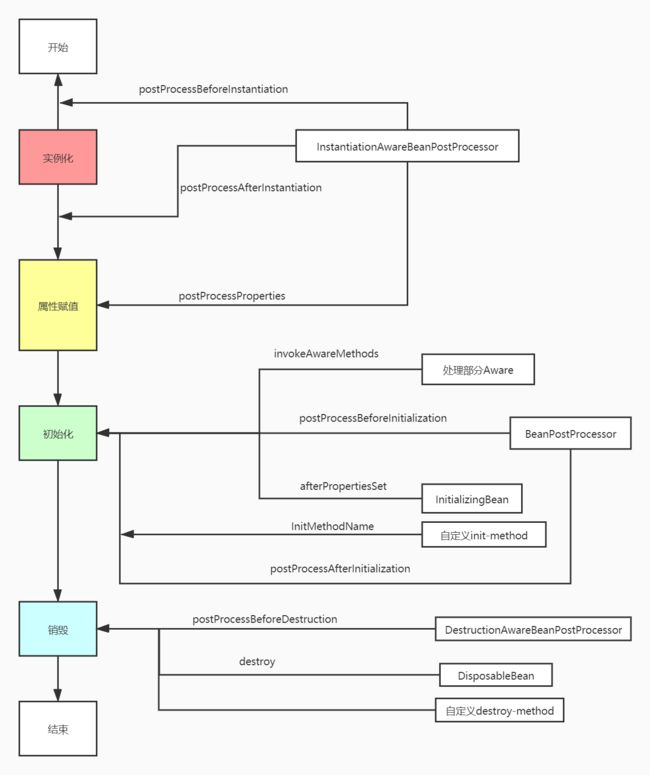
通过前面的分析,现在对于Spring Bean的生命周期不会太复杂了。总结来说就是四个主要流程,然后再这些流程中加入很多扩展。其实只要记住四个主要流程和扩展点的顺序,对Spring Bean的生命周期就好理解了。
这个图就是上面所有流程的总结。最后使用一个示例代码展示Spring中各个生命周期。
package com.buydeem.lifecycle;
import org.springframework.beans.BeansException;
import org.springframework.beans.PropertyValues;
import org.springframework.beans.factory.DisposableBean;
import org.springframework.beans.factory.InitializingBean;
import org.springframework.beans.factory.config.BeanPostProcessor;
import org.springframework.beans.factory.config.InstantiationAwareBeanPostProcessor;
import org.springframework.context.annotation.AnnotationConfigApplicationContext;
import org.springframework.context.annotation.Bean;
import javax.annotation.PostConstruct;
import javax.annotation.PreDestroy;
/**
 * todo 描述信息
 *
 * @author zengchao
 * @date 2021-02-03 15:37:37
 */
public class LifecycleDemo3 {
    public static void main(String[] args) {
        AnnotationConfigApplicationContext context = new AnnotationConfigApplicationContext();
        context.register(Config.class);
        context.refresh();
        context.close();
    }
}
class Student implements InitializingBean, DisposableBean {
    private String name;
    public String getName() {
        return name;
    }
    public void setName(String name) {
        this.name = name;
    }
    public Student() {
        System.out.println("实例化Bean");
    }
    @PostConstruct
    public void postConstruct(){
        System.out.println("@PostConstruct");
    }
    @Override
    public void afterPropertiesSet() throws Exception {
        System.out.println("InitializingBean#afterPropertiesSet()");
    }
    public void customInitMethod(){
        System.out.println("BeanDefinition中自定义的init-method");
    }

    @PreDestroy
    public void preDestroy(){
        System.out.println("@PreDestroy");
    }
    @Override
    public void destroy() throws Exception {
        System.out.println("DisposableBean#destroy()");
    }
    public void customDestroyMethod(){
        System.out.println("BeanDefinition中自定义的destroy-method");
    }
}
class CustomInstantiationAwareBeanPostProcessor implements InstantiationAwareBeanPostProcessor {
    @Override
    public Object postProcessBeforeInstantiation(Class beanClass, String beanName) throws BeansException {
        System.out.println("InstantiationAwareBeanPostProcessor#postProcessBeforeInstantiation()");
        return null;
    }

    @Override
    public boolean postProcessAfterInstantiation(Object bean, String beanName) throws BeansException {
        System.out.println("InstantiationAwareBeanPostProcessor#postProcessAfterInstantiation()");
        return true;
    }
    @Override
    public PropertyValues postProcessProperties(PropertyValues pvs, Object bean, String beanName) throws BeansException {
        System.out.println("InstantiationAwareBeanPostProcessor#postProcessProperties()");
        return null;
    }
}
class CustomBeanPostProcessor implements BeanPostProcessor{
    @Override
    public Object postProcessBeforeInitialization(Object bean, String beanName) throws BeansException {
        System.out.println("BeanPostProcessor#postProcessBeforeInitialization()");
        return bean;
    }
    @Override
    public Object postProcessAfterInitialization(Object bean, String beanName) throws BeansException {
        System.out.println("BeanPostProcessor#postProcessAfterInitialization()");
        return bean;
    }
}
class Config{
    @Bean(initMethod = "customInitMethod",destroyMethod = "customDestroyMethod")
    public Student student(){
        return new Student();
    }
    @Bean
    public CustomInstantiationAwareBeanPostProcessor customInstantiationAwareBeanPostProcessor(){
        return new CustomInstantiationAwareBeanPostProcessor();
    }
    @Bean
    public CustomBeanPostProcessor customBeanPostProcessor(){
        return new CustomBeanPostProcessor();
    }
}
打印结果如下:
InstantiationAwareBeanPostProcessor#postProcessBeforeInstantiation()
实例化Bean
InstantiationAwareBeanPostProcessor#postProcessAfterInstantiation()
InstantiationAwareBeanPostProcessor#postProcessProperties()
BeanPostProcessor#postProcessBeforeInitialization()
@PostConstruct
InitializingBean#afterPropertiesSet()
BeanDefinition中自定义的init-method
BeanPostProcessor#postProcessAfterInitialization()
@PreDestroy
DisposableBean#destroy()
BeanDefinition中自定义的destroy-method
