前言:由于项目是基于vue-cli2搭建的,使用的是webpack3.x版本。随着时间的迁移,打包的速度越来越慢,痛下决定将webpack升级到4.0版本。
安装依赖
首先先贴出升级完成后的package.json
"devDependencies": {
    "assets-webpack-plugin": "^3.9.10",
    "autoprefixer": "^7.1.2",
    "babel-core": "^6.22.1",
    "babel-helper-vue-jsx-merge-props": "^2.0.3",
    "babel-loader": "^7.1.4",
    "babel-plugin-syntax-jsx": "^6.18.0",
    "babel-plugin-transform-runtime": "^6.22.0",
    "babel-plugin-transform-vue-jsx": "^3.7.0",
    "babel-preset-env": "^1.3.2",
    "babel-preset-stage-2": "^6.22.0",
    "chalk": "^2.0.1",
    "copy-webpack-plugin": "^5.0.4",
    "css-loader": "^3.2.0",
    "file-loader": "^4.2.0",
    "friendly-errors-webpack-plugin": "^1.7.0",
    "html-webpack-plugin": "^3.2.0",
    "kity": "^2.0.4",
    "less": "^3.0.1",
    "less-loader": "^5.0.0",
    "mini-css-extract-plugin": "^0.8.0",
    "node-notifier": "^5.1.2",
    "optimize-css-assets-webpack-plugin": "^5.0.3",
    "ora": "^1.2.0",
    "portfinder": "^1.0.13",
    "postcss-import": "^11.0.0",
    "postcss-loader": "^3.0.0",
    "postcss-url": "^7.2.1",
    "progress-bar-webpack-plugin": "^1.11.0",
    "rimraf": "^2.6.0",
    "semver": "^5.3.0",
    "shelljs": "^0.7.6",
    "uglifyjs-webpack-plugin": "^1.1.1",
    "url-loader": "^2.1.0",
    "vue-loader": "^15.7.1",
    "vue-style-loader": "^4.1.2",
    "vue-template-compiler": "^2.5.21",
    "webpack": "^4.39.3",
    "webpack-cli": "^3.3.8",
    "webpack-dev-middleware": "^3.7.1",
    "webpack-dev-server": "^3.8.0",
    "webpack-merge": "^4.2.2",
  },
第一步
npm i -D [email protected]
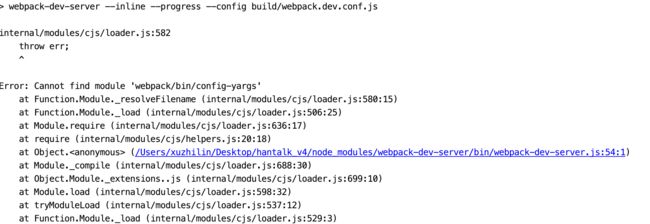
出现报错:connot find module 'webpack/bin/config-yargs'
报错原因:提示缺少依赖
webpack-cli
解决方案:安装依赖
npm i -D [email protected]
第二步
在安装完webpack-cli之后,在继续npm run dev
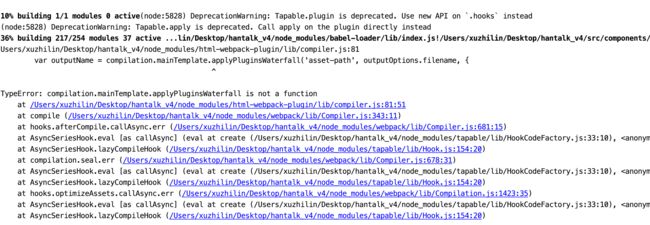
出现报错:
var outputName = compilation.mainTemplate.applyPluginsWaterfall('asset-path', outputOptions.filename, {
^
TypeEorror: compilation.mainTemplate.applyPluginsWaterfall is not function
报错原因:
html-webpack-plugin版本过低
解决方案:安装依赖
npm i -D [email protected]
第三步
在升级完html-webpack-plugin之后,在继续npm run dev
出现报错: Module build failed (from ./node_module/vue-loader/index.js):
TypeError: Connot read property 'vue' of undefined.
根据上面描述,很明显是vue-loader的依赖出了问题,想要了解详情的请点击从v14迁移 | vue-loader
报错原因:
vue-loader版本过低
解决方案:
安装依赖
npm i -D [email protected]
在
webpack.base.conf.js下修改
-- const vueLoaderConfig = require('./vue-loader.conf')
-- options: vueLoaderConfig
++ const { VueLoaderPlugin } = require('vue-loader')
++ new VueLoaderPlugin()
具体操作
//const vueLoaderConfig = require('./vue-loader.conf')
const { VueLoaderPlugin } = require('vue-loader')
module.exports = {
  ...,
  module: {
    rules: [
      {
        test: /\.vue$/,
        loader: 'vue-loader',
       // options: vueLoaderConfig
      },
    ]
  },
 plugins: [
   new VueLoaderPlugin()
 ]
}
第四步
升级完后继续dev
出现报错:
Module parse failed: Unexpected token
File was process with loaders:
*./node_modules/vue-loaders/lib/index.js
You may need an additional loader to handle the result of these loaders.
.ht-Head-Search{
...
}
这时候会感到困惑,我刚刚升级了
vue-loader到v15版本,怎么还是提示vue-loader的错误,难道是升级的方式不对?
继续往下看,发现多了点
css样式的提示,明白了可能是css-loader和vue-style-loader也需要跟着升级
报错原因:
css-loader,vue-style-loader版本过低
解决方案:安装依赖
npm i -D [email protected] [email protected]
第五步
升级是考验耐心的事情,不着急一个坑一个坑的解决,在升级完css-loader和vue-style-loade后,继续dev
出现报错:
Module Warning (from ./node_module/postcss-loader/lib/index):
(Emitted value instead of an instace of Error)
PostCSS Loader
Previous source map found,but options.sourceMap isn't set.
报错原因:
postcss-loader版本过低
解决方案:安装依赖
npm i -D [email protected]
解决development环境下的配置问题
首先在webpack.dev.conf.js 文件下添加mode: 'development',
然后移除NamedModulesPlugin,NoEmitOnErrorsPlugin插件,webpack4已修改为内置插件
module.exports = {
  ...,
 mode: 'development,
 ...,
 plugins: {
     //new webpack.NamedModulesPlugin(), // HMR shows correct file names in console on update.
    //new webpack.NoEmitOnErrorsPlugin(),
  }
}
在这里终于看到了我们熟悉的localhost:8080,说明我们的项目可以成功的在dev环境下运行了,心想升级到webpack4,也是挺简单的嘛,迫不及待的在网页打开地址,想和项目进一步的亲近的时候。却在控制台看见了报错,不说了重新打开编译继续回到正题。
出现报错:
Uncaught TypeError:Connot assign to read only property 'exports' of object '#
报错原因:说是
es6的import 和es5的module.export不能一起使用,项目全局查询 module.export发现没没有一起使用,排除掉这个可能,真相只有一个,那就是配置出了问题
解决方案:
一共有两种解决方案
- 第一种方法 移除
resolve('node_modules/webpack-dev-server/client')
webpack.base.conf.js
module.exports = {
  ...
  module: {
    rules: [
      {
        test: /\.js$/,
        loader: 'babel-loader'
       // include: [resolve('src'), resolve('test'), resolve('node_modules/webpack-dev-server/client')]
        include: [resolve('src'),resolve('test')],
        exclude: /node_modules/
      },

    ]
  }
}
- 第二种方法 移除
transform-runtime
.babelrc
{
  "presets": [
    ["env", {
      "modules": false,
      "targets": {
        "browsers": ["> 1%", "last 2 versions", "not ie <= 8"]
      }
    }],
    "stage-2"
  ],
   // "plugins": ["transform-vue-jsx", "transform-runtime"]
  "plugins": ["transform-vue-jsx"]
}
重新dev,打开控制台没有报错,在这里,终于可以和项目来一波深入亲近了,一波功能乱点确认无可疑报错,开始幻想如何build,生成我们最爱的dist文件
解决production环境下配置问题
第一步
首先在webpack.prod.conf.js文件下,添加mode: 'production'
const webpackConfig = merge(baseWebpackConfig, {
  ...,
  mode: 'production'
})
然后选择build
果然,build的过程没有想象的那么一帆风顺,通过npm run build,
项目还未跑动就被扼杀在摇篮
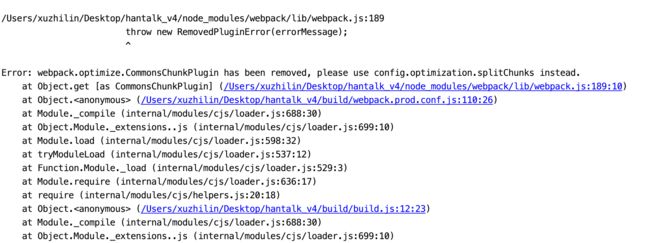
出现报错:
thorw new RemovedPluginError(errorMessage);
Error: webpack.optimize.CommonsChunkPlugin has been removed, please use config.optimization.splitChunks instead.
报错原因:
webpack4移除了
webpack.optimize.CommonsChunkPlugin
解决方案:
在
webpack.prod.conf.js文件下将以下方法删除
- webpack.optimize.CommonsChunkPlugin
- webpack.optimize.CommonsChunkPlugin
- webpack.optimize.CommonsChunkPlugin
- webpack.optimize.ModuleConcatenationPlugin
- OptimizeCSSPlugin
- UglifyJsPlugin
const webpackConfig = merge(baseWebpackConfig, {
   ...,
    plugins: [
      //new webpack.optimize.CommonsChunkPlugin(),
      //new webpack.optimize.CommonsChunkPlugin({}),
      //new webpack.optimize.CommonsChunkPlugin({}),
      //new webpack.optimize.ModuleConcatenationPlugin(),
      //new OptimizeCSSPlugin({}),
      //new UglifyJsPlugin({})
   ],
})
然后在webpack.prod.conf.js文件下添加以下代码:
  const webpackConfig = merge(baseWebpackConfig, {
    ...,
   optimization: {
    //取代 new UglifyJsPlugin
    minimizer: [
      // 压缩代码
      new UglifyJsPlugin({
        uglifyOptions: {
          compress: {
            warnings: false,
            drop_debugger: true,//关闭debug
            drop_console: true,//关闭console
          }
        },
        sourceMap: config.build.productionSourceMap,
        parallel: true
      }),
      // 可自己配置,建议第一次升级先不配置
      new OptimizeCSSPlugin({
        // cssProcessorOptions: config.build.productionSourceMap
        //     ? {safe: true, map: {inline: false}, autoprefixer: false}
        //     : {safe: true}
      }),
    ],
    // 识别package.json中的sideEffects以剔除无用的模块,用来做tree-shake
    // 依赖于optimization.providedExports和optimization.usedExports
    sideEffects: true,
    // 取代 new webpack.optimize.ModuleConcatenationPlugin()
    concatenateModules: true,
    // 取代 new webpack.NoEmitOnErrorsPlugin(),编译错误时不打印输出资源。
    noEmitOnErrors: true,
    splitChunks: {
      cacheGroups: {
        vendors: {
          test: /[\\/]node_modules[\\/]/,
          chunks: 'initial',
          name: 'vendors',
        },
        'async-vendors': {
          test: /[\\/]node_modules[\\/]/,
          minChunks: 2,
          chunks: 'async',
          name: 'async-vendors'
        }
      }
    },
    runtimeChunk: { name: 'runtime' }
    },
  })
第二步
上面操作主要是废除和迁移了一些插件,由于webpack4将其内置,所以无需在plugins下进行实例。
继续build
出现报错:
Error: Chunk.entrypoints: Use Chunks.groupsIterable and filter by instanceof Entrypoint insted
at .../node_module/extract-text-webpack-plugin/dist/index.js
报错原因:
extract-text-webpack-plugin:3.0.0并不兼容webpack4
解决方案:
官方推荐使用
mini-css-extract-plugin来替换extract-text-webpack-plugin,另一种方法是升级extract-text-webpack-plugin至[email protected]
安装依赖
npm i -D [email protected]
安装完成之后,打开
utils.js 和 webpack.prod.conf.js文件
utils.js
// const ExtractTextPlugin = require('extract-text-webpack-plugin')
const MiniCssExtractPlugin = require('mini-css-extract-plugin')

exports.cssLoaders = function (options) {
  ...
// Extract CSS when that option is specified
    // (which is the case during production build)
    // if (options.extract) {
    //   return ExtractTextPlugin.extract({
    //     use: loaders,
    //     fallback: 'vue-style-loader',
    //     publicPath: '../../', //注意: 此处根据路径, 自动更改,添加publicPath,可以在css中使用背景图
    //   })
    // } else {
    //   return ['vue-style-loader'].concat(loaders)
    // }
 return [
      options.extract ? MiniCssExtractPlugin.loader : 'vue-style-loader',
    ].concat(loaders)
}
-
webpack.prod.conf.js
添加mini-css-extract-plugin,移除ExtractTextPlugin
//const ExtractTextPlugin = require('extract-text-webpack-plugin')
const MiniCssExtractPlugin = require('mini-css-extract-plugin')
const webpackConfig = merge(baseWebpackConfig, {
    ...,
    plugins: [
      new MiniCssExtractPlugin({
        filename: utils.assetsPath('css/[name].[contenthash].css'),
        allChunks: true,
      }),
        // new ExtractTextPlugin({
        //   filename: utils.assetsPath('css/[name].[contenthash].css'),
        // Setting the following option to `false` will not extract CSS from codesplit chunks.
        // Their CSS will instead be inserted dynamically with style-loader when the codesplit chunk has been loaded by webpack.
       // It's currently set to `true` because we are seeing that sourcemaps are included in the codesplit bundle as well when it's `false`,
       // increasing file size: https://github.com/vuejs-templates/webpack/issues/1110
      //  allChunks: true,
      // }),
    ]
})
在build,终于看到可爱的 dist文件了,吃了dev的教训,首先我们还是检查下dist,是否正常的,要是隔壁老王打出了包岂不是一片青青草原。
打开网页,发现所有的背景图全部失效,找到utils.js下的配置看看有什么不对的地方。
发现webpack3中的设置
if (options.extract) {
      return ExtractTextPlugin.extract({
        use: loaders,
        fallback: 'vue-style-loader',
        publicPath: '../../', //注意: 此处根据路径, 自动更改,添加publicPath,可以在css中使用背景图
      })
    } else {
      return ['vue-style-loader'].concat(loaders)
    }
webpack4中的设置
   return [
      options.extract ? MiniCssExtractPlugin.loader : 'vue-style-loader',
    ].concat(loaders)
这明显不对,人家webpack3有配置背景图路径,咱webpack4可不能丢下,修改配置如下即可
 return [
      options.extract ? {loader:MiniCssExtractPlugin.loader, options: {publicPath: '../../'}} : 'vue-style-loader',
    ].concat(loaders)
如果有本文章没有出现的报错,请下面留言我会试着帮你解决!!!
如果文章对你有所帮助,请留下你的小爱心
就这样这次webpack3迁移到webpack4的踏坑之旅快走到尾声了,不过这里还有一些bug不一定发生,我简单列出来。
拓展-(可能你的项目还有其他报错)
- 如果你的项目中使用了
web worker,那么你在升级到webpack4运行dev的时候,会出现报错,如下:
Uncaught ReferenceError: window is not defined
其实在worker-loader插件的issues已经有了解决办法,想要了解更多,请戳我
解决办法: 在webpack.base.conf.js文件下加入globalObject: 'this'
module.exports = {
...
 output: {
  path: config.build.assetsRoot,
    filename: '[name].js',
    publicPath: process.env.NODE_ENV === 'production'
      ? config.build.assetsPublicPath
      : config.dev.assetsPublicPath,
    globalObject: 'this'
}
}
2.如果你的项目出现这个错误
Vue packages version mismatch:
- [email protected]
- [email protected]
This may cause things to work incorrectly. Make sure to use the same version for both.
If you are using vue-loader@>=10.0, simply update vue-template-compiler.
If you are using vue-loader@<10.0 or vueify, re-installing vue-loader/vueify should bump vue-template-compiler to the latest.
@ ./resources/assets/js/app.js 12:13-46
@ multi ./resources/assets/js/app.js ./resources/assets/sass/app.scss
ERROR in ./resources/assets/js/components/steps.vue
Module build failed (from ./node_modules/vue-loader/lib/index.js):
TypeError: Cannot read property 'parseComponent' of undefined
不要担心,这只是你的vue版本和vue-template-compiler不一致导致的,
统一下两个的版本就可以了
- 如果你的项目使用了
eslint报错
TypeError: Cannot read property 'eslint' of undefined
请升级npm i -D [email protected]
打包优化
一.使用happypack多线程打包
1.安装依赖npm i -D [email protected]
2.导入插件
webpack.base.conf.js
const HappyPack = require('happypack')
const os = require('os')
// 创建 happypack 共享进程池
const happyThreadPool = HappyPack.ThreadPool({size: os.cpus().length})
module.exports = {
 ...
  module: {
   rules: [
    ...
     {
       test: /\.js$/,
       //loader: 'babel-loader',
       use: ['happypack/loader?id=babel'],
      // include: [resolve('src'), resolve('test'), resolve('node_modules/webpack-dev-server/client')]
       include: [resolve('src'),resolve('test')],
       exclude: /node_modules/
     }
   ]
 },
 plugins: [
    new HappyPack({
     /*
      * 必须配置项
      */
     // id 标识符,要和 rules 中指定的 id 对应起来
     id: 'babel',
     // 需要使用的 loader,用法和 rules 中 Loader 配置一样
     // 可以直接是字符串,也可以是对象形式
     loaders: ['babel-loader?cacheDirectory'],
     // 使用共享进程池中的进程处理任务
     threadPool: happyThreadPool,
     verbose: true
   })
 ]
}
二.使用DllReferencePlugin打包公共方法
1.新建文件dll.js和 webpack.dll.conf.js,两个文件和webpack.base.conf.js同级。
2.在dll.js文件下添加以下代码
const path  = require('path');
const webpack = require('webpack');
const dllConfig  = require('./webpack.dll.conf');
const chalk = require('chalk')
const rm  = require('rimraf')
const ora = require('ora')
const spinner = ora({
  color: 'green',
  text: '正为生产环境打包dll包中...'
})
spinner.start()
rm(path.resolve(__dirname, '../dll'),  err => {
  if (err) throw err
  webpack(dllConfig,function (err, stats) {
    spinner.stop()
    if (err) throw err
    process.stdout.write(stats.toString({
      colors: true,
      modules: false,
      children: false,
      chunks: false,
      chunkModules: false
    }) + '\n\n')
    console.log(chalk.cyan('  dll打包已完成啦!\n'))
  })
});
3.在webpack.dll.conf.js文件下添加以下代码
const path = require('path')
const webpack = require('webpack')
const CleanWebpackPlugin = require('clean-webpack-plugin')
const AssetsPlugin = require('assets-webpack-plugin')
module.exports = {
  mode: 'development',
  entry: {
    vendor: [
      'vue/dist/vue.esm.js'
    ]
  },
  output: {
    path: path.join(__dirname, '../static/js/'), // 生成的文件存放路径
    filename: 'dll.[name].[chunkhash].js', // 生成的文件名字(默认为dll.vendor.[hash].js)
    library: '[name]_[chunkhash]' // 生成文件的映射关系,与下面DllPlugin中配置对应
  },
  plugins: [
    new CleanWebpackPlugin(['dll','../static/js']),
    new webpack.DllPlugin({
      // 会生成一个json文件,里面是关于dll.js的一些配置信息
      path:path.join(__dirname, '../dll/[name]-manifest.json'),
      name: '[name]_[chunkhash]', // 与上面output中配置对应
      context: __dirname // 上下文环境路径(必填,为了与DllReferencePlugin存在与同一上下文中)
    }),
    new AssetsPlugin({  //
      filename: 'bundle-conf.json',
      path: './dll'
    })
  ]
}
- 安装依赖
npm i -D clean-webpack-plugin@latest assets-webpack-plugin@latest
5.在webpack.prod.conf.js文件下
const AddAssetHtmlPlugin = require('add-asset-html-webpack-plugin')
const CleanWebpackPlugin = require('clean-webpack-plugin')
const boundConf = require('../dll/bundle-conf.json') //bundle-confi.json目录结构要正确
const webpackConfig = merge(baseWebpackConfig, {
...
 plugins: [
    new CleanWebpackPlugin(['dist']),
      new webpack.DllReferencePlugin({
        context: __dirname,
        manifest: require('../dll/vendor-manifest.json')
      }),
    //这个主要是将生成的vendor.dll.js文件加上hash值插入到页面中。
    new AddAssetHtmlPlugin([{
      filepath: path.resolve(`./static/js/${boundConf.vendor.js}`),
      outputPath: utils.assetsPath('js'),
      publicPath: path.posix.join(config.build.assetsPublicPath, 'static/js'),
      includeSourcemap: false,
      hash: true,
    }]),
  ]
})
- 在
package.sjon下添加配置"build:dll": "node build/dll.js",
"scripts": {
    "dev": "webpack-dev-server --inline --progress --config build/webpack.dev.conf.js",
    "start": "npm run dev",
    "build": "node build/build.js",
    "build:dll": "node build/dll.js"
  },
6 只需第一次执行npm run build:dll,打包生成文件之后,以后就不需要在npm run build之前再npm run build:dll了


