回首个的20XX年!
抱歉,罗老师!再来一下~
回首个的20XX年。。
前期发布应用后,主要维护和更新App(悲伤辣么大~)。。后期又开始做Mac App!
本来想写一篇叫《Mac App常用的控件》的文章!结果整理发现一个NSButton都有点让人头痛。。
所以这篇文章就讲讲NSButton及其相应的应用!
最近这段时间一直在做Mac App。Mac App被叫做“Cocoa App”!(我习惯叫Mac App!)
创建时,长这样:
工程创建好,创建2个button,看看效果~:
NSButton * btn1 = [[NSButton alloc] initWithFrame:NSMakeRect(100, 100, 100, 100)];
[self.view addSubview:btn1];
[btn1 setTitle:@"dadfjkl"];
btn1.wantsLayer = YES;
btn1.layer.backgroundColor = [NSColor redColor].CGColor;

NSButton * btn2 = [[NSButton alloc] initWithFrame:NSMakeRect(200, 100, 100, 20)];
[self.view addSubview:btn2];
[btn2 setTitle:@"sdafd"];
btn2.wantsLayer = YES;
btn2.layer.backgroundColor = [NSColor cyanColor].CGColor;
运行的效果:
OK,开始研究其特征,咱就创建一堆button:
属性 - 边框样式NSBezelStyle:
typedef NS_ENUM(NSUInteger, NSBezelStyle) {
     NSBezelStyleRounded           = 1,
     NSBezelStyleRegularSquare     = 2,
     NSBezelStyleDisclosure        = 5,
     NSBezelStyleShadowlessSquare  = 6,
     NSBezelStyleCircular          = 7,
     NSBezelStyleTexturedSquare    = 8,
     NSBezelStyleHelpButton        = 9,
     NSBezelStyleSmallSquare       = 10,
     NSBezelStyleTexturedRounded   = 11,
     NSBezelStyleRoundRect         = 12,
     NSBezelStyleRecessed          = 13,
     NSBezelStyleRoundedDisclosure = 14,
    NSBezelStyleInline NS_ENUM_AVAILABLE_MAC(10_7) = 15,
};
将title设置为@"":
CGFloat margin = 2.f;
CGFloat total_W = NSWidth([self.view frame]);
for (int i = 0; i < 13; i ++) {
    CGFloat w = (total_W - margin*(CGFloat)(13-1))/(CGFloat)13;
    CGFloat x = i*(w+margin);
    CGFloat y = 5.f;
    CGFloat h = 20.f;
    NSButton * btn = [[NSButton alloc] initWithFrame:NSMakeRect(x, y, w, h)];
    [self.view addSubview:btn];
    [btn setTitle:@""];
    switch (i) {
        case 0:{
            [btn setBezelStyle:NSBezelStyleRounded];
        } break;
        case 1:{
            [btn setBezelStyle:NSBezelStyleRegularSquare];
        } break;
        case 2:{
            [btn setBezelStyle:NSBezelStyleDisclosure];
        } break;
        case 3:{
            [btn setBezelStyle:NSBezelStyleShadowlessSquare];
        } break;
        case 4:{
            [btn setBezelStyle:NSBezelStyleCircular];
        } break;
        case 5:{
            [btn setBezelStyle:NSBezelStyleTexturedSquare];
        } break;
        case 6:{
            [btn setBezelStyle:NSBezelStyleHelpButton];
        } break;
        case 7:{
            [btn setBezelStyle:NSBezelStyleSmallSquare];
        } break;
        case 8:{
            [btn setBezelStyle:NSBezelStyleTexturedRounded];
        } break;
        case 9:{
            [btn setBezelStyle:NSBezelStyleRoundRect];
        } break;
        case 10:{
            [btn setBezelStyle:NSBezelStyleRecessed];
        } break;
        case 11:{
            [btn setBezelStyle:NSBezelStyleRoundedDisclosure];
        } break;
        case 12:{
            [btn setBezelStyle:NSBezelStyleInline];
        } break;
        default:
            break;
    }
}
运行的效果:
注释掉“
[btn setTitle:@""];”与 将title设置为@"" 的对比:(展示标题与否)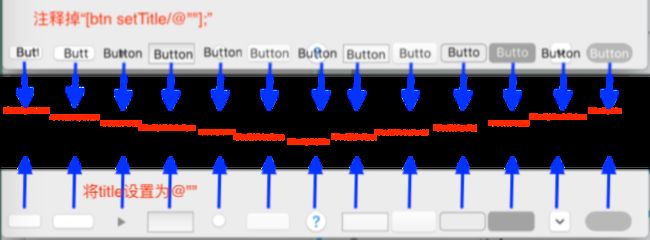
点击效果:
属性 - 按钮样式NSButtonType:
typedef NS_ENUM(NSUInteger, NSButtonType) {
    NSButtonTypeMomentaryLight    = 0,
    NSButtonTypePushOnPushOff     = 1,
    NSButtonTypeToggle            = 2,
    NSButtonTypeSwitch            = 3,
    NSButtonTypeRadio             = 4,
    NSButtonTypeMomentaryChange   = 5,
    NSButtonTypeOnOff             = 6,
    NSButtonTypeMomentaryPushIn   = 7,
    NSButtonTypeAccelerator NS_ENUM_AVAILABLE_MAC(10_10_3) = 8,
    NSButtonTypeMultiLevelAccelerator NS_ENUM_AVAILABLE_MAC(10_10_3) = 9,
};
咱还是创建一堆button:
CGFloat margin = 2.f;
CGFloat total_W = NSWidth([self.view frame]);
for (int i = 0; i < 10; i ++) {
    CGFloat w = (total_W - margin*(CGFloat)(10-1))/(CGFloat)10;
    CGFloat x = i*(w+margin);
    CGFloat y = 5.f;
    CGFloat h = 20.f;
    NSButton * btn = [[NSButton alloc] initWithFrame:NSMakeRect(x, y, w, h)];
    [self.view addSubview:btn];
    btn.wantsLayer = YES;
    btn.layer.backgroundColor = [NSColor redColor].CGColor;//背景色为红色
    [btn setBezelStyle:NSRoundedBezelStyle];//设置边框样式为‘圆状曲线’
    [btn setTitle:@""];
    switch (i) {
        case 0:{
            [btn setButtonType:NSButtonTypeMomentaryLight];
        } break;
        case 1:{
            [btn setButtonType:NSButtonTypePushOnPushOff];
        } break;
        case 2:{
            [btn setButtonType:NSButtonTypeToggle];
        } break;
        case 3:{
            [btn setButtonType:NSButtonTypeSwitch];
        } break;
        case 4:{
            [btn setButtonType:NSButtonTypeRadio];
        } break;
        case 5:{
            [btn setButtonType:NSButtonTypeMomentaryChange];
        } break;
        case 6:{
            [btn setButtonType:NSButtonTypeOnOff];
        } break;
        case 7:{
            [btn setButtonType:NSButtonTypeMomentaryPushIn];
        } break;
        case 8:{
            [btn setButtonType:NSButtonTypeAccelerator];
        } break;
        case 9:{
            [btn setButtonType:NSButtonTypeMultiLevelAccelerator];
        } break;
        default:
            break;
    }
}
运行的效果:

注释掉“
[btn setTitle:@""];”与 将title设置为@"" 的对比:(展示标题与否)
点击效果:
总结
0 (
NSButtonTypeMomentaryLight)、
2 (NSButtonTypeToggle)、
7 (NSButtonTypeMomentaryPushIn)
8 (NSButtonTypeAccelerator)
9 (NSButtonTypeMultiLevelAccelerator):
点击时会有 高亮的选中色(高亮状态)。1 (
NSButtonTypePushOnPushOff)、
6 (NSButtonTypeOnOff):
选中状态是蓝色,再次点击会恢复到原本的颜色。3 (
NSButtonTypeSwitch):
选中后,可取消选中(设置state)!(适合做多选。)4 (
NSButtonTypeRadio) :
选中后,不能取消选中(代码上设置state,可取消选中)!(适合做单选。)5 (
NSButtonTypeMomentaryChange):
点击时会有高亮状态(文字闪烁),但没有 高亮的选中色。
§§§§§§§§不设置边框样式
注释掉“[btn setBezelStyle:NSRoundedBezelStyle];//设置边框样式为‘圆状曲线’”
对应的效果: 注释掉“[btn setTitle:@""];”
注释掉“
[btn setTitle:@""];”与 将title设置为@"" 的对比:(展示标题与否)点击效果:
基本的使用如上,达到各种效果就需要组合属性来使用(当然还有其他属性)!
(2019.02.13)
(2021.05.02) 以上代码的效果肯定与现在编译you差异,没心思去改了,请见谅~
!拖泥马这么久,再写。。
| 设置按钮的背景色 |
|---|
Mac的控件,只能在layer层设置颜色 — 设置wantsLayer为YES,再通过.layer.backgroundColor设置颜色 |
NSButton * backColorBtn = [[NSButton alloc] initWithFrame:CGRectMake(100, 120, 100, 100)];
[self.view addSubview:backColorBtn];
backColorBtn.wantsLayer = YES;
backColorBtn.layer.backgroundColor = [NSColor redColor].CGColor;
[backColorBtn setBezelStyle:NSBezelStyleDisclosure];//格式1
//[backColorBtn setBezelStyle:NSBezelStyleCircular];//格式2
//[backColorBtn setBezelStyle:NSBezelStyleHelpButton];//格式3
[backColorBtn setTitle:@"标题"];
三种可看背景色的边框格式对应造型:NSBezelStyleDisclosure、NSBezelStyleCircular、NSBezelStyleHelpButton
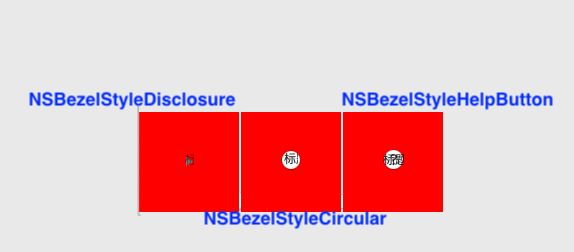
系统的Button造型不纯(控件NSButton系统自带的附带信息多)!但是设置按钮的背景色实际使用的意义不大!
非要实现设置按钮的背景色:可以在NSButton上添加一个视图(NSView \ NSImageView均可以)覆盖掉就好了(再封装个控件就好了),反正是不会响应鼠标事件的视图就可以!
NSView * addedV = [[NSView alloc] initWithFrame:backColorBtn.bounds];
addedV.wantsLayer = YES;
addedV.layer.backgroundColor = backColorBtn.layer.backgroundColor;
[backColorBtn addSubview:addedV];
[backColorBtn setTarget:self]; [backColorBtn setAction:@selector(clickBackColorBtn:)];
事件的响应:
-(void)clickBackColorBtn:(NSButton *)btn { NSLog(@"clickBackColorBtn"); }效果:交互无问题,美观有问题(有一个标题)!
有一个标题,影响美观为了到达如下效果:
纯色按钮
- 解决方法1:把
[backColorBtn setTitle:@"标题"];替换为[backColorBtn setTitle:@""];!直接不展示标题即可!- 解决方法2:添加
[backColorBtn setImage:[NSImage imageNamed:@"gyh_btn_nor"]];这一句代码,设置一张图片覆盖掉系统的控件!(需保证添加的图片尺寸能覆盖完系统的控件,但又不超出该按钮的范围)
为Button添加图片,进行覆盖
达到最终效果就废了这么多幺蛾子。。(再封装一下就可以搞个‘生成纯色按钮’的方法)当然这是我自己的的代码!有熟悉Mac OS开发的朋友有更好的方法来实现,可以交流一下!
搞这个玩意儿,意义真不大!
说意义不大的原因是:开发的软件产品一般不会用到纯色按钮的情况!
软件产品中大多可能用到无色(ClearColor)加上按钮的图片!
| 设置按钮的标题颜色及字体 |
|---|
(原理:为NSButton设置富文本属性—attributedTitle) |
为NSButton添加类别(NSButton+SetTitleFont),实现如下:
#import "NSButton+SetTitleFont.h"

@implementation NSButton (SetTitleFont)

-(void)setTitleColorToColor:(NSColor *)color andFontNum:(CGFloat)FontNum isBold:(BOOL)isBold {
    NSMutableParagraphStyle *paraStyle = [[NSMutableParagraphStyle alloc] init];
    [paraStyle setParagraphStyle:[NSParagraphStyle defaultParagraphStyle]];
    [paraStyle setAlignment:NSTextAlignmentCenter];
    //[paraStyle setLineBreakMode:NSLineBreakByTruncatingTail];
    NSFont * useFont = [NSFont systemFontOfSize:FontNum];
    if (isBold == YES) {
        useFont = [NSFont boldSystemFontOfSize:FontNum];
    }
    NSDictionary *attrButton = @{
                                 NSFontAttributeName : useFont,
                                 NSForegroundColorAttributeName : color,
                                 NSParagraphStyleAttributeName : paraStyle
                                 };
    NSAttributedString * btnString = [[NSAttributedString alloc] initWithString:self.title attributes:attrButton];

    self.attributedTitle = btnString;
}
使用如下:
NSButton * backColorBtn = [[NSButton alloc] initWithFrame:CGRectMake(100, 120, 150, 150)];
[self.view addSubview:backColorBtn];
[backColorBtn setTitle:@"标题title"];
[backColorBtn setTitleColorToColor:[NSColor blueColor] andFontNum:15.f isBold:YES];
效果如下:(蓝色、15号字体、加粗)
| 设置按钮的图片、按钮状态的控制 |
|---|
(setImage:方法-设置普通状态的图片 和 setAlternateImage:方法-设置选中状态的图片) |
常用状态—NSControlStateValueOff、NSControlStateValueOn |
实现功能:有一排操作按钮——前两项的选中只能是单选,最后一项点击鼠标后仅响应事件!
图片素材添加上:

设置全局变量:
@implementation ViewController {
    NSButton * _select_lineBtn;//选中的按钮
    NSArray * _titleArr;//所有项目的数组
}
实现功能:
_titleArr = @[@"文件",@"txt",@"goyohol"];//所有项目的数组
NSArray * norImgArr = @[@"file_btn_nor",@"txt_btn_nor",@"gyh_btn_nor"];//普通状态的图片
NSArray * selImgArr = @[@"file_btn_sel",@"txt_btn_sel",@"gyh_btn_sel"];//选中时的图片
float btn_Y = 20.f;
float btn_Width = 100.f;
float margin = btn_Width*(15.f/200.f);
for (int i = 0; i < _titleArr.count; i++) {
    float x = margin + i*(margin+btn_Width);
    NSButton * lineBtn = [[NSButton alloc] initWithFrame:CGRectMake(x, btn_Y, btn_Width, btn_Width)];
    [self.view addSubview:lineBtn];
    lineBtn.tag = 100 + I;
    lineBtn.layer.backgroundColor = [NSColor clearColor].CGColor;

    [lineBtn setTitle:@""];//[lineBtn setTitle:titleArr[i] ];//标题
    [lineBtn setToolTip:_titleArr[i] ];//悬停的提示
    [lineBtn setBezelStyle:NSBezelStyleCircular];
    lineBtn.bordered = NO;//设置为NO,点击不响应
    NSString * imgStr = norImgArr[I];
    [lineBtn setImage:[NSImage imageNamed:imgStr]];
    NSString * sel_imgStr = selImgArr[I];
    [lineBtn setAlternateImage:[NSImage imageNamed:sel_imgStr]];
    if (i == _titleArr.count - 1) {
        NSString * down_imgStr = selImgArr[I];
        [lineBtn setAlternateImage:[NSImage imageNamed:down_imgStr]];
    }

    [lineBtn setImagePosition:NSImageOnly];
    [lineBtn setButtonType:NSButtonTypeSwitch ];//按钮类型(可多选)
    [lineBtn setTarget:self];
    [lineBtn setAction:@selector(clickTheButton:)];
    lineBtn.layer.masksToBounds = YES;
    lineBtn.layer.cornerRadius = btn_Width/2.f;

    if (i == 0) { //第一项 设置为选中
        lineBtn.state = NSControlStateValueOn;
        _select_lineBtn = lineBtn;//设置为  选中的按钮
    }
}
点击这一排按钮的响应:
/** MARK:点击一排的按钮 */
-(void)clickTheButton:(NSButton *)sender {
    long selectTag = sender.tag - 100;

    if (selectTag != _titleArr.count - 1) {
        _select_lineBtn.state = NSControlStateValueOff;//设置为非选中  选中的按钮(一排)

        sender.state = NSControlStateValueOn;
        _select_lineBtn = sender;//设置为  选中的按钮(一排)
    } else { //最后一项 不可变为选中状态
        sender.state = NSControlStateValueOff;
    }

}
效果: 前两项的选中只能是单选,最后一项点击鼠标后仅响应点击事件!
Tips:设置“toolTip”属性——“
setToolTip:”方法:(鼠标悬停的提示,目前看来大部分控件都有此属性)设置“toolTip”属性后
| 常见 可选中(背景图)、含标题的按钮 |
|---|
图片放在最下面-setImagePosition:NSImageOverlaps、图片自动调整尺寸-setImageScaling:NSImageScaleAxesIndependently |
图片素材:
执行代码:
NSButton * selectBtn = [[NSButton alloc] initWithFrame:NSMakeRect(100, 100, 150, 50)];
[self.view addSubview:selectBtn];
[selectBtn setTitle:@"标题"];
[selectBtn setTitleColorToColor:[NSColor blackColor] andFontNum:15.f isBold:YES];
[selectBtn setBezelStyle:NSBezelStyleCircular];
[selectBtn setButtonType:NSButtonTypeSwitch ];  //按钮类型(可多选)
[selectBtn setImagePosition:NSImageOverlaps];   //图片放在最下面
[selectBtn setImageScaling:NSImageScaleAxesIndependently];  //图片自动调整尺寸
[selectBtn setImage:[NSImage imageNamed:@"unit_btn_nor"]];
[selectBtn setAlternateImage:[NSImage imageNamed:@"unit_btn_sel"]];
效果:单击可切换按钮的状态—选中/未选中
NSButton内部的层次关系:
未选中状态选中状态
| 按下不变色,标题会改变 |
|---|
关键代码:btn.cell setHighlightsBy:NSNoCellMask!(但不能调用setButtonType:方法,设置按钮类型为NSButtonTypeOnOff、NSButtonTypePushOnPushOff这种开关状态类型! |
NSButton * backGroundBtn = [[NSButton alloc] initWithFrame:NSMakeRect(100, 100, 100, 50)];
[self.view addSubview:backGroundBtn];
[backGroundBtn setTitle:@"未选中"];
[backGroundBtn setTarget:self];   [backGroundBtn setAction:@selector(clickToBackGroundBtn:)];
[backGroundBtn setBezelStyle:NSBezelStyleRegularSquare];
[backGroundBtn.cell setHighlightsBy:NSNoCellMask];//设置高亮状态:按下 不变色
按钮的响应方法:
-(void)clickToBackGroundBtn:(NSButton *)btn {
    NSString * logStr = @"";
    switch (btn.state) {
        case NSControlStateValueMixed:
            logStr = @"NSControlStateValueMixed";
            break;
        case NSControlStateValueOff:
            logStr = @"NSControlStateValueOff";
            break;
        case NSControlStateValueOn:
            logStr = @"NSControlStateValueOn";
            break;
        default:
            break;
    }
    NSLog(@"btn.state:%@",logStr);
    if (btn.state == NSControlStateValueOn) {
        [btn setTitle:@"未选中"];
    } else {
        [btn setTitle:@"选中"];
    }
}
效果:按钮按下不变色,标题会根据按钮状态而改变!

Tips:按钮A拥有按下不变色的特性,还可以将按钮A作为(不变色的)绝缘的背景视图!
由于按钮A隔绝了其他鼠标事件的传递!所以点击按钮A(或在按钮A上操作子控件时误触按钮A),不会影响按钮A的父视图(鼠标事件将不会传递到父视图)!
| 按钮类型(单选) |
|---|
调用setButtonType:方法,设置按钮类型为NSButtonTypeRadio!再对按钮的状态进行控制! |
界面布局代码:
//"暗黑模式:"Label
CGFloat DarkMode_LB_X = 10.f, DarkMode_LB_Y = 10.f, DarkMode_LB_W = 70.f, DarkMode_LB_H = 20.f;
NSTextField * _DarkMode_Label = [[NSTextField alloc] initWithFrame:NSMakeRect(DarkMode_LB_X, DarkMode_LB_Y, DarkMode_LB_W, DarkMode_LB_H)];
[self.view addSubview:_DarkMode_Label];
_DarkMode_Label.backgroundColor = [NSColor clearColor];
_DarkMode_Label.editable = NO;
_DarkMode_Label.bordered = NO;
_DarkMode_Label.alignment = NSTextAlignmentLeft;
_DarkMode_Label.stringValue = @"暗黑模式:";
_DarkMode_Label.font = [NSFont systemFontOfSize:13.f];
//"开启"按钮(“暗黑模式”)
CGFloat selectBtn_W = 50.f;      CGFloat selectBtn_H = 20.f;
CGFloat on_DarkMode_Btn_X = CGRectGetMaxX(_DarkMode_Label.frame);
CGFloat on_DarkMode_Btn_Y = CGRectGetMinY(_DarkMode_Label.frame);
_on_DarkMode_Btn = [[NSButton alloc] initWithFrame:NSMakeRect(on_DarkMode_Btn_X, on_DarkMode_Btn_Y, selectBtn_W, selectBtn_H)];
[self.view addSubview:_on_DarkMode_Btn];       //"开启"按钮(“暗黑模式”)
[_on_DarkMode_Btn setTitle:@"开启"];
[_on_DarkMode_Btn setButtonType:NSButtonTypeRadio];//按钮类型(单选)
[_on_DarkMode_Btn setTarget:self];
[_on_DarkMode_Btn setAction:@selector(clickToTurnOnDarkModeButtonSelect)];   //"开启"按钮(“暗黑模式”)-选中
_on_DarkMode_Btn.state = NSControlStateValueOn;
//"关闭"按钮(“暗黑模式”)
CGFloat off_DarkMode_Btn_X = CGRectGetMaxX(_on_DarkMode_Btn.frame);
CGFloat off_DarkMode_Btn_Y = CGRectGetMinY(_on_DarkMode_Btn.frame);
_off_DarkMode_Btn = [[NSButton alloc] initWithFrame:NSMakeRect(off_DarkMode_Btn_X, off_DarkMode_Btn_Y, selectBtn_W, selectBtn_H)];
[self.view addSubview:_off_DarkMode_Btn];     //"关闭"按钮(“暗黑模式”)
[_off_DarkMode_Btn setTitle:@"关闭"];
[_off_DarkMode_Btn  setButtonType:NSButtonTypeRadio];//按钮类型(单选)
[_off_DarkMode_Btn setTarget:self];
[_off_DarkMode_Btn setAction:@selector(clickToTurnOffDarkModeButtonDisSelect)];//"关闭"按钮(“暗黑模式”)-选中
_off_DarkMode_Btn.state = NSControlStateValueOff;
按钮的响应事件:
-(void)clickToTurnOnDarkModeButtonSelect {      //"开启"按钮(“暗黑模式”)-选中
    _on_DarkMode_Btn.state = NSControlStateValueOn;
    _off_DarkMode_Btn.state = NSControlStateValueOff;
}
-(void)clickToTurnOffDarkModeButtonDisSelect {  //"关闭"按钮(“暗黑模式”)-选中
    _on_DarkMode_Btn.state = NSControlStateValueOff;
    _off_DarkMode_Btn.state = NSControlStateValueOn;
}
效果:"开启"或"关闭"只能选中一个!
后续有关于NSButton总结的内容,再更新吧~
goyohol's essay