yolox Head-Decoupled head源码解读
目录
前言
yolox网络结构
yolox head网络结构
head组件及对应源码
解码
前言
yolox backbone部分介绍
yolox neck部分介绍
yolox:https://github.com/Megvii-BaseDetection/YOLOX
yolox详细解读可参考:https://jishuin.proginn.com/p/763bfbd628ce
yolox网络结构
yolox head网络结构
head组件及对应源码
三个大分支输入的是三种尺度特征图,自下而上分别对应前面提到的backbone输出的dark3, dark4, dark5。尺度由大到小,堆叠成金字塔型。
(1)每个分支的开头是一个CBL,是一个1x1的卷积,目的是通道降维。
# stem
self.stems = nn.ModuleList()  # 1x1卷积

# 3个不同尺度的输出分支(对应dark3, dark4, dark5),期间用到的组件都是一样的。
for i in range(len(in_channels)):  # 3个通道数,开头1x1的卷积会用到。对应三种尺度输出,
	self.stems.append(
		BaseConv(
			in_channels=int(in_channels[i] * width),
			out_channels=int(256 * width),
			ksize=1,
			stride=1,
			act=act,
		)
	)
(2)然后是两个分支,一个是分类分支,一个是回归分支。都是开头2个CBL
# conv
self.cls_convs = nn.ModuleList()  # 两个3x3的卷积
self.reg_convs = nn.ModuleList()  # 两个3x3的卷积

# 3个不同尺度的输出分支(对应dark3, dark4, dark5),期间用到的组件都是一样的。
for i in range(len(in_channels)):  # 3个通道数,开头1x1的卷积会用到。对应三种尺度输出,
	self.cls_convs.append(
		nn.Sequential(
			*[
				Conv(in_channels=int(256 * width),out_channels=int(256 * width),ksize=3,stride=1,act=act,),
				Conv(in_channels=int(256 * width),out_channels=int(256 * width),ksize=3,stride=1,act=act,),
			]
		)
	)
	self.reg_convs.append(
		nn.Sequential(
			*[
				Conv(in_channels=int(256 * width),out_channels=int(256 * width),ksize=3,stride=1,act=act,
				),
				Conv(in_channels=int(256 * width),out_channels=int(256 * width),ksize=3,stride=1,act=act,
				),
			]
		)
	)
(3)然后紫色的组件,这是1x1的卷积,目的是将特征的channel维度变成指定数量。
# pred
self.cls_preds = nn.ModuleList()  # 一个1x1的卷积,把通道数变成类别数,比如coco 80类
self.reg_preds = nn.ModuleList()  # 一个1x1的卷积,把通道数变成4通道,因为位置是xywh.
self.obj_preds = nn.ModuleList()  # 一个1x1的卷积,把通道数变成1通道,通过一个值即可判断有无目标.

# 3个不同尺度的输出分支(对应dark3, dark4, dark5),期间用到的组件都是一样的。
for i in range(len(in_channels)):  # 3个通道数,开头1x1的卷积会用到。对应三种尺度输出,
	self.cls_preds.append(
		nn.Conv2d(
			in_channels=int(256 * width),out_channels=self.n_anchors * self.num_classes,kernel_size=1,stride=1,padding=0,
		)
	)
	self.reg_preds.append(
		nn.Conv2d(in_channels=int(256 * width),out_channels=4,kernel_size=1,stride=1,padding=0,
		)
	)
	self.obj_preds.append(
		nn.Conv2d(in_channels=int(256 * width),out_channels=self.n_anchors * 1,kernel_size=1,stride=1,padding=0,
		)
	)
(4)concat + reshape + concat + transpose
- 黄色的concat组件,是把分类和回归结果按channel维度,即dim=1拼接;
- 然后是reshape,将特征图展平成向量,(b,c,h,w) -> (b,c, h*w),h*w即预测anchor个数;
- 按dim=2,concat不同尺度下的输出,(b,c, h*w) -> (b,c, num_anchors);
- 然后是转置操作,(b,c, num_anchors) -> (b, num_anchors, c)。
对应的代码很简洁,如下。
# channel维度,将分类和回归分支结果拼接。
output = torch.cat(
	[reg_output, obj_output.sigmoid(), cls_output.sigmoid()], 1
)

# 1, reshape + concat + transpose, (b,c,h,w) -> (b,c,h*w) -> (b,c, ?) -> (b, ?, c)
outputs = torch.cat(
	[x.flatten(start_dim=2) for x in outputs], dim=2
).permute(0, 2, 1)
如上图,转置之后的输出维度是(b, num_anchors, c),其中每一行是一个预测的anchor信息。后面就是解码,即将这些输入翻译成对应的预测框。
解码
对网络的输出进行解码,这里需要解码信息是回归的位置信息(分类信息不需要解码),因为输出的xywh是相对位置,简单来说解码过程就是(x+x_c, y+y_c, w, h) * stride,即预测的相对于网格左上角偏移的位置加上网格的位置,再乘以下采样倍数,映射到原图位置。解码模块的输入是 (b, num_anchors, c)
# 2, decode
if self.decode_in_inference:
	return self.decode_outputs(outputs, dtype=xin[0].type())
else:
	return outputs
解码代码非常精简,很是服气!拜读了!
def decode_outputs(self, outputs, dtype):
	grids = []  # 所有网格行列号位置。
	strides = []  # 所有网格的下采样倍数。
	# 计算每个尺度下所有网格的位置和对应的下采样倍数
	for (hsize, wsize), stride in zip(self.hw, self.strides):  # 特征图尺度,下采样倍数
		# yv和xv分别存储了每个网格的行和列。shape都是(hsize, wsize)
		yv, xv = torch.meshgrid([torch.arange(hsize), torch.arange(wsize)])

		# (hsize, wsize) -> (hsize, wsize, 2) -> (1, hsize*wsize, 2)
		# 这样每一行对应的是一个网络的行列号。
		grid = torch.stack((xv, yv), 2).view(1, -1, 2)  # (1, hsize*wsize, 2)

		# 存储每个尺度下所有网格的位置和对应的下采样倍数
		grids.append(grid)
		shape = grid.shape[:2]
		strides.append(torch.full((*shape, 1), stride))  # (1, hsize*wsize, 1) 存储放大倍数

	# 多个(1,hsize*wsize,2) -> (1,all_num_grids,2),并转换类型。主要是把所有不同尺度下的网格位置信息拼接起来。
	grids = torch.cat(grids, dim=1).type(dtype)
	strides = torch.cat(strides, dim=1).type(dtype)  # 同理。 多个(1,hsize*wsize,1) -> (1,all_num_grids,1)

	# x,y位置偏移outputs[..., :2], shape=(1, all_num_grids, 2)
	# grids所有网格的xy行列号, shape=(1, all_num_grids, 2)
	# strides所有网格的下采样倍数, shape=(1, all_num_grids, 1)
	outputs[..., :2] = (outputs[..., :2] + grids) * strides  # 乘以strides,映射到原图尺度下的xy位置。
	outputs[..., 2:4] = torch.exp(outputs[..., 2:4]) * strides  # wh, 乘以strides,映射到原图尺度下的anchor尺度。
	return outputs
其中有两行代码生成每个网格xy行列号位置信息和其对应的下采样倍数,示例如下。
比如,网格个数是2行4列
a, b = torch.meshgrid([torch.arange(2), torch.arange(4)])
a
tensor([[0, 0, 0, 0],
        [1, 1, 1, 1]])
b
tensor([[0, 1, 2, 3],
        [0, 1, 2, 3]])

grid = torch.stack((a, b), 2).view(1, -1, 2)
grid
tensor([[[0, 0],
         [0, 1],
         [0, 2],
         [0, 3],
         [1, 0],
         [1, 1],
         [1, 2],
         [1, 3]]])
求loss
网络分类层输出没有经过sigmoid.
(1)首先,head部分会将分类和回归concat
output = torch.cat([reg_output, obj_output, cls_output], 1)(2)然后,映射位置到原图尺度。
pred[..., :2] = (pred[..., :2] + grid) * stride  # xy, 这里xy也是没有经过sigmoid,网络应该是直接输出相对位置(0-1)。
pred[..., 2:4] = torch.exp(pred[..., 2:4]) * stride  # wh, e(x)指数函数。
a,初步正样本提取
根据锚框中心点来判断。 规则:寻找anchor_box中心点,落在ground_truth_boxes矩形范围的所有anchors。
(1)计算网格锚框在原图尺度下的中心位置。
# x_shifts: Tensor. (1, 8400). [[0.,1.,2.,...,17.,18.,19.]]
# y_shifts: Tensor. (1, 8400). [[0.,0.,0.,...,19.,19.,19.]]
x_centers_per_image = (x_shifts[0] + 0.5) * expanded_strides_per_image. [8400]
y_centers_per_image = (y_shifts[0] + 0.5) * expanded_strides_per_image. [8400]
(2)计算ground_true目标框范围,即左上角坐标,和右下角坐标。
# groundtruth [x_c,y_c,w,h] -> [l, r, t, b]
gt_bboxes_per_image_l = (  # l: x_c - 0.5*w. (3, 8400)
	(gt_bboxes_per_image[:, 0] - 0.5 * gt_bboxes_per_image[:, 2]).unsqueeze(1).repeat(1, total_num_anchors))

gt_bboxes_per_image_r = (  # r: x_c + 0.5*w
	(gt_bboxes_per_image[:, 0] + 0.5 * gt_bboxes_per_image[:, 2]).unsqueeze(1).repeat(1, total_num_anchors))

gt_bboxes_per_image_t = (  # t: y - 0.5*h. (3, 8400)
	(gt_bboxes_per_image[:, 1] - 0.5 * gt_bboxes_per_image[:, 3]).unsqueeze(1).repeat(1, total_num_anchors)
)

gt_bboxes_per_image_b = (  # b: y + 0.5*h.
	(gt_bboxes_per_image[:, 1] + 0.5 * gt_bboxes_per_image[:, 3]).unsqueeze(1).repeat(1, total_num_anchors)
)
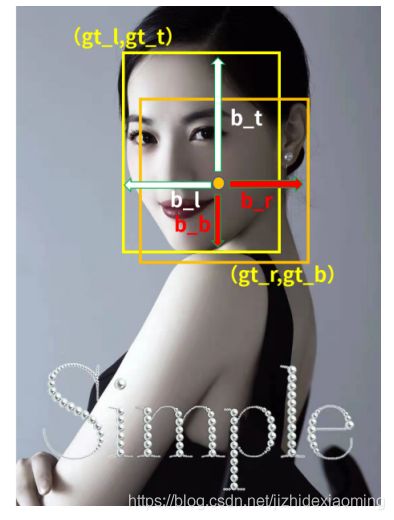
(3)计算锚框中心点和标注框边界的距离。如下图所示。
b_l = x_centers_per_image - gt_bboxes_per_image_l
b_r = gt_bboxes_per_image_r - x_centers_per_image
b_t = y_centers_per_image - gt_bboxes_per_image_t
b_b = gt_bboxes_per_image_b - y_centers_per_image

bbox_deltas = torch.stack([b_l, b_t, b_r, b_b], 2)
is_in_boxes = bbox_deltas.min(dim=-1).values > 0.0
is_in_boxes_all = is_in_boxes.sum(dim=0) > 0
待续。。。


