本文旨在通过介绍一个接口改造需求的实现过程,分享下笔者在读、改Fabric源码中积累的一点心得,偏颇之处,欢迎指正
需求:
拓展chaincode查询历史数据接口功能,增加分页功能
准备:
1、从Fabric fork一个自己的版本 (我选择的是 Fabric v1.2.0)
2、本地git clone
3、简单瞄一下源码
项目结构还算清晰,其中msp、orderer、peer目录可也理解为对应模块的入口,且与cli命令一一对应,比如说channel 命令 ,对比官网peer channel命令和源码peer/channel下的文件:
每条命令映射到一个文件,如何实现的?瞄一下 peer/main.go
import(
    ...
    "github.com/spf13/cobra"
    ...
)
cobra是一个用来生成CLI的强大工具,参见官网 https://github.com/spf13/cobra
找到入口,就可以在代码中完整的跟踪一个命令的执行过程
定位:
需求是扩展chaincode接口中的历史数据查询接口,增加分页功能,直接定位到接口文件:core/chaincode/shim/interfaces.go
怎么定位,最简单的方法就是IDE中全文搜chaincode中常用方法GetArgs()
找到历史数据查询接口:
    // GetHistoryForKey returns a history of key values across time.
    // For each historic key update, the historic value and associated
    // transaction id and timestamp are returned. The timestamp is the
    // timestamp provided by the client in the proposal header.
    // GetHistoryForKey requires peer configuration
    // core.ledger.history.enableHistoryDatabase to be true.
    // The query is NOT re-executed during validation phase, phantom reads are
    // not detected. That is, other committed transactions may have updated
    // the key concurrently, impacting the result set, and this would not be
    // detected at validation/commit time. Applications susceptible to this
    // should therefore not use GetHistoryForKey as part of transactions that
    // update ledger, and should limit use to read-only chaincode operations.
    GetHistoryForKey(key string) (HistoryQueryIteratorInterface, error)
可以通过上面注释看到该函数的返回数据格式、配置、使用场景说明。
另外注意Fabric中的“历史数据”记录的是并不是所有数据的操作记录,而只是对"world state"即“世界状态”中的key-value数据新增或变化进行记录,历史数据库默认用的是leveldb,所以所有历史记录也是key-value数据,且value值为空,仅仅只有key,格式为ns?key?blockNo?tranNo,其中的问号指代分隔符,真正的分隔符为[]byte{0x00}。
这里可能会有点不太好理解,为什么历史记录只用key,value为空,两个原因:
第一,“历史数据”存的是key的create、update操作对应的blockID、transactionID,不复杂;
第二,leveldb适合“随机写、顺序读/写”,其中的顺序读指的是按字符大小顺序,ns?key?blockNo?tranNo存储刚好满足范围查询时的顺序读特性。
调用流程
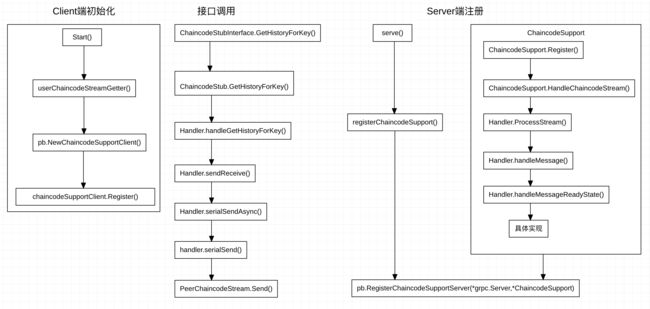
前面定位了接口位置,真正要做改造优化,还需要知道整个接口的实现过程,也就是调用流程。
上面是笔者总结的一个简单的chaincode接口调用peer具体实现的过程,通信采用protobuf+gRPC(没有接触过的同学建议先了解下),client相关函数主要在core/chaincode/shim的interfaces.go、handler.go、chaincode.go,server相关函数主要在core/chaincode下面的handler.go、chaincode_support.go。
注意两点:
一个是gRPC server端的注册
protobuf文件protos/peer/chaincode_shim.proto,对应的go文件即同目录下的同名.go文件,点击查看chaincode_shim.proto文件
// Interface that provides support to chaincode execution. ChaincodeContext
// provides the context necessary for the server to respond appropriately.
service ChaincodeSupport {
rpc Register(stream ChaincodeMessage) returns (stream ChaincodeMessage) {}
}
发现只声明了一个函数,且客户端服务端都使用stream通信,
该函数服务端实现在chaincode_support.go下:
// Register the bidi stream entry point called by chaincode to register with the Peer.
func (cs *ChaincodeSupport) Register(stream pb.ChaincodeSupport_RegisterServer) error {
    return cs.HandleChaincodeStream(stream.Context(), stream)
}
可以追踪HandleChaincodeStream()方法,
--->handler.ProcessStream()
--->handler.handleMessage()
--->handler.handleMessageCreatedState() or handler.handleMessageReadyState()
以后者为例
func (h *Handler) handleMessageReadyState(msg *pb.ChaincodeMessage) error {
    switch msg.Type {
    case pb.ChaincodeMessage_COMPLETED, pb.ChaincodeMessage_ERROR:
        h.Notify(msg)
    case pb.ChaincodeMessage_PUT_STATE:
        go h.HandleTransaction(msg, h.HandlePutState)
    case pb.ChaincodeMessage_DEL_STATE:
        go h.HandleTransaction(msg, h.HandleDelState)
    case pb.ChaincodeMessage_INVOKE_CHAINCODE:
        go h.HandleTransaction(msg, h.HandleInvokeChaincode)
    case pb.ChaincodeMessage_GET_STATE:
        go h.HandleTransaction(msg, h.HandleGetState)
    case pb.ChaincodeMessage_GET_STATE_BY_RANGE:
        go h.HandleTransaction(msg, h.HandleGetStateByRange)
    case pb.ChaincodeMessage_GET_QUERY_RESULT:
        go h.HandleTransaction(msg, h.HandleGetQueryResult)
    case pb.ChaincodeMessage_GET_HISTORY_FOR_KEY:
        go h.HandleTransaction(msg, h.HandleGetHistoryForKey)
    case pb.ChaincodeMessage_QUERY_STATE_NEXT:
        go h.HandleTransaction(msg, h.HandleQueryStateNext)
    case pb.ChaincodeMessage_QUERY_STATE_CLOSE:
        go h.HandleTransaction(msg, h.HandleQueryStateClose)
    default:
        return fmt.Errorf("[%s] Fabric side handler cannot handle message (%s) while in ready state", msg.Txid, msg.Type)
    }
    return nil
}
即可定位到server端的具体实现方法。
一个是Client端的初始化
入口是chaincode.go 下的start(),即每个合约文件的main方法中都会调用的方法,由上图所述,追踪到userChaincodeStreamGetter(),其中的:
...
// Establish connection with validating peer
    clientConn, err := newPeerClientConnection()
...
    chaincodeSupportClient := pb.NewChaincodeSupportClient(clientConn)
    // Establish stream with validating peer
    stream, err := chaincodeSupportClient.Register(context.Background())
...
即实现gRPC Client端的初始化,并调用pb文件中声明的唯一方法,建立跟peer节点注册的server端的通信。
OK,大体的调用流程搞明白,再聚焦到GetHistoryForKey()的实现,通过上面的说明,快速定位到corechincode/handler.go 中的 HandleGetHistoryForKey()方法中的
historyIter, err := txContext.HistoryQueryExecutor.GetHistoryForKey(chaincodeName, getHistoryForKey.Key)
注意其中的historyleveldb_test.go,改造后的代码可以先在test文件中验证,前提是代码执行本地安装了docker。
回到代码
// GetHistoryForKey implements method in interface `ledger.HistoryQueryExecutor`
func (q *LevelHistoryDBQueryExecutor) GetHistoryForKey(namespace string, key string) (commonledger.ResultsIterator, error) {

    if ledgerconfig.IsHistoryDBEnabled() == false {
        return nil, errors.New("History tracking not enabled - historyDatabase is false")
    }

    var compositeStartKey []byte
    var compositeEndKey []byte
    compositeStartKey = historydb.ConstructPartialCompositeHistoryKey(namespace, key, false)
    compositeEndKey = historydb.ConstructPartialCompositeHistoryKey(namespace, key, true)

    // range scan to find any history records starting with namespace~key
    dbItr := q.historyDB.db.GetIterator(compositeStartKey, compositeEndKey)
    return newHistoryScanner(compositeStartKey, namespace, key, dbItr, q.blockStore), nil
}
可以看到,这里通过构造compositeStartKey,compositeEndKey获取指定范围的iterator。
瞄一下构造key的方法
var compositeKeySep = []byte{0x00}

//ConstructPartialCompositeHistoryKey builds a partial History Key namespace~key~
// for use in history key range queries
func ConstructPartialCompositeHistoryKey(ns string, key string, endkey bool) []byte {
    var compositeKey []byte
    compositeKey = append(compositeKey, []byte(ns)...)
    compositeKey = append(compositeKey, compositeKeySep...)
    compositeKey = append(compositeKey, []byte(key)...)
    compositeKey = append(compositeKey, compositeKeySep...)
    if endkey {
        compositeKey = append(compositeKey, []byte{0xff}...)
    }
    return compositeKey
}
注意endkey,前面说过,历史数据是按(key=ns?key?blockNo?tranNo,value=nil)的格式存储在leveldb上,这里的?指代的就是上面的分隔符[]byte{0x00},endkey []byte{0xff}就是byte格式的最大值,这样就能查询出ns?key?开头的所有key值。
继续切入,最终定位到iterator的生成方法:
// GetIterator returns an iterator over key-value store. The iterator should be released after the use.
// The resultset contains all the keys that are present in the db between the startKey (inclusive) and the endKey (exclusive).
// A nil startKey represents the first available key and a nil endKey represent a logical key after the last available key
func (dbInst *DB) GetIterator(startKey []byte, endKey []byte) iterator.Iterator {
    return dbInst.db.NewIterator(&goleveldbutil.Range{Start: startKey, Limit: endKey}, dbInst.readOpts)
}
注释里有对iterator的startkey,endkey不同情况的详细说明。一个是对iterator区间是封前不封后,二是如果startKey为nil表示区间从第一个可用值开始,endKey为nil表示区间以最后一个有效值的后一位结束,还有就是iterator不用的话要close()。
源码改造
好了,函数调用过程和具体实现都已解析完毕,接下来就是改源码,实现需求了。
实现分页,无非就是拓展GetHistoryForKey()方法,个人建议另外声明一个函数实现而不对原函数做修改。
简单实现,直接新建接口GetHistoryForKeyByPage(),并在入参中加入分页需要的参数,如下:
GetHistoryForKeyByPage(key string, currentPage int64, pageSize int64) (HistoryQueryIteratorInterface, error)
这里仅仅加入当前页和页容量两个参数,如果有别的需求可以直接改为传入一个通用的option结构体。
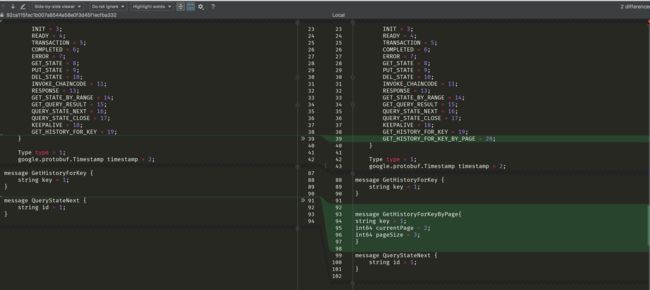
之后就是参照GetHistoryForKey()函数相继增加后继的实现函数。注意Client端调用的函数增加很简单,直接仿照GetHistoryForKey()实现即可,Server端的修改涉及的内容较多,一个是chaincode_shim.proto文件修改: 修改完用protoc工具生成新的chaincode_shim.pb.go文件。二是要在core/chaincode/handler.go的handleMessageReadyState()分发函数中增加新的函数分支最终的实现放在leveldb_helper.go ,具体实现笔者就不放上来啦,简单思路就是遍历iterator,根据currentPage,pageSize做截取。
编译部署
最后一环节就是编译部署,修改源码后必须要重新编译打包成docker,再次部署才能生效。
里面命令较多,有兴趣可以都试试,涉及到重编译和生成docker的已在图中标出,例如,修改了peer工程下的代码,编译&docker生成只要 执行:
make peer && make peer-docker
但是我们这里修改的文件大多在core目录下,少量common目录,那就要执行:
make clean && make docker
测试
两种测试方法,一种是前面说的,在historyleveldb_test.go中写单元测试函数,可仿照TestHistory()对新分页函数做测试,一种是编写新chaincode,部署后通过cli或者sdk测试,具体可参见我的上一篇博客 https://www.jianshu.com/p/e16345cc2cde
tips:
追加需求,对历史数据增加按时间戳查询条件,如何实现?
十秒钟过了,有思路了么,思路其实不难,重新构造key的格式,追加timestamp字段,定位到historyleveldb.go commit()方法,修改key的构建方式:
...
            // for each transaction, loop through the namespaces and writesets
            // and add a history record for each write
            for _, nsRWSet := range txRWSet.NsRwSets {
                ns := nsRWSet.NameSpace

                for _, kvWrite := range nsRWSet.KvRwSet.Writes {
                    writeKey := kvWrite.Key


                    //composite key for history records is in the form ns~key~blockNo~tranNo
                    //compositeHistoryKey := historydb.ConstructCompositeHistoryKey(ns, writeKey, blockNo, tranNo)

                    //composite key for history records is in the form ns~key~timestamp~blockNo~tranNo
                    compositeHistoryKey := historydb.ConstructCompositeHistoryKeyTimestamp(ns, writeKey, chdr.GetTimestamp(),blockNo, tranNo)

                    // No value is required, write an empty byte array (emptyValue) since Put() of nil is not allowed
                    dbBatch.Put(compositeHistoryKey, emptyValue)
                }
            }
...
当然,之后的查询实现都要做修改。


