如今运维人员都在强调自动化,降低运维成本。尽管现在搭建一套运维自动化体系架构并不难,然后有些工作还是必须需要运维手动工作,比如上线动作(上线的过程自动化,但是操作点由谁来操作,比如jenkins上谁去点击构建),或者偶尔有开发或测试会在直接找你手动更改数据操作,这些暂时都必须人为手动操作。次数多了,难免会想这些怎么去实现自动化,无需人为干预!知道有次在钉钉群有人添加生活机器人,互动回复天气情况。当时我在想后面的逻辑肯定是,当机器人收到指定后,自动调第三方接口,将数据返回。如果这个接口是我自己编写,实现自己的功能,不就可以将一些手动任务直接让机器人去执行了!换句话说,下次开发有条sql要执行,别@我,直接@机器人,然后机器人直接将sql执行,然后返回给对应的开发就完美了!还别说,真有人在做这样的事情,那就是Hubot。一些相关细节早就有人发过博客,我就不啰嗦了,请自动百度!以下是我尝试使用机器人,去模拟实现我目前工作中的一些简单任务。
一,安装nodejs,过程略
[bot@k8s-node1 scripts]$ node -v
v8.11.2
[bot@k8s-node1 scripts]$
[bot@k8s-node1 scripts]$ npm -version
6.4.1
[bot@k8s-node1 scripts]$
二,安装redis
hubot一些底层数据会默认存储在本机localhost:6379中,测试功能中,一切随简
[bot@k8s-node1 scripts]$ ps -ef | grep redis
redis    109616      1  0 Oct16 ?        00:04:22 /usr/bin/redis-server 127.0.0.1:6379
bot      111413  89457  0 15:39 pts/0    00:00:00 grep --color=auto redis
三,安装hubot,过程比较简单
npm install –y generator-hubot yo
mkdir myhubot && cd myhubot
yo hubot
正常启动如下图

如果能看到上图说明hubot部署成功
当前文件下的文件如下
drwxrwxr-x.   2 bot bot    36 Oct 17 15:47 bin
-rw-rw-r--.   1 bot bot   288 Oct 17 16:30 external-scripts.json
-rw-rw-r--.   1 bot bot     0 Oct 18 14:12 hubot.log
-rw-rw-r--.   1 bot bot     2 Jul 19 17:51 hubot-scripts.json
drwxrwxr-x. 102 bot bot  4096 Oct 17 15:49 node_modules
-rw-------.   1 bot bot  6703 Oct 18 15:52 nohup.out
-rw-r--r--.   1 bot bot   694 Oct 17 13:14 package.json
-rw-rw-r--.   1 bot bot 28437 Oct 17 15:49 package-lock.json
-rw-r--r--.   1 bot bot    27 Jul 19 17:51 Procfile
-rw-r--r--.   1 bot bot  7856 Jul 19 17:51 README.md
drwxrwxr-x.   2 bot bot    85 Oct 18 13:25 scripts
-rw-rw-r--.   1 bot bot   401 Oct 16 17:26 touser.coffee
node_modules 目录是存放npm install packagename 第三方包的存放目录
external-scripts.json 将安装玩的第三方包要添加到此配置文件
scripts 文件夹用户存放用户自定义的,机器人能“读懂”的指令,具体使用情况请查看github地址:https://github.com/hubotio/hubot/blob/master/docs/scripting.md
启动:
[bot@k8s-node1 scripts]$ nohup ./bin/hubot -a bearychat 2&1> hubot.log
四,与聊天机器人结合
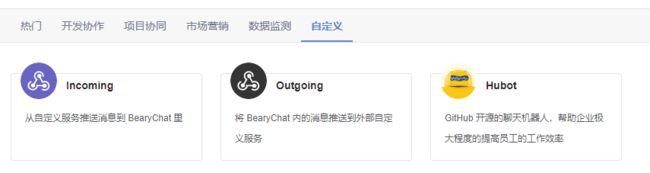
既然hubot作为聊天机器人,那么肯定要结合聊天工具,才能真正的实际意义。可惜的是国内办公聊天工具如钉钉,微信(如果算的话)官方暂未支持hubot机器人。所以只能用替代工具测试hubot功能,https://bearychat.com/,倍洽相当于国内的slack,官方支持hubot机器人,免费。
在页面直接添加机器人
token和url要是与hubot机器人服务端配合的关键信息,url是机器人服务的url

在服务端添加环境变量
export PATH=$PATH:/usr/local/go/bin
export HUBOT_BEARYCHAT_TOKENS=75f1fa443b9219d4e7d646898booxx
export HUBOT_BEARYCHAT_MODE=rtm
export EXPRESS_PORT=8090
export HUBOT_JENKINS_URL=http://papapa.jenkins.com:8080
export HUBOT_JENKINS_AUTH=admin:admin
安装倍洽adapter
[bot@k8s-node1 scripts]$ npm install hubot-bearychat --save
重启hubot服务
测试如下

机器人能回复说明一切正常
模块测试
npm install hubot-script-shellcmd
在./node_modules/hubot-script-shellcmd/bash/handlers 目录中添加自己定义好的可执行文件
将包名添加到external-scripts.json文件,并重启服务

[bot@k8s-node1 handlers]$ ll
total 16
-rwxrwxr-x. 1 bot bot  18 Oct 16 16:06 disk
-rwxrwxr-x. 1 bot bot  66 Nov 10  2017 helloworld
-rwxrwxr-x. 1 bot bot  39 Oct 16 16:32 run
-rwxrwxr-x. 1 bot bot 168 Nov 10  2017 update
[bot@k8s-node1 handlers]$
1.查看本地第一个脚本
[bot@k8s-node1 handlers]$ cat disk
#!/bin/bash
df -h
[bot@k8s-node1 handlers]$
非常简单的一个查看磁盘使用情况脚本

这个模块好好利用还是非常强大的,比如可用配合工具一起使用
如在服务端安装ansible,mysql;甚至kubectl客户端。可以简化很多操作
2.测试ansible脚本
[bot@k8s-node1 handlers]$ cat /etc/ansible/hosts | grep -A2 test
[test]
192.168.138.131
[bot@k8s-node1 handlers]$ cat run
#!/bin/bash

sudo ansible test -m ping
[bot@k8s-node1 handlers]$
测试结果如下

个人认为好好利用这个模块,能做的事情还是很多的!
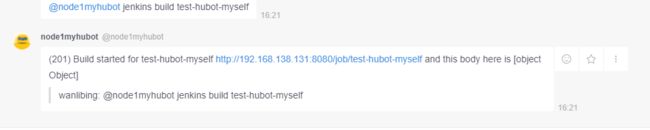
hubot-jenkins模块
[bot@k8s-node1 handlers]$ npm install hubot-jenkins
添加jenkins相关环境变量添加
export HUBOT_JENKINS_URL=http://papapa.jenkins.com:8080
export HUBOT_JENKINS_AUTH=admin:admin
重启hubot
测试结果如下

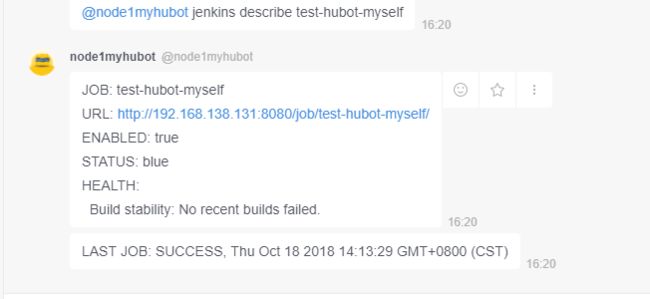
查看jenkins任务

正常构建
发起http请求
运维可以将一些负责的运维工作封装,暴露rest接口,通过机器人发送执行,发起请求;
测试如下
1.编写一个简单的接口
package main

import (
    "fmt"
    "net/http"
    "log"
    "encoding/json"
)

type job struct {
    Name string
    Counter int
    Execter string
}

func sayhelloName(w http.ResponseWriter, r *http.Request) {

    thisjob := job{
        Name: "soms",
        Counter: 19,
        Execter: "myself",
    }
    bytes, _ := json.Marshal(thisjob)
    fmt.Fprintf(w, string(bytes))
}

func main() {
    http.HandleFunc("/api/hubot", sayhelloName)
    err := http.ListenAndServe(":9898", nil)
    if err != nil {
        log.Fatal("ListenAndServe: ", err)
    }
}
测试接口

在scripts目录下添加脚本
http.coffee
module.exports = (robot) ->
  robot.respond /test http url get/i, (res) ->
    robot.http("http://172.21.53.67:9898/api/hubot")
      .header('Accept', 'application/json')
      .get() (err, response, body) ->
        data = JSON.parse body
        res.send "#{data.Name} build this job "
重启hubot服务
机器人测试如下

完美!一切都按照自己臆想的进行!
以上就是这次对hubot一些简单的探索,和尝试使用,当然还有很多强大的地方我没有写到,网友可以去github搜索hubot查看更深入的使用!这个实际是就是运维界有人推行的chatops理念,让机器人代理运维!但是这个理念推广的并不广泛,好多行业内的朋友都不知道这个东西!个人感觉这个还是很有可为,可以尝试在所在公司推广使用,但是必须要解决两个问题:权限问题,办公聊天工具支持!
码字,好累...