前言:
工作需要接入虹软人脸识别,刚开始接入时候真的有点头大,官网下载的demo都跑不通,文档写的也不是特别完善,遇到的问题也没有地方可以借鉴.
因为是OC语言的SDK,所以选择先用OC接入.功能实现之后再迁移成Swift语言.做个记录以作各位参考.也可以让我回头复习.
实现功能:
开启前置摄像头获取稳定人脸信息后截图并跳转至另一控制器
实现步骤:
1.在官方注册账号,注册App,并下载SDK拖入项目.
2.在.info文件中添加权限提示字段,
3.加入必需框架
4.将一个文件的后缀名改为.mm
5.激活引擎
6.使用AVFondation框架,实现CameraController,开启前置摄像头,并创建数据回调delegate
7.新建VideoCheckViewController,实现页面.
8.添加陀螺仪判断,以保证照片清晰度
9.在delegate回调中实现主要功能.
1.在官方注册账号,注册App,并下载SDK拖入项目.
注册App很重要,因为注册app需要账号的企业认证,所以官方的和我的demo里都不自带appID和SDKKey,需要填入自己公司申请的appID.
2.在.info文件中添加权限提示字段
!!!谨记,如果没添加权限提示,激活引擎时会返回错误: 94217未知错误
    NSCameraUsageDescription
    App需要您的相机权限
3.加入必需框架
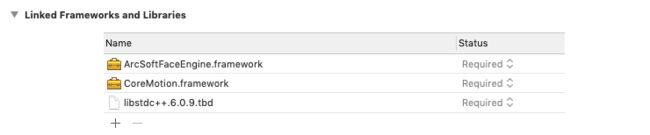
ArcSoftFaceEngine框架是虹软主体SDK,
libstdc++.6.0.9.tdb是它必需框架.
CoreMotion是开启陀螺仪传感器,不需要可以不加
4.将一个文件的后缀名改为.mm
由于虹软SDK采用了Objective-C++实现,需要保证工程中至少有一个.mm 后缀的源文件(可以将任意一个.m后缀的文件改名为.mm)
5.激活引擎
填入appid和sdkkey
-(void)engineActive:(UIButton*)sender {
    /// 虹软官网注册的appid
    NSString *appid = @"";
    NSString *sdkkey = @"";
    ArcSoftFaceEngine *engine = [[ArcSoftFaceEngine alloc] init];
    MRESULT mr = [engine activeWithAppId:appid SDKKey:sdkkey];
    if (mr == ASF_MOK) {
        UIAlertController* alertController = [UIAlertController alertControllerWithTitle:@"SDK激活成功" message:@"" preferredStyle:UIAlertControllerStyleAlert];
        [self presentViewController:alertController animated:YES completion:nil];
        [alertController addAction:[UIAlertAction actionWithTitle:@"确定" style:UIAlertActionStyleCancel handler:^(UIAlertAction *action) {
        }]];
    } else if(mr == MERR_ASF_ALREADY_ACTIVATED){
        UIAlertController* alertController = [UIAlertController alertControllerWithTitle:@"SDK已激活" message:@"" preferredStyle:UIAlertControllerStyleAlert];
        [self presentViewController:alertController animated:YES completion:nil];
        [alertController addAction:[UIAlertAction actionWithTitle:@"确定" style:UIAlertActionStyleCancel handler:^(UIAlertAction *action) {
        }]];
    } else {
        NSString *result = [NSString stringWithFormat:@"SDK激活失败:%ld", mr];
        UIAlertController* alertController = [UIAlertController alertControllerWithTitle:result message:@"" preferredStyle:UIAlertControllerStyleAlert];
        [self presentViewController:alertController animated:YES completion:nil];
        [alertController addAction:[UIAlertAction actionWithTitle:@"确定" style:UIAlertActionStyleCancel handler:^(UIAlertAction *action) {
        }]];
    }
}
6.使用AVFondation框架,实现CameraController,开启前置摄像头,并创建数据回调delegate
#import "ASFCameraController.h"
#import

@interface ASFCameraController ()
{
    /// AVCaptureSession是AVFoundation的核心类,用于捕捉视频和音频,协调视频和音频的输入和输出流.
    AVCaptureSession    *captureSession;
    /// 捕捉连接——AVCaptureConnection,捕捉连接负责将捕捉会话接收的媒体类型和输出连接起来
    AVCaptureConnection *videoConnection;
}
@end

@implementation ASFCameraController

#pragma mark capture
/// 输出流回调,开启相机后实时调用
- (void)captureOutput:(AVCaptureOutput *)captureOutput didOutputSampleBuffer:(CMSampleBufferRef)sampleBuffer fromConnection:(AVCaptureConnection *)connection
{
    if (connection == videoConnection) {
        /// 使用protocol将其回调到VideoCheckViewController
        if (self.delegate && [self.delegate respondsToSelector:@selector(captureOutput:didOutputSampleBuffer:fromConnection:)]) {
            [self.delegate captureOutput:captureOutput didOutputSampleBuffer:sampleBuffer fromConnection:connection];
        }
    }
}

#pragma mark - Setup Video Session
/// 设置数据源摄像头
- (AVCaptureDevice *)videoDeviceWithPosition:(AVCaptureDevicePosition)position
{
    NSArray *devices = [AVCaptureDevice devicesWithMediaType:AVMediaTypeVideo];
    for (AVCaptureDevice *device in devices)
        if ([device position] == position)
            return device;
    return nil;
}

- (BOOL) setupCaptureSession:(AVCaptureVideoOrientation)videoOrientation
{
    captureSession = [[AVCaptureSession alloc] init];
    /// beginConfiguration和commitConfiguration方法中的修改将在commit时同时提交
    [captureSession beginConfiguration];
    /// 设置摄像头为前置摄像头
    AVCaptureDevice *videoDevice = [self videoDeviceWithPosition:AVCaptureDevicePositionFront];
    AVCaptureDeviceInput *videoIn = [[AVCaptureDeviceInput alloc] initWithDevice:videoDevice error:nil];
    if ([captureSession canAddInput:videoIn])
        [captureSession addInput:videoIn];
    /// 设置输出流
    AVCaptureVideoDataOutput *videoOut = [[AVCaptureVideoDataOutput alloc] init];
    [videoOut setAlwaysDiscardsLateVideoFrames:YES];

    _previewLayer = [[AVCaptureVideoPreviewLayer alloc] initWithSession:captureSession];
    _previewLayer.videoGravity = AVLayerVideoGravityResizeAspectFill;
    /// 指定像素格式
    NSDictionary *dic = [NSDictionary dictionaryWithObject:[NSNumber numberWithInt:kCVPixelFormatType_420YpCbCr8BiPlanarFullRange] forKey:(id)kCVPixelBufferPixelFormatTypeKey];
    [videoOut setVideoSettings:dic];
    /// 开新线程进行输出流代理方法调用
    dispatch_queue_t videoCaptureQueue = dispatch_get_global_queue(DISPATCH_QUEUE_PRIORITY_HIGH,0);
    [videoOut setSampleBufferDelegate:self queue:videoCaptureQueue];
    /// 将输出流加入session
    if ([captureSession canAddOutput:videoOut])
        [captureSession addOutput:videoOut];
    videoConnection = [videoOut connectionWithMediaType:AVMediaTypeVideo];
    /// 设置镜像展示,不设置或赋值为false则获取图片是延垂直线相反
    if (videoConnection.supportsVideoMirroring) {
        [videoConnection setVideoMirrored:true];
    }
    /// 设置摄像头位置
    if ([videoConnection isVideoOrientationSupported]) {
        [videoConnection setVideoOrientation:videoOrientation];
    }
    /// 输出像素
    if ([captureSession canSetSessionPreset:AVCaptureSessionPreset1280x720]) {
        [captureSession setSessionPreset:AVCaptureSessionPreset1280x720];
    }

    [captureSession commitConfiguration];

    return YES;
}
- (void) startCaptureSession
{
    if ( !captureSession )
        return;
    if (!captureSession.isRunning )
        [captureSession startRunning];
}
- (void) stopCaptureSession
{
    [captureSession stopRunning];
}

@end
7.新建VideoCheckViewController,实现页面.
     /// 人脸识别页面控制器
@interface VideoCheckViewController (){
    /// 根据takePhoto状态来决定拍照
    BOOL takePhoto;
    /// 拍照后结果展示圆形ImageView
    UIImageView *showImageView;
    /// 拍照后背景半透明View
    UIView *imageBackView;
    /// 扫描框ImageView
    UIImageView *scanningImageView;
}
/// 获取前摄像头影像
@property (nonatomic, strong) ASFCameraController* cameraController;
/// 虹软进行人脸识别分析的工具
@property (nonatomic, strong) ASFVideoProcessor* videoProcessor;
/// 装载所有人脸信息框的Array
@property (nonatomic, strong) NSMutableArray* arrayAllFaceRectView;

@end

@implementation VideoCheckViewController

- (void)viewDidLoad {
    [super viewDidLoad];

    [self getManager];

    takePhoto = true;
    /// 将设备方向赋给cameraController
    UIInterfaceOrientation uiOrientation = [[UIApplication sharedApplication] statusBarOrientation];
    AVCaptureVideoOrientation videoOrientation = (AVCaptureVideoOrientation)uiOrientation;
    /// 预存Array内存
    self.arrayAllFaceRectView = [NSMutableArray arrayWithCapacity:0];
    /// 虹软的人脸识别控制器
    self.videoProcessor = [[ASFVideoProcessor alloc] init];
    self.videoProcessor.delegate = self;
    [self.videoProcessor initProcessor];
    /// 开启前置摄像
    self.cameraController = [[ASFCameraController alloc]init];
    self.cameraController.delegate = self;
    [self.cameraController setupCaptureSession:videoOrientation];
    /// 将摄影机layer置于控制器前
    [self.view.layer addSublayer:self.cameraController.previewLayer];
    self.cameraController.previewLayer.frame = self.view.layer.frame;
    /// 扫描框ImageView
    scanningImageView = [[UIImageView alloc] initWithImage:[UIImage imageNamed:@"scanning"]];
    scanningImageView.frame = CGRectMake((UIScreen.mainScreen.bounds.size.width - 230)/2, 231, 230, 230);
    [self.view addSubview:scanningImageView];
    /// 拍照后背景半透明颜色
    imageBackView = [[UIView alloc] initWithFrame:UIScreen.mainScreen.bounds];
    imageBackView.backgroundColor = [UIColor.blackColor colorWithAlphaComponent:0.7];
    imageBackView.hidden = true;
    [self.view addSubview:imageBackView];
    /// 拍照后预览图
    showImageView = [[UIImageView alloc] initWithFrame: CGRectMake((UIScreen.mainScreen.bounds.size.width - 230)/2, 231, 230, 230)];
    showImageView.layer.cornerRadius = 115;
    showImageView.layer.masksToBounds = YES;
    showImageView.contentMode = UIViewContentModeCenter;
    [imageBackView addSubview:showImageView];
    /// 预览相片旁边的波纹动画
    RippleAnimationView *viewA = [[RippleAnimationView alloc] initWithFrame:CGRectMake(0, 0, showImageView.frame.size.width, showImageView.frame.size.height) animationType:AnimationTypeWithBackground];
    viewA.center = showImageView.center;
    [imageBackView addSubview:viewA];
    [imageBackView bringSubviewToFront:showImageView];
}

- (void)didReceiveMemoryWarning {
    [super didReceiveMemoryWarning];
}

- (void)viewWillAppear:(BOOL)animated {
    [super viewWillAppear:animated];
    /// 开始前摄像头画面捕捉
    [self.cameraController startCaptureSession];
}

- (void)viewWillDisappear:(BOOL)animated {
    [super viewWillDisappear:animated];
    /// 停止前摄像头画面捕捉
    [self.cameraController stopCaptureSession];
}
@end
8.添加陀螺仪判断,以保证照片清晰度
/**
    开启陀螺仪,判断陀螺仪状态保证手机不在太过晃动情况下拍照,保证照片质量
 */
- (void) getManager {
    //初始化全局管理对象
    CMMotionManager *manager = [[CMMotionManager alloc] init];
    self.motionManager = manager;

    if (manager.gyroAvailable) {
        [manager startGyroUpdates];
    }
}
9.在delegate回调中实现主要功能.
- (void)captureOutput:(AVCaptureOutput *)captureOutput didOutputSampleBuffer:(CMSampleBufferRef)sampleBuffer fromConnection:(AVCaptureConnection *)connection {
    /// 在获取相片状态下
    if (takePhoto == true){
        /// 获取数据传入虹软人面识别控制器
        CVImageBufferRef cameraFrame = CMSampleBufferGetImageBuffer(sampleBuffer);
        ASF_CAMERA_DATA* cameraData = [Utility  getCameraDataFromSampleBuffer:sampleBuffer];
        /// 获取画面中人脸信息
        NSArray *arrayFaceInfo = [self.videoProcessor process:cameraData];

        __weak __typeof__(self) weakself = self;
        /// 主线程进行页面操作
        dispatch_sync(dispatch_get_main_queue(), ^{
            /// 获取人脸view数组是为了判断rect
            if(weakself.arrayAllFaceRectView.count >= arrayFaceInfo.count)
            {
                /// 如果画面中人脸数量高于储存人脸View数量,则从数组中获取.
                for (NSUInteger face=arrayFaceInfo.count; face= -10 && faceInfo.face3DAngle.yawAngle <= 10 && faceInfo.face3DAngle.yawAngle >= -10 && faceInfo.face3DAngle.pitchAngle <= 10 && faceInfo.face3DAngle.pitchAngle >= -10){
                        /// 判断人脸View.frame,保证人脸在扫描框中
                        if (CGRectContainsRect(CGRectMake(30, 150, (UIScreen.mainScreen.bounds.size.width - 60), (UIScreen.mainScreen.bounds.size.height - 300)), faceRectView.frame)){
                            /// 判断陀螺仪实时片钻加速度,保证手机在尽量平稳的状态
                            CMGyroData *newestAccel = self.motionManager.gyroData;
                            if (newestAccel.rotationRate.x < 0.000005 && newestAccel.rotationRate.y < 0.000005 && newestAccel.rotationRate.z < 0.000005 ){
                                /// 全部条件满足,则拍照.
                                self->takePhoto = false;
                                /// 将数据转换成UIImage
                                CIImage *ciImage = [[CIImage alloc] initWithCVPixelBuffer: cameraFrame];
                                CIContext *context = [[CIContext alloc] init];
                                CGRect imageRect= CGRectMake(0, 0, CVPixelBufferGetWidth(cameraFrame), CVPixelBufferGetHeight(cameraFrame));
                                struct CGImage *image = [context createCGImage:ciImage fromRect:imageRect];
                                UIImage *resultImage = [[UIImage alloc] initWithCGImage:image scale:UIScreen.mainScreen.scale orientation:UIImageOrientationUp];
                                /// 将预览View展示,把结果image加入预览ImageView
                                self->imageBackView.hidden = NO;
                                self->showImageView.image = resultImage;
                                /// 添加一个缩小动画,并在动画结束后跳转到新页面
                                [UIView animateWithDuration:1.3 animations:^{
                                    self->showImageView.transform =CGAffineTransformMakeScale(0.7, 0.7);
                                } completion:^(BOOL finished) {
                                    ImageShowViewController *vc = [[ImageShowViewController alloc] init];
                                    vc.image = resultImage;
                                    double delayInSeconds = 2.0;
                                    dispatch_time_t popTime = dispatch_time(DISPATCH_TIME_NOW, (int64_t)(delayInSeconds * NSEC_PER_SEC));
                                    dispatch_after(popTime, dispatch_get_main_queue(), ^(void){

                                        [weakself presentViewController:vc animated:false completion:nil];
                                    });
                                }];
                            }
                        }
                    }
                }
            }
        });
        /// 释放内存!!! 重要!!!
        [Utility freeCameraData:cameraData];
    }
}
其他问题.
1.运行报错就报错/clang linker command failed with exit code 1 (use -v to see invocation).
因为Xcode10之后移除了libstdc++.6.0.9库,但是虹软SDK并没有更新修改他的依赖库,所以Xcode10需要手动添加libstdc++.6.0.9库。具体实现可以参考iOS12开发问题: library not found for -lstdc++.6.0.9 有附件
2.官方demo跑不通.
官方的demo有两个问题,首先是没有在target中ArcSoftFaceEngine,libstdc++.6.0.9.tdb框架,
其次是在激活引擎方法里没有填入appid和sdkkey,需要我们自己手动加入.
3.激活引擎错误94217未知错误.
这个是因为没有在info.plist文件中添加相机权限提示.
4.激活后调用相机app内存无限升高,直到崩溃
注意观察 func captureOutput(_ output: AVCaptureOutput, didOutput sampleBuffer: CMSampleBuffer, from connection: AVCaptureConnection) {}
方法中是不是有调用
Utility.freeCameraData(cameraData)
demo地址: EWArcSoftDemo
调用成功记得查看下内存使用情况,一定要将data及时释放,保证不产生内存泄漏.
接入的主要核心内容就是AVFoundation框架实现的摄像机,以及虹软自己框架对摄像机传回数据的处理.包括之前我自定制相机时也是用了AVFoundation框架,所以它真的很重要.需要深入学习.
Swift版本: Swift.虹软人脸识别SDK接入
有问题欢迎探讨.