Mock接口平台功能介绍:
java -jar -Dfile.encoding=UTF-8 moco-runner-0.11.0-standalone.jar http -p 8888 -c startup1.json
moco框架基本介绍:
1.下载mocojar包
2.如何启动moco (java -jar moco-runner-0.11.0-standalone.jar http -p 8888 -c jsondemo)
3.第一个demo 访问:localhost:8888/demo
4.jsondemo文件内容
[
  {
    "description":"这是我们的第一个mock例子",
    "request":{
    "uri":"/demo"
    },
    "response":{
      "text":"第一个mock框架demo"
    }
    }
]
1.不带参数的get方法实现
[
  {
    "description":"这是我们的第一个mock例子",
    "request":{
    "uri":"/demo",
    "method":"get"
    },
    "response":{
      "text":"第一个mock框架demo"
    }
    }
]
2.带参数的get方法实现
[
  {
    "description":"这是我们的第一个mock例子",
    "request":{
    "uri":"/demo",
    "method":"get",
     "queries":{
          "name":"huhanssan",
          "age":"18"
      }
    },
    "response":{
      "text":"第一个mock框架demo"
    }
    }
]
3.带参数的post方法实现
[
  {
    "description":"这是我们的第一个mock例子",
    "request":{
    "uri":"/demo",
    "method":"post",
     "forms":{
          "name":"huhanssan",
          "age":"18"
      }
    },
    "response":{
      "text":"第一个mock框架demo"
    }
    }
]
4.带cookies的get方法实现
[{
"description":"这是我们的第一个mock例子",
    "request":{
    "uri":"/demo",
    "method":"get",
    "cookies":{
    "login":"true"
    },
  "response":{
  "test":"这是一个带cookies的get方法实现"
}
}]
5.带cookies的post方法实现
[
{
    "description":"带cookies的post请求",
    "request":{
        "uri":"/post/with/cookies",
        "method":"post",
        "cookies":{
            "login":"true"
        },
        "json":{
            "name":"zhangssna",
            "age":"18"
        }

    },
    "response":{
        "status":"200",
        "json":{
            "huhansan":"success",
            "status":"1"
        }
    }
}
]
6.moco框架中如何加入header
[
{
    "description":"带cookies的post请求",
    "request":{
        "uri":"/post/with/headers",
        "method":"post",
        "headers":{
            "content-type":"application/json"
        },
        "cookies":{
            "login":"true"
        },
        "json":{
            "name":"zhangssna",
            "age":"18"
        }

    },
    "response":{
        "status":"200",
        "json":{
            "huhansan":"success",
            "status":"1"
        }
    }
}
]
7.重定向
[
    {
        "description":"重定向到百度",
        "request":{
            "uri":"/redirect",

        },
        "redirectTo":"http://www.baidu.com"

    },
    {
        "description":"重定向到自己的网页上",
        "request":{
            "uri":"/redirect/topath",
        },
        "redirectTo":"/redirect/topath"

    },
]
类似:
1.简介
mock用来模拟接口的,本次学习mock用的是moco框架,moco框架是github上的一个开源项目,可以模拟一些http,https,Socket协议。
2.实际场景
比如前后台开发的时候,如果后端接口没有开发完,但是前台同志需要接口来调试自己的页面,这时候就可以利用mock来模拟自己想要的接口和数据。
3.启动
moco框架是github上的一个开源项目,可以把这个项目源码拿下来使用 gradle编译为一个jar,也可以网上直接找 jar 包下载。这里提供一个jar的下载 地址:https://repo1.maven.org/maven2/com/github/dreamhead/moco-runner/0.11.0/moco-runner-0.11.0-standalone.jar 里面也有很多个版本,选择最大的那个包即可。
启动命令如下:
java -jar -Dfile.encoding=UTF-8 ./moco-runner-0.11.0-standalone.jar 协议类型 -p 端口号 -c json配置文件
4.demo示例
我的操作在IDEA环境中执行,可以在本机环境随便一个目录执行,但是需要安装 jdk 。
第一步:在IDEA中创建目录 Chapter7,把下载好的jar包 moco-runner-0.11.0-standalone.jar 放在目录下,创建一个json的demo文件 startup1.json
里面的内容如下:
[
  {
    "description":"这是我们的第一个mock例子",
    "request":{
      "uri":"/demo"
    },
    "response":{
      "text":"我是第一个mock例子"
    }

  }

]
json的语法叶有点了解的,不然总是会写错。
description 程序不会识别,是写给我们自己看的。
request 是请求,里面的 uri 是我们访问应用的时候拼接在端口后面的路径。
response 是响应。
执行: java -jar -Dfile.encoding=UTF-8 ./moco-runner-0.11.0-standalone.jar http -p 8888 -c startup1.json
返回如下代表启动成功。

浏览器访问 http://localhost:8888/demo 返回如下:

5.get请求
5.1.不带参数的get请求
[
  {
    "description":"模拟一个没有参数的get请求",
    "request":{
      "uri":"/getdemo",
      "method":"get"
    },
    "response":{
      "text":"这是一个没有参数的get请求"
    }

  }
]
浏览器访问 http://localhost:8888/getdemo
5.2.带参数的get请求
[
 {
    "description":"这是一个带参数的get请求",
    "request":{
      "uri":"/getwithparam",
      "method":"get",
      "queries": {
        "name": "huhansan",
        "age": "18"
        }
      },
      "response":{
        "text":"我胡汉三又回来了!!"
      }

    }

]
浏览器访问 http://localhost:8888/getwithparam?name=huhansan&age=18
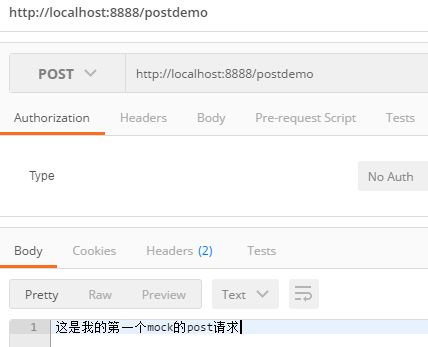
6.post请求(带参数和不带参数)
[
  {
    "description":"模拟一个post请求",

    "request":{
      "uri":"/postdemo",
      "method":"post"
    },

    "response":{
      "text":"这是我的第一个mock的post请求"
    }

  },

  {
    "description":"这是一个带参数的post请求",
    "request":{
      "uri":"/postdemoparam",
      "method":"post",
      "forms":{
        "name":"huhansan",
        "sex":"man"
      }
     },
    "response":{
      "text":"胡汉三带参数来了"
    }
  }
]
这里要注意的是 post的传参和get不一样,get里面用的 :
"queries": {
"name": "huhansan",
"age": "18"
}
但是 post 是用的 :
"forms":{
"name":"huhansan",
"sex":"man"
}
也可以用json格式:
"json": {
"name": "huhansan",
"age": "18"
}
但是如果用了 json格式再访问的时候也记得使用 json格式传参哈~
post接口的调用需要借助工具,我使用的postman。

7.带cookies的请求(get & post)
[
  {
    "description":"这是一个带cookies信息的get请求",
    "request":{
      "uri":"/get/with/cookies",
      "method":"get",
      "cookies":{
        "login":"true"
      }
    },
    "response":{
      "text":"这是一个需要携带cookies信息的get请求"
    }

  },

  {
    "description":"这是一个带cookies信息的post请求",

    "request": {
      "uri": "/post/with/cookies",
      "method": "post",
      "cookies": {
        "login": "true"
      },
      "json": {
        "name": "huhansan",
        "age": "18"
      }
    },

      "response":{
        "status":200,
        "json":{
          "huhansan":"success",
          "status":"1"
        }
      }

  }

]
访问的时候在头信息加上cookie即可。
8.带请求头(headers)的请求(post)
[
  {
    "description":"这是一个带header信息的post请求",
    "request":{
      "uri":"/post/with/headers",
      "method":"post",
      "headers":{
        "content-type":"application/json"
      },
      "json":{
        "name":"wanglaosi",
        "sex":"woman"
      }
    },
    "response":{
      "json":{
        "wanglaosi":"success",
        "status":"1"
      }
    }

  }

]
访问的时候加上请求头信息即可。
9.重定向
[
  {
    "description":"重定向到百度",
    "request":{
      "uri":"/redirect"
    },
    "redirectTo":"http://www.baidu.com"
  },

  {
    "description":"重定向自己的网页上",
    "request":{
      "uri":"/redirect/topath"
    },
    "redirectTo":"/redirect/new"
  },

  {
    "description":"这是被重定向的请求",
    "request":{
      "uri":"/redirect/new"
    },
    "response":{
      "text":"重定向成功啦。。"
    }
  }
]
第一个访问 http://localhost:8888/redirect 跳转到百度,
第二个访问 http://localhost:8888/redirect/topath 返回 重定向成功啦。。就代表重定向成功。
完了,虽然不多,但是感觉收获不少呢。
作者:飞翼_U
链接:https://www.jianshu.com/p/2270360a827f
来源:
著作权归作者所有。商业转载请联系作者获得授权,非商业转载请注明出处。