3.1、pom.xml文件
           org.springframework.boot
            spring-boot-starter-tomcat


           org.springframework.boot
            spring-boot-starter-web


            commons-codec
            commons-codec
            1.8


            org.apache.shiro
            shiro-spring
            1.4.0


            org.springframework.boot
            spring-boot-devtools


            org.springframework.boot
            spring-boot-starter-thymeleaf


            org.slf4j
            slf4j-log4j12
            1.6.1


            org.mybatis.spring.boot
            mybatis-spring-boot-starter
            1.3.2


            mysql
            mysql-connector-java


            org.springframework.boot
            spring-boot-starter-test


            junit
            junit
            4.9
3.2、配置文件
dataSource=org.springframework.jdbc.datasource.DriverManagerDataSource
#数据库url
spring.datasource.url=jdbc:mysql://127.0.0.1:3306/user?useUnicode=true&characterEncoding=UTF-8&allowMultiQueries=true
#数据库账号
spring.datasource.username=root
#数据库密码
spring.datasource.password=123456
spring.driver-class-name=com.mysql.jdbc.Driver
server.port=8044

#mybatis的 xml 文件:放在resources下面
mybatis.mapper-locations=classpath:repository/*.xml
#这个配置使用的mapper文件所在目录
mybatis.type-aliases-package=com.huihui.chapter2.mapper


# 页面访问路径
spring.thymeleaf.prefix=/WEB-INF/views/
spring.thymeleaf.suffix=.html
spring.thymeleaf.mode=HTML5
spring.thymeleaf.encoding=UTF-8
spring.thymeleaf.cache=false

#################################################日志####################################################
#com.mycompany.mavenspringboot.mapper sql日志 DEBUG级别输出
logging.level.com.huihui.chapter2.mapper=DEBUG
logging.file=logs/spring-boot-logging.log
logging.pattern.console=%d{yyyy/MM/dd-HH:mm:ss} [%thread] %-5level %logger- %msg%n
logging.pattern.file=%d{yyyy/MM/dd-HH:mm} [%thread] %-5level %logger- %msg%n
3.3、数据库设计
数据库跟上一篇一样,看过的跳过
shiro_user表:
DROP TABLE IF EXISTS `shiro_user`;
CREATE TABLE `shiro_user`  (
  `ID` int(11) NOT NULL AUTO_INCREMENT,
  `USER_NAME` varchar(255) CHARACTER SET latin1 COLLATE latin1_swedish_ci NULL DEFAULT NULL,
  `PASSWORD` varchar(255) CHARACTER SET latin1 COLLATE latin1_swedish_ci NULL DEFAULT NULL,
  PRIMARY KEY (`ID`) USING BTREE
) ENGINE = InnoDB AUTO_INCREMENT = 2 CHARACTER SET = latin1 COLLATE = latin1_swedish_ci ROW_FORMAT = Dynamic;
INSERT INTO `shiro_user` VALUES (1, 'test', '123456');
shiro_user_role表:
DROP TABLE IF EXISTS `shiro_user_role`;
CREATE TABLE `shiro_user_role`  (
  `ID` int(11) NOT NULL AUTO_INCREMENT,
  `USER_NAME` varchar(255) CHARACTER SET latin1 COLLATE latin1_swedish_ci NULL DEFAULT NULL,
  `ROLE_NAME` varchar(255) CHARACTER SET latin1 COLLATE latin1_swedish_ci NULL DEFAULT NULL,
  PRIMARY KEY (`ID`) USING BTREE
) ENGINE = InnoDB AUTO_INCREMENT = 2 CHARACTER SET = latin1 COLLATE = latin1_swedish_ci ROW_FORMAT = Dynamic;
INSERT INTO `shiro_user_role` VALUES (1, 'test', 'role1');
shiro_role_permission表:
DROP TABLE IF EXISTS `shiro_role_permission`;
CREATE TABLE `shiro_role_permission`  (
  `ID` int(11) NOT NULL AUTO_INCREMENT,
  `ROLE_NAME` varchar(255) CHARACTER SET latin1 COLLATE latin1_swedish_ci NULL DEFAULT NULL,
  `PERM_NAME` varchar(255) CHARACTER SET latin1 COLLATE latin1_swedish_ci NULL DEFAULT NULL,
  PRIMARY KEY (`ID`) USING BTREE
) ENGINE = InnoDB AUTO_INCREMENT = 2 CHARACTER SET = latin1 COLLATE = latin1_swedish_ci ROW_FORMAT = Dynamic;
INSERT INTO `shiro_role_permission` VALUES (1, 'role1', 'perm1');
3.4、程序的入口
Application.java类是springBoot程序的入口
@SpringBootApplication
//扫描你项目所有的java类
@ComponentScan(basePackages = {"com.huihui"})
//扫描mapper所在的位置
@MapperScan({"com.huihui.chapter2.mapper"})
public class Application {

    public static void main(String[] args) throws Exception{
        SpringApplication.run(Application.class,args);

    }

}
3.5、开始写接口代码
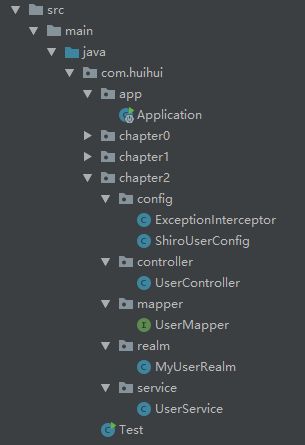
先看一下项目的结构
代码从数据库开始写起:
@Repository
public interface UserMapper {

    String queryUserPassword(@Param("userName")String userName);

    List queryUserRole(@Param("userName")String userName);

    List queryRolePermission(@Param("roleName")String roleName);

    List queryUserPermission(@Param("userName")String userName);
}
mapper对应的xml文件:
接下来是service:
@Service
public class UserService {

    @Autowired
    UserMapper userMapper;
    @Autowired
    MyUserRealm myUserRealm;

    /**
     * 登录
     * @param username
     * @param password
     * @throws Exception
     */
    public void doLogin(String username, String password) throws Exception {
        Subject currentUser = SecurityUtils.getSubject();

        if (!currentUser.isAuthenticated()) {
            UsernamePasswordToken token = new UsernamePasswordToken(username, password);
            token.setRememberMe(true);//是否记住用户
            try {
                currentUser.login(token);//执行登录
            } catch (UnknownAccountException uae) {
                throw new Exception("账户不存在");
            } catch (IncorrectCredentialsException ice) {
                throw new Exception("密码不正确");
            } catch (LockedAccountException lae) {
                throw new Exception("用户被锁定了 ");
            } catch (AuthenticationException ae) {
                ae.printStackTrace();
                throw new Exception("未知错误");
            }
        }
    }

    /**
     * 根据用户名查询密码
     * @param userName
     * @return
     */
    public String queryUserPassword(String userName){
        return userMapper.queryUserPassword(userName);
    }

    /**
     * 查询当前用户对应的权限
     * @param userName
     * @return
     */
    public List queryUserPermission(String userName){
        return userMapper.queryUserPermission(userName);
    }

}
controller:
@Controller
public class UserController {

    @Autowired
    UserService userService;

    @RequestMapping(value = "/index",method = RequestMethod.POST)
    public String goLogin() {
        return "/index.html";
    }

    @RequestMapping(value = "/logout",method = RequestMethod.POST)
    public String login() {
        Subject currentUser = SecurityUtils.getSubject();
        currentUser.logout();
        return "/index.html";
    }

    @RequestMapping(value = "/",method = RequestMethod.GET)
    public String index() {
        return "/index.html";
    }

    @RequestMapping(value = "/login",method = RequestMethod.POST)
    public String login(String username, String password) {
        try {
            userService.doLogin(username, password);
        } catch (Exception e) {
            return "redirect:/hello";
        }
        return "redirect:/hello";
    }

    @RequestMapping(value = "/hello")
    public String hello(){
        return "hello.html";
    }

    @RequestMapping(value = "/hello1")
//需要访问此接口的权限
    @RequiresPermissions("perm3")
    public String hello1(){
        return "hello2.html";
    }

}
写一个异常拦截器,拦截没有权限和未登录的异常:
@ControllerAdvice
public class ExceptionInterceptor {

    @ExceptionHandler({ UnauthorizedException.class, AuthorizationException.class })
    public String authorizationException(HttpServletRequest req, HttpServletResponse response, Exception e)  {
        return "没有权限";
    }

    @ExceptionHandler({ UnauthenticatedException.class, AuthenticationException.class })
    public String authenticationException(HttpServletRequest req, HttpServletResponse response, Exception e)  {

        return "请登录";
    }

}
写一个Realm继承AuthorizingRealm,重写获取权限,登录等方法:
public class MyUserRealm extends AuthorizingRealm {

    @Autowired
    UserService userService;

    public AuthorizationInfo queryAuthorizationInfo(PrincipalCollection principals){
        return this.getAuthorizationInfo(principals);
    }

    // 获取用户的权限
    @Override
    protected AuthorizationInfo doGetAuthorizationInfo(PrincipalCollection principals) {

        String userName = principals.fromRealm(getName()).iterator().next().toString();
        if(userName != null){
            //获取用户所有权限  根据自己的需求编写获取授权信息,这里简化代码获取了用户对应的所有权限
            List perms = userService.queryUserPermission(userName);
            if(perms != null && !perms.isEmpty()){
                SimpleAuthorizationInfo info = new SimpleAuthorizationInfo();
                for(String each : perms){
                    //将权限添加到用户信息中
                    info.addStringPermission(each);
                }
                return info;
            }
        }

        return null;
    }

    @Override
    protected AuthenticationInfo doGetAuthenticationInfo(AuthenticationToken authenticationToken) throws AuthenticationException {

        UsernamePasswordToken token = (UsernamePasswordToken)authenticationToken;
        //通过表单接受的用户名,调用currentUser.login的时候执行
        String userName = token.getUsername();
        if(userName != null && !"".equals(userName)){
            //查询密码
            String password = userService.queryUserPassword(userName);
            if(password != null){
                return new SimpleAuthenticationInfo(userName,password,getName());
            }
        }

        return null;
    }

    @Override
    public void clearCachedAuthorizationInfo(PrincipalCollection principals) {
        super.clearCachedAuthorizationInfo(principals);
    }

    @Override
    public void clearCachedAuthenticationInfo(PrincipalCollection principals) {
        super.clearCachedAuthenticationInfo(principals);
    }

    @Override
    public void clearCache(PrincipalCollection principals) {
        super.clearCache(principals);
    }

}
接下来写一些配置的属性,可以写在配置文件里面,也可以用java类代替,我这边是用java类直接写的:
@Configuration
public class ShiroUserConfig {

    @Bean
    public MyUserRealm myUserRealm(){
        MyUserRealm realm = new MyUserRealm();
        return realm;
    }

    @Bean
    public DefaultWebSecurityManager securityManager(){
        DefaultWebSecurityManager webSecurityManager = new DefaultWebSecurityManager();
        webSecurityManager.setRealm(myUserRealm());
        return webSecurityManager;
    }

    @Bean(name = "shiroFilter")
    public ShiroFilterFactoryBean shiroFilter(){
        ShiroFilterFactoryBean factoryBean = new ShiroFilterFactoryBean();
        factoryBean.setSecurityManager(securityManager());
        // 配置访问权限
        LinkedHashMap filterChainDefinitionMap = new LinkedHashMap<>();

        //filterChainDefinitionMap.put("/index", "anon"); // 表示可以匿名访问
//      filterChainDefinitionMap.put("/*", "authc");// 表示需要认证才可以访问
//      filterChainDefinitionMap.put("/user/login", "perms[权限添加]");

        factoryBean.setFilterChainDefinitionMap(filterChainDefinitionMap);
        return factoryBean;
    }


    /***  开启Shiro的注解*/
    @Bean
    public LifecycleBeanPostProcessor lifecycleBeanPostProcessor() {
        return new LifecycleBeanPostProcessor();
    }

    @Bean
    public DefaultAdvisorAutoProxyCreator defaultAdvisorAutoProxyCreator() {
        DefaultAdvisorAutoProxyCreator creator = new DefaultAdvisorAutoProxyCreator();
        creator.setProxyTargetClass(true);
        return creator;
    }

    @Bean
    public AuthorizationAttributeSourceAdvisor authorizationAttributeSourceAdvisor() {
        AuthorizationAttributeSourceAdvisor authorizationAttributeSourceAdvisor = new AuthorizationAttributeSourceAdvisor();
        authorizationAttributeSourceAdvisor.setSecurityManager(securityManager());
        return authorizationAttributeSourceAdvisor;
    }
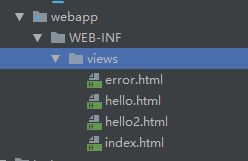
OK,接口准备完毕了,接下来写几个简单的页面测试一下:
index.html
hello.html
hello2.html跟error.html随便写点东西
OK,到这里代码及写完了

