Python 手写数字识别的实现(pytorch框架) 超详细版本-jupyter notebook
系列文章目录
- pytorch MNIST数据集无法正常加载的解决办法( HTTP Error 503: Service Unavailable)
- Python 手写数字识别的实现(pytorch框架) 超详细版本
- pytorch 手写数字识别 新网络设计和学习率探索
文章目录
- 系列文章目录
- 前言
- 分步骤解释
- colab文件链接
前言
这是中国科学院大学深度学习的课程作业
本文详细介绍了如何构建LeNet-5神经网络用于手写数字识别。
文中大量的代码解释包含在代码行后的注释中,请注意查看。
在pytorch 手写数字识别 新网络设计和学习率探索中我探索了一个新结构的CNN网络用于手写数字识别,可参看。
下面的代码在谷歌云盘的colab上运行,也可以在jupyter notebook上运行
文本参考了用PyTorch实现MNIST手写数字识别(非常详细)中的部分内容。
分步骤解释
- 首先导入需要的包
import torch
import torchvision
import torchvision.transforms as transforms
- 设置超参数,每个参数解释见注释
n_epochs = 5 # 模型训练5轮
log_interval = 30 #控制打印频率的,设n = 30*batch_size,即n张图后打印一次进度
DEVICE = torch.device("cuda" if torch.cuda.is_available() else "cpu") # 根据设备是否支持GPU来选择硬件
size = 32 # 对输入图片进行处理,拉伸为32*32的图片,这是为了复刻手写数字识别的神经网络,其输入为32*32的灰度图像
learn_rate = 0.03 # 学习率
momentum = 0.1  # 动量
- 加载数据集(见blog:pytorch集成的数据集无法访问,采用了指定url方法)
!wget www.di.ens.fr/~lelarge/MNIST.tar.gz
!tar -zxvf MNIST.tar.gz

from torchvision.datasets import MNIST


transform = transforms.Compose(
    [ transforms.Resize(size), transforms.ToTensor(),
     transforms.Normalize((0.5), (0.5))]) # 正则化处理,相当于z-score

trainset = MNIST(root = './', train=True, download=True, transform=transform)
trainloader = torch.utils.data.DataLoader(trainset, batch_size=64, shuffle=True, num_workers=2)

testset = MNIST(root = './', train=False, download=True, transform=transform)
testloader = torch.utils.data.DataLoader(testset, batch_size=1000, shuffle=True, num_workers=2)


# classes = ('1', '2', '3', '4', '5', '6', '7', '8', '9', '0')
这一步需要说明的是,对加载来的图像进行了增强处理(transforms.Compose()),主要是为了防止过拟合、
详细解释推荐博客:https://medium.com/@CinnamonAITaiwan/cnn%E5%85%A5%E9%96%80-%E5%9C%96%E5%83%8F%E5%A2%9E%E5%BC%B7-fa654d36dafc
后面将通过进一步实验探索图像增强对结果的影响
- 打印测试集的标签和tensor大小
examples = enumerate(testloader)
batch_idx, (example_data, example_targets) = next(examples)
print(example_targets)
print(example_data.shape)
这一步目的是查看数据是否符合我们的要求
结果:
tensor([3, 0, 9, 7, 6, 1, 4, 9, 3, 1, 9, 6, 1, 2, 4, 2, 6, 0, 1, 4, 7, 3, 7, 7,
        7, 1, 6, 6, 9, 0, 8, 6, 9, 2, 8, 3, 7, 0, 3, 5, 1, 1, 5, 6, 1, 6, 8, 6,
        5, 2, 5, 1, 4, 8, 8, 1, 4, 2, 1, 8, 6, 2, 4, 9, 3, 0, 7, 5, 2, 2, 4, 8,
        7, 4, 9, 2, 2, 7, 7, 8, 1, 7, 4, 8, 7, 8, 9, 1, 5, 5, 4, 8, 0, 5, 4, 9,
        5, 1, 1, 3, 9, 4, 9, 6, 6, 7, 8, 0, 8, 1, 6, 6, 5, 6, 3, 6, 2, 2, 1, 3,
        9, 2, 1, 3, 3, 0, 2, 6, 3, 6, 2, 9, 2, 9, 4, 9, 8, 7, 8, 7, 6, 0, 6, 4,
        6, 0, 3, 9, 5, 3, 6, 9, 4, 0, 3, 2, 7, 0, 8, 7, 2, 3, 4, 7, 8, 1, 5, 5,
        4, 9, 1, 5, 1, 2, 9, 8, 0, 4, 7, 9, 8, 8, 3, 5, 1, 1, 0, 5, 8, 3, 1, 2,
        6, 8, 3, 3, 4, 3, 0, 4, 4, 7, 5, 4, 9, 1, 3, 9, 9, 4, 9, 0, 7, 1, 0, 4,
        0, 3, 7, 3, 4, 8, 4, 6, 5, 1, 4, 1, 8, 8, 6, 5, 1, 0, 9, 9, 7, 5, 6, 9,
        1, 8, 7, 3, 3, 9, 8, 8, 3, 2, 7, 8, 1, 4, 2, 9, 8, 9, 4, 9, 2, 4, 4, 3,
        5, 1, 5, 9, 1, 1, 7, 9, 5, 5, 3, 1, 5, 6, 9, 2, 8, 4, 3, 7, 1, 7, 2, 3,
        1, 6, 6, 8, 8, 0, 1, 3, 9, 0, 3, 0, 9, 7, 7, 9, 2, 0, 8, 3, 9, 5, 9, 6,
        5, 6, 4, 4, 6, 0, 3, 3, 1, 2, 0, 5, 6, 6, 1, 0, 1, 4, 8, 8, 3, 3, 5, 0,
        5, 4, 7, 9, 1, 1, 7, 4, 2, 8, 6, 9, 7, 6, 7, 2, 3, 9, 3, 7, 9, 2, 8, 3,
        0, 8, 7, 3, 2, 6, 8, 8, 0, 7, 2, 9, 5, 7, 1, 7, 9, 1, 9, 4, 5, 3, 7, 8,
        3, 9, 7, 0, 8, 8, 7, 8, 8, 3, 8, 3, 6, 8, 2, 9, 6, 1, 5, 4, 7, 0, 8, 8,
        9, 5, 9, 4, 1, 0, 4, 4, 6, 2, 9, 7, 1, 0, 3, 3, 0, 2, 5, 7, 3, 7, 7, 7,
        4, 0, 8, 7, 3, 1, 2, 4, 8, 0, 1, 3, 9, 7, 7, 3, 5, 1, 3, 2, 3, 2, 2, 2,
        6, 6, 8, 7, 8, 6, 0, 4, 4, 1, 3, 7, 4, 6, 8, 2, 3, 9, 4, 6, 9, 4, 2, 6,
        1, 9, 1, 9, 0, 3, 6, 3, 6, 9, 6, 3, 7, 1, 4, 8, 4, 4, 6, 6, 2, 4, 1, 0,
        2, 0, 4, 1, 3, 2, 0, 5, 2, 5, 1, 6, 9, 4, 5, 9, 0, 0, 3, 1, 9, 6, 2, 8,
        3, 9, 3, 1, 6, 4, 1, 4, 4, 8, 6, 7, 1, 8, 5, 4, 6, 4, 8, 6, 8, 5, 9, 4,
        2, 4, 2, 9, 3, 2, 4, 5, 9, 9, 7, 4, 3, 7, 4, 9, 1, 9, 6, 4, 3, 8, 3, 5,
        9, 9, 3, 2, 0, 7, 6, 3, 3, 1, 8, 8, 8, 0, 4, 3, 9, 7, 2, 0, 7, 9, 0, 3,
        7, 2, 6, 1, 6, 3, 9, 0, 6, 4, 9, 5, 9, 8, 7, 1, 9, 7, 8, 2, 0, 7, 1, 3,
        9, 4, 4, 2, 1, 4, 9, 9, 7, 0, 1, 6, 9, 8, 4, 2, 6, 0, 4, 5, 1, 2, 9, 5,
        1, 9, 4, 0, 7, 5, 1, 2, 5, 2, 9, 9, 4, 7, 6, 8, 9, 4, 7, 8, 9, 6, 9, 6,
        9, 8, 1, 9, 3, 2, 7, 7, 5, 8, 8, 3, 2, 5, 8, 9, 1, 0, 1, 9, 1, 3, 6, 1,
        4, 1, 4, 5, 3, 0, 5, 4, 8, 3, 5, 9, 6, 0, 6, 5, 8, 3, 8, 1, 1, 9, 2, 7,
        9, 7, 3, 4, 2, 8, 2, 2, 6, 5, 9, 7, 9, 7, 0, 2, 0, 2, 6, 4, 9, 8, 4, 7,
        4, 9, 6, 1, 2, 7, 6, 3, 0, 2, 1, 7, 4, 5, 8, 6, 6, 1, 5, 6, 2, 4, 2, 8,
        3, 6, 7, 5, 7, 7, 9, 4, 0, 3, 1, 6, 6, 2, 3, 1, 6, 9, 2, 9, 0, 9, 3, 3,
        5, 9, 9, 1, 3, 0, 7, 6, 8, 3, 8, 2, 5, 7, 8, 6, 2, 5, 1, 8, 2, 4, 3, 5,
        0, 8, 8, 1, 1, 6, 9, 4, 9, 4, 5, 2, 1, 7, 2, 8, 9, 7, 8, 8, 4, 9, 0, 5,
        8, 6, 4, 2, 4, 2, 6, 0, 9, 9, 1, 1, 8, 5, 0, 5, 5, 9, 9, 2, 6, 3, 6, 5,
        7, 4, 2, 0, 0, 4, 3, 0, 7, 9, 5, 8, 2, 8, 2, 5, 1, 7, 7, 0, 1, 9, 9, 7,
        4, 4, 5, 6, 4, 4, 3, 5, 9, 2, 6, 0, 0, 7, 6, 7, 3, 2, 3, 9, 8, 2, 1, 8,
        3, 2, 6, 6, 9, 2, 4, 1, 8, 7, 0, 7, 2, 2, 6, 0, 3, 5, 6, 2, 8, 4, 4, 0,
        1, 6, 4, 3, 3, 1, 6, 2, 9, 9, 0, 4, 9, 8, 0, 0, 4, 1, 9, 5, 5, 5, 8, 2,
        7, 7, 8, 0, 4, 9, 8, 5, 7, 1, 4, 1, 1, 9, 0, 6, 1, 8, 4, 3, 1, 6, 4, 1,
        0, 1, 6, 0, 5, 5, 6, 9, 1, 3, 5, 1, 9, 0, 4, 8])
torch.Size([1000, 1, 32, 32])
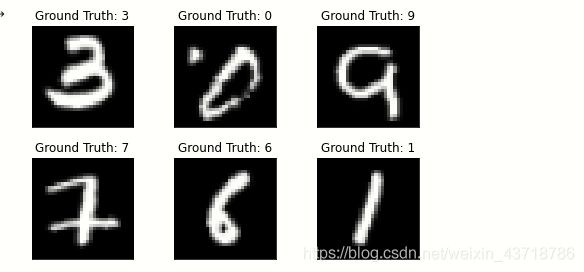
- 展示6张图片看一看
import matplotlib.pyplot as plt
fig = plt.figure()
for i in range(6):
  plt.subplot(2,3,i+1)
  plt.tight_layout()
  plt.imshow(example_data[i][0], cmap='gray', interpolation='none')
  plt.title("Ground Truth: {}".format(example_targets[i]))
  plt.xticks([])
  plt.yticks([])
plt.show()
- 设计LeNet-5网络
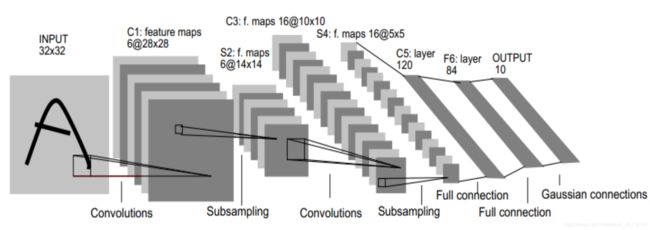
复现LeNet-5网络,结构图如下:

一些解释
输入层
– 3232的图片,也就是相当于1024个神经元
C1层(卷积层)
– 选择6个55的卷积核,得到6个大小为32-5+1=28的特征图,也就是
神经元的个数为62828=4704
S2层(下采样层)
– 每个下抽样节点的4个输入节点求和后取平均(平均池化),均值乘上一个权重参数加上一个偏置参数作为激活函数的输入,激活函数的输出即是下一层节点的值。池化核大小选择22,得到6个 1414大小特征图
C3层(卷积层)
– 用55的卷积核对S2层输出的特征图进行卷积后,得到6张1010新图片,然后将这6张图片相加在一起,然后加一个偏置项b,然后用激活函数进行映射,就可以得到1张1010的特征图。我们希望得到16张1010的 特征图,因此我们就需要参数个数 为 16*(6*(55))=166*(55)个参数
S4层(下采样层)
– 对C3的16张1010特征图进行最大池化,池化核大小为22,得到16
张大小为55的特征图。神经元个数已经减少为:1655=400
C5层(卷积层)
– 用5*5的卷积核进行卷积,然后我们希望得到120个特征图,特征图 大小为5-5+1=1。神经元个数为120
F6层(全连接层)
– 有84个节点,该层的训练参数和连接数都是(120+1)x84=10164
Output层
– 共有10个节点,分别代表数字0到9,如果节点i的输出值为0,则网
识别的结果是数字i。
根据上图,首先设置各层的参数。详细见注释
import torch.nn as nn
import torch.nn.functional as F
import torch.optim as optim

class Net(nn.Module):
    def __init__(self):
        super(Net, self).__init__()
        self.conv1 = nn.Conv2d(1, 6, kernel_size=5, stride=1, padding=0, bias=True) # C1层使用单通道,6深度的卷积核,卷积核大小为5
        self.max_pool_1 = nn.MaxPool2d(2)  # maxpooling从28降到14个像素点,故采用大小为2最大池化
        self.conv2 = nn.Conv2d(6, 16, kernel_size=5, stride=1, padding=0, bias=True) # 第二次卷积
        self.max_pool_2 = nn.MaxPool2d(2) # 第二次maxpooling
        self.conv3 = nn.Conv2d(16, 120, kernel_size=5, stride=1, padding=0, bias=F) #第三次卷积,得到120张大小为1的“图像”

        self.fc1 = nn.Linear(120,84) # 全连接层
        self.fc2 = nn.Linear(84,10) # 全连接层

    def forward(self, x):
        # print("0:"+ str(x.size())) # 输出tensor大小
        x = F.relu(self.conv1(x)) # 用激活函数处理卷积结果,激活函数结果再在下一步做maxpooling
        x = self.max_pool_1(x)
        # print("1:"+ str(x.size()))
        x = F.relu(self.conv2(x)) # 同上
        x = self.max_pool_2(x)
        # print("2:"+ str(x.size()))


        x = F.relu(self.conv3(x))
        # print("3:"+ str(x.size()))
        # x = F.dropout(x, training=self.training)
        x = x.view(-1, 120) # 把120张大小为1的图像当成一个长度为120的一维tensor
        x = F.relu(self.fc1(x))
        x = F.relu(self.fc2(x))
        return F.log_softmax(x)
- 实例化神经网络
network = Net().to(DEVICE)
optimizer = optim.SGD(network.parameters(), lr = learn_rate, momentum=momentum) # 学习率,动量
- 设置需要输出参数的存储变量
train_losses = []
train_counter = []
test_losses = []
test_counter = [i*len(trainloader.dataset) for i in range(n_epochs + 1)] #test_losses为横坐标,test_losses为纵坐标
test_acc = []
- 定义训练函数
def train(epoch, device):
  network.train() # 调用上一步实例化对象network中的方法(该方法包内已经写好)
  for batch_idx, (data, target) in enumerate(trainloader): # 按batch_size为集合对象进行逐个处理
    data, target = data.to(device), target.to(device) # data是图片,target是标签,device是为了有GPU情况下使用GPU加速
    optimizer.zero_grad() # 开始进行BP之前将梯度设置为零,因为PyTorch会在随后的BP中累积梯度
    output = network(data)
    loss = F.nll_loss(output, target) # 函数全称是negative log likelihood loss,下面博客有详细解释
    # https://blog.csdn.net/weixin_38145317/article/details/103288032
    loss.backward() # 根据误差进行BP
    optimizer.step()
    if batch_idx % log_interval == 0: # 控制输出频率
      print('Train Epoch: {} [{}/{} ({:.0f}%)]\tLoss: {:.6f}'.format(
        epoch, batch_idx * len(data), len(trainloader.dataset),
        100. * batch_idx / len(trainloader), loss.item()))
      train_losses.append(loss.item()) # 记录并储存train loss
      train_counter.append(
        (batch_idx*64) + ((epoch-1)*len(trainloader.dataset)))
- 定义测试函数
def test(device):
  network.eval()
  test_loss = 0
  correct = 0
  with torch.no_grad():
    for data, target in testloader:
      data, target = data.to(device), target.to(device)
      output = network(data)
      test_loss += F.nll_loss(output, target, size_average=False).item()
      pred = output.data.max(1, keepdim=True)[1] # 找到概率最大的下标,为预测类别
      correct += pred.eq(target.data.view_as(pred)).sum() # x下面都是记录数据用于绘图,不再解释
  test_loss /= len(testloader.dataset)
  test_losses.append(test_loss)
  print('\nTest set: Avg. loss: {:.4f}, Accuracy: {}/{} ({:.0f}%)\n'.format(
    test_loss, correct, len(testloader.dataset),
    100. * correct / len(testloader.dataset)))
  test_acc.append(correct / len(testloader.dataset))
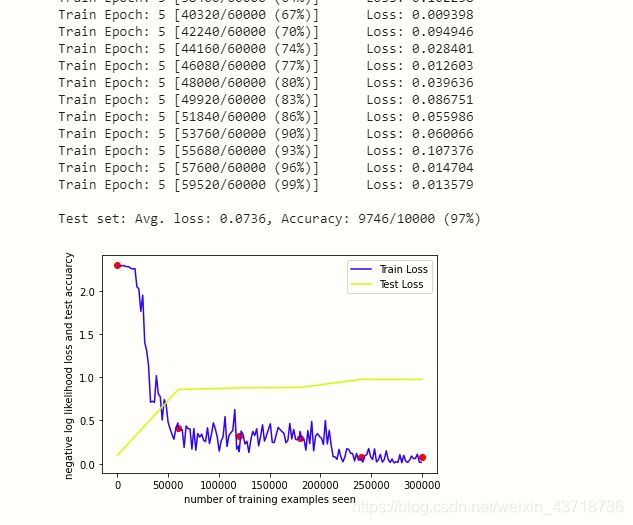
- 训练模型,绘制图像
在这儿我只训练了5轮(为了节约时间),可以增大训练轮数,获得更精确的结果。
test(DEVICE)
for epoch in range(1, n_epochs + 1):
  train(epoch, DEVICE)
  test(DEVICE)
import matplotlib.pyplot as plt
fig = plt.figure()
plt.plot(train_counter, train_losses, color='blue') # train_losses变化曲线
plt.plot(test_counter, test_acc, color='yellow') # test集accuracy变化曲线
plt.scatter(test_counter, test_losses, color='red') # test集loss散点图
plt.legend(['Train Loss', 'Test Loss'], loc='upper right')
plt.xlabel('number of training examples seen')
plt.ylabel('negative log likelihood loss and test accuarcy')
plt.show()
- 测试模型
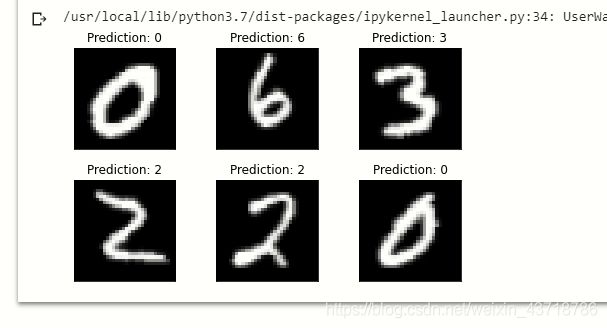
使用6张图来测试一下,是否能正常读取
examples = enumerate(testloader)
batch_idx, (example_data, example_targets) = next(examples)
with torch.no_grad():
  example_data, example_targets = example_data.to(DEVICE), example_targets.to(DEVICE)
  output = network(example_data)
fig = plt.figure()
for i in range(6):
  plt.subplot(2,3,i+1)
  plt.tight_layout()
  plt.imshow(example_data[i][0].cpu().clone().numpy(), cmap='gray', interpolation='none')
  plt.title("Prediction: {}".format(
    output.data.max(1, keepdim=True)[1][i].item()))
  plt.xticks([])
  plt.yticks([])
plt.show()
colab文件链接
https://colab.research.google.com/drive/14yVmcQTSLrWm5Fwm7zvw8zK_AODYoxrQ?usp=sharing


