YOLOv5学习总结(持续更新)
YOLOv5学习总结
- 训练效果(持续更新)
- 前言
- 网络结构可视化
-
- yolov3
- yolov4
- yolov5
- 核心基础内容
-
- Mosaic数据增强
- 自适应锚框计算
- 自适应图片缩放
- Focus结构
- CSP结构
- neck部分
- 输出端
-
- GIOU
- DIoU
- CIOU
- nms非极大值抑制
- Yolov5四种网络的深度
- Yolov5四种网络的宽度
首先感谢江大白大佬的研究与分享,贴上链接
深入浅出Yolo系列之Yolov5核心基础知识完整讲解
将yolov3-v5的变化讲的很清楚,思路很清晰,值得花时间好好从头到尾读一遍。
训练效果(持续更新)
先贴结果,自己试了组工牌胸牌检测(yolov5s),100个epoch的[email protected] 达到0.95,效果真的不错,检测速度也很快,一张图0.009s(2080TI),cpu上速度待测试,yolov5其他模型待测试。
前言
YOLOv4出来后不久,又出现了YOLOv5,虽然作者没有放上和YOLOv4的直接测试对比,但在COCO数据集的测试效果还是很可观的。
很多人考虑到YOLOv5的创新性不足,对算法是否能够进化,称得上YOLOv5而议论纷纷。
但既然称之为YOLOv5,也有很多非常不错的地方值得我们学习。不过因为Yolov5的网络结构和v3、v4相比,不好可视化,导致很多人看YOLOv5看的云里雾里。
网络结构可视化
为了方便对比,顺便把yolov3和v4的网络结构图贴出来
yolov3
yolov4
简单提两句,yolov4在yolov3的基础上增加了近两年的研究成果
- 输入端采用mosaic数据增强
- Backbone上采用了CSPDarknet53、Mish激活函数、Dropblock等方式。(cspnet减少了计算量的同时可以保证准确率)
- Mish函数为 M i s h = x ∗ t a n h ( l n ( 1 + e x ) ) Mish = x * tanh(ln(1+e^x)) Mish=x∗tanh(ln(1+ex))
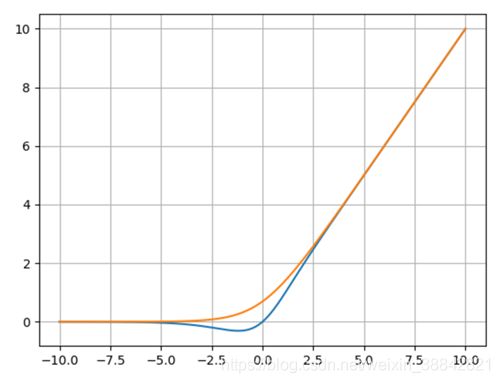
橙色曲线为:ln(1+e^(x))
蓝色曲线为:Mish函数
为什么采用mish函数?可能也是最重要的,目前的想法是,平滑的激活函数允许更好的信息深入神经网络,从而得到更好的准确性和泛化。 - Neck中采用了SPP、FPN+PAN的结构,
- 输出端则采用CIOU_Loss、DIOU_nms操作。(CIOU,DIOU,GIOU后续更新)
yolov5
通过netron可以直观查看网络结构,对网络的架构会有更清晰的认识。
![]()
算法性能测试图:
![]()
Yolov5s网络最小,速度最少,AP精度也最低。但如果检测的以大目标为主,追求速度,倒也是个不错的选择。
其他的三种网络,在此基础上,不断加深加宽网络,AP精度也不断提升,但速度的消耗也在不断增加。
目前使用下来,yolov5s的模型十几M大小,速度很快,线上生产效果可观,嵌入式设备可以使用。
核心基础内容
Mosaic数据增强
Yolov5的输入端采用了和Yolov4一样的Mosaic数据增强的方式。
随机缩放、随机裁剪、随机排布的方式进行拼接,对于小目标的检测效果很不错。
自适应锚框计算
在Yolo算法中,针对不同的数据集,都会有初始设定长宽的锚框。
在网络训练中,网络在初始锚框的基础上输出预测框,进而和真实框groundtruth进行比对,计算两者差距,再反向更新,迭代网络参数。
yolov5s初始设定的anchor

Yolov5中将此功能嵌入到代码中,每次训练时,自适应的计算不同训练集中的最佳锚框值。
当然,如果觉得计算的锚框效果不是很好,也可以在代码中将自动计算锚框功能关闭。
parser.add_argument('--noautoanchor', action='store_true', help='disable autoanchor check')
train.py中上面一行代码,设置成False,每次训练时,不会自动计算。
自适应图片缩放
先贴代码,utils/datasets.py中
def letterbox(img, new_shape=(640, 640), color=(114, 114, 114), auto=True, scaleFill=False, scaleup=True):
    # Resize image to a 32-pixel-multiple rectangle https://github.com/ultralytics/yolov3/issues/232
    shape = img.shape[:2]  # current shape [height, width]
    if isinstance(new_shape, int):
        new_shape = (new_shape, new_shape)

    # Scale ratio (new / old)
    r = min(new_shape[0] / shape[0], new_shape[1] / shape[1])
    if not scaleup:  # only scale down, do not scale up (for better test mAP)
        r = min(r, 1.0)

    # Compute padding
    ratio = r, r  # width, height ratios
    new_unpad = int(round(shape[1] * r)), int(round(shape[0] * r))
    dw, dh = new_shape[1] - new_unpad[0], new_shape[0] - new_unpad[1]  # wh padding
    if auto:  # minimum rectangle
        dw, dh = np.mod(dw, 64), np.mod(dh, 64)  # wh padding
    elif scaleFill:  # stretch
        dw, dh = 0.0, 0.0
        new_unpad = (new_shape[1], new_shape[0])
        ratio = new_shape[1] / shape[1], new_shape[0] / shape[0]  # width, height ratios

    dw /= 2  # divide padding into 2 sides
    dh /= 2

    if shape[::-1] != new_unpad:  # resize
        img = cv2.resize(img, new_unpad, interpolation=cv2.INTER_LINEAR)
    top, bottom = int(round(dh - 0.1)), int(round(dh + 0.1))
    left, right = int(round(dw - 0.1)), int(round(dw + 0.1))
    img = cv2.copyMakeBorder(img, top, bottom, left, right, cv2.BORDER_CONSTANT, value=color)  # add border
    return img, ratio, (dw, dh)
在常用的目标检测算法中,不同的图片长宽都不相同,因此常用的方式是将原始图片统一缩放到一个标准尺寸,再送入检测网络中。
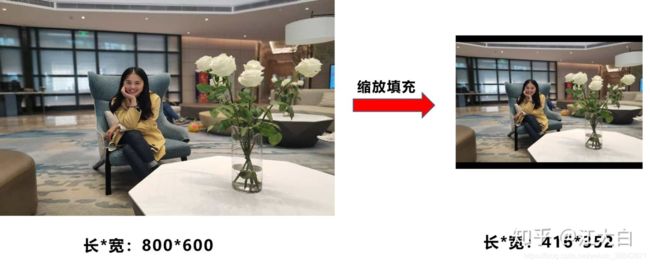
图像高度上两端的黑边变少了,在推理时,计算量也会减少,即目标检测速度会得到提升。
通过这种简单的改进,推理速度得到了37%的提升,可以说效果很明显。
Focus结构
Focus是Yolov5新增的操作,右图就是将4 * 4 * 3的图像切片后变成2 * 2 * 12的特征图。
以Yolov5s的结构为例,原始608 * 608 * 3的图像输入Focus结构,采用切片操作,先变成304 * 304 * 12的特征图,再经过一次32个卷积核的卷积操作,最终变成304 * 304 * 32的特征图。
需要注意的是:Yolov5s的Focus结构最后使用了32个卷积核,而其他三种结构,使用的数量有所增加。
CSP结构
Yolov4借鉴了CSPNet的设计思路,在主干网络中设计了CSP结构,但只有主干网络使用了CSP结构。
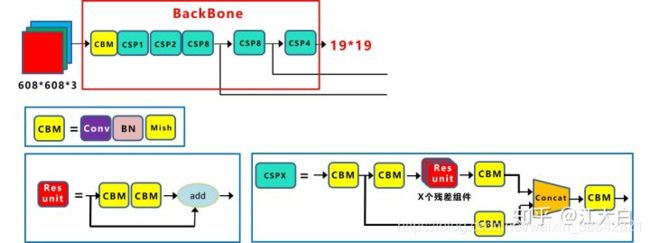
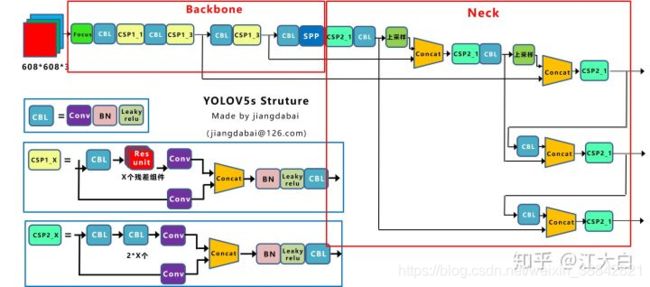
Yolov5中设计了两种CSP结构,以Yolov5s网络为例,CSP1_X结构应用于Backbone主干网络,另一种CSP2_X结构则应用于Neck中。
CSPNet(Cross Stage Partial Network):跨阶段局部网络,以缓解以前需要大量推理计算的问题。
- 增强了CNN的学习能力,能够在轻量化的同时保持准确性。
- 降低计算瓶颈。
- 降低内存成本。
CSPNet通过将梯度的变化从头到尾地集成到特征图中,在减少了计算量的同时可以保证准确率。
CSPNet和PRN都是一个思想,将feature map拆成两个部分,一部分进行卷积操作,另一部分和上一部分卷积操作的结果进行concate。
neck部分
Yolov5的Neck和Yolov4中一样,都采用FPN+PAN的结构。
FPN是自顶向下,将高层的强语义特征传递下来,对整个金字塔进行增强,不过只增强了语义信息,对定位信息没有传递。PAN就是针对这一点,在FPN的后面添加一个自底向上的金字塔,对FPN补充,将低层的强定位特征传递上去,又被称之为“双塔战术”。
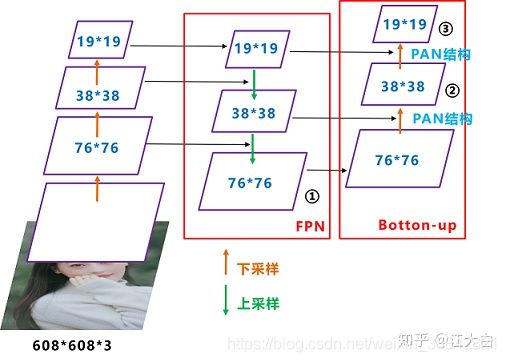
Yolov4的Neck结构中,采用的都是普通的卷积操作。而Yolov5的Neck结构中,采用借鉴CSPnet设计的CSP2结构,加强网络特征融合的能力。

输出端
主要是IOU的不同计算方法,这一块要重点理解,对于目标检测的输出结果有很大的影响(重叠)
GIOU
Yolov5中采用其中的GIOU_Loss做Bounding box的损失函数。
G I o U = I o U − ∣ A c − U ∣ ∣ A c ∣ GIoU = IoU - \frac{|A_c - U|}{|A_c|} GIoU=IoU−∣Ac∣∣Ac−U∣
上面公式的意思是:先计算两个框的最小闭包区域面积 [公式] (通俗理解:同时包含了预测框和真实框的最小框的面积),再计算出IoU,再计算闭包区域中不属于两个框的区域占闭包区域的比重,最后用IoU减去这个比重得到GIoU。

用图片来进行理解就是:
- 两个框的最小闭包区域面积 = 红色矩形面积
- IoU = 黄色框和蓝色框的交集 / 并集
- 闭包区域中不属于两个框的区域占闭包区域的比重 = 蓝色面积 / 红色矩阵面积
- GIoU = IoU - 比重
附上GIoU的计算代码
def Giou(rec1,rec2):
    #分别是第一个矩形左右上下的坐标
    x1,x2,y1,y2 = rec1
    x3,x4,y3,y4 = rec2
    iou = Iou(rec1,rec2)
    area_C = (max(x1,x2,x3,x4)-min(x1,x2,x3,x4))*(max(y1,y2,y3,y4)-min(y1,y2,y3,y4))
    area_1 = (x2-x1)*(y1-y2)
    area_2 = (x4-x3)*(y3-y4)
    sum_area = area_1 + area_2

    w1 = x2 - x1   #第一个矩形的宽
    w2 = x4 - x3   #第二个矩形的宽
    h1 = y1 - y2
    h2 = y3 - y4
    W = min(x1,x2,x3,x4)+w1+w2-max(x1,x2,x3,x4)    #交叉部分的宽
    H = min(y1,y2,y3,y4)+h1+h2-max(y1,y2,y3,y4)    #交叉部分的高
    Area = W*H    #交叉的面积
    add_area = sum_area - Area    #两矩形并集的面积

    end_area = (area_C - add_area)/area_C    #闭包区域中不属于两个框的区域占闭包区域的比重
    giou = iou - end_area
    return giou
DIoU
DIoU要比GIou更加符合目标框回归的机制,将目标与anchor之间的距离,重叠率以及尺度都考虑进去,使得目标框回归变得更加稳定,不会像IoU和GIoU一样出现训练过程中发散等问题。
D I o U = I o U − ρ 2 ( b , b g t ) c 2 DIoU = IoU - \frac{\rho^2(b,b^{gt})}{c^2} DIoU=IoU−c2ρ2(b,bgt)
其中, b , b g t b,b^{gt} b,bgt 分别代表了预测框和真实框的中心点,且 ρ \rho ρ 代表的是计算两个中心点间的欧式距离。 c c c 代表的是能够同时包含预测框和真实框的最小闭包区域的对角线距离。
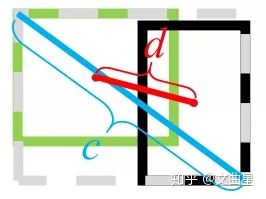
优点:
- 与GIoU loss类似,DIoU loss( L D I o U = 1 − D I o U L_{DIoU} = 1 - DIoU LDIoU=1−DIoU)在与目标框不重叠时,仍然可以为边界框提供移动方向。
- DIoU loss可以直接最小化两个目标框的距离,因此比GIoU loss收敛快得多。
- 对于包含两个框在水平方向和垂直方向上这种情况,DIoU损失可以使回归非常快,而GIoU损失几乎退化为IoU损失。
- DIoU还可以替换普通的IoU评价策略,应用于NMS中,使得NMS得到的结果更加合理和有效。
def Diou(bboxes1, bboxes2):
    rows = bboxes1.shape[0]
    cols = bboxes2.shape[0]
    dious = torch.zeros((rows, cols))
    if rows * cols == 0:#
        return dious
    exchange = False
    if bboxes1.shape[0] > bboxes2.shape[0]:
        bboxes1, bboxes2 = bboxes2, bboxes1
        dious = torch.zeros((cols, rows))
        exchange = True
    # #xmin,ymin,xmax,ymax->[:,0],[:,1],[:,2],[:,3]
    w1 = bboxes1[:, 2] - bboxes1[:, 0]
    h1 = bboxes1[:, 3] - bboxes1[:, 1]
    w2 = bboxes2[:, 2] - bboxes2[:, 0]
    h2 = bboxes2[:, 3] - bboxes2[:, 1]

    area1 = w1 * h1
    area2 = w2 * h2

    center_x1 = (bboxes1[:, 2] + bboxes1[:, 0]) / 2
    center_y1 = (bboxes1[:, 3] + bboxes1[:, 1]) / 2
    center_x2 = (bboxes2[:, 2] + bboxes2[:, 0]) / 2
    center_y2 = (bboxes2[:, 3] + bboxes2[:, 1]) / 2

    inter_max_xy = torch.min(bboxes1[:, 2:],bboxes2[:, 2:])
    inter_min_xy = torch.max(bboxes1[:, :2],bboxes2[:, :2])
    out_max_xy = torch.max(bboxes1[:, 2:],bboxes2[:, 2:])
    out_min_xy = torch.min(bboxes1[:, :2],bboxes2[:, :2])

    inter = torch.clamp((inter_max_xy - inter_min_xy), min=0)
    inter_area = inter[:, 0] * inter[:, 1]
    inter_diag = (center_x2 - center_x1)**2 + (center_y2 - center_y1)**2
    outer = torch.clamp((out_max_xy - out_min_xy), min=0)
    outer_diag = (outer[:, 0] ** 2) + (outer[:, 1] ** 2)
    union = area1+area2-inter_area
    dious = inter_area / union - (inter_diag) / outer_diag
    dious = torch.clamp(dious,min=-1.0,max = 1.0)
    if exchange:
        dious = dious.T
    return dious
CIOU
作者考虑到bbox回归三要素中的长宽比还没被考虑到计算中,因此,进一步在DIoU的基础上提出了CIoU。
Yolov4中采用CIOU_Loss作为目标Bounding box的损失。
完整的 CIoU 损失函数定义:
L C I o U = 1 − I o U + ρ 2 ( b , b g t ) c 2 + α v L_{CIoU} = 1 - IoU + \frac{\rho^2(b,b^{gt})}{c^2} + \alpha v LCIoU=1−IoU+c2ρ2(b,bgt)+αv
其中 α \alpha α 是权重函数,而 v v v 用来度量长宽比的相似性,定义为 v = 4 π 2 ( a r c t a n w g t h g t − a r c t a n w h ) 2 v = \frac{4}{\pi^2} (arctan\frac{w^{gt}}{h^{gt}} - arctan\frac{w}{h})^2 v=π24(arctanhgtwgt−arctanhw)2
def bbox_overlaps_ciou(bboxes1, bboxes2):
    rows = bboxes1.shape[0]
    cols = bboxes2.shape[0]
    cious = torch.zeros((rows, cols))
    if rows * cols == 0:
        return cious
    exchange = False
    if bboxes1.shape[0] > bboxes2.shape[0]:
        bboxes1, bboxes2 = bboxes2, bboxes1
        cious = torch.zeros((cols, rows))
        exchange = True

    w1 = bboxes1[:, 2] - bboxes1[:, 0]
    h1 = bboxes1[:, 3] - bboxes1[:, 1]
    w2 = bboxes2[:, 2] - bboxes2[:, 0]
    h2 = bboxes2[:, 3] - bboxes2[:, 1]

    area1 = w1 * h1
    area2 = w2 * h2

    center_x1 = (bboxes1[:, 2] + bboxes1[:, 0]) / 2
    center_y1 = (bboxes1[:, 3] + bboxes1[:, 1]) / 2
    center_x2 = (bboxes2[:, 2] + bboxes2[:, 0]) / 2
    center_y2 = (bboxes2[:, 3] + bboxes2[:, 1]) / 2

    inter_max_xy = torch.min(bboxes1[:, 2:],bboxes2[:, 2:])
    inter_min_xy = torch.max(bboxes1[:, :2],bboxes2[:, :2])
    out_max_xy = torch.max(bboxes1[:, 2:],bboxes2[:, 2:])
    out_min_xy = torch.min(bboxes1[:, :2],bboxes2[:, :2])

    inter = torch.clamp((inter_max_xy - inter_min_xy), min=0)
    inter_area = inter[:, 0] * inter[:, 1]
    inter_diag = (center_x2 - center_x1)**2 + (center_y2 - center_y1)**2
    outer = torch.clamp((out_max_xy - out_min_xy), min=0)
    outer_diag = (outer[:, 0] ** 2) + (outer[:, 1] ** 2)
    union = area1+area2-inter_area
    u = (inter_diag) / outer_diag
    iou = inter_area / union
    with torch.no_grad():
        arctan = torch.atan(w2 / h2) - torch.atan(w1 / h1)
        v = (4 / (math.pi ** 2)) * torch.pow((torch.atan(w2 / h2) - torch.atan(w1 / h1)), 2)
        S = 1 - iou
        alpha = v / (S + v)
        w_temp = 2 * w1
    ar = (8 / (math.pi ** 2)) * arctan * ((w1 - w_temp) * h1)
    cious = iou - (u + alpha * ar)
    cious = torch.clamp(cious,min=-1.0,max = 1.0)
    if exchange:
        cious = cious.T
    return cious
nms非极大值抑制
在目标检测的后处理过程中,针对很多目标框的筛选,通常需要nms操作。
因为CIOU_Loss中包含影响因子v,涉及groudtruth的信息,而测试推理时,是没有groundtruth的。
所以Yolov4在DIOU_Loss的基础上采用DIOU_nms的方式,而Yolov5中采用加权nms的方式。
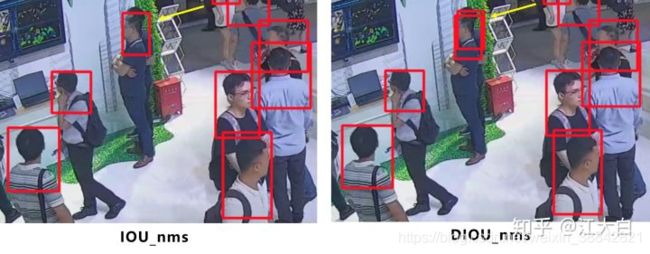
不同的nms,会有不同的效果,采用了DIOU_nms的方式,在同样的参数情况下,将nms中IOU修改成DIOU_nms。对于一些遮挡重叠的目标,确实会有一些改进。
比如下面黄色箭头部分,原本两个人重叠的部分,在参数和普通的IOU_nms一致的情况下,修改成DIOU_nms,可以将两个目标检出。
虽然大多数状态下效果差不多,但在不增加计算成本的情况下,有稍微的改进也是好的。
