【YOLOV5-5.x 源码解读】common.py
目录
- 前言
- 0、导入需要的包和基本配置
- 1、基本组件
-
- 1.1、autopad
- 1.2、Conv
- 1.3、Focus
- 1.4、Bottleneck
- 1.5、BottleneckCSP
- 1.6、C3
- 1.7、SPP
- 1.8、Concat
- 1.9、Contract、Expand
- 2、注意力模块
-
- 2.1、transformer自注意力模块
- 2.2、SE注意力模块
- 2.3、CBAM注意力模块
- 2.4、CA注意力模块
- 3、模型扩展模块
-
- 3.1、NMS
- 3.2、AutoShape
- 3.3、Detections
- 3.4、Classify
- 总结
- Reference
前言
源码: YOLOv5源码.
导航: 【YOLOV5-5.x 源码讲解】整体项目文件导航.
注释版全部项目文件已上传至GitHub: yolov5-5.x-annotations.
这个模块存放着yolov5网络搭建常见Common模块。
0、导入需要的包和基本配置
import math                # 数学函数模块
from copy import copy      # 数据拷贝模块 分浅拷贝和深拷贝
from pathlib import Path   # Path将str转换为Path对象 使字符串路径易于操作的模块

import numpy as np         # numpy数组操作模块
import pandas as pd        # panda数组操作模块
import requests            # Python的HTTP客户端库
import torch               # pytorch深度学习框架
import torch.nn as nn      # 专门为神经网络设计的模块化接口
from PIL import Image      # 图像基础操作模块
from torch.cuda import amp # 混合精度训练模块

from utils.datasets import letterbox
from utils.general import non_max_suppression, make_divisible, scale_coords, increment_path, xyxy2xywh, save_one_box
from utils.plots import colors, plot_one_box
from utils.torch_utils import time_synchronized
1、基本组件
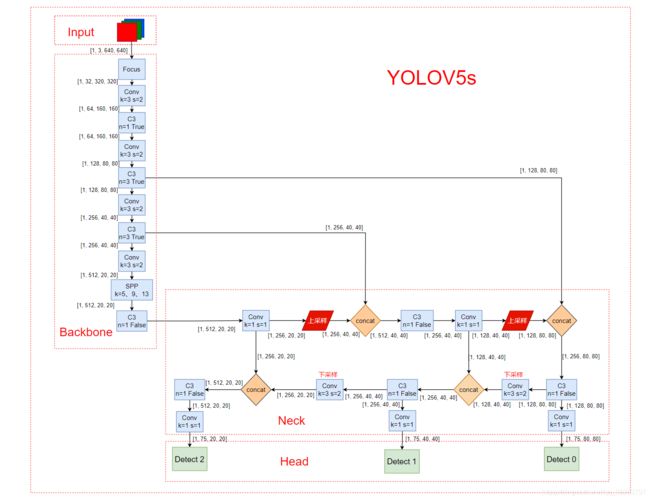
\qquad 从上面的yolov5s的结构图可以看出,下面的这些组件就是组成yolov5s的一些基本组件。
1.1、autopad
\qquad 这个模块可以根据输入的卷积核计算该卷积模块所需的pad值。将会用于下面会讲到的Conv函数和Classify函数中。
autopad模块代码:
def autopad(k, p=None):
    """用于Conv函数和Classify函数中
    为same卷积或same池化作自动扩充(0填充)  Pad to 'same'
    :params k: 卷积核的kernel_size
    :return p: 自动计算的需要pad值(0填充)
    """
    if p is None:
        p = k // 2 if isinstance(k, int) else [x // 2 for x in k]  # 自动计算pad数
    return p
1.2、Conv
\qquad 这个函数是整个网络中最基础的组件,由卷积层 + BN层 + 激活函数 组成,具体结构如下图:

\qquad 既然是基础的组件,那么肯定会在很多的模块中被调用,如Focus、Bottleneck、BottleneckCSP、C3、SPP、DWConv、TransformerBlock等。
Conv模块代码:
class Conv(nn.Module):
    def __init__(self, c1, c2, k=1, s=1, p=None, g=1, act=True):
        """在Focus、Bottleneck、BottleneckCSP、C3、SPP、DWConv、TransformerBloc等模块中调用
        Standard convolution  conv+BN+act
        :params c1: 输入的channel值
        :params c2: 输出的channel值
        :params k: 卷积的kernel_size
        :params s: 卷积的stride
        :params p: 卷积的padding  一般是None  可以通过autopad自行计算需要pad的padding数
        :params g: 卷积的groups数  =1就是普通的卷积  >1就是深度可分离卷积
        :params act: 激活函数类型   True就是SiLU()/Swish   False就是不使用激活函数
                     类型是nn.Module就使用传进来的激活函数类型
        """
        super(Conv, self).__init__()
        self.conv = nn.Conv2d(c1, c2, k, s, autopad(k, p), groups=g, bias=False)  # conv
        self.bn = nn.BatchNorm2d(c2)  # bn
        self.act = nn.SiLU() if act is True else (act if isinstance(act, nn.Module) else nn.Identity())  # activation

    def forward(self, x):
        return self.act(self.bn(self.conv(x)))

    def fuseforward(self, x):
        """用于Model类的fuse函数
        融合conv+bn 加速推理 一般用于测试/验证阶段
        """
        return self.act(self.conv(x))
\qquad 另外这个类中还有一个特殊函数 fuseforward ,这是一个前向加速推理模块,在前向传播过程中,通过融合conv + bn层,达到加速推理的作用,一般用于测试或验证阶段。
1.3、Focus
\qquad 这个模块是yolov5作者自己设计的一个模块,用在了模型的一开始,将输入图像先 slice 成4份,再做concat。结构如下所示:
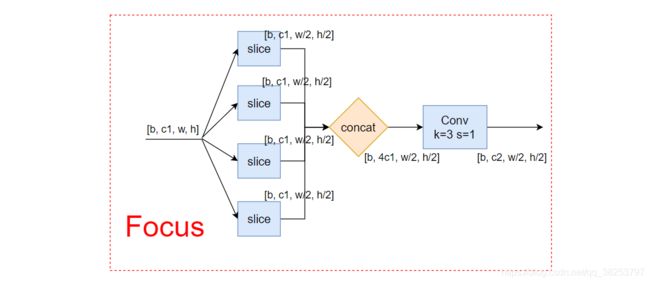
\qquad 设计思路:理论上从高分辨率图像中,周期性的抽出像素点重构到低分辨率图像中,即将图像相邻的四个位置进行堆叠,聚焦wh维度信息到c通道空,提高每个点感受野,并减少原始信息的丢失。这个组件并不是为了增加网络的精度的,而是为了减少计算量,增加速度。
Focus模块代码:
class Focus(nn.Module):
    def __init__(self, c1, c2, k=1, s=1, p=None, g=1, act=True):
        """在yolo.py的parse_model函数中被调用
        理论:从高分辨率图像中,周期性的抽出像素点重构到低分辨率图像中,即将图像相邻的四个位置进行堆叠,
            聚焦wh维度信息到c通道空,提高每个点感受野,并减少原始信息的丢失,该模块的设计主要是减少计算量加快速度。
        Focus wh information into c-space 把宽度w和高度h的信息整合到c空间中
        先做4个slice 再concat 最后再做Conv
        slice后 (b,c1,w,h) -> 分成4个slice 每个slice(b,c1,w/2,h/2)
        concat(dim=1)后 4个slice(b,c1,w/2,h/2)) -> (b,4c1,w/2,h/2)
        conv后 (b,4c1,w/2,h/2) -> (b,c2,w/2,h/2)
        :params c1: slice后的channel
        :params c2: Focus最终输出的channel
        :params k: 最后卷积的kernel
        :params s: 最后卷积的stride
        :params p: 最后卷积的padding
        :params g: 最后卷积的分组情况  =1普通卷积  >1深度可分离卷积
        :params act: bool激活函数类型  默认True:SiLU()/Swish  False:不用激活函数
        """
        super(Focus, self).__init__()
        self.conv = Conv(c1 * 4, c2, k, s, p, g, act)  # concat后的卷积(最后的卷积)
        # self.contract = Contract(gain=2)  # 也可以调用Contract函数实现slice操作

    def forward(self, x):

        # x(b,c,w,h) -> y(b,4c,w/2,h/2)  有点像做了个下采样
        return self.conv(torch.cat([x[..., ::2, ::2], x[..., 1::2, ::2], x[..., ::2, 1::2], x[..., 1::2, 1::2]], 1))
        # return self.conv(self.contract(x))
1.4、Bottleneck
\qquad 这个模式是一个标准的 bottleneck 模块,非常简单,就是由一些 1x1conv、3x3conv、残差块组成,具体的结构如下所示:
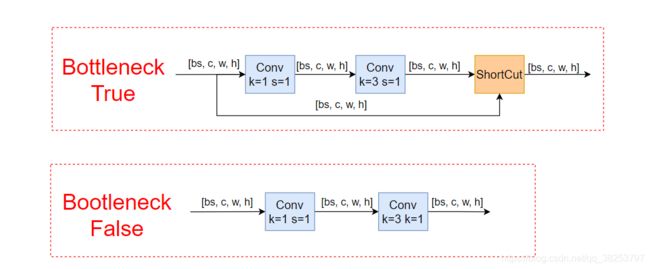
Bottleneck模块代码:
class Bottleneck(nn.Module):
    def __init__(self, c1, c2, shortcut=True, g=1, e=0.5):
        """在BottleneckCSP和yolo.py的parse_model中调用
        Standard bottleneck  Conv+Conv+shortcut
        :params c1: 第一个卷积的输入channel
        :params c2: 第二个卷积的输出channel
        :params shortcut: bool 是否有shortcut连接 默认是True
        :params g: 卷积分组的个数  =1就是普通卷积  >1就是深度可分离卷积
        :params e: expansion ratio  e*c2就是第一个卷积的输出channel=第二个卷积的输入channel
        """
        super(Bottleneck, self).__init__()
        c_ = int(c2 * e)                    # hidden channels
        self.cv1 = Conv(c1, c_, 1, 1)       # 1x1
        self.cv2 = Conv(c_, c2, 3, 1, g=g)  # 3x3
        self.add = shortcut and c1 == c2    # shortcut=True and c1 == c2 才能做shortcut

    def forward(self, x):
        return x + self.cv2(self.cv1(x)) if self.add else self.cv2(self.cv1(x))
1.5、BottleneckCSP
\qquad 这个模块是由Bottleneck模块和CSP结构组成。CSP结构来源于2019年发表的一篇论文:CSPNet: A New Backbone that can Enhance Learning Capability of CNN.如果不是很清楚这个结构或者想了解这篇论文的,可以看看我的另一篇博客:【论文复现】CSPNet(2019).
\qquad 这个模块和上面yolov5s中的C3模块等效,如果要用的话直接在yolov5s.yaml文件中讲C3改成BottleneckCSP即可,但是一般来说不用改,因为C3更好。
BottleneckCSP模块代码:
class BottleneckCSP(nn.Module):
    def __init__(self, c1, c2, n=1, shortcut=True, g=1, e=0.5):
        """在C3模块和yolo.py的parse_model模块调用
        CSP Bottleneck https://github.com/WongKinYiu/CrossStagePartialNetworks
        :params c1: 整个BottleneckCSP的输入channel
        :params c2: 整个BottleneckCSP的输出channel
        :params n: 有n个Bottleneck
        :params shortcut: bool Bottleneck中是否有shortcut,默认True
        :params g: Bottleneck中的3x3卷积类型  =1普通卷积  >1深度可分离卷积
        :params e: expansion ratio c2xe=中间其他所有层的卷积核个数/中间所有层的输入输出channel数
        """
        # ch_in, ch_out, number, shortcut, groups, expansion
        super(BottleneckCSP, self).__init__()
        c_ = int(c2 * e)  # hidden channels
        self.cv1 = Conv(c1, c_, 1, 1)
        self.cv2 = nn.Conv2d(c1, c_, 1, 1, bias=False)
        self.cv3 = nn.Conv2d(c_, c_, 1, 1, bias=False)
        self.cv4 = Conv(2 * c_, c2, 1, 1)
        self.bn = nn.BatchNorm2d(2 * c_)  # applied to cat(cv2, cv3)  2*c_
        self.act = nn.LeakyReLU(0.1, inplace=True)
        # 叠加n次Bottleneck
        self.m = nn.Sequential(*[Bottleneck(c_, c_, shortcut, g, e=1.0) for _ in range(n)])

    def forward(self, x):
        y1 = self.cv3(self.m(self.cv1(x)))
        y2 = self.cv2(x)
        return self.cv4(self.act(self.bn(torch.cat((y1, y2), dim=1))))
1.6、C3
\qquad 这个模块是一种简化版的BottleneckCSP,因为除了Bottleneck部分只有3个卷积,可以减少参数,所以取名C3。而作者之所以用C3来带代替BottleneckCSP也是有原因的,作者原话:
C3() is an improved version of CSPBottleneck(). It is simpler, faster and and lighter with similar performance and better fuse characteristics.
C3模块代码:
class C3(nn.Module):
    def __init__(self, c1, c2, n=1, shortcut=True, g=1, e=0.5):
        """在C3TR模块和yolo.py的parse_model模块调用
        CSP Bottleneck with 3 convolutions
        :params c1: 整个BottleneckCSP的输入channel
        :params c2: 整个BottleneckCSP的输出channel
        :params n: 有n个Bottleneck
        :params shortcut: bool Bottleneck中是否有shortcut,默认True
        :params g: Bottleneck中的3x3卷积类型  =1普通卷积  >1深度可分离卷积
        :params e: expansion ratio c2xe=中间其他所有层的卷积核个数/中间所有层的输入输出channel数
        """
        super(C3, self).__init__()
        c_ = int(c2 * e)  # hidden channels
        self.cv1 = Conv(c1, c_, 1, 1)
        self.cv2 = Conv(c1, c_, 1, 1)
        self.cv3 = Conv(2 * c_, c2, 1)  # act=FReLU(c2)
        self.m = nn.Sequential(*[Bottleneck(c_, c_, shortcut, g, e=1.0) for _ in range(n)])
        # 实验性 CrossConv
        # self.m = nn.Sequential(*[CrossConv(c_, c_, 3, 1, g, 1.0, shortcut) for _ in range(n)])

    def forward(self, x):
        return self.cv3(torch.cat((self.m(self.cv1(x)), self.cv2(x)), dim=1))
1.7、SPP
\qquad 这个模块的主要目的是为了将更多不同分辨率的特征进行融合,得到更多的信息。
SPP模块代码:
class SPP(nn.Module):
    def __init__(self, c1, c2, k=(5, 9, 13)):
        """在yolo.py的parse_model模块调用
        空间金字塔池化 Spatial pyramid pooling layer used in YOLOv3-SPP
        :params c1: SPP模块的输入channel
        :params c2: SPP模块的输出channel
        :params k: 保存着三个maxpool的卷积核大小 默认是(5, 9, 13)
        """
        super(SPP, self).__init__()
        c_ = c1 // 2  # hidden channels
        self.cv1 = Conv(c1, c_, 1, 1)  # 第一层卷积
        self.cv2 = Conv(c_ * (len(k) + 1), c2, 1, 1)  # 最后一层卷积  +1是因为有len(k)+1个输入
        self.m = nn.ModuleList([nn.MaxPool2d(kernel_size=x, stride=1, padding=x // 2) for x in k])

    def forward(self, x):
        x = self.cv1(x)
        return self.cv2(torch.cat([x] + [m(x) for m in self.m], 1))
1.8、Concat
\qquad 这个函数是讲自身(a list of tensors)按照某个维度进行concat,常用来合并前后两个feature map,也就是上面yolov5s结构图中的Concat。
class Concat(nn.Module):
    def __init__(self, dimension=1):
        """在yolo.py的parse_model模块调用
        Concatenate a list of tensors along dimension
        :params dimension: 沿着哪个维度进行concat
        """
        super(Concat, self).__init__()
        self.d = dimension

    def forward(self, x):
        # x: a list of tensors
        return torch.cat(x, self.d)
1.9、Contract、Expand
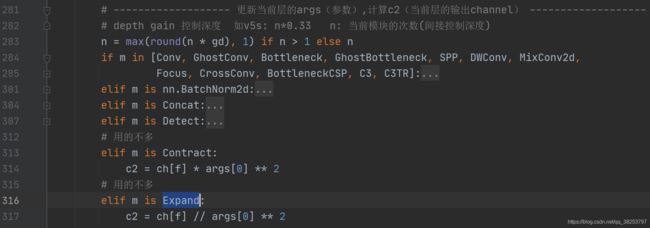
\qquad 这两个函数是用于改变feature map的维度,并不是很常用。Contract函数改变输入特征的shape,将feature map的w和h维度(缩小)的数据收缩到channel维度上(放大)。如:x(1,64,80,80) to x(1,256,40,40)。Expand函数也是改变输入特征的shape,不过与Contract的相反, 是将channel维度(变小)的数据扩展到W和H维度(变大)。如:x(1,64,80,80) to x(1,16,160,160)。
代码:
class Contract(nn.Module):
    """用在yolo.py的parse_model模块 用的不多
    改变输入特征的shape 将w和h维度(缩小)的数据收缩到channel维度上(放大)
    Contract width-height into channels, i.e. x(1,64,80,80) to x(1,256,40,40)
    """
    def __init__(self, gain=2):
        super().__init__()
        self.gain = gain

    def forward(self, x):
        N, C, H, W = x.size()  # 1 64 80 80
        s = self.gain  # 2
        x = x.view(N, C, H // s, s, W // s, s)  # x(1,64,40,2,40,2)
        # permute: 改变tensor的维度顺序
        x = x.permute(0, 3, 5, 1, 2, 4).contiguous()  # x(1,2,2,64,40,40)
        # .view: 改变tensor的维度
        return x.view(N, C * s * s, H // s, W // s)  # x(1,256,40,40)

class Expand(nn.Module):
    """用在yolo.py的parse_model模块  用的不多
    改变输入特征的shape 将channel维度(变小)的数据扩展到W和H维度(变大)
    Expand channels into width-height, i.e. x(1,64,80,80) to x(1,16,160,160)
    """
    def __init__(self, gain=2):
        super().__init__()
        self.gain = gain

    def forward(self, x):
        N, C, H, W = x.size()  # 1 64 80 80
        s = self.gain  # 2
        x = x.view(N, s, s, C // s ** 2, H, W)  # x(1,2,2,16,80,80)
        x = x.permute(0, 3, 4, 1, 5, 2).contiguous()  # x(1,16,80,2,80,2)
        return x.view(N, C // s ** 2, H * s, W * s)  # x(1,16,160,160)
会用在yolo.py的parse_model模块(用的不多):
2、注意力模块
\qquad 注意力机制一直是比较火热的研究方向。注意力机制主要是告诉模型那里更重要,什么更重要,并赋予其一个更大权重,而那些不重要的区域就赋予一个较小的权重,让模型更关注于重要的区域;同时也会起到一个结合全局信息的作用。
关于注意力机制使用的一些个人看法,不一定正确:
- 在上采样+concat之后接一个注意力机制可能会更好?
- channel-wise比spatial-wise更好用?
- backbone结尾使用一个注意力机制?
- 每个block(如residual block)结尾使用比每个Conv里使用更好?
这些只是我总结的一些注意力机制使用的常见模式,不一定适用全部的模型或者数据集,还是需要多多实验。
2.1、transformer自注意力模块
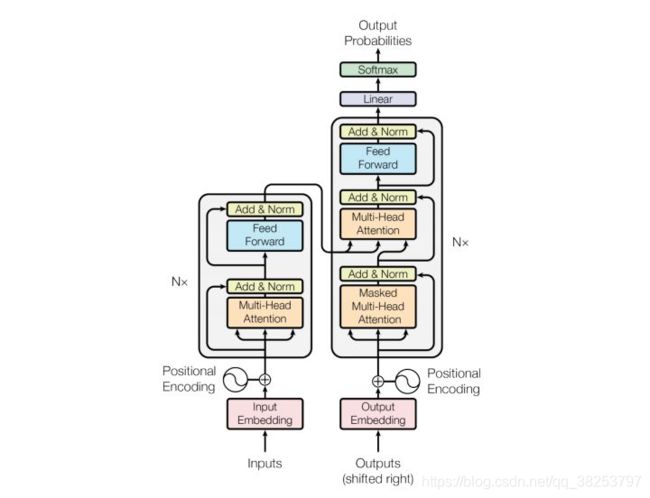
\qquad 这个部分是作者根据论文: Attention is all you need 和 (ViT)An Image is Worth 16x16 Words: Transformers for Image Recognition at Scale两篇论文中提出的Transformer自注意力机制,稍加改编而来的。
\qquad 关于transformer的论文我看的比较少,笔记都是记在ipad上,我是跟着 Transformer从零详细解读(可能是你见过最通俗易懂的讲解). 和 李宏毅老师视频. 这两个视频入的门。后面再看论文和源码。不过学的还是比较浅,就不多说了,如果想进一步了解的可以按照这个路线进行学习。
如下图是整个transformer的结构,我们这里代码部分只用了左边的Encoding部分:
transformer自注意力模块代码:
# transformer
class TransformerLayer(nn.Module):
    """
     Transformer layer https://arxiv.org/abs/2010.11929 (LayerNorm layers removed for better performance)
     视频: https://www.bilibili.com/video/BV1Di4y1c7Zm?p=5&spm_id_from=pageDriver
          https://www.bilibili.com/video/BV1v3411r78R?from=search&seid=12070149695619006113
     这部分相当于原论文中的单个Encoder部分(只移除了两个Norm部分, 其他结构和原文中的Encoding一模一样)
    """
    def __init__(self, c, num_heads):
        super().__init__()
        self.q = nn.Linear(c, c, bias=False)
        self.k = nn.Linear(c, c, bias=False)
        self.v = nn.Linear(c, c, bias=False)
        # 输入: query、key、value
        # 输出: 0 attn_output 即通过self-attention之后,从每一个词语位置输出来的attention 和输入的query它们形状一样的
        #      1 attn_output_weights 即attention weights 每一个单词和任意另一个单词之间都会产生一个weight
        self.ma = nn.MultiheadAttention(embed_dim=c, num_heads=num_heads)
        self.fc1 = nn.Linear(c, c, bias=False)
        self.fc2 = nn.Linear(c, c, bias=False)

    def forward(self, x):
        # 多头注意力机制 + 残差(这里移除了LayerNorm for better performance)
        x = self.ma(self.q(x), self.k(x), self.v(x))[0] + x
        # feed forward 前馈神经网络 + 残差(这里移除了LayerNorm for better performance)
        x = self.fc2(self.fc1(x)) + x
        return x
class TransformerBlock(nn.Module):
    """
    Vision Transformer https://arxiv.org/abs/2010.11929
    视频: https://www.bilibili.com/video/BV1Di4y1c7Zm?p=5&spm_id_from=pageDriver
         https://www.bilibili.com/video/BV1v3411r78R?from=search&seid=12070149695619006113
    这部分相当于原论文中的Encoders部分 只替换了一些编码方式和最后Encoders出来数据处理方式
    """
    def __init__(self, c1, c2, num_heads, num_layers):
        super().__init__()
        self.conv = None
        if c1 != c2:
            self.conv = Conv(c1, c2)
        self.linear = nn.Linear(c2, c2)  # learnable position embedding 位置编码
        self.tr = nn.Sequential(*[TransformerLayer(c2, num_heads) for _ in range(num_layers)]) # encoder * n
        self.c2 = c2  # 输出channel

    def forward(self, x):
        if self.conv is not None:  # embedding
            x = self.conv(x)
        b, _, w, h = x.shape
        p = x.flatten(2)
        p = p.unsqueeze(0)
        p = p.transpose(0, 3)
        p = p.squeeze(3)
        e = self.linear(p)         # positional encoding
        x = p + e                  # 残差

        x = self.tr(x)             # encode * n
        x = x.unsqueeze(3)         # encoders结束 维度处理
        x = x.transpose(0, 3)
        x = x.reshape(b, self.c2, w, h)
        return x
class C3TR(C3):
    """
    这部分是根据上面的C3结构改编而来的, 将原先的Bottleneck替换为调用TransformerBlock模块
    """
    # C3 module with TransformerBlock()
    def __init__(self, c1, c2, n=1, shortcut=True, g=1, e=0.5):
        super().__init__(c1, c2, n, shortcut, g, e)
        c_ = int(c2 * e)
        self.m = TransformerBlock(c_, c_, 4, n)
使用方式:
1、修改yolov5s.yaml的backbone部分:
# YOLOv5 backbone
backbone:
  # [from, number, module, args]
  [[-1, 1, Focus, [64, 3]],  # 0-P1/2
   [-1, 1, Conv, [128, 3, 2]],  # 1-P2/4
   [-1, 3, C3, [128]],
   [-1, 1, Conv, [256, 3, 2]],  # 3-P3/8
   [-1, 9, C3, [256]],
   [-1, 1, Conv, [512, 3, 2]],  # 5-P4/16
   [-1, 9, C3, [512]],
   [-1, 1, Conv, [1024, 3, 2]],  # 7-P5/32
   [-1, 1, SPP, [1024, [5, 9, 13]]],
   [-1, 3, C3TR, [1024, False]],  # 9  <-------- C3TR() Transformer module
  ]
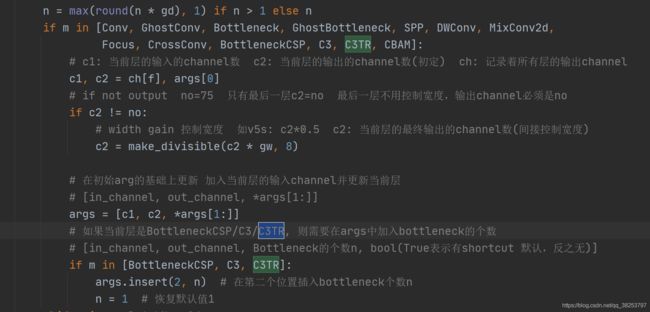
2、yolo.py中的parse_model函数调用C3TR函数:
2.2、SE注意力模块
\qquad 这个模块是自己写的实验性模块,SELayer来自论文: Squeeze-and-Excitation Networks。相关的理论请看:【论文复现】SENet(2019)。
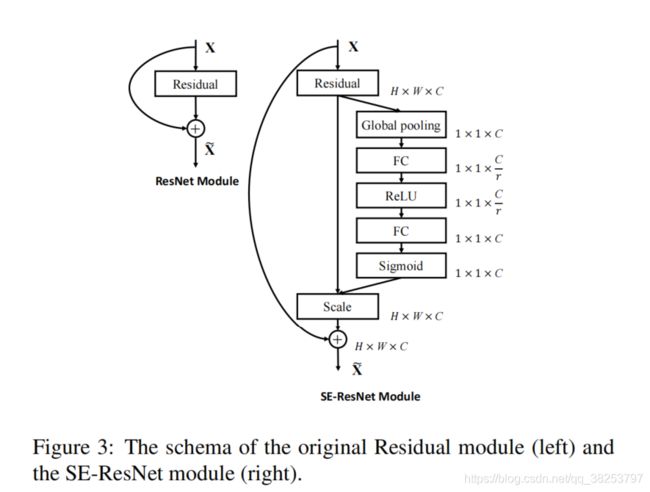
SELayer模块代码:
class SELayer(nn.Module):
    # SE注意力机制模块
    # https://arxiv.org/abs/1709.01507
    def __init__(self, c1, r=16):
        super(SELayer, self).__init__()
        self.avgpool = nn.AdaptiveAvgPool2d(1)
        self.l1 = nn.Linear(c1, c1 // r, bias=False)
        self.relu = nn.ReLU(inplace=True)
        self.l2 = nn.Linear(c1 // r, c1, bias=False)
        self.sig = nn.Sigmoid()

    def forward(self, x):
        b, c, _, _ = x.size()
        y = self.avgpool(x).view(b, c)
        y = self.l1(y)
        y = self.relu(y)
        y = self.l2(y)
        y = self.sig(y)
        y = y.view(b, c, 1, 1)
        return x * y.expand_as(x)
如何添加注意力机制?这里提供其中一个改动方法,大家也可以尝试自己的方法,效果可能都不同。
# YOLOv5 backbone
backbone:
  # [from, number, module, args]
  [
    [-1, 1, Focus, [64, 3]], # 0-P1/2                 #1
    [-1, 1, Conv, [128, 3, 2]], # 1-P2/4              #2
    [-1, 3, C3, [128]], #3
    [-1, 1, Conv, [256, 3, 2]], # 3-P3/8              #4
    [-1, 9, C3, [256]], #5
    [-1, 1, Conv, [512, 3, 2]], # 5-P4/16             #6
    [-1, 9, C3, [512]], #7
    [-1, 1, Conv, [1024, 3, 2]], # 7-P5/32            #8
    [-1, 1, SPP, [1024, [5, 9, 13]]], #9
    [-1, 3, C3, [1024, False]], # 9                   #10
    [-1, 1, SELayer, [1024, 4]], #10
  ]
2.3、CBAM注意力模块
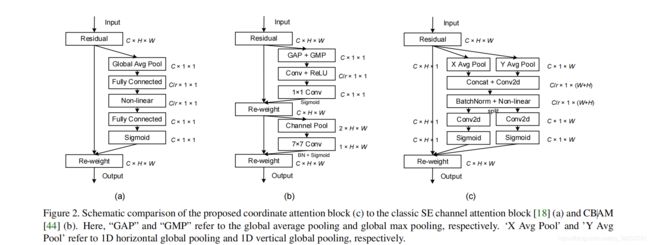
\qquad 这个模块是自己写的实验性模块,CBAM来自论文: CBAM。相关的理论请看:【论文复现】CBAM(2018)。
通道注意力模块(CAM):

空间注意力模块(SAM):
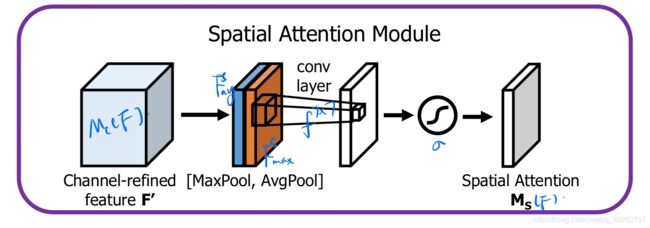
CBAM:

CBAM模块所有代码:
# CBAM
class CBAM(nn.Module):
    def __init__(self, c1,c2):
        super(CBAM, self).__init__()
        self.channel_attention = ChannelAttention(c1)
        self.spatial_attention = SpatialAttention()

    def forward(self, x):
        out = self.channel_attention(x) * x
        out = self.spatial_attention(out) * out
        return out
class ChannelAttention(nn.Module):
    def __init__(self, in_planes, ratio=16):
        """
        :params: in_planes 输入模块的feature map的channel
        :params: ratio 降维/升维因子
        通道注意力则是将一个通道内的信息直接进行全局处理,容易忽略通道内的信息交互
        """
        super(ChannelAttention, self).__init__()
        self.avg_pool = nn.AdaptiveAvgPool2d(1)  # 平均池化,是取整个channel所有元素的均值 [3,5,5] => [3,1,1]
        self.max_pool = nn.AdaptiveMaxPool2d(1)  # 最大池化,是取整个channel所有元素的最大值[3,5,5] => [3,1,1]

        # shared MLP
        self.fc1 = nn.Conv2d(in_planes, in_planes // ratio, 1, bias=False)
        self.relu1 = nn.ReLU()
        self.fc2 = nn.Conv2d(in_planes // ratio, in_planes, 1, bias=False)

        self.sigmoid = nn.Sigmoid()

    def forward(self, x):
        avg_out = self.fc2(self.relu1(self.fc1(self.avg_pool(x))))
        max_out = self.fc2(self.relu1(self.fc1(self.max_pool(x))))
        out = avg_out + max_out
        return self.sigmoid(out)
class SpatialAttention(nn.Module):
    def __init__(self, kernel_size=7):
        """对空间注意力来说,由于将每个通道中的特征都做同等处理,容易忽略通道间的信息交互"""
        super(SpatialAttention, self).__init__()

        # 这里要保持卷积后的feature尺度不变,必须要padding=kernel_size//2
        self.conv1 = nn.Conv2d(2, 1, kernel_size, padding=kernel_size // 2, bias=False)
        self.sigmoid = nn.Sigmoid()

    def forward(self, x):                               # 输入x = [b, c, 56, 56]
        avg_out = torch.mean(x, dim=1, keepdim=True)    # avg_out = [b, 1, 56, 56]  求x的每个像素在所有channel相同位置上的平均值
        max_out, _ = torch.max(x, dim=1, keepdim=True)  # max_out = [b, 1, 56, 56]  求x的每个像素在所有channel相同位置上的最大值
        x = torch.cat([avg_out, max_out], dim=1)        # x = [b, 2, 56, 56]  concat操作
        x = self.conv1(x)                               # x = [b, 1, 56, 56]  卷积操作,融合avg和max的信息,全方面考虑
        return self.sigmoid(x)
如何添加注意力机制?这里提供其中一个改动方法,大家也可以尝试自己的方法,效果可能都不同。
yolov5s-cbam.yaml
# parameters
nc: 80  # number of classes
depth_multiple: 0.33  # model depth multiple
width_multiple: 0.50  # layer channel multiple

# anchors
anchors:
  #- [5,6, 7,9, 12,10]      # P2/4
  - [10,13, 16,30, 33,23]  # P3/8
  - [30,61, 62,45, 59,119]  # P4/16
  - [116,90, 156,198, 373,326]  # P5/32

# YOLOv5 backbone
backbone:
  # [from, number, module, args]               # [c=channels,module,kernlsize,strides]-  1代表来自上一层输出
  [[-1, 1, Focus, [64, 3]],  # 0-P1/2           [c=3,64*0.5=32,3]  举例,输出通道数*width_multiple:=64*0.5
   [-1, 1, Conv, [128, 3, 2]],  # 1-P2/4
   [-1, 3, C3, [128]],
   [-1, 3, CBAM, [128]],                   # 举例,3*width_multiple:=3*0.33=1
   [-1, 1, Conv, [256, 3, 2]],  # 3-P3/8
   [-1, 9, C3, [256]],
   [-1, 3, CBAM, [256]] ,
   [-1, 1, Conv, [512, 3, 2]],  # 5-P4/16
   [-1, 9, C3, [512]],
   [-1, 3, CBAM, [512]],
   [-1, 1, Conv, [1024, 3, 2]],  # 7-P5/32
   [-1, 1, SPP, [1024, [5, 9, 13]]],
   [-1, 3, C3, [1024, False]],  # 9
   [-1, 3, CBAM, [1024]], #13

  ]

# YOLOv5 head
head:
  [[-1, 1, Conv, [512, 1, 1]],
   [-1, 1, nn.Upsample, [None, 2, 'nearest']],
   [[-1, 7], 1, Concat, [1]],  # cat backbone P4
   [-1, 3, C3, [512, False]],  # 13

   [-1, 1, Conv, [256, 1, 1]],
   [-1, 1, nn.Upsample, [None, 2, 'nearest']],
   [[-1, 4], 1, Concat, [1]],  # cat backbone P3
   [-1, 3, C3, [256, False]],  # 19 (P3/8-small)
   [-1, 3, CBAM, [256]],
   #[-1, 3, C3, [256]],

   [-1, 1, Conv, [256, 3, 2]],
   [[-1, 18], 1, Concat, [1]],  # cat head P4
   [-1, 3, C3, [512, False]],  # 23 (P4/16-medium)       [256, 256, 1, False]
   [-1, 3, CBAM, [512]],
   #[-1, 3, C3, [512]],

   [-1, 1, Conv, [512, 3, 2]],                           #[256, 256, 3, 2]
   [[-1, 14], 1, Concat, [1]],  # cat head P5
   [-1, 3, C3, [1024, False]],  # 27 (P5/32-large)       [512, 512, 1, False]
   [-1, 3, CBAM, [1024]],
   #[-1, 3, C3, [1024]],

   [[22, 26, 30], 1, ASFF_Detect, [nc, anchors,0.5,True]],  # ASFF_Detect(P3, P4, P5,mult,rfb)
  ]
2.4、CA注意力模块
\qquad CA(Coordinate Attention)协同注意力机制。来自于CVPR2021的一份最新论文中: https://arxiv.org/abs/2103.02907. 论文源码: https://github.com/Andrew-Qibin/CoordAttention/blob/main/coordatt.py.
CA注意力代码:
class CoorAttention(nn.Module):
    """
    CA Coordinate Attention 协同注意力机制
    论文 CVPR2021: https://arxiv.org/abs/2103.02907
    源码: https://github.com/Andrew-Qibin/CoordAttention/blob/main/coordatt.py
    CA注意力机制是一个Spatial Attention 相比于SAM的7x7卷积, CA建立了远程依赖
    可以考虑把SE + CA合起来用试试?
    """
    def __init__(self, inp, oup, reduction=32):
        super(CoorAttention, self).__init__()
        # [B, C, H, W] -> [B, C, H, 1]
        self.pool_h = nn.AdaptiveAvgPool2d((None, 1))
        # [B, C, H, W] -> [B, C, 1, W]
        self.pool_w = nn.AdaptiveAvgPool2d((1, None))

        mip = max(8, inp // reduction)   # 对中间层channel做一个限制 不得少于8

        # 将x轴信息和y轴信息融合在一起
        self.conv1 = nn.Conv2d(inp, mip, kernel_size=1, stride=1, padding=0)
        self.bn1 = nn.BatchNorm2d(mip)
        self.act = Hardswish()  # 这里自己可以实验什么激活函数最佳 论文里是hard-swish

        self.conv_h = nn.Conv2d(mip, oup, kernel_size=1, stride=1, padding=0)
        self.conv_w = nn.Conv2d(mip, oup, kernel_size=1, stride=1, padding=0)

    def forward(self, x):
        identity = x

        n, c, h, w = x.size()
        # [B, C, H, W] -> [B, C, H, 1]
        x_h = self.pool_h(x)   # h avg pool
        # [B, C, H, W] -> [B, C, 1, W] -> [B, C, W, 1]
        x_w = self.pool_w(x).permute(0, 1, 3, 2)  # w avg pool

        y = torch.cat([x_h, x_w], dim=2)  # [B, C, H+W, 1]
        y = self.conv1(y)
        y = self.bn1(y)
        y = self.act(y)

        # split  x_h: [B, C, H, 1]  x_w: [B, C, W, 1]
        x_h, x_w = torch.split(y, [h, w], dim=2)
        # [B, C, W, 1] -> [B, C, 1, W]
        x_w = x_w.permute(0, 1, 3, 2)

        a_h = self.conv_h(x_h).sigmoid()
        a_w = self.conv_w(x_w).sigmoid()

        # 基于W和H方向做注意力机制 建立远程依赖关系
        out = identity * a_w * a_h

        return out
整个模块没做过什么实验,有条件的朋友可以做做消融实验,不同位置或者SE+CA结合等等。
3、模型扩展模块
\qquad 下面的几个函数都是属于模型的扩展模块。yolov5的作者将搭建模型的函数功能写的很齐全。不光包含搭建模型部分,还考虑到了各个方面其他的功能,比如给模型搭载nms功能、给模型封装成包含前处理、推理、后处理的模块(预处理 + 推理 + nms)、二次分类等等功能。如下图(功能齐全):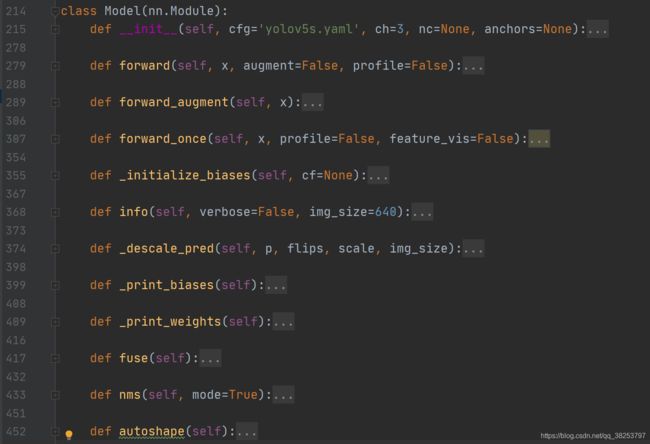
3.1、NMS
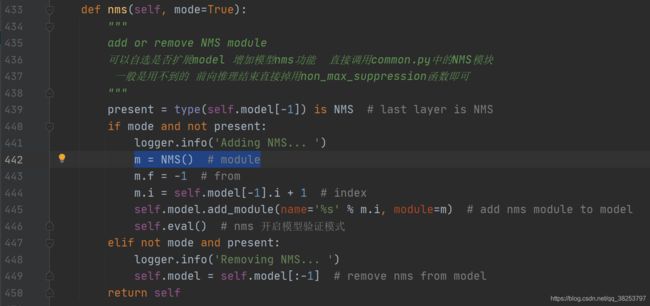
\qquad 这个模块是给模型搭载nms功能,直接调用的general.py文件的non_max_suppression函数,但是我们一般不会用, 一般是在前向推理结束后再调用non_max_suppression函数。
NMS模块代码:
class NMS(nn.Module):
    """在yolo.py中Model类的nms函数中使用
    NMS非极大值抑制 Non-Maximum Suppression (NMS) module
    给模型model封装nms  增加模型的扩展功能  但是我们一般不用 一般是在前向推理结束后再调用non_max_suppression函数
    """
    conf = 0.25     # 置信度阈值              confidence threshold
    iou = 0.45      # iou阈值                IoU threshold
    classes = None  # 是否nms后只保留特定的类别 (optional list) filter by class
    max_det = 1000  # 每张图片的最大目标个数    maximum number of detections per image

    def __init__(self):
        super(NMS, self).__init__()

    def forward(self, x):
        """
        :params x[0]: [batch, num_anchors(3个yolo预测层), (x+y+w+h+1+num_classes)]
        直接调用的是general.py中的non_max_suppression函数给model扩展nms功能
        """
        return non_max_suppression(x[0], self.conf, iou_thres=self.iou, classes=self.classes, max_det=self.max_det)
3.2、AutoShape
\qquad 这个模块是一个模型扩展模块,给模型封装成包含前处理、推理、后处理的模块(预处理 + 推理 + nms),用的不多。
AutoShape模块代码:
class AutoShape(nn.Module):
    """在yolo.py中Model类的autoshape函数中使用
    将model封装成包含前处理、推理、后处理的模块(预处理 + 推理 + nms)  也是一个扩展模型功能的模块
    autoshape模块在train中不会被调用,当模型训练结束后,会通过这个模块对图片进行重塑,来方便模型的预测
    自动调整shape,我们输入的图像可能不一样,可能来自cv2/np/PIL/torch 对输入进行预处理 调整其shape,
    调整shape在datasets.py文件中,这个实在预测阶段使用的,model.eval(),模型就已经无法训练进入预测模式了
    input-robust model wrapper for passing cv2/np/PIL/torch inputs. Includes preprocessing, inference and NMS
    """
    conf = 0.25     # 置信度阈值 NMS confidence threshold
    iou = 0.45      # NMS IoU threshold
    classes = None  # 是否nms后只保留特定的类别 (optional list) filter by class
    max_det = 1000  # maximum number of detections per image

    def __init__(self, model):
        super(AutoShape, self).__init__()
        # 开启验证模式
        self.model = model.eval()

    def autoshape(self):
        print('AutoShape already enabled, skipping... ')  # model already converted to model.autoshape()
        return self

    @torch.no_grad()
    def forward(self, imgs, size=640, augment=False, profile=False):
        # 这里的imgs针对不同的方法读入,官方也给了具体的方法,size是图片的尺寸,就比如最上面图片里面的输入608*608*3
        # Inference from various sources. For height=640, width=1280, RGB images example inputs are:
        #   filename:   imgs = 'data/images/zidane.jpg'
        #   URI:             = 'https://github.com/ultralytics/yolov5/releases/download/v1.0/zidane.jpg'
        #   OpenCV:          = cv2.imread('image.jpg')[:,:,::-1]  # HWC BGR to RGB x(640,1280,3)
        #   PIL:             = Image.open('image.jpg')  # HWC x(640,1280,3)
        #   numpy:           = np.zeros((640,1280,3))  # HWC
        #   torch:           = torch.zeros(16,3,320,640)  # BCHW (scaled to size=640, 0-1 values)
        #   multiple:        = [Image.open('image1.jpg'), Image.open('image2.jpg'), ...]  # list of images
        t = [time_synchronized()]
        p = next(self.model.parameters())  # for device and type

        # 图片如果是tensor格式 说明是预处理过的, 直接正常进行前向推理即可 nms在推理结束进行(函数外写)
        if isinstance(imgs, torch.Tensor):  # torch
            with amp.autocast(enabled=p.device.type != 'cpu'):
                return self.model(imgs.to(p.device).type_as(p), augment, profile)  # inference

        # 图片不是tensor格式 就先对图片进行预处理  Pre-process
        n, imgs = (len(imgs), imgs) if isinstance(imgs, list) else (1, [imgs])  # number of images, list of images
        shape0, shape1, files = [], [], []  # image and inference shapes, filenames
        for i, im in enumerate(imgs):
            f = f'image{i}'  # filename
            if isinstance(im, str):  # filename or uri
                im, f = np.asarray(Image.open(requests.get(im, stream=True).raw if im.startswith('http') else im)), im
            elif isinstance(im, Image.Image):  # PIL Image
                im, f = np.asarray(im), getattr(im, 'filename', f) or f
            files.append(Path(f).with_suffix('.jpg').name)
            if im.shape[0] < 5:  # image in CHW
                im = im.transpose((1, 2, 0))  # reverse dataloader .transpose(2, 0, 1)
            im = im[:, :, :3] if im.ndim == 3 else np.tile(im[:, :, None], 3)  # enforce 3ch input
            s = im.shape[:2]  # HWC
            shape0.append(s)  # image shape
            g = (size / max(s))  # gain
            shape1.append([y * g for y in s])
            imgs[i] = im if im.data.contiguous else np.ascontiguousarray(im)  # update
        shape1 = [make_divisible(x, int(self.stride.max())) for x in np.stack(shape1, 0).max(0)]  # inference shape
        x = [letterbox(im, new_shape=shape1, auto=False)[0] for im in imgs]  # pad image
        x = np.stack(x, 0) if n > 1 else x[0][None]  # stack image
        x = np.ascontiguousarray(x.transpose((0, 3, 1, 2)))  # BHWC to BCHW
        x = torch.from_numpy(x).to(p.device).type_as(p) / 255.  # uint8 to fp16/32
        t.append(time_synchronized())

        with amp.autocast(enabled=p.device.type != 'cpu'):
            # 预处理结束再进行前向推理  Inference
            y = self.model(x, augment, profile)[0]  # forward 前向推理
            t.append(time_synchronized())

            # 前向推理结束后 进行后处理Post-process  nms
            y = non_max_suppression(y, self.conf, iou_thres=self.iou, classes=self.classes, max_det=self.max_det)  # NMS
            for i in range(n):
                scale_coords(shape1, y[i][:, :4], shape0[i])  # 将nms后的预测结果映射回原图尺寸
            t.append(time_synchronized())

            return Detections(imgs, y, files, t, self.names, x.shape)
在yolo.py中Model类的autoshape函数中使用:

3.3、Detections
\qquad 对推理结果进行一些处理,用的真的不多,整个yolov5只在上面的AutoShape函数结尾调用了一下,感兴趣的可以看看,偷下懒,我就不看了。
class Detections:
    """用在AutoShape函数结尾
    detections class for YOLOv5 inference results
    """
    def __init__(self, imgs, pred, files, times=None, names=None, shape=None):
        super(Detections, self).__init__()
        d = pred[0].device  # device
        gn = [torch.tensor([*[im.shape[i] for i in [1, 0, 1, 0]], 1., 1.], device=d) for im in imgs]  # normalizations
        self.imgs = imgs  # list of images as numpy arrays
        self.pred = pred  # list of tensors pred[0] = (xyxy, conf, cls)
        self.names = names  # class names
        self.files = files  # image filenames
        self.xyxy = pred  # xyxy pixels
        self.xywh = [xyxy2xywh(x) for x in pred]  # xywh pixels
        self.xyxyn = [x / g for x, g in zip(self.xyxy, gn)]  # xyxy normalized
        self.xywhn = [x / g for x, g in zip(self.xywh, gn)]  # xywh normalized
        self.n = len(self.pred)  # number of images (batch size)
        self.t = tuple((times[i + 1] - times[i]) * 1000 / self.n for i in range(3))  # timestamps (ms)
        self.s = shape  # inference BCHW shape

    def display(self, pprint=False, show=False, save=False, crop=False, render=False, save_dir=Path('')):
        for i, (im, pred) in enumerate(zip(self.imgs, self.pred)):
            str = f'image {i + 1}/{len(self.pred)}: {im.shape[0]}x{im.shape[1]} '
            if pred is not None:
                for c in pred[:, -1].unique():
                    n = (pred[:, -1] == c).sum()  # detections per class
                    str += f"{n} {self.names[int(c)]}{'s' * (n > 1)}, "  # add to string
                if show or save or render or crop:
                    for *box, conf, cls in pred:  # xyxy, confidence, class
                        label = f'{self.names[int(cls)]} {conf:.2f}'
                        if crop:
                            save_one_box(box, im, file=save_dir / 'crops' / self.names[int(cls)] / self.files[i])
                        else:  # all others
                            plot_one_box(box, im, label=label, color=colors(cls))

            im = Image.fromarray(im.astype(np.uint8)) if isinstance(im, np.ndarray) else im  # from np
            if pprint:
                print(str.rstrip(', '))
            if show:
                im.show(self.files[i])  # show
            if save:
                f = self.files[i]
                im.save(save_dir / f)  # save
                print(f"{'Saved' * (i == 0)} {f}", end=',' if i < self.n - 1 else f' to {save_dir}\n')
            if render:
                self.imgs[i] = np.asarray(im)

    def print(self):
        self.display(pprint=True)  # print results
        print(f'Speed: %.1fms pre-process, %.1fms inference, %.1fms NMS per image at shape {tuple(self.s)}' % self.t)

    def show(self):
        self.display(show=True)  # show results

    def save(self, save_dir='runs/hub/exp'):
        save_dir = increment_path(save_dir, exist_ok=save_dir != 'runs/hub/exp', mkdir=True)  # increment save_dir
        self.display(save=True, save_dir=save_dir)  # save results

    def crop(self, save_dir='runs/hub/exp'):
        save_dir = increment_path(save_dir, exist_ok=save_dir != 'runs/hub/exp', mkdir=True)  # increment save_dir
        self.display(crop=True, save_dir=save_dir)  # crop results
        print(f'Saved results to {save_dir}\n')

    def render(self):
        self.display(render=True)  # render results
        return self.imgs

    def pandas(self):
        # return detections as pandas DataFrames, i.e. print(results.pandas().xyxy[0])
        new = copy(self)  # return copy
        ca = 'xmin', 'ymin', 'xmax', 'ymax', 'confidence', 'class', 'name'  # xyxy columns
        cb = 'xcenter', 'ycenter', 'width', 'height', 'confidence', 'class', 'name'  # xywh columns
        for k, c in zip(['xyxy', 'xyxyn', 'xywh', 'xywhn'], [ca, ca, cb, cb]):
            a = [[x[:5] + [int(x[5]), self.names[int(x[5])]] for x in x.tolist()] for x in getattr(self, k)]  # update
            setattr(new, k, [pd.DataFrame(x, columns=c) for x in a])
        return new

    def tolist(self):
        # return a list of Detections objects, i.e. 'for result in results.tolist():'
        x = [Detections([self.imgs[i]], [self.pred[i]], self.names, self.s) for i in range(self.n)]
        for d in x:
            for k in ['imgs', 'pred', 'xyxy', 'xyxyn', 'xywh', 'xywhn']:
                setattr(d, k, getattr(d, k)[0])  # pop out of list
        return x

    def __len__(self):
        return self.n
3.4、Classify
\qquad 这是一个二级分类模块,什么是二级分类模块?比如做车牌的识别,先识别出车牌 ,如果想对车牌上的字进行识别,就需要二级分类进一步检测。如果对模型输出的分类再进行分类,就可以用这个模块。不过这里这个类写的比较简单,若进行复杂的二级分类,可以根据自己的实际任务可以改写,这里代码不唯一。这里的功能和torch_utils.py中的load_classifier函数功能相似,不过我们这里是给模型自定义的,可以直接加载在模型上。用的不多的。
Classify模块代码:
class Classify(nn.Module):
    def __init__(self, c1, c2, k=1, s=1, p=None, g=1):
        """
        这是一个二级分类模块, 什么是二级分类模块? 比如做车牌的识别, 先识别出车牌, 如果想对车牌上的字进行识别, 就需要二级分类进一步检测.
        如果对模型输出的分类再进行分类, 就可以用这个模块. 不过这里这个类写的比较简单, 若进行复杂的二级分类, 可以根据自己的实际任务可以改写, 这里代码不唯一.
        Classification head, i.e. x(b,c1,20,20) to x(b,c2)
        用于第二级分类   可以根据自己的任务自己改写,比较简单
        比如车牌识别 检测到车牌之后还需要检测车牌在哪里,如果检测到侧拍后还想对车牌上的字再做识别的话就要进行二级分类
        """
        # ch_in, ch_out, kernel, stride, padding, groups
        super(Classify, self).__init__()
        self.aap = nn.AdaptiveAvgPool2d(1)  # to x(b,c1,1,1)  自适应平均池化操作
        self.conv = nn.Conv2d(c1, c2, k, s, autopad(k, p), groups=g)  # to x(b,c2,1,1)
        self.flat = nn.Flatten()  # 展平

    def forward(self, x):
        # 先自适应平均池化操作, 然后拼接
        z = torch.cat([self.aap(y) for y in (x if isinstance(x, list) else [x])], 1)  # cat if list
        # 对z进行展平操作
        return self.flat(self.conv(z))  # flatten to x(b,c2)
总结
\qquad 由于yolov5是函数式的编程,所以yolov5把每个模块写成了一个个的函数形式,这个文件的代码是整个网络搭建的基石,所以一定要牢牢掌握。第一部分的基本组件除了1.9的2个函数其他的8个函数都很重要;第二部分是包括yolov5作者自己探索的自注意力和我这阵子学习的一些注意力机制,我都加了进来,大家看了一尽情的尝试;第三部分的内容并不是很重要的,只是对模型功能进行了一系列的扩展,可看可不看。
–2021.08.24 10:24
Reference
CSDN XiaoGShou: yolov5 代码解读 --common.py
CSDN weixin_45483906: YoloV5系列(2)-model解析
