pandas数据相关性分析_使用Pandas,SciPy和Seaborn进行探索性数据分析
pandas数据相关性分析
In this post we are going to learn to explore data using Python, Pandas, and Seaborn. The data we are going to explore is data from a Wikipedia article. In this post we are actually going to learn how to parse data from a URL, exploring this data by grouping it and data visualization. More specifically, we will learn how to count missing values, group data to calculate the mean, and then visualize relationships between two variables, among other things.
在本文中,我们将学习使用Python, Pandas和Seaborn探索数据。 我们将要探索的数据是维基百科文章中的数据。 在这篇文章中,我们实际上将学习如何从URL解析数据,通过对数据进行分组和数据可视化来对其进行探索。 更具体地说,我们将学习如何计算缺失值,将数据分组以计算平均值,然后可视化两个变量之间的关系。
In previous posts we have used Pandas to import data from Excel and CSV files. Here we are going to use Pandas read_html because it has support for reading data from HTML from URLs (https or http). To read HTML Pandas use one of the Python libraries LXML, Html5Lib, or BeautifulSoup4. This means that you have to make sure that at least one of these libraries are installed. In the specific Pandas read_html example here, we use BeautifulSoup4 to parse the html tables from the Wikipedia article.
在以前的文章中,我们使用Pandas从Excel和CSV文件导入数据。 在这里,我们将使用Pandas read_html,因为它支持从URL(https或http)中读取HTML数据。 要读取HTML熊猫,请使用Python库LXML,Html5Lib或BeautifulSoup4中的一种。 这意味着您必须确保至少安装了这些库之一。 在此处的特定Pandas read_html示例中,我们使用BeautifulSoup4来解析Wikipedia文章中的html表。
安装库 (Installing the Libraries)
Before proceeding to the Pandas read_html example we are going to install the required libraries. In this post we are going to use Pandas, Seaborn, NumPy, SciPy, and BeautifulSoup4. We are going to use Pandas to parse HTML and plotting, Seaborn for data visualization, NumPy and SciPy for some calculations, and BeautifulSoup4 as the parser for the read_html method.
在继续阅读Pandas read_html示例之前,我们将安装所需的库。 在本文中,我们将使用Pandas,Seaborn,NumPy,SciPy和BeautifulSoup4。 我们将使用Pandas解析HTML和绘图,使用Seaborn进行数据可视化,使用NumPy和SciPy进行一些计算,并使用BeautifulSoup4作为read_html方法的解析器。
Installing Anaconda is the absolutely easiest method to install all packages needed. If your Anaconda distribution you can open up your terminal and type: conda install
安装Anaconda是绝对简单的方法来安装所有需要的软件包。 如果是Anaconda发行版,则可以打开终端并键入:conda install
conda install numpy scipy pandas seaborn beautifulsoup4
It’s also possible to install using Pip:
也可以使用Pip安装:
pip install numpy scipy pandas seaborn beautifulsoup4
如何使用熊猫read_html (How to Use Pandas read_html)
In this section we will work with Pandas read_html to parse data from a Wikipedia article. The article we are going to parse have 6 tables and there are some data we are going to explore in 5 of them. We are going to look at Scoville Heat Units and Pod size of different chili pepper species.
在本节中,我们将与Pandas read_html一起使用,以分析Wikipedia文章中的数据。 我们将要分析的文章有6个表,其中5个将要探究一些数据。 我们将研究Scoville的热量单位和不同辣椒品种的荚大小。
import pandas as pd

url = 'https://en.wikipedia.org/wiki/List_of_Capsicum_cultivars'
data = pd.read_html(url, flavor='bs4', header=0, encoding='UTF8')
In the code above we are, as usual, starting by importing pandas. After that we have a string variable (i.e., URL) that is pointing to the URL. We are then using Pandas read_html to parse the HTML from the URL. As with the read_csv and read_excel methods, the parameter header is used to tell Pandas read_html on which row the headers are. In this case, it’s the first row. The parameter flavor is used, here, to make use of beatifulsoup4 as HTML parser. If we use LXML, some columns in the dataframe will be empty. Anyway, what we get is all tables from the URL. These tables are, in turn, stored in a list (data). In this Panda read_html example the last table is not of interest:
在上面的代码中,我们照常从导入熊猫开始。 之后,我们有一个指向URL的字符串变量(即URL)。 然后,我们使用Pandas read_html从URL解析HTML。 与read_csv和read_excel方法一样,参数标头用于告诉Pandas read_html标头在哪一行。 在这种情况下,它是第一行。 这里使用参数flavor来将beatifulsoup4用作HTML解析器。 如果我们使用LXML,则数据框中的某些列将为空。 无论如何,我们得到的是URL中的所有表。 这些表又存储在列表(数据)中。 在此Panda read_html示例中,最后一张表不感兴趣:
Thus we are going to remove this dataframe from the list:
因此,我们将从列表中删除此数据框:
# Let's remove the last table
del data[-1]
合并熊猫数据框 (Merging Pandas Dataframes)
The aim with this post is to explore the data and what we need to do now is to add a column in each dataframe in the list. This columns will have information about the species and we create a list with strings. In the following for-loop we are adding a new column, named “Species”, and we add the species name from the list.
这篇文章的目的是探索数据,我们现在需要做的是在列表的每个数据框中添加一列。 此列将提供有关物种的信息,我们将创建一个包含字符串的列表。 在下面的for循环中,我们添加了一个名为“ Species”的新列,并从列表中添加了种类名称。
species = ['Capsicum annum', 'Capsicum baccatum', 'Capsicum chinense',
          'Capsicum frutescens', 'Capsicum pubescens']


for i in range(len(species)):
    data[i]['Species'] = species[i]
Finally, we are going to concatenate the list of dataframes using Pandas concat:
最后,我们将使用Pandas concat连接数据帧列表:
df = pd.concat(data, sort=False)
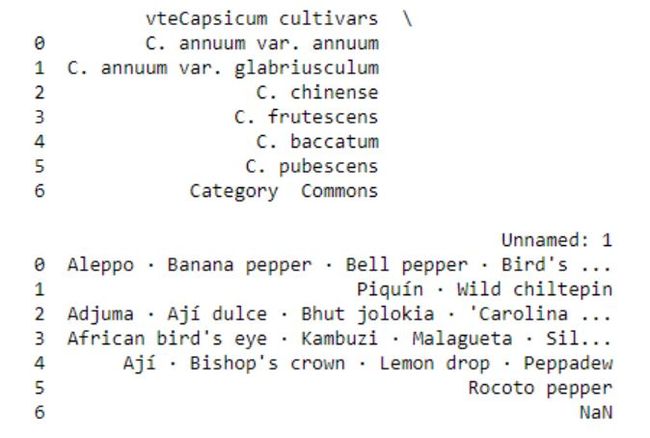
df.head()
()
The data we obtained using Pandas read_html can, of course, be saved locally using either Pandas to_csv or to_excel, among other methods. See the two following tutorials on how to work with these methods and file formats:
当然,我们使用Pandas read_html获取的数据可以使用Pandas to_csv或to_excel等方法在本地保存。 请参阅以下两个有关如何使用这些方法和文件格式的教程:
- Pandas Read CSV Tutorial
- Pandas Excel Tutorial
- 熊猫阅读CSV教程
- 熊猫Excel教程
准备数据 (Preparing the Data)
Now that we have used Pandas read_html and merged the dataframes we need to clean up the data a bit. We are going to use the method map together with lambda and regular expressions (i.e., sub, findall) to remove and extract certain things from the cells. We are also using the split and rstrip methods to split the strings into pieces. In this example we want the centimeter values. Because of the missing values in the data we have to see if the value from a cell (x, in this case) is a string. If not, we will us NumPy’s NaN to code that it is a missing value.
现在我们已经使用了Pandas read_html并合并了数据帧,我们需要稍微清理一下数据。 我们将使用方法映射以及lambda和正则表达式(即sub,findall)来从单元格中删除某些内容。 我们还使用split和rstrip方法将字符串分成多个部分。 在此示例中,我们需要厘米值。 由于数据中缺少值,因此我们必须查看单元格(在本例中为x)中的值是否为字符串。 如果不是,我们将使用NumPy的NaN编码为缺少的值。
# Remove brackets and whats between them (e.g. [14])
df['Name'] = df['Name'].map(lambda x: re.sub("[([].*?[)]]", "", x)
                                         if isinstance(x, str) else np.NaN)

# Pod Size get cm
df['Pod size'] = df['Pod size'].map(lambda x: x.split(' ', 1)[0].rstrip('cm')
                                              if isinstance(x, str) else np.NaN)

# Taking the largest number in a range and convert all values to float
df['Pod size']  = df['Pod size'].map(lambda x: x.split('–', 1)[-1]
                                              if isinstance(x, str) else np.NaN)
# Convert to float
df['Pod size'] = df['Pod size'].map(lambda x: float(x))

# Taking the largest SHU
df['Heat'] = df['Heat'].map(lambda x: re.sub("[([].*?[)]]", "", x)
                            if isinstance(x, str) else np.NaN)
df['Heat'] = df['Heat'].str.replace(',', '')
df['Heat'] = df['Heat'].map(lambda x: float(re.findall(r'd+(?:,d+)?', x)[-1])
                            if isinstance(x, str) else np.NaN)
Python中的探索性数据分析 (Explorative Data Analysis in Python)
In this section we are going to explore the data using Pandas and Seaborn. First we are going to see how many missing values we have, count how many occurrences we have of one factor, and then group the data and calculate the mean values for the variables.
在本节中,我们将使用Pandas和Seaborn探索数据。 首先,我们将查看我们有多少个缺失值,计算一个因素中有多少次出现,然后将数据分组并计算变量的平均值。
计算缺失值 (Counting Missing Values)
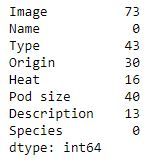
First thing we are going to do is to count the number of missing values in the different columns. We are going to do this using the isna and sum methods:
我们要做的第一件事是计算不同列中缺失值的数量。 我们将使用isna和sum方法执行此操作:
df.isna().sum()
Later in the post we are going to explore the relationship between the heat and the pod size of chili peppers. Note, there are a lot of missing data in both of these columns.
在后面的文章中,我们将探讨辣椒的热量和豆荚大小之间的关系。 请注意,这两列都缺少很多数据。
统计列中的分类数据 (Counting categorical Data in a Column)
We can also count how many factors (or categorical data; i.e., strings) we have in a column by selecting that column and using the Pandas Series method value_counts:
我们还可以通过选择该列并使用Pandas Series方法value_counts来计算一列中有多少个因素(或分类数据;即字符串):
df['Species'].value_counts()
按组汇总 (Aggregating by Group)
We can also calculate the mean Heat and Pod size for each species using Pandas groupby and mean methods:
我们还可以使用Pandas groupby和均值方法计算每个物种的平均热量和荚果大小:
df_aggregated = df.groupby('Species').mean().reset_index()
df_aggregated
There are of course many other ways to explore your data using Pandas methods (e.g., value_counts, mean, groupby). See the posts Descriptive Statistics using Python and Data Manipulation with Pandas for more information.
当然,还有许多其他方法可以使用Pandas方法(例如value_counts,mean,groupby)浏览数据。 有关更多信息,请参见使用Python进行描述性统计和使用Pandas进行数据处理 。
使用Pandas和Seaborn进行数据可视化 (Data Visualization using Pandas and Seaborn)
In this section we are going to visualize the data using Pandas and Seaborn. We are going to start to explore whether there is a relationship between the size of the chili pod (‘Pod size’) and the heat of the chili pepper (Scoville Heat Units).
在本节中,我们将使用Pandas和Seaborn可视化数据。 我们将开始研究辣椒荚的大小(“荚大小”)和辣椒的热量(斯科维尔加热装置)之间是否存在关系。
熊猫散点图 (Pandas Scatter Plot)
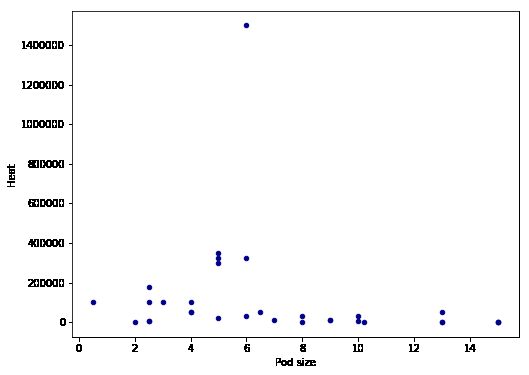
In the first scatter plot, we are going to use Pandas built-in method ‘scatter’. In this basic example we are going to have pod size on the x-axis and heat on the y-axis. We are also getting the blue points by using the parameter c.
在第一个散点图中,我们将使用Pandas内置方法“散点”。 在这个基本示例中,我们将在x轴上具有容器尺寸,在y轴上具有热量。 我们还通过使用参数c获得了蓝点。
ax1 = df.plot.scatter(x='Pod size',
                    y='Heat',
                     c='DarkBlue')
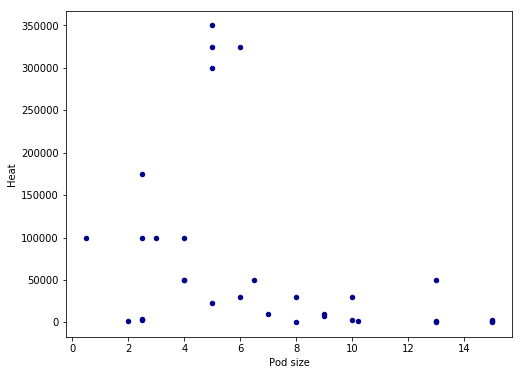
There seems to be a linear relationship between heat and pod size. However, we have an outlier in the data and the pattern may be more clear if we remove it. Thus, in the next Pandas scatter plot example we are going to subset the dataframe taking only values under 1,400,000 SHU:
热量和豆荚大小之间似乎存在线性关系。 但是,我们在数据中存在异常值,如果我们将其删除,则模式可能会更加清晰。 因此,在下一个Pandas散点图示例中,我们将对数据框进行子集处理,仅采用1,400,000 SHU以下的值:
ax1 = df.query('Heat < 1400000').plot.scatter(x='Pod size',
                    y='Heat',
                     c='DarkBlue', figsize=(8, 6))
We used pandas query to select the rows were the value in the column ‘Heat’ is lower than preferred value. The resulting scatter plot shows a more convincing pattern:
我们使用熊猫查询来选择“热”列中的值低于首选值的行。 生成的散点图显示了更令人信服的模式:
We still have some possible outliers (around 300,000 – 35000 SHU) but we are going to leave them. Note that I used the parameter figsize=(8, 6) in both plots above to get the dimensions of the posted images. That is, if you want to change the dimensions of the Pandas plots you should use figsize.
我们仍然有一些可能的离群值(大约300,000 – 35000 SHU),但我们将保留它们。 请注意,我在以上两个图中都使用了参数figsize =(8,6)来获取发布图像的尺寸。 也就是说,如果要更改熊猫图的尺寸,则应使用figsize。
Now we would like to plot a regression line on the Pandas scatter plot. As far as I know, this is not possible (please comment below if you know a solution and I will add it). Therefore, we are now going to use Seaborn to visualize data as it gives us more control and options over our graphics.
现在,我们想在熊猫散点图上绘制一条回归线。 据我所知,这是不可能的(如果您知道解决方案,请在下面评论,我将添加它)。 因此,我们现在将使用Seaborn来可视化数据,因为它为我们提供了对图形的更多控制和选项。
使用Seaborn进行数据可视化 (Data Visualization using Seaborn)
In this section we are going to continue exploring the data using the Python package Seaborn. We start with scatter plots and continue with
在本节中,我们将继续使用Python软件包Seaborn探索数据。 我们从散点图开始,然后继续
Seaborn散点图 (Seaborn Scatter Plot)
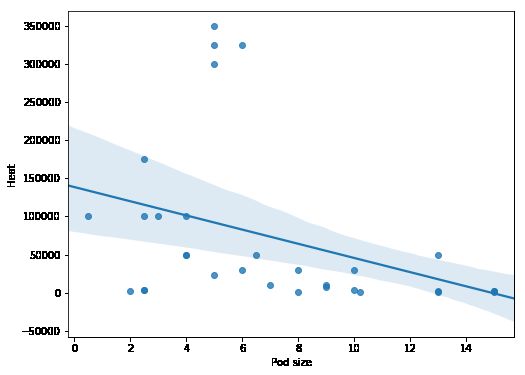
Creating a scatter plot using Seaborn is very easy. In the basic scatter plot example below we are, as in the Pandas example, using the parameters x and y (x-axis and y-axis, respectively). However, we have use the parameter data and our dataframe.
使用Seaborn创建散点图非常容易。 在下面的基本散点图示例中,就像在熊猫示例中一样,我们使用参数x和y(分别为x轴和y轴)。 但是,我们使用了参数数据和数据框。
import seaborn as sns

ax = sns.regplot(x="Pod size", y="Heat", data=df.query('Heat < 1400000'))
Python中的关联 (Correlation in Python)
Judging from above there seems to be a relationship between the variables of interest. Next thing we are going to do is to see if this visual pattern also shows up as a statistical association (i.e., correlation). To this aim, we are going to use SciPy and the pearsonr method. We start by importing pearsonr from scipy.stats.
从上面判断,感兴趣的变量之间似乎存在关系。 接下来,我们要做的是查看这种视觉模式是否也显示为统计关联(即相关性)。 为此,我们将使用SciPy和pearsonr方法。 我们首先从scipy.stats导入pearsonr。
from scipy.stats import pearsonr
As we found out when exploring the data using Pandas groupby there was a lot of missing data (both for heat and pod size). When calculating the correlation coefficient using Python we need to remove the missing values. Again, we are also removing the strongest chili pepper using Pandas query.
正如我们在使用Pandas groupby探索数据时发现的那样,有很多缺失的数据(包括热量和豆荚大小)。 使用Python计算相关系数时,我们需要删除缺失值。 同样,我们还使用Pandas查询删除了最强的辣椒。
df_full = df[['Heat', 'Pod size']].dropna()
df_full = df_full.query('Heat < 1400000')
print(len(df_full))
# Output: 31
Note, in the example above we are selecting the columns “Heat” and “Pod size” only. If we want to keep the other variables but only have complete cases we can use the subset parameter (df_full = df.dropna(subset=[‘Heat’, ‘Pod size’])). That said, we now have a subset of our dataframe with 31 complete cases and it’s time to carry out the correlation. It’s quite simple, we just put in the variables of interest. We are going to display the correlation coefficient and p-value on the scatter plot later so we use NumPy’s round to round the values.
注意,在上面的示例中,我们仅选择“加热”和“容器大小”列。 如果我们想保留其他变量但只有完整的情况,则可以使用子集参数(df_full = df.dropna(subset = ['Heat','Pod size']))。 也就是说,我们现在有31个完整案例的数据框子集,现在该进行关联了。 这很简单,我们只需要输入感兴趣的变量即可。 稍后,我们将在散点图上显示相关系数和p值,因此我们使用NumPy的舍入对值进行舍入。
corr = pearsonr(df_full['Heat'], df_full['Pod size'])
corr = [np.round(c, 2) for c in corr]
print(corr)
# Output: [-0.37, 0.04]
具有趋势线的Seaborn相关图 (Seaborn Correlation Plot with Trend Line)
It’s time to stitch everything together! First, we are creating a text string for displaying the correlation coefficient (r=-0.37) and the p-value (p=0.04). Second, we are creating the correlation plot using Seaborn regplot, as in the previous example. To display the text we use the text method; the first parameter is the x coordinate and the second is the y coordinate. After the coordinates we have our text and the size of the font. We are also sing set_title to add a title to the Seaborn plot and we are changing the x- and y-labels using the set method.
是时候将所有内容拼接在一起了! 首先,我们创建一个文本字符串来显示相关系数(r = -0.37)和p值(p = 0.04)。 第二,如上例所示,我们使用Seaborn regplot创建相关图。 为了显示文本,我们使用text方法。 第一个参数是x坐标,第二个参数是y坐标。 在坐标之后,我们有文本和字体大小。 我们还使用set_title为Seaborn图添加标题,并且使用set方法更改x和y标签。
text = 'r=%s, p=%s' % (corr[0], corr[1])
ax = sns.regplot(x="Pod size", y="Heat", data=df_full)
ax.text(10, 300000, text, fontsize=12)
ax.set_title('Capsicum')
ax.set(xlabel='Pod size (cm)', ylabel='Scoville Heat Units (SHU)')
熊猫箱图示例 (Pandas Boxplot Example)
Now we are going to visualize some other aspects of the data. We are going to use the aggregated data (grouped by using Pandas groupby) to visualize the mean heat across species. We start by using Pandas boxplot method:
现在,我们将可视化数据的其他方面。 我们将使用汇总数据(使用Pandas groupby分组)来可视化物种间的平均热量。 我们从使用Pandas boxplot方法开始:
df_aggregated = df.groupby('Species').mean().reset_index()
df_aggregated.plot.bar(x='Species', y='Heat')
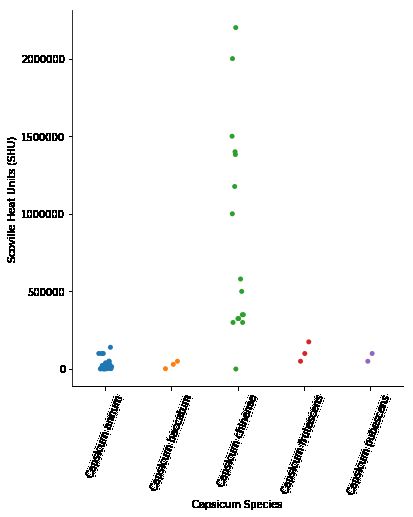
In the image above, we can see that the mean heat is highest for the Capsicum Chinense species. However, the bar graph my hide important information (remember, the scatter plot revealed some outliers). We are therefore continuing with a categorical scatter plot using Seaborn:
在上图中,我们可以看到辣椒辣椒的平均热量最高。 但是,条形图隐藏了重要信息(请记住,散点图显示了一些异常值)。 因此,我们将继续使用Seaborn进行分类散点图:
与Seaborn分组的散点图 (Grouped Scatter Plot with Seaborn)
Here, we don’t add that much compared to the previous Seaborn scatter plots examples. However, we need to rotate the tick labels on the x-axis using set_xticklabels and the parameter rotation.
在这里,与之前的Seaborn散点图示例相比,我们没有添加太多内容。 但是,我们需要使用set_xticklabels和参数rotation在x轴上旋转刻度线标签。
ax = sns.catplot(x='Species', y='Heat', data=df)
ax.set(xlabel='Capsicum Species', ylabel='Scoville Heat Units (SHU)')
ax.set_xticklabels(rotation=70)
结论 (Conclusion)
Now we have learned how to explore data using Python, Pandas, NumPy, SciPy, and Seaborn. Specifically, we have learned how to us Pandas read_html to parse HTML from a URL, clean up the data in the columns (e.g., remove unwanted information), create scatter plots both in Pandas and Seaborn, visualize grouped data, and create categorical scatter plots in Seaborn. We have now an idea how to change the axis ticks labels rotation, change the y- and x-axis labels, and adding a title to Seaborn plots.
现在,我们已经学习了如何使用Python,Pandas,NumPy,SciPy和Seaborn探索数据。 具体来说,我们学习了如何使用Pandas read_html来从URL解析HTML,清理列中的数据(例如,删除不需要的信息),在Pandas和Seaborn中创建散点图,可视化分组数据以及创建分类散点图在Seaborn。 现在,我们有了一个想法,如何更改轴刻度标签的旋转,更改y和x轴的标签以及如何为Seaborn绘图添加标题。
翻译自: https://www.pybloggers.com/2018/11/explorative-data-analysis-with-pandas-scipy-and-seaborn/
pandas数据相关性分析
