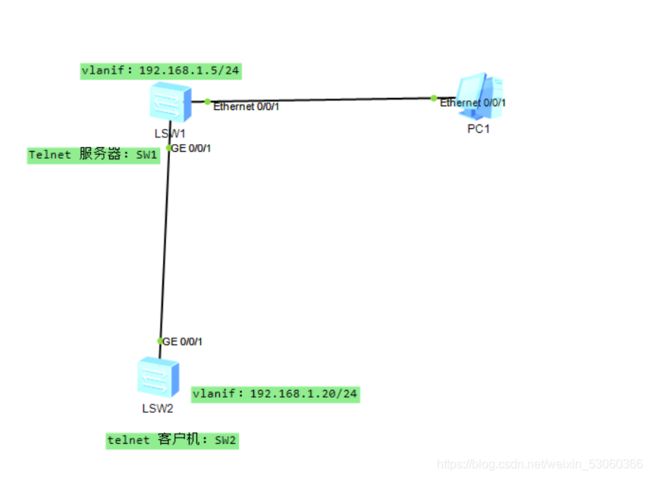
拓扑图带你走进Telnet命令世界(全是项目干货)
目录
1.VRP是什么?
2.模拟服务器与客户端:
1.首先得有一台服务器和客户机;
2.接下来在命令行对服务器进行设置:(因为市场上华为的交换机用的比较多,所以这里我们用华为的来模拟一下)
3.进入Telnet,进行服务器设置:
4.下面我们对服务器配置IP:
5.接下来在用户视图保存你的配置,防止关机时丢失;
6.接下来我们对客户机SW2进行设置:
7.这里客户端SW2我们不用进入Telnet,下面我们设置一个IP地址:
8.下面我们用SW2作为客户机去访问我们的SW1服务器;
总结:
1.VRP是什么?
VRP 是虚拟现实平台,是一款直接面向三维美工的一款虚拟现实软件。
特点:
VRP适用性强、操作简单、功能强大、高度可视化、所见即所得;
应用范围:
VRP可广泛的应用于城市规划、室内设计、工业仿真、古迹复原、桥梁道路设计、房地产销售、旅游教学、水利电力、地质灾害等众多领域,为其提供切实可行的解决方案。
2.模拟服务器与客户端:
应用层有Telnet服务,使用的是TCP的23号端口;
Telnet服务一般是C/S架构,开启Telnet功能的主机是服务器模式,等待用户使用Telnet远程登录上本机;
客户机是client模式,使用Telnet协议远程登入上Telnet服务器;
1.首先得有一台服务器和客户机;
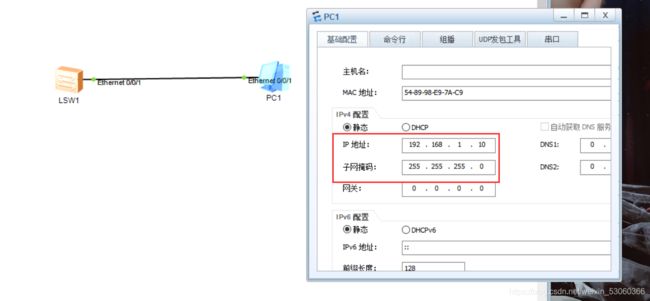
这里我们用拓扑图实现:
上面我们配置了客户机PC1的IP地址和子网掩码;
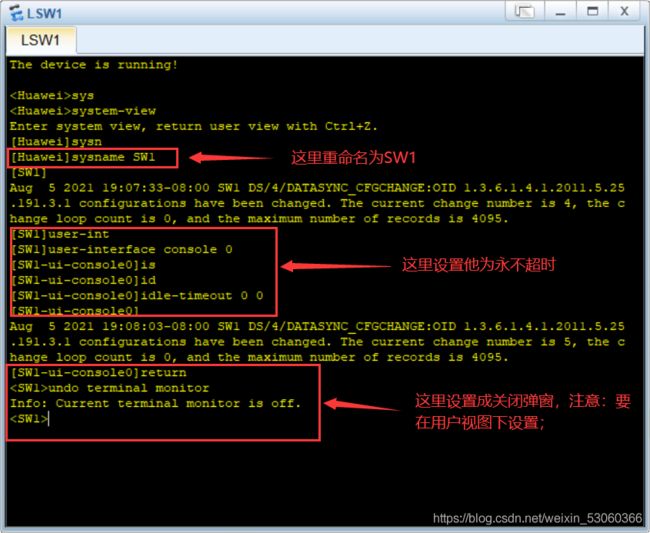
2.接下来在命令行对服务器进行设置:(因为市场上华为的交换机用的比较多,所以这里我们用华为的来模拟一下)
SW1(服务器)的Telnet命令:
[Huawei]sysname SW1 修改名字
设置永不超时:
[SW1]user-interface console 0
[SW1-ui-console0]id
[SW1-ui-console0]idle-timeout 0 0
关闭弹窗:
[SW1]q
Info: Current terminal monitor is off. 提示弹窗已关闭
3.进入Telnet,进行服务器设置:
[SW1]user-interface vty 0 4
验证模式为密码模式
[SW1-ui-vty0-4]authentication-mode password
Simple是密码为明文,cipher是密码为密文
[SW1-ui-vty0-4]set authentication password simple huawei
用户权限:3-15都是管理员级别(0是参观级别:网络诊断命令,1是监控级:系统维护,业务故障诊断,2是配置级:业务配置)
[SW1-ui-vty0-4]user privilege level 3
4.下面我们对服务器配置IP:
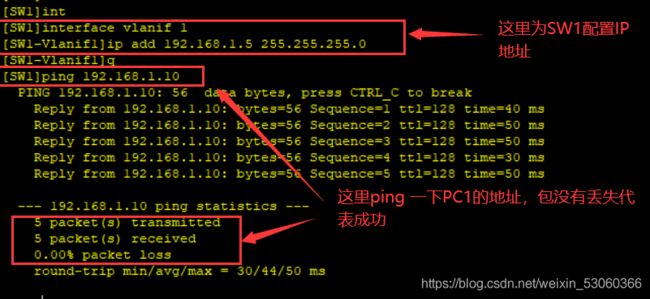
下面配置IP
[SW1-ui-vty0-4]q
[SW1]interface vlanif 1
[SW1-Vlanif1]ip add 192.168.1.5 255.255.255.0
下面ping 一下客户端的IP,能出来代表成功;
[SW1-Vlanif1]q
[SW1]ping 192.168.1.10
  PING 192.168.1.10: 56  data bytes, press CTRL_C to break
    Reply from 192.168.1.10: bytes=56 Sequence=1 ttl=128 time=70 ms
    Reply from 192.168.1.10: bytes=56 Sequence=2 ttl=128 time=50 ms
    Reply from 192.168.1.10: bytes=56 Sequence=3 ttl=128 time=50 ms
    Reply from 192.168.1.10: bytes=56 Sequence=4 ttl=128 time=40 ms
    Reply from 192.168.1.10: bytes=56 Sequence=5 ttl=128 time=30 ms

  --- 192.168.1.10 ping statistics ---
    5 packet(s) transmitted
    5 packet(s) received
    0.00% packet loss
    round-trip min/avg/max = 30/48/70 ms
注意:
交换机有一个虚拟接口,默认虚拟接口名称叫vlanif 1,我们可以给默认虚拟机接口配置IP,即给二层交换机配置一个管理IP。
[ ]interface vlanif 1
Undo shutdown 开启接口(交换机不需要,路由器需要,因为路由器默认是关闭的)
交换机/路由器虚拟接口特性:只要设备启动,虚拟接口默认开启;
交换机的物理接口默认是开启状态;
5.接下来在用户视图保存你的配置,防止关机时丢失;
计算机存储有RAM和ROM:
内存:RAM(随机存储器):
易失性存储器,设备断电后,当前的配置文件会丢失;
硬盘:ROM(只读存储器):
设备断电后,当前的配置文件不会丢失;
因此,我们要养成实时保存的好习惯。
[SW1]q
save  注意:这里一定要在用户视图下保存
The current configuration will be written to the device.
Are you sure to continue?[Y/N]y
Info: Please input the file name ( *.cfg, *.zip ) [vrpcfg.zip]:
这里默认即可,有cfg和zip两种保存格式;
Now saving the current configuration to the slot 0.
Save the configuration successfully.  这里代表保存成功了。
6.接下来我们对客户机SW2进行设置:
[Huawei]sysname SW2 同样是修改名字
设置永不超时:
[SW1]user-interface console 0
[SW1-ui-console0]id
[SW1-ui-console0]idle-timeout 0 0
关闭弹窗:
[SW1]q
Info: Current terminal monitor is off. 提示弹窗已关闭
7.这里客户端SW2我们不用进入Telnet,下面我们设置一个IP地址:
system-view
[SW2]interface vlanif 1
[SW2-Vlanif1]ip add 192.168.1.20 24
这里ping 一下服务器IP,包没丢失代表成功;
[SW2-Vlanif1]ping 192.168.1.5
  PING 192.168.1.5: 56  data bytes, press CTRL_C to break
    Reply from 192.168.1.5: bytes=56 Sequence=1 ttl=255 time=50 ms
    Reply from 192.168.1.5: bytes=56 Sequence=2 ttl=255 time=50 ms
    Reply from 192.168.1.5: bytes=56 Sequence=3 ttl=255 time=50 ms
    Reply from 192.168.1.5: bytes=56 Sequence=4 ttl=255 time=40 ms
    Reply from 192.168.1.5: bytes=56 Sequence=5 ttl=255 time=60 ms

  --- 192.168.1.5 ping statistics ---
    5 packet(s) transmitted
    5 packet(s) received
    0.00% packet loss
    round-trip min/avg/max = 40/50/60 ms
8.下面我们用SW2作为客户机去访问我们的SW1服务器;
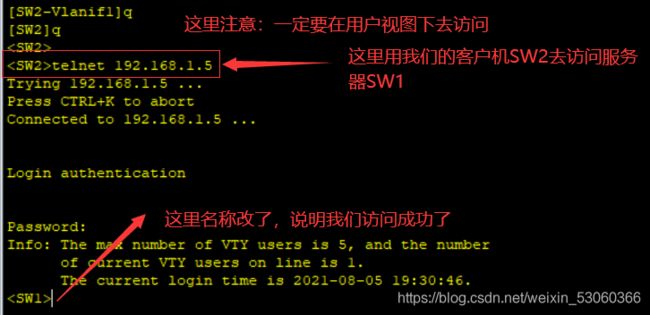
这里注意:Telnet要在用户视图下去测试才能出来效果,因为系统视图没有那个命令;
[SW2]q
Trying 192.168.1.5 ...
Press CTRL+K to abort
Connected to 192.168.1.5 ...
Login authentication
Password:
Info: The max number of VTY users is 5, and the number
of current VTY users on line is 1.
The current login time is 2021-08-05 18:18:48.
这里我们是登入上去了,名称发生了改变;
下面我们查看一下当前配置(这里是没保存的,当设备断电后,配置文件就没有了):
#
user-interface con 0
idle-timeout 0 0
user-interface vty 0 4
user privilege level 3
set authentication password simple huawei --这里我们是明文,所以可以看到密码;
查看保存过的配置信息:
下面我们退出SW1(服务器),进入客户端SW2保存一下配置:
Info: The max number of VTY users is 5, and the number
of current VTY users on line is 0.
Info: The connection was closed by the remote host.
The current configuration will be written to the device.
Are you sure to continue?[Y/N]y
Info: Please input the file name ( *.cfg, *.zip ) [vrpcfg.zip]:
Now saving the current configuration to the slot 0.
Save the configuration successfully.
到这已经完成了,你学会了吗。
总结:
1.服务器上设置管理IP:
[SW1]interface vlanif 1
[SW1-Vlanif1]ip add 192.168.1.5 255.255.255.0
下面ping 一下客户端的IP,能出来代表成功;
[SW1-Vlanif1]q
[SW1]ping 192.168.1.10
2.开启Telnet功能:
[SW1]user-interface vty 0 4
3.设置Telnet模式为密码模式:
[SW1-ui-vty0-4]authentication-mode password
4.设置明文/密文密码:
Simple是密码为明文,cipher是密码为密文
[SW1-ui-vty0-4]set authentication password simple huawei
5.设置用户权限:
3-15都是管理员级别(0是参观级别:网络诊断命令,1是监控级:系统维护,业务故障诊断,2是配置级:业务配置)
[SW1-ui-vty0-4]user privilege level 3
6.客户机上设置管理IP:
这里客户端我们不用进入Telnet,下面我们设置一个IP地址:
[SW2]interface vlanif 1
[SW2-Vlanif1]ip add 192.168.1.20 24
这里ping 一下服务器IP,包没丢失代表成功;
[SW2-Vlanif1]ping 192.168.1.5
7.客户机验证Telnet服务器是否可以登录:
这里注意:Telnet要在用户视图下去测试才能出来效果,因为系统视图没有那个命令;
[SW2]q
Trying 192.168.1.5 ...
Press CTRL+K to abort
Connected to 192.168.1.5 ...
Login authentication
Password:
Info: The max number of VTY users is 5, and the number
of current VTY users on line is 1.
The current login time is 2021-08-05 18:18:48.
