linux服务器虚拟环境部署yolov5 & 训练自己的数据集
一、虚拟环境
1. 下载conda(如果已有conda可跳过)
wget -c https://repo.continuum.io/miniconda/Miniconda3-latest-Linux-x86_64.sh
2. 添加权限
chmod 777 Miniconda3-latest-Linux-x86_64.sh
3.运行
sh Miniconda3-latest-Linux-x86_64.sh
(1)中间会有两个提示,第一个按回车,第二个接受协议输入yes
(2)出现installation finished字样之后,会有提示问你是否要初始化(Do you wish the installer to initialize Miniconda3 by running conda init?[yes | no])
输入no
4.编辑.bashrc文件
vim ~/.bashrc
在末尾加上export PATH="你的miniconda3路径/bin:"$PATH

5.启动bashrc
source ~/.bashrc
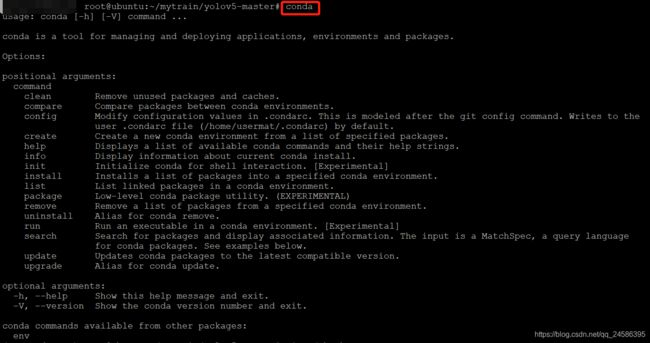
6.验证
conda
7.创建python3.7的虚拟环境
conda create -n 虚拟环境名字 python==3.7
一些关于虚拟环境的常用命令:
下次想要进入这个虚拟环境时:conda activate 虚拟环境名字
切换到其他虚拟环境:conda source activate 其他虚拟环境名字
退出(结束)虚拟环境:conda deactivate
查看都有哪些虚拟环境:conda env list

完成!
二、yolov5配置
1.github下载yolob5项目
git clone https://github.com/ultralytics/yolov5
2.下载.pt文件
运行download_weights.sh下载 或者 自己下载好放到weights路径中(为方便查看下图为windows中的样子)

3.跑yolov5
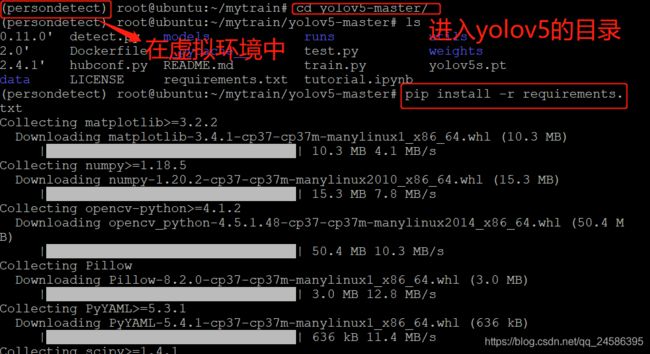
(1)(虚拟环境中)进入yolov5的目录,执行
pip install -r requirements.txt
(2) 执行
python detect.py

(3)在(上一步图)路径中可看见两张结果图片
(4)或者想要检测一个自己的视频(图片也适用),视频名叫normalvideo.mp4,权重文件用yolov5.pt
python detect.py --source normalvideo.mp4 --weights yolov5s.pt --conf 0.4
根据提示,在runs/detect/exp5(每个人的结果可能不一样的)中寻找检测后的文件

完成!
三、训练自己的数据集
我要做的是训练一个只识别person的(不是那种更改配置文件实际识别了80中但只显示一种的)
1. 文件路径准备
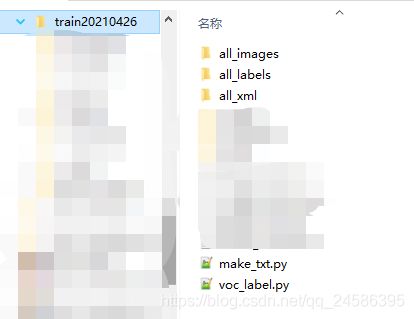
(1)在mytrain文件夹中放入GitHub下载的yolov5的官方代码,创建train20210426(我的训练集)
(2)在train20210426中,创建:
| all_images | 用于存放标注后产生的xml文件 |
|---|---|
| all_xml | 用于存放标注后产生的xml文件 |
| make_txt.py | 用于生成 |
| train_val.py | 用于存放所有需要标注的图片 |
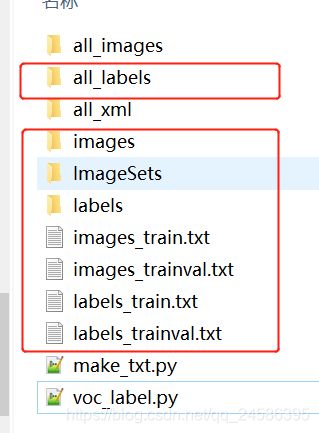
(下图中的all_labels可由train_val.py产生)
(3)make_txt.py 代码
import os
import random
trainval_percent = 0.1
train_percent = 0.9
xmlfilepath = 'all_images'
txtsavepath = 'ImageSets'
total_xml = os.listdir(xmlfilepath)
num = len(total_xml)
list = range(num)
tv = int(num * trainval_percent)
tr = int(tv * train_percent)
trainval = random.sample(list, tv) #从所有list中返回tv个数量的项目
train = random.sample(trainval, tr)
if not os.path.exists('ImageSets/'):
    os.makedirs('ImageSets/')
ftrainval = open('ImageSets/trainval.txt', 'w')
ftest = open('ImageSets/test.txt', 'w')
ftrain = open('ImageSets/train.txt', 'w')
fval = open('ImageSets/val.txt', 'w')
for i in list:
    name = total_xml[i][:-4] + '\n'
    if i in trainval:
        ftrainval.write(name)
        if i in train:
            ftest.write(name)
        else:
            fval.write(name)
    else:
        ftrain.write(name)
ftrainval.close()
ftrain.close()
fval.close()
ftest.close()
(4)voc_label.py代码
import xml.etree.ElementTree as ET
import pickle
import os
import shutil
from PIL import Image
from os import listdir, getcwd
from os.path import join
sets = ['train', 'trainval']
classes = ['person'] #按需修改类别
def convert(size, box):
    dw = 1. / size[0]
    dh = 1. / size[1]
    x = (box[0] + box[1]) / 2.0
    y = (box[2] + box[3]) / 2.0
    w = box[1] - box[0]
    h = box[3] - box[2]
    x = x * dw
    w = w * dw
    y = y * dh
    h = h * dh
    return (x, y, w, h)
def convert_annotation(image_id):
    in_file = open('all_xml/%s.xml' % (image_id),encoding='utf-8') #在所有的open()中加入encoding='utf-8'防止出现gbk错误
    out_file = open('all_labels/%s.txt' % (image_id), 'w',encoding='utf-8')
    tree = ET.parse(in_file)
    root = tree.getroot()
    size = root.find('size')
    w = int(size.find('width').text)
    h = int(size.find('height').text)
    for obj in root.iter('object'):
        difficult = obj.find('difficult').text
        cls = obj.find('name').text
        if cls not in classes or int(difficult) == 1:
            continue
        cls_id = classes.index(cls)
        xmlbox = obj.find('bndbox')
        b = (float(xmlbox.find('xmin').text), float(xmlbox.find('xmax').text), float(xmlbox.find('ymin').text),
             float(xmlbox.find('ymax').text))
        bb = convert((w, h), b)
        out_file.write(str(cls_id) + " " + " ".join([str(a) for a in bb]) + '\n')
wd = getcwd()
print(wd)
for image_set in sets:
    if not os.path.exists('all_labels/'):
        os.makedirs('all_labels/')
    image_ids = open('ImageSets/%s.txt' % (image_set),encoding='utf-8').read().strip().split()
    image_list_file = open('images_%s.txt' % (image_set), 'w',encoding='utf-8')
    labels_list_file=open('labels_%s.txt'%(image_set),'w',encoding='utf-8')
    for image_id in image_ids:
        image_list_file.write('%s.jpg\n' % (image_id))
        labels_list_file.write('%s.txt\n'%(image_id))
        convert_annotation(image_id) #如果标签已经是txt格式,将此行注释掉,所有的txt存放到all_labels文件夹。
    image_list_file.close()
    labels_list_file.close()


def copy_file(new_path,path_txt,search_path):#参数1:存放新文件的位置  参数2:为上一步建立好的train,val训练数据的路径txt文件  参数3:为搜索的文件位置
    if not os.path.exists(new_path):
        os.makedirs(new_path)
    with open(path_txt, 'r') as lines:
        filenames_to_copy = set(line.rstrip() for line in lines)
        # print('filenames_to_copy:',filenames_to_copy)
        # print(len(filenames_to_copy))
    for root, _, filenames in os.walk(search_path):
        # print('root',root)
        # print(_)
        # print(filenames)
        for filename in filenames:
            if filename in filenames_to_copy:
                shutil.copy(os.path.join(root, filename), new_path)

#按照划分好的训练文件的路径搜索目标,并将其复制到yolo格式下的新路径
copy_file('./images/train/','./images_train.txt','./all_image')
copy_file('./images/val/','./images_trainval.txt','./all_image')
copy_file('./labels/train/','./labels_train.txt','./all_labels')
copy_file('./labels/val/','./labels_trainval.txt','./all_labels')

###############################################
#执行好以上部分发现图片没有复制到对应路径,补充了下列代码

data = []
for line in open("images_train.txt", "r"):  # 设置文件对象并读取每一行文件
    data.append(line)

for a in data:

  im = Image.open('all_images/{}'.format(a[:-1]))#打开目标文件夹
  im.save('images/train/{}'.format(a[:-1])) #把文件夹中指定的文件名称的图片另存到该路径下
  im.close()

data_val = []
for line in open("images_trainval.txt", "r"):  # 设置文件对象并读取每一行文件
    data_val.append(line)

for a in data_val:

  im = Image.open('all_images/{}'.format(a[:-1]))#打开目标文件夹
  im.save('images/val/{}'.format(a[:-1])) #把文件夹中指定的文件名称的图片另存到该路径下
  im.close()
2. 图片标注
用labelImg标注图片,如果你已经有了labelImg可跳过此步
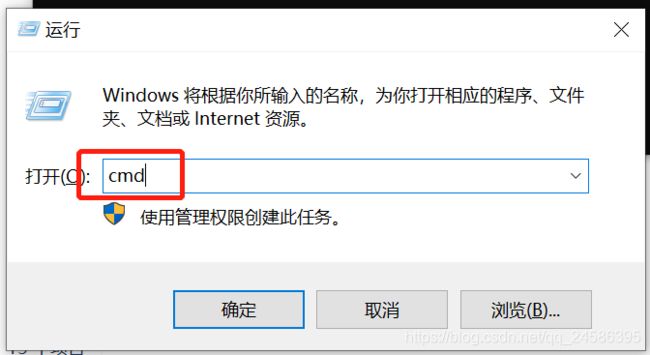
(1)windows+r 打开cmd
(2)下载labelImg
pip install -i https://pypi.tuna.tsinghua.edu.cn/simple labelImg
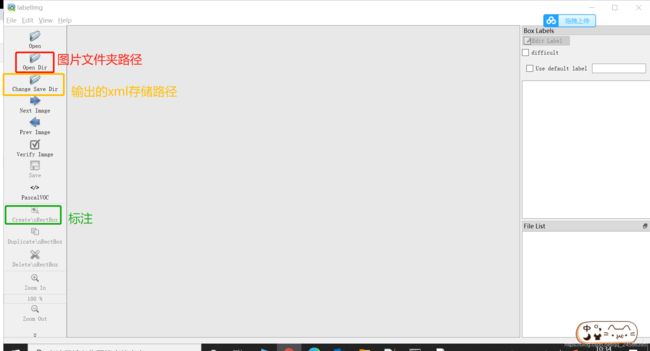
(4)打开labelImg并标注图片(open dir是all_images, save dir是all_xml)
3.运行两个py文件,得到文件结构如下:
4.更改yolov5中的配置文件
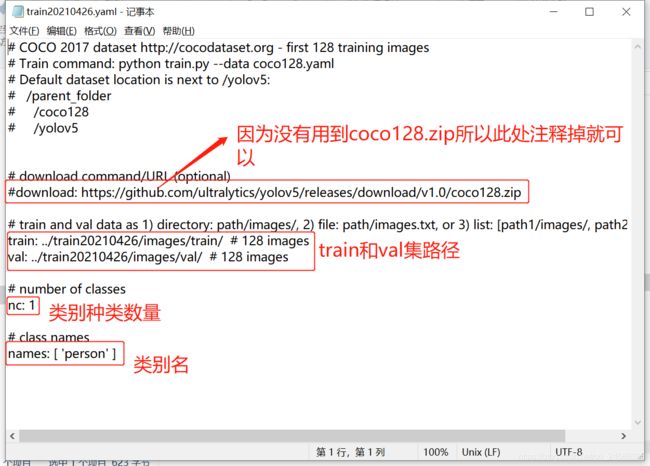
(1) 制作yaml文件
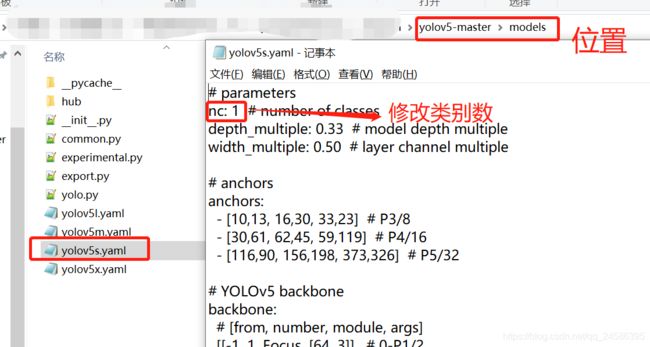
(2)更改yolov5s.yaml文件
(3)更改train.py的主函数(main)中所用的yaml文件
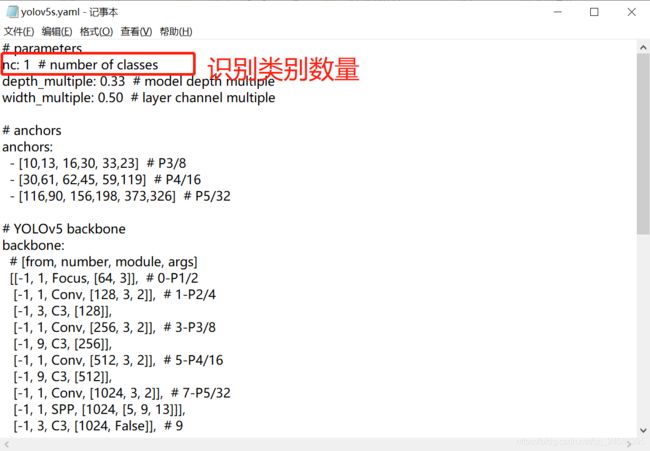
(4)修改yolov5s.yaml中的类别数(我这里只识别person类,所以nc:1)
5.训练数据集
python train.py
或者你有点追求
python train.py --data data/train20210425.yaml --cfg yolov5s.yaml --weights yolov5s.pt --epochs 10 --batch-size 32
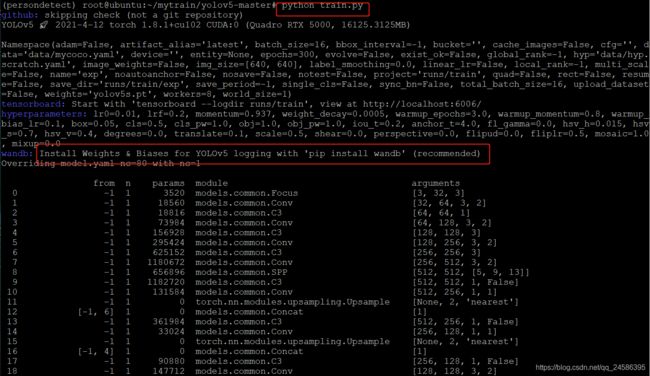
此处可能会有wandb的报错,根据提示操作或者在代码中注释掉wandb的部分。以下为不注释wandb的解决办法:
pip install wandb
wandb init

打开浏览器登录https://wandb.ai/authorize,完成注册(可能需要科学上网)
注册完成后长这样
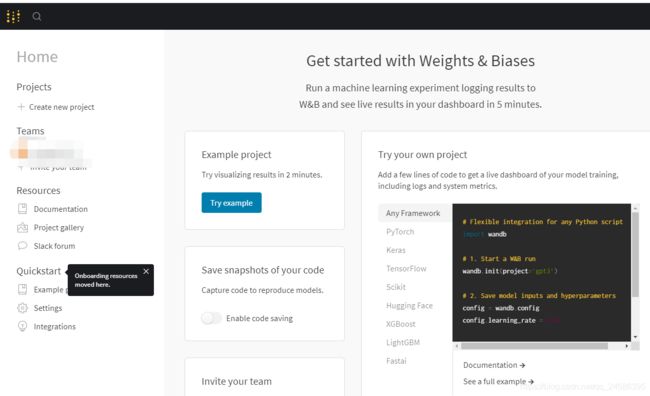
APIkey在右上角的setting中


回到linux,填入APIkey,输入自定义的wandb项目名称(随便起一个就行,无需其他操作)

ok后再train一下
train完成后根据提示找到训练好的权重(best.pt)所在位置,detect一下
python detect.py --weights best.pt --source real1.mp4
完成!
虚拟环境参考:https://blog.csdn.net/weixin_43840215/article/details/89599559
训练参考:
https://blog.csdn.net/weixin_48994268/article/details/115282688
https://blog.csdn.net/a_cheng_/article/details/111401500?utm_term=yolov5%E8%AE%AD%E7%BB%83%E8%87%AA%E5%B7%B1%E7%9A%84%E8%AE%AD%E7%BB%83%E9%9B%86&utm_medium=distribute.pc_aggpage_search_result.none-task-blog-2allsobaiduweb~default-1-111401500&spm=3001.4430
