Jbd2:Hadoop
Jbd2:Hadoop
- 1. 发展历史
- 2. 主要特性
- 3. 部分组件
-
- 3.1 HDFS
- 3.2 HBase
- 3.3 Sqoop
- 3.4 Zookeeper
- 4. 实践操作
-
- 4.1 创建Hadoop用户
- 4.2 安装Java
-
- 4.2.1 安装jdk
- 4.2.2 修改环境变量
- 4.2.3 SSH登录权限设置
- 4.3 单机版Hadoop
-
- 4.3.1 安装Hadoop
- 4.3.2 修改系统环境变量
- 4.3.3 修改hadoop-env.sh文件配置
- 4.4 伪分布式Hadoop
-
- 4.4.1 修改core-site.xml文件配置
- 4.4.2 修改hdfs-site.xml文件配置
- 4.4.3 修改mapred-site.xml文件配置
- 4.4.4 修改yarn-site.xml文件配置
- 4.4.5 格式化分布式文件系统
- 4.4.6 启动Hadoop
- 4.4.7 查看Hadoop进程
- 4.4.8 Hadoop WebUI管理界面
- 4.4.9 测试HDFS集群以及MapReduce任务程序
- 4.4.5 关闭Hadoop
1. 发展历史
2. 主要特性
- 高可靠性:
采用冗余数据存储方式,即使一个副本发生故障,其他副本也可以保证正常对外提供服务。Hadoop按位存储和处理数据的能力,值得人们信赖。- 高效性:
作为并行分布式计算平台,Hadoop采用分布式存储和分布式处理两大核心技术,能够高效地处理PB级数据。Hadoop能够在节点之间动态地移动数据,并保证各个节点的动态平衡,因此处理速度非常快。- 高可扩展性:
Hadoop的设计目标是可以高效稳定地运行在廉价的计算机集群上,可以扩展到数以千计的计算机节点。- 高容错性:
采用冗余数据存储方式,自动保存数据的多个副本,并且能够自动将失败的任务进行重新分配。- 成本低:
Hadoop采用廉价的计算机集群,成本较低,普通用户也很容易用自己的PC上搭建Hadoop运行环境。与一体机、商用数据仓库以及QlikView、Yonghong Z-Suite等数据集市相比,Hadoop是开源的,项目的软件成本因此会大大降低。- 运行在Linux平台上:
Hadoop是基于Java语言开发的,可以较好地运行在Linux平台上。- 支持多种编程语言:
Hadoop上的应用程序也可以使用其他语言编写,如C++。
3. 部分组件

3.1 HDFS
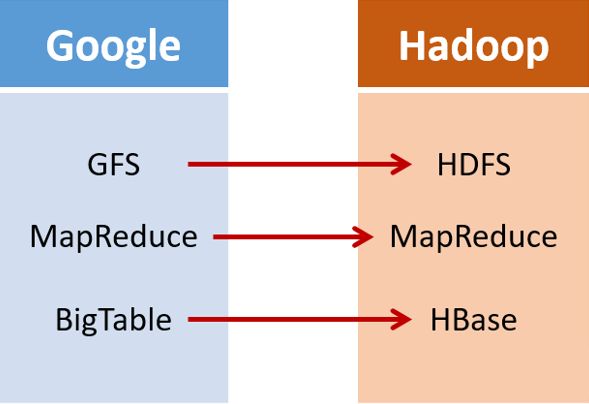
Hadoop分布式文件系统(Hadoop Distributed File System,HDFS)是针对谷歌文件系统(Google File System,GFS)的开源实现
-
优点是处理超大数据、流式处理、可以运行在廉价商用服务器上等。
-
可以通过提供高吞吐率来访问应用程序的数据,适合那些具有超大数据集的应用程序
-
放宽了可移植操作系统接口的要求,这样可以通过流的形式访问文件系统中的数据
3.2 HBase
HBase是一个提供高可靠性、高性能、可伸缩、实时读写和分布式的列式数据库,一般采用HDFS作为其底层数据存储。
-
HBase适合用于去存储非结构化数据
-
HBase的存储模式是基于列而不是基于行的
-
HBase表是疏松的,用户可以给行定义各种不同类型的列
-
HBase主要用于需要随机访问、实时读写的大数据
3.3 Sqoop
Sqoop可以改进数据的互操作性,主要用来在Hadoop和关系数据库之间交换数据。
-
Sqoop主要通过JDBC(Java DataBase Connectivity)与关系数据库进行交互
-
理论上,支持JDBC的关系数据库都可以用Sqoop与Hadoop进行数据交互。
-
Sqoop是专门为大数据集设计的,支持增量更新
3.4 Zookeeper
Zookeeper是一个为分布式应用所涉及的开源协调服务
-
主要为用户提供同步、配置管理、分组和命名等服务
-
Zookeeper的文件系统使用了我们所熟悉的目录树结构
-
Zookeeper是主要使用Java语言编写,同时支持C语言。
4. 实践操作
4.1 创建Hadoop用户
分离账号使不同用户之间有明确的权限区别。同时,也可以防止Hadoop的配置操作影响到其他用户的使用。
ubuntu@VM-0-12-ubuntu:~$ sudo adduser master
Adding user `master' ...
Adding new group `master' (1001) ...
Adding new user `master' (1001) with group `master' ...
Creating home directory `/home/master' ...
Copying files from `/etc/skel' ...
New password:
Retype new password:
passwd: password updated successfully
Changing the user information for master
Enter the new value, or press ENTER for the default
	Full Name []:
	Room Number []:
	Work Phone []:
	Home Phone []:
	Other []:
Is the information correct? [Y/n] y
ubuntu@VM-0-12-ubuntu:~$ su master
Password:
master@VM-0-12-ubuntu:/home/ubuntu$
4.2 安装Java
4.2.1 安装jdk
master@VM-0-12-ubuntu:/opt/JuciyBigData$ ls
apache-hive-2.3.9-bin.tar.gz  hbase-2.4.8-bin.tar.gz      mysql-connector-java_8.0.27-1ubuntu20.04_all.deb
hadoop-3.3.1.tar.gz           jdk-8u311-linux-x64.tar.gz  spark-3.2.0-bin-without-hadoop.tgz
master@VM-0-12-ubuntu:/opt/JuciyBigData$ sudo tar -xzvf jdk-8u311-linux-x64.tar.gz -C /opt
[sudo] password for master:
master is not in the sudoers file.  This incident will be reported.
master@VM-0-12-ubuntu:/opt/JuciyBigData$ su root
Password:
root@VM-0-12-ubuntu:/opt/JuciyBigData# sudo tar -xzvf jdk-8u311-linux-x64.tar.gz -C /opt
jdk1.8.0_311/jre/lib/security/trusted.libraries
jdk1.8.0_311/jre/lib/security/java.security
jdk1.8.0_311/jre/lib/security/policy/
jdk1.8.0_311/jre/lib/security/policy/limited/
···
root@VM-0-12-ubuntu:/opt/JuciyBigData# su master
master@VM-0-12-ubuntu:/opt/JuciyBigData$
sudo确实没办法用,这里的解决方案是先切回root,教程当中有说明:
注意:如果sudo命令无法使用,请直接切换到root用户,su root或sudo -i。但要注意,以下步骤需要切换到datawhale用户下进行操作:
- ssh登录权限设置
- Hadoop伪分布安装中的5、6、7、8、9步骤。
那放在我的操作上,就是要切换到hadoop用户,保证这些操作在该用户上有效
接下来是将jdk目录重命名为java,同样需要切换用户:
master@VM-0-12-ubuntu:/opt/JuciyBigData$ ls
apache-hive-2.3.9-bin.tar.gz  hbase-2.4.8-bin.tar.gz      mysql-connector-java_8.0.27-1ubuntu20.04_all.deb
hadoop-3.3.1.tar.gz           jdk-8u311-linux-x64.tar.gz  spark-3.2.0-bin-without-hadoop.tgz
master@VM-0-12-ubuntu:/opt/JuciyBigData$ cd ..
master@VM-0-12-ubuntu:/opt$ ls
jdk1.8.0_311  JuciyBigData  JuciyBigData.zip
master@VM-0-12-ubuntu:/opt$ sudo mv /opt/jdk1.8.0_311/ /opt/java
[sudo] password for master:
master is not in the sudoers file.  This incident will be reported.
master@VM-0-12-ubuntu:/opt$ su root
Password:
root@VM-0-12-ubuntu:/opt# sudo mv /opt/jdk1.8.0_311/ /opt/java
root@VM-0-12-ubuntu:/opt# ls
java  JuciyBigData  JuciyBigData.zip
接下来是,修改java目录的所属用户,因为解压等操作是root做的,不是master:
root@VM-0-12-ubuntu:/opt# ll
total 1496456
drwxr-xr-x  4 root  root        4096 Mar 15 21:24 ./
drwxr-xr-x 20 root  root        4096 Mar 15 21:27 ../
drwxr-xr-x  8 10143 10143       4096 Sep 27 20:29 java/
drwxr-xr-x  2 root  root        4096 Feb 12 17:51 JuciyBigData/
-rw-r--r--  1 root  root  1532346446 Mar 15 18:28 JuciyBigData.zip
root@VM-0-12-ubuntu:/opt# sudo chown -R master:master /opt/java
root@VM-0-12-ubuntu:/opt# ll
total 1496456
drwxr-xr-x  4 root   root         4096 Mar 15 21:24 ./
drwxr-xr-x 20 root   root         4096 Mar 15 21:28 ../
drwxr-xr-x  8 master master       4096 Sep 27 20:29 java/
drwxr-xr-x  2 root   root         4096 Feb 12 17:51 JuciyBigData/
-rw-r--r--  1 root   root   1532346446 Mar 15 18:28 JuciyBigData.zip
root@VM-0-12-ubuntu:/opt#
4.2.2 修改环境变量
打开/etc/profile文件,还是需要sudo,还是需要root用户:
root@VM-0-12-ubuntu:/opt# sudo vim /etc/profile
root@VM-0-12-ubuntu:/opt#
添加内容如下:
#java
export JAVA_HOME=/opt/java
export PATH=$JAVA_HOME/bin:$PATH
Linux编辑文件的基础很简单,vim打开后i是插入,然后光标移到尾部,shift+insert粘贴
然后按esc退出编辑模式,再用shift+:进入命令模式,输入w和q表示写入和退出
编辑完毕后用source /etc/profile更新环境变量,再用java -version命令去检查
root@VM-0-12-ubuntu:/opt# source /etc/profile
root@VM-0-12-ubuntu:/opt# java -version
java version "1.8.0_311"
Java(TM) SE Runtime Environment (build 1.8.0_311-b11)
Java HotSpot(TM) 64-Bit Server VM (build 25.311-b11, mixed mode)
root@VM-0-12-ubuntu:/opt#
想了想我们还是给master一个sudo的权限吧,主要是担心后面忘记切换用户
根据博客,我们需要先授予root用户关于sudoers文件的管理权限,默认是只读
root@VM-0-12-ubuntu:/opt# chmod u+w /etc/sudoers
然后追加以下内容:
master ALL=(ALL:ALL) NOPASSWD:ALL
意即允许用户master执行sudo命令,并且在执行的时候不输入密码
最后记得对于sudoers文件的写入权限:
root@VM-0-12-ubuntu:/opt# chmod u-w /etc/sudoers
然后切回master,尝试一下sudo,设置成功
root@VM-0-12-ubuntu:/opt# su master
master@VM-0-12-ubuntu:/opt$ sudo vim /etc/profile
master@VM-0-12-ubuntu:/opt$
4.2.3 SSH登录权限设置
教程这里就指明了,要切换回我们操作Hadoop的用户
对于Hadoop的伪分布和全分布而言,Hadoop名称节点(NameNode)需要启动集群中所有机器的Hadoop守护进程,这个过程可以通过SSH登录来实现。Hadoop并没有提供SSH输入密码登录的形式,因此,为了能够顺利登录每台机器,需要将所有机器配置为名称节点,可以通过SSH无密码的方式登录它们。
设置SSH,我感觉主要就是为了集群内部的通信吧
首先我们需要生成密钥:
为了实现SSH无密码登录方式,首先需要让NameNode生成自己的SSH密钥,命令如下:
master@VM-0-12-ubuntu:/opt$ ssh-keygen -t rsa # 执行该命令后,遇到提示信息,一直按回车就可以
Generating public/private rsa key pair.
Enter file in which to save the key (/home/master/.ssh/id_rsa):
Created directory '/home/master/.ssh'.
Enter passphrase (empty for no passphrase):
Enter same passphrase again:
Your identification has been saved in /home/master/.ssh/id_rsa
Your public key has been saved in /home/master/.ssh/id_rsa.pub
The key fingerprint is:
SHA256:HfMDj9TBrGiVvkaLkxwXGZPI3H4EMpKL+E2nmWO/Z0A master@VM-0-12-ubuntu
The key's randomart image is:
+---[RSA 3072]----+
|      .+oo+O.    |
|      ..+oBo+.   |
|   . . . ==+.    |
|  . . o Eo*B.    |
|   . o OS*o++    |
|    . B * +  .   |
|     . o +       |
|        . o      |
|        .+       |
+----[SHA256]-----+
master@VM-0-12-ubuntu:/opt$
然后就是把这个登录的凭证发送给其他机器
NameNode生成密钥之后,需要将它的公共密钥发送给集群中的其他机器。我们可以将id_dsa.pub中的内容添加到需要SSH无密码登录的机器的~/ssh/authorized_keys目录下,然后就可以无密码登录这台机器了。对于无密码登录本机而言,可以执行以下命令:
教程给了两个方式,我依次尝试了一下,第二个好像不行:
master@VM-0-12-ubuntu:/opt$ cat ~/.ssh/id_rsa.pub >> ~/.ssh/authorized_keys
master@VM-0-12-ubuntu:/opt$ cat /home/datawhale/.ssh/id_rsa.pub >> /home/datawhale/.ssh/authorized_keys
bash: /home/datawhale/.ssh/authorized_keys: No such file or directory
master@VM-0-12-ubuntu:/opt$
然后就是测试连接,ssh localhost,我好像是成功了?但是没见sucessful login啊
master@VM-0-12-ubuntu:/opt$ ssh localhost
The authenticity of host 'localhost (127.0.0.1)' can't be established.
ECDSA key fingerprint is SHA256:5vRo0/nGDBuyknC2msG0n3P4a7H1LD2weTDyiIdNUhU.
Are you sure you want to continue connecting (yes/no/[fingerprint])? yes
Warning: Permanently added 'localhost' (ECDSA) to the list of known hosts.
Welcome to Ubuntu 20.04 LTS (GNU/Linux 5.4.0-96-generic x86_64)

 * Documentation:  https://help.ubuntu.com
 * Management:     https://landscape.canonical.com
 * Support:        https://ubuntu.com/advantage

  System information as of Tue 15 Mar 2022 10:13:21 PM CST

  System load:  0.0                Processes:             127
  Usage of /:   15.0% of 49.16GB   Users logged in:       1
  Memory usage: 14%                IPv4 address for eth0: 172.16.0.12
  Swap usage:   0%

 * Super-optimized for small spaces - read how we shrank the memory
   footprint of MicroK8s to make it the smallest full K8s around.

   https://ubuntu.com/blog/microk8s-memory-optimisation


The programs included with the Ubuntu system are free software;
the exact distribution terms for each program are described in the
individual files in /usr/share/doc/*/copyright.

Ubuntu comes with ABSOLUTELY NO WARRANTY, to the extent permitted by
applicable law.
教程上也说了,可能是没有安装openssh-server。于是我去看了给的参考博客
但是我这个情况,跟博客上面成功解决问题之后的样子,好像是一样的,博客例子如下:
$ ssh localhost
The authenticity of host 'localhost (127.0.0.1)' can't be established.
ECDSA key fingerprint is SHA256:7FTkHoAyQ9yLqfLXI+GOOz/Ej7uBe1vJldjpsej+OuM.
Are you sure you want to continue connecting (yes/no)? no
我感觉应该是成功了吧,毕竟我这里都刷新出来了系统的状态,跟我每次登录服务器的样子一样
4.3 单机版Hadoop
4.3.1 安装Hadoop
先解压文件:
master@VM-0-12-ubuntu:/opt/JuciyBigData$ ls
apache-hive-2.3.9-bin.tar.gz  hbase-2.4.8-bin.tar.gz      mysql-connector-java_8.0.27-1ubuntu20.04_all.deb
hadoop-3.3.1.tar.gz           jdk-8u311-linux-x64.tar.gz  spark-3.2.0-bin-without-hadoop.tgz
master@VM-0-12-ubuntu:/opt/JuciyBigData$ sudo tar -xzvf hadoop-3.3.1.tar.gz -C /opt
···
hadoop-3.3.1/include/hdfs.h
hadoop-3.3.1/include/Pipes.hh
master@VM-0-12-ubuntu:/opt/JuciyBigData$
然后也重命名一下,并且更改所属用户和所属组:
master@VM-0-12-ubuntu:/opt$ ls
hadoop-3.3.1  java  JuciyBigData  JuciyBigData.zip
master@VM-0-12-ubuntu:/opt$ sudo mv /opt/hadoop-3.3.1/ /opt/hadoop
master@VM-0-12-ubuntu:/opt$ ll
total 1496460
drwxr-xr-x  5 root   root         4096 Mar 15 22:23 ./
drwxr-xr-x 20 root   root         4096 Mar 15 22:23 ../
drwxr-xr-x 10 ubuntu ubuntu       4096 Jun 15  2021 hadoop/
drwxr-xr-x  8 master master       4096 Sep 27 20:29 java/
drwxr-xr-x  2 root   root         4096 Feb 12 17:51 JuciyBigData/
-rw-r--r--  1 root   root   1532346446 Mar 15 18:28 JuciyBigData.zip
master@VM-0-12-ubuntu:/opt$ sudo chown -R master:master /opt/hadoop
master@VM-0-12-ubuntu:/opt$ ll
total 1496460
drwxr-xr-x  5 root   root         4096 Mar 15 22:23 ./
drwxr-xr-x 20 root   root         4096 Mar 15 22:24 ../
drwxr-xr-x 10 master master       4096 Jun 15  2021 hadoop/
drwxr-xr-x  8 master master       4096 Sep 27 20:29 java/
drwxr-xr-x  2 root   root         4096 Feb 12 17:51 JuciyBigData/
-rw-r--r--  1 root   root   1532346446 Mar 15 18:28 JuciyBigData.zip
master@VM-0-12-ubuntu:/opt$
因为这个文件是我在ubuntu用户下载的,所以说一开始属于ubuntu
4.3.2 修改系统环境变量
跟上面一样,打开/etc/profile进行修改:
master@VM-0-12-ubuntu:/opt$ sudo vim /etc/profile
master@VM-0-12-ubuntu:/opt$
在末尾添加如下内容:
#hadoop
export HADOOP_HOME=/opt/hadoop
export PATH=$HADOOP_HOME/bin:$PATH
更新环境变量并测试:
master@VM-0-12-ubuntu:/opt$ source /etc/profile
master@VM-0-12-ubuntu:/opt$
master@VM-0-12-ubuntu:/opt$ hadoop version
Hadoop 3.3.1
Source code repository https://github.com/apache/hadoop.git -r a3b9c37a397ad4188041dd80621bdeefc46885f2
Compiled by ubuntu on 2021-06-15T05:13Z
Compiled with protoc 3.7.1
From source with checksum 88a4ddb2299aca054416d6b7f81ca55
This command was run using /opt/hadoop/share/hadoop/common/hadoop-common-3.3.1.jar
master@VM-0-12-ubuntu:/opt$
4.3.3 修改hadoop-env.sh文件配置
这好像是配置hadoop的环境变量,感觉也就是指定解释器什么的那种感觉
对于单机安装,首先需要更改hadoop-env.sh文件,用于配置Hadoop运行的环境变量,命令如下:
master@VM-0-12-ubuntu:/opt$ cd hadoop
master@VM-0-12-ubuntu:/opt/hadoop$ vim etc/hadoop/hadoop-env.sh
master@VM-0-12-ubuntu:/opt/hadoop$
然后同样的文件末尾添加新内容:
export JAVA_HOME=/opt/java/
同样地,我们也要测试一下
Hadoop文档中还附带了一些例子来供我们测试,可以运行WordCount的示例,检测一下Hadoop安装是否成功。运行示例的步骤如下:
- 在/opt/hadoop/目录下新建input文件夹,用来存放输入数据;
- 将etc/hadoop/文件夹下的配置文件拷贝至input文件夹中;
- 在hadoop目录下新建output文件夹,用于存放输出数据;
- 运行wordCount示例
- 查看输出数据的内容。
执行命令如下:
master@VM-0-12-ubuntu:/opt/hadoop$ ls
bin  etc  include  lib  libexec  LICENSE-binary  licenses-binary  LICENSE.txt  NOTICE-binary  NOTICE.txt  README.txt  sbin  share
master@VM-0-12-ubuntu:/opt/hadoop$ mkdir input
master@VM-0-12-ubuntu:/opt/hadoop$ ls
bin  include  lib      LICENSE-binary   LICENSE.txt    NOTICE.txt  sbin
etc  input    libexec  licenses-binary  NOTICE-binary  README.txt  share
master@VM-0-12-ubuntu:/opt/hadoop$ cp etc/hadoop/*.xml input
master@VM-0-12-ubuntu:/opt/hadoop$ bin/hadoop jar share/hadoop/mapreduce/hadoop-mapreduce-examples-3.3.1.jar grep input output 'dfs[a-z.]+'
2022-03-15 22:59:45,601 INFO impl.MetricsConfig: Loaded properties from hadoop-metrics2.properties
···
	File Output Format Counters
		Bytes Written=23
master@VM-0-12-ubuntu:/opt/hadoop$ cat output/*
1	dfsadmin
master@VM-0-12-ubuntu:/opt/hadoop$
测试成功
这意味着,在所有的配置文件中,只有一个符合正则表达式dfs[a-z.]+的单词,输出结果正确。
4.4 伪分布式Hadoop
4.4.1 修改core-site.xml文件配置
打开core-site.xml文件,添加下面配置到与标签之间:
<configuration>
    <property>
        <name>fs.defaultFS</name>
        <value>hdfs://localhost:9000</value>
    </property>
</configuration>
master@VM-0-12-ubuntu:/opt/hadoop$ cat /opt/hadoop/etc/hadoop/core-site.xml
<?xml version="1.0" encoding="UTF-8"?>
<?xml-stylesheet type="text/xsl" href="configuration.xsl"?>
<!--
  Licensed under the Apache License, Version 2.0 (the "License");
  you may not use this file except in compliance with the License.
  You may obtain a copy of the License at

    http://www.apache.org/licenses/LICENSE-2.0

  Unless required by applicable law or agreed to in writing, software
  distributed under the License is distributed on an "AS IS" BASIS,
  WITHOUT WARRANTIES OR CONDITIONS OF ANY KIND, either express or implied.
  See the License for the specific language governing permissions and
  limitations under the License. See accompanying LICENSE file.
-->

<!-- Put site-specific property overrides in this file. -->

<configuration>
</configuration>
master@VM-0-12-ubuntu:/opt/hadoop$ vim /opt/hadoop/etc/hadoop/core-site.xml
master@VM-0-12-ubuntu:/opt/hadoop$ cat /opt/hadoop/etc/hadoop/core-site.xml
<?xml version="1.0" encoding="UTF-8"?>
<?xml-stylesheet type="text/xsl" href="configuration.xsl"?>
<!--
  Licensed under the Apache License, Version 2.0 (the "License");
  you may not use this file except in compliance with the License.
  You may obtain a copy of the License at

    http://www.apache.org/licenses/LICENSE-2.0

  Unless required by applicable law or agreed to in writing, software
  distributed under the License is distributed on an "AS IS" BASIS,
  WITHOUT WARRANTIES OR CONDITIONS OF ANY KIND, either express or implied.
  See the License for the specific language governing permissions and
  limitations under the License. See accompanying LICENSE file.
-->

<!-- Put site-specific property overrides in this file. -->

<configuration>
	<property>
		<name>fs.defaultFS</name>
		<value>hdfs://localhost:9000</value>
	</property>
</configuration>
master@VM-0-12-ubuntu:/opt/hadoop$
可以看出,core-site.xml配置文件的格式十分简单,标签代表了配置项的名字,项设置的是配置的值。对于该文件,我们只需要在其中指定HDFS的地址和端口号,端口号按照官方文档设置为9000即可。
4.4.2 修改hdfs-site.xml文件配置
打开hdfs-site.xml文件,添加下面配置到与标签之间:
<configuration>
    <property>
        <name>dfs.replication</name>
        <value>1</value>
    </property>
</configuration>
master@VM-0-12-ubuntu:/opt/hadoop$ cat /opt/hadoop/etc/hadoop/hdfs-site.xml
<?xml version="1.0" encoding="UTF-8"?>
<?xml-stylesheet type="text/xsl" href="configuration.xsl"?>
<!--
  Licensed under the Apache License, Version 2.0 (the "License");
  you may not use this file except in compliance with the License.
  You may obtain a copy of the License at

    http://www.apache.org/licenses/LICENSE-2.0

  Unless required by applicable law or agreed to in writing, software
  distributed under the License is distributed on an "AS IS" BASIS,
  WITHOUT WARRANTIES OR CONDITIONS OF ANY KIND, either express or implied.
  See the License for the specific language governing permissions and
  limitations under the License. See accompanying LICENSE file.
-->

<!-- Put site-specific property overrides in this file. -->

<configuration>

</configuration>
master@VM-0-12-ubuntu:/opt/hadoop$ vim /opt/hadoop/etc/hadoop/hdfs-site.xml
master@VM-0-12-ubuntu:/opt/hadoop$ cat /opt/hadoop/etc/hadoop/hdfs-site.xml
<?xml version="1.0" encoding="UTF-8"?>
<?xml-stylesheet type="text/xsl" href="configuration.xsl"?>
<!--
  Licensed under the Apache License, Version 2.0 (the "License");
  you may not use this file except in compliance with the License.
  You may obtain a copy of the License at

    http://www.apache.org/licenses/LICENSE-2.0

  Unless required by applicable law or agreed to in writing, software
  distributed under the License is distributed on an "AS IS" BASIS,
  WITHOUT WARRANTIES OR CONDITIONS OF ANY KIND, either express or implied.
  See the License for the specific language governing permissions and
  limitations under the License. See accompanying LICENSE file.
-->

<!-- Put site-specific property overrides in this file. -->

<configuration>
	<property>
		<name>dfs.replication</name>
		<value>1</value>
	</property>
</configuration>
master@VM-0-12-ubuntu:/opt/hadoop$
对于hdfs-site.xml文件,我们设置replication值为1,这也是Hadoop运行的默认最小值,用于设置HDFS文件系统中同一份数据的副本数量。
4.4.3 修改mapred-site.xml文件配置
打开mapred-site.xml文件,添加下面配置到与标签之间
<configuration>
    <property>
        <name>mapreduce.framework.name</name>
        <value>yarn</value>
    </property>
    <property>
        <name>mapreduce.application.classpath</name>
        <value>$HADOOP_MAPRED_HOME/share/hadoop/mapreduce/*:$HADOOP_MAPRED_HOME/share/hadoop/mapreduce/lib/*</value>
    </property>
</configuration>
master@VM-0-12-ubuntu:/opt/hadoop$ cat /opt/hadoop/etc/hadoop/mapred-site.xml
<?xml version="1.0"?>
<?xml-stylesheet type="text/xsl" href="configuration.xsl"?>
<!--
  Licensed under the Apache License, Version 2.0 (the "License");
  you may not use this file except in compliance with the License.
  You may obtain a copy of the License at

    http://www.apache.org/licenses/LICENSE-2.0

  Unless required by applicable law or agreed to in writing, software
  distributed under the License is distributed on an "AS IS" BASIS,
  WITHOUT WARRANTIES OR CONDITIONS OF ANY KIND, either express or implied.
  See the License for the specific language governing permissions and
  limitations under the License. See accompanying LICENSE file.
-->

<!-- Put site-specific property overrides in this file. -->

<configuration>

</configuration>
master@VM-0-12-ubuntu:/opt/hadoop$ vim /opt/hadoop/etc/hadoop/mapred-site.xml
master@VM-0-12-ubuntu:/opt/hadoop$ cat /opt/hadoop/etc/hadoop/mapred-site.xml
<?xml version="1.0"?>
<?xml-stylesheet type="text/xsl" href="configuration.xsl"?>
<!--
  Licensed under the Apache License, Version 2.0 (the "License");
  you may not use this file except in compliance with the License.
  You may obtain a copy of the License at

    http://www.apache.org/licenses/LICENSE-2.0

  Unless required by applicable law or agreed to in writing, software
  distributed under the License is distributed on an "AS IS" BASIS,
  WITHOUT WARRANTIES OR CONDITIONS OF ANY KIND, either express or implied.
  See the License for the specific language governing permissions and
  limitations under the License. See accompanying LICENSE file.
-->

<!-- Put site-specific property overrides in this file. -->

<configuration>
	<property>
		<name>mapreduce.framework.name</name>
		<value>yarn</value>
	</property>
	<property>
		<name>mapreduce.application.classpath</name>
		<value>$HADOOP_MAPRED_HOME/share/hadoop/mapreduce/*:$HADOOP_MAPRED_HOME/share/hadoop/mapreduce/lib/*</value>
	</property>
</configuration>

master@VM-0-12-ubuntu:/opt/hadoop$
4.4.4 修改yarn-site.xml文件配置
添加下面配置到与标签之间
<configuration>
    <property>
        <name>yarn.nodemanager.aux-services</name>
        <value>mapreduce_shuffle</value>
    </property>
    <property>
        <name>yarn.nodemanager.env-whitelist</name>
        <value>JAVA_HOME,HADOOP_COMMON_HOME,HADOOP_HDFS_HOME,HADOOP_CONF_DIR,CLASSPATH_PREPEND_DISTCACHE,HADOOP_YARN_HOME,HADOOP_MAPRED_HOME</value>
    </property>
</configuration>
master@VM-0-12-ubuntu:/opt/hadoop$ cat /opt/hadoop/etc/hadoop/yarn-site.xml
<?xml version="1.0"?>
<!--
  Licensed under the Apache License, Version 2.0 (the "License");
  you may not use this file except in compliance with the License.
  You may obtain a copy of the License at

    http://www.apache.org/licenses/LICENSE-2.0

  Unless required by applicable law or agreed to in writing, software
  distributed under the License is distributed on an "AS IS" BASIS,
  WITHOUT WARRANTIES OR CONDITIONS OF ANY KIND, either express or implied.
  See the License for the specific language governing permissions and
  limitations under the License. See accompanying LICENSE file.
-->
<configuration>

<!-- Site specific YARN configuration properties -->

</configuration>
master@VM-0-12-ubuntu:/opt/hadoop$ vim /opt/hadoop/etc/hadoop/yarn-site.xml
master@VM-0-12-ubuntu:/opt/hadoop$ cat /opt/hadoop/etc/hadoop/yarn-site.xml
<?xml version="1.0"?>
<!--
  Licensed under the Apache License, Version 2.0 (the "License");
  you may not use this file except in compliance with the License.
  You may obtain a copy of the License at

    http://www.apache.org/licenses/LICENSE-2.0

  Unless required by applicable law or agreed to in writing, software
  distributed under the License is distributed on an "AS IS" BASIS,
  WITHOUT WARRANTIES OR CONDITIONS OF ANY KIND, either express or implied.
  See the License for the specific language governing permissions and
  limitations under the License. See accompanying LICENSE file.
-->

<configuration>
	<property>
		<name>yarn.nodemanager.aux-services</name>
		<value>mapreduce_shuffle</value>
	</property>
	<property>
		<name>yarn.nodemanager.env-whitelist</name>
	<value>JAVA_HOME,HADOOP_COMMON_HOME,HADOOP_HDFS_HOME,HADOOP_CONF_DIR,CLASSPATH_PREPEND_DISTCACHE,HADOOP_YARN_HOME,HADOOP_MAPRED_HOME</value>
	</property>
</configuration>

master@VM-0-12-ubuntu:/opt/hadoop$
4.4.5 格式化分布式文件系统
首先要检查用户为Hadoop用户,然后执行初始化
在配置完成后,首先需要初始化文件系统,由于Hadoop的很多工作是在自带的 HDFS文件系统上完成的,因此,需要将文件系统初始化之后才能进一步执行计算任务。执行初始化的命令如下:
hdfs namenode -format
master@VM-0-12-ubuntu:/opt/hadoop$ hdfs namenode -format
WARNING: /opt/hadoop/logs does not exist. Creating.
2022-03-15 23:20:48,206 INFO namenode.NameNode: STARTUP_MSG:
/************************************************************
STARTUP_MSG: Starting NameNode
STARTUP_MSG:   host = localhost.localdomain/127.0.1.1
STARTUP_MSG:   args = [-format]
STARTUP_MSG:   version = 3.3.1
···
2022-03-15 23:20:50,155 INFO common.Storage: Storage directory /tmp/hadoop-master/dfs/name has been `successfully formatted.`
···
2022-03-15 23:20:50,490 INFO namenode.NameNode: SHUTDOWN_MSG:
/************************************************************
SHUTDOWN_MSG: Shutting down NameNode at localhost.localdomain/127.0.1.1
************************************************************/
master@VM-0-12-ubuntu:/opt/hadoop$
这个初始化成功的successfully formatted还挺不好找的
4.4.6 启动Hadoop
使用如下命令启动Hadoop的所有进程,可以通过提示信息得知,所有的启动信息都写入到对应的日志文件。如果出现启动错误,则可以查看相应的错误日志。
master@VM-0-12-ubuntu:/opt/hadoop$ /opt/hadoop/sbin/start-all.sh
WARNING: Attempting to start all Apache Hadoop daemons as master in 10 seconds.
WARNING: This is not a recommended production deployment configuration.
WARNING: Use CTRL-C to abort.
Starting namenodes on [localhost]
Starting datanodes
Starting secondary namenodes [VM-0-12-ubuntu]
VM-0-12-ubuntu: Warning: Permanently added 'vm-0-12-ubuntu' (ECDSA) to the list of known hosts.
Starting resourcemanager
Starting nodemanagers
master@VM-0-12-ubuntu:/opt/hadoop$
4.4.7 查看Hadoop进程
master@VM-0-12-ubuntu:/opt/hadoop$ jps
85952 NodeManager
85335 DataNode
86393 Jps
85800 ResourceManager
85565 SecondaryNameNode
85183 NameNode
master@VM-0-12-ubuntu:/opt/hadoop$
4.4.8 Hadoop WebUI管理界面
此时,可以通过http://localhost:8088访问Web界面,查看Hadoop的信息。
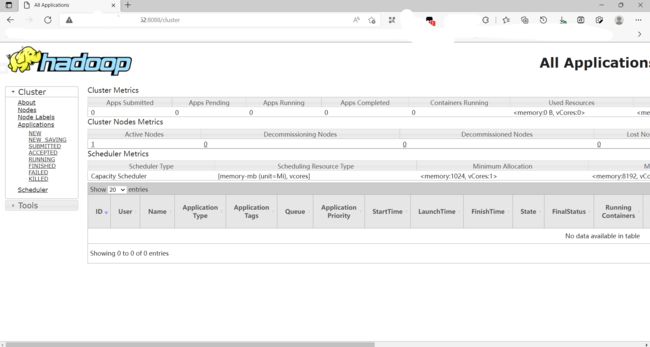
哇,神奇,我在浏览器访问服务器的这个端口也可以,我还以为不对外开放呢
4.4.9 测试HDFS集群以及MapReduce任务程序
先创建文件夹:
master@VM-0-12-ubuntu:/$ hadoop fs -mkdir /user
master@VM-0-12-ubuntu:/$ hadoop fs -mkdir /user/master
master@VM-0-12-ubuntu:/opt$ hadoop fs -mkdir /input
我查到的是说这是在HDFS的文件系统当中,Linux直接查是查不到的
然后新建测试文件,写入Hello world!
master@VM-0-12-ubuntu:/$ vim /home/master/test
将测试文件上传到Hadoop HDFS集群目录,命令如下:
master@VM-0-12-ubuntu:/$ hadoop fs -put /home/master/test /input
执行wordcount程序,命令如下:
master@VM-0-12-ubuntu:/$ hadoop jar /opt/hadoop/share/hadoop/mapreduce/hadoop-mapreduce-examples-3.3.1.jar wordcount /input /out
2022-03-15 23:39:05,938 INFO client.DefaultNoHARMFailoverProxyProvider: Connecting to ResourceManager at /0.0.0.0:8032
2022-03-15 23:39:07,070 INFO mapreduce.JobResourceUploader: Disabling Erasure Coding for path: /tmp/hadoop-yarn/staging/master/.staging/job_1647357988111_0001
···
通过以下命令,查看执行结果:
master@VM-0-12-ubuntu:/$ hadoop fs -ls /out
Found 2 items
-rw-r--r--   1 master supergroup          0 2022-03-15 23:39 /out/_SUCCESS
-rw-r--r--   1 master supergroup         17 2022-03-15 23:39 /out/part-r-00000
可以看到,结果中包含_SUCCESS文件,表示Hadoop集群运行成功。
查看具体的输出结果,命令如下:
master@VM-0-12-ubuntu:/$ hadoop fs -text /out/part-r-00000
Hello	1
world!	1
master@VM-0-12-ubuntu:/$
还有集群安装模式可以做,但是我现在只有一台服务器,笔记本又暂时开不了虚拟机,以后再说吧
4.4.5 关闭Hadoop
噢,对了,之前启动了,那对应的得关闭啊
ubuntu@VM-0-12-ubuntu:~$ /opt/hadoop/sbin/stop-all.sh
WARNING: Stopping all Apache Hadoop daemons as ubuntu in 10 seconds.
WARNING: Use CTRL-C to abort.
^C
ubuntu@VM-0-12-ubuntu:~$
ubuntu@VM-0-12-ubuntu:~$ su master
Password:
master@VM-0-12-ubuntu:/home/ubuntu$ /opt/hadoop/sbin/stop-all.sh
WARNING: Stopping all Apache Hadoop daemons as master in 10 seconds.
WARNING: Use CTRL-C to abort.
Stopping namenodes on [localhost]
Stopping datanodes
Stopping secondary namenodes [VM-0-12-ubuntu]
Stopping nodemanagers
localhost: WARNING: nodemanager did not stop gracefully after 5 seconds: Trying to kill with kill -9
Stopping resourcemanager
master@VM-0-12-ubuntu:/home/ubuntu$ /opt/hadoop/sbin/stop-all.sh
WARNING: Stopping all Apache Hadoop daemons as master in 10 seconds.
WARNING: Use CTRL-C to abort.
Stopping namenodes on [localhost]
Stopping datanodes
Stopping secondary namenodes [VM-0-12-ubuntu]
Stopping nodemanagers
Stopping resourcemanager
master@VM-0-12-ubuntu:/home/ubuntu$
这波还挺神奇的,由于我刚刚是重新连接上的服务器,所以没切换用户
然后等我反应过来的时候,立即用ctrl+c去进行打断,然后切换用户
切换完后,第一次执行还没完全成功,我一边查一边关第二次,然后就行了
我看这关闭的这几个组件,跟启动的时候是一一对应的,顺序都一致
说起来,如果我没有切换用户去关,也不知道行不行,下次试试
还有,我之前查到说尽量不要用*-all.sh这种东西,因为对应的是全部
如果脚本执行的时候出错了,不方便定位原因,所以建议一个一个来