detectron2(目标检测框架)无死角玩转-05:源码详解(1)-总体架构分析
以下链接是个人关于detectron2(目标检测框架),所有见解,如有错误欢迎大家指出,我会第一时间纠正。有兴趣的朋友可以加微信:17575010159 相互讨论技术。若是帮助到了你什么,一定要记得点赞!因为这是对我最大的鼓励。 文 末 附 带 \color{blue}{文末附带} 文末附带 公 众 号 − \color{blue}{公众号 -} 公众号− 海 量 资 源 。 \color{blue}{ 海量资源}。 海量资源。
detectron2(目标检测框架)无死角玩转-00:目录
前言
根据前面的博客,已经知道如何去训练自己的数据,本人是在之前的编写的程序上进行分析,也就是使用configs/My/retinanet_R_50_FPN_3x.yaml配置文件。通过tools/train_my.py的代码,可以在main函数看到如下:
    trainer = Trainer(cfg)
    trainer.resume_or_load(resume=args.resume)
    return trainer.train()
说到底,其核心在于Trainer(cfg),既然如此,我们就来对其解剖一下。
Registry
进入Trainer,可以看到,重写了两个函数分别为:
def build_evaluator(cls, cfg, dataset_name, output_folder=None):
def test_with_TTA(cls, cfg, model):
暂时我们不去理会,到底是什么玩意,先看看Trainer继承的父类DefaultTrainer,在初始化函数可以看到如下:
def __init__(self, cfg):
        model = self.build_model(cfg) # 构建模型
        optimizer = self.build_optimizer(cfg, model) # 构建优化方式
        data_loader = self.build_train_loader(cfg) # 构建训练数据迭代器
是的,就是这么简单,整体框架就是这样的,倒是其内部的实现是很复杂的,比如我们进入self.build_model中的build_model(cfg),追踪到detectron2\modeling\meta_arch\build.py文件,真的很简单,就下面几句代码:
from detectron2.utils.registry import Registry

META_ARCH_REGISTRY = Registry("META_ARCH")  # noqa F401 isort:skip
META_ARCH_REGISTRY.__doc__ = """

def build_model(cfg):

    meta_arch = cfg.MODEL.META_ARCHITECTURE
    return META_ARCH_REGISTRY.get(meta_arch)(cfg)
相信大家看了之后也明白,核心要点就是META_ARCH_REGISTRY = Registry(“META_ARCH”),那么这到底是个什么东西呢?其实简单的说,把他当作一个字典就可以了,如上面的META_ARCH_REGISTRY.get(meta_arch)(cfg),就是获得字典中键 “META_ARCH” 对应的值去构建的模型。这样说起来,大家可以可能有点迷糊,前面提到,我们讲的这一系列不可现在是围绕,目标检测retina网络来讲解的,那我们我们先来这个,我相信大家就不会迷糊了,detectron2/modeling/meta_arch/retinanet.py中的clas RetinaNet(nn.Module):
@META_ARCH_REGISTRY.register()
class RetinaNet(nn.Module):
    """
    Implement RetinaNet (https://arxiv.org/abs/1708.02002).
    """

    def __init__(self, cfg):
        super().__init__()

        self.device = torch.device(cfg.MODEL.DEVICE)
其核心的重点,是前面的@META_ARCH_REGISTRY.register(),这里和其名字一样,是一个注册的操作,总的来说就是把RetinaNet(nn.Module)这个模型注册到 META_ARCH_REGISTRY 中去, 换而言之 META_ARCH_REGISTRY 保存的是模型架构,如Retina, Rcnn。在detectron2\modeling\meta_arch\rcnn.py文件中我们就能看到Rcnn的注册。如果我们想创建新的网络架构,我们也要去注册一个,这个后续的章节我带大家走一遍,学习如何去添加一个新得网络构架。
其实把META_ARCH_REGISTRY理解为容器也可以,我们把模型都放入到这个容器之中,等到想要的时候,就可以把他取出来。除了用来装载网络模型的容器,也还有很多其他的容器如下:
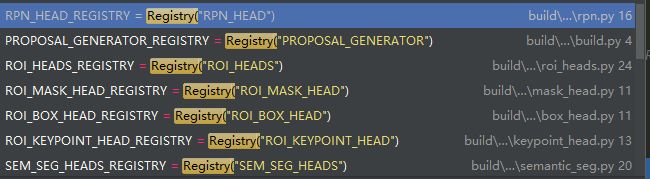
有装载ROI_xx的容易,或者装载SEM_SEG_xxx的容器,虽然现在我不是很明白他们的作用,但是并不会干扰我对程序的分析。从目前的分析来看,就是有很多容器,每个容器之中,都装载着不同配置的模型,或者ROI_DEAD等等。那我我们怎么才能从这么多容器中,拿到我们想要的东西呢?我们回到detectron2/modeling/meta_arch/build.py,其中的:
META_ARCH_REGISTRY = Registry("META_ARCH") # noqa F401 isort:skip
表示加载了META_ARCH这个容器,然后我们在根据 cfg.MODEL.META_ARCHITECTURE = 'RetinaNet’获得这个容器中我们想要的’RetinaNet模型。至于如何构建的,我们后续的章节机进行讲解。下面我们来看看:
optimizer = self.build_optimizer(cfg, model)
optimizer
追踪上面的函数到detectron2/solver/build.py,可以看到如下:
def build_optimizer(cfg: CfgNode, model: torch.nn.Module) -> torch.optim.Optimizer:
    """
    Build an optimizer from config.
    """
    params: List[Dict[str, Any]] = []
    for key, value in model.named_parameters():
        if not value.requires_grad:
            continue
        lr = cfg.SOLVER.BASE_LR
        weight_decay = cfg.SOLVER.WEIGHT_DECAY
        if key.endswith("norm.weight") or key.endswith("norm.bias"):
            weight_decay = cfg.SOLVER.WEIGHT_DECAY_NORM
        elif key.endswith(".bias"):
            # NOTE: unlike Detectron v1, we now default BIAS_LR_FACTOR to 1.0
            # and WEIGHT_DECAY_BIAS to WEIGHT_DECAY so that bias optimizer
            # hyperparameters are by default exactly the same as for regular
            # weights.
            lr = cfg.SOLVER.BASE_LR * cfg.SOLVER.BIAS_LR_FACTOR
            weight_decay = cfg.SOLVER.WEIGHT_DECAY_BIAS
        params += [{"params": [value], "lr": lr, "weight_decay": weight_decay}]

    optimizer = torch.optim.SGD(params, lr, momentum=cfg.SOLVER.MOMENTUM)
    return optimizer
其实实现的过程十分的简单,就是把模型中对应的参数加载到SGD优化器之中,然后设定好学习率,权重衰减等等。
build_train_loader
最后就只剩下
data_loader = self.build_train_loader(cfg)
其实现于detectron2/data/build.py
def build_detection_train_loader(cfg, mapper=None):
    """
    A data loader is created by the following steps:

    1. Use the dataset names in config to query :class:`DatasetCatalog`, and obtain a list of dicts.
    2. Start workers to work on the dicts. Each worker will:
      * Map each metadata dict into another format to be consumed by the model.
      * Batch them by simply putting dicts into a list.
    The batched ``list[mapped_dict]`` is what this dataloader will return.

    Args:
        cfg (CfgNode): the config
        mapper (callable): a callable which takes a sample (dict) from dataset and
            returns the format to be consumed by the model.
            By default it will be `DatasetMapper(cfg, True)`.

    Returns:
        an infinite iterator of training data
    """
    # 迭代数据的线程数目
    num_workers = get_world_size()
    images_per_batch = cfg.SOLVER.IMS_PER_BATCH
    assert (
        images_per_batch % num_workers == 0
    ), "SOLVER.IMS_PER_BATCH ({}) must be divisible by the number of workers ({}).".format(
        images_per_batch, num_workers
    )
    assert (
        images_per_batch >= num_workers
    ), "SOLVER.IMS_PER_BATCH ({}) must be larger than the number of workers ({}).".format(
        images_per_batch, num_workers
    )

    # 每个线程获取的图像数目
    images_per_worker = images_per_batch // num_workers

    # 根据配置创建数据迭代器
    dataset_dicts = get_detection_dataset_dicts(
        cfg.DATASETS.TRAIN, # 指定为训练模式
        filter_empty=cfg.DATALOADER.FILTER_EMPTY_ANNOTATIONS, # 是否过滤掉注释为空的图像
        min_keypoints=cfg.MODEL.ROI_KEYPOINT_HEAD.MIN_KEYPOINTS_PER_IMAGE
        if cfg.MODEL.KEYPOINT_ON # 是否开启关键点
        else 0,
        proposal_files=cfg.DATASETS.PROPOSAL_FILES_TRAIN if cfg.MODEL.LOAD_PROPOSALS else None, # 是否预定义了训练文件
    )

    # 把数据按照一定格式输出
    dataset = DatasetFromList(dataset_dicts, copy=False)
    if mapper is None:
        mapper = DatasetMapper(cfg, True)
    dataset = MapDataset(dataset, mapper)

    # 根据重新开始训练还是继续加载训练,设定对应的参数
    sampler_name = cfg.DATALOADER.SAMPLER_TRAIN
    logger = logging.getLogger(__name__)
    logger.info("Using training sampler {}".format(sampler_name))
    if sampler_name == "TrainingSampler":
        sampler = samplers.TrainingSampler(len(dataset))
    elif sampler_name == "RepeatFactorTrainingSampler":
        sampler = samplers.RepeatFactorTrainingSampler(
            dataset_dicts, cfg.DATALOADER.REPEAT_THRESHOLD
        )
    else:
        raise ValueError("Unknown training sampler: {}".format(sampler_name))


    # 这路存在的意思,本人认为是,训练的时候如果图片大小不统一,则进行的是分组训练
    # 否则就按照batch_size进行训练
    if cfg.DATALOADER.ASPECT_RATIO_GROUPING:
        data_loader = torch.utils.data.DataLoader(
            dataset,
            sampler=sampler,
            num_workers=cfg.DATALOADER.NUM_WORKERS,
            batch_sampler=None,
            collate_fn=operator.itemgetter(0),  # don't batch, but yield individual elements
            worker_init_fn=worker_init_reset_seed,
        )  # yield individual mapped dict
        data_loader = AspectRatioGroupedDataset(data_loader, images_per_worker)
    else:
        batch_sampler = torch.utils.data.sampler.BatchSampler(
            sampler, images_per_worker, drop_last=True
        )
        # drop_last so the batch always have the same size
        data_loader = torch.utils.data.DataLoader(
            dataset,
            num_workers=cfg.DATALOADER.NUM_WORKERS,
            batch_sampler=batch_sampler,
            collate_fn=trivial_batch_collator,
            worker_init_fn=worker_init_reset_seed,
        )

    return data_loader
其实简单的说,就是数据迭代器的创建,其中做了一些数据预处理,后续我们再慢慢的分析细节
train
通过前面的讲解,已经知道了如何构建网络模型,优化器,以及数据迭代器,剩下的就是去训练模型了,其代码的实现于detectron2/engine/train_loop.py:
    def train(self, start_iter: int, max_iter: int):
        """
        Args:
            start_iter, max_iter (int): See docs above
        """
        logger = logging.getLogger(__name__)
        logger.info("Starting training from iteration {}".format(start_iter))

        self.iter = self.start_iter = start_iter
        self.max_iter = max_iter

        with EventStorage(start_iter) as self.storage:
            try:
                self.before_train()
                for self.iter in range(start_iter, max_iter):
                    self.before_step()
                    self.run_step()
                    self.after_step()
            finally:
                self.after_train()
里面的细节,本人暂时也没有查看,不过没有关系,很明显其中最核心在于:
                    self.before_step()
                    self.run_step()
                    self.after_step()
大致分成了三个循序,迭代前,迭代进行,迭代后。
结语
接下来,我们的任务就是去分析每一个细节了。后面的博客见,记得点赞哈!
