通过t4模板结合XML定义文件生成MVVM中的Model Entity Class 代码
在之前的两篇文章,我针对MVVM项目实践中如何简化Model和ViewModel类型的编码工作,提供了两种不同的方法。它们分别是
这一篇是这个话题的最后一篇,将提供第三种方法。
我们的思路就是,AOP和Interception都是需要做代码注入的,它们的使用也或多越少会有一些特殊的要求,例如Interception这种做法,它将使得我们无法直接通过new的方式创建Model的实例。那么是否可以有办法不进行这些复杂的步骤,而只是通过一些自动化的方式来生成我们需要的Model类型代码呢?
答案是:有。在Visual Studio 2010中全新支持的t4模板将很好地支持这一点。我记得多年前,我用过CodeSmith等一些工具生成代码,感觉还是不错的。但这些工具或多或少都需要收费,现在Visual Studio 2010既然内置支持代码生成,对我们来说绝对是一个好消息。
关于t4模板,以及一些基本概念,请参考
http://msdn.microsoft.com/en-us/library/bb126445.aspx
好了,我介绍一下我编写的这个模板吧。我的思路是这样的
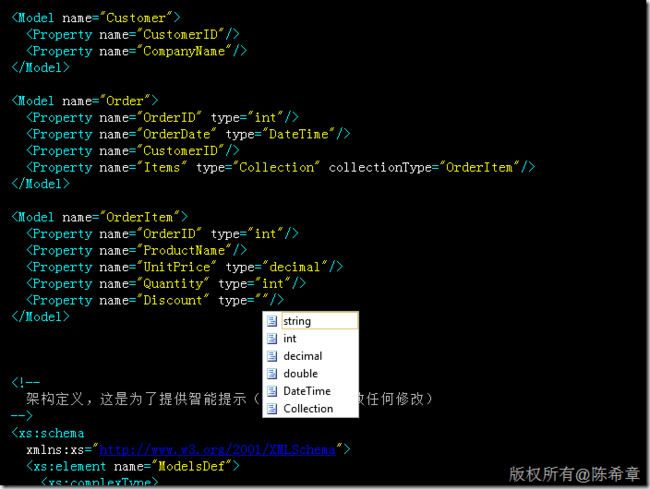
1. 通过一个XML文件,定义项目中所需要的Model类型以及他们的属性
2. 通过一个t4模板,读取该XML文件,并且生成所有有关的Class,包括ModelBase,和每个Model
第一步,定义XML文件(我称其为ModelsDef文件)
<?xml version="1.0" encoding="utf-8" ?>
<ModelsDef>

  <!--根节点上面还可以指定所有模型的基类,默认为ModelBase-->

  <!--
    MVVM实体模型定义文件
    作者:陈希章
    时间:2011年6月
    说明:该文件是用来生成业务实体模型代码的,将结合t4模板生成。
    反馈:[email protected]
  -->

  <!--
    这里开始定义模型(下面是几个范例,你可以根据它们进行修改
    规范:
    1. 每个业务实体,定义一个Model元素,必须要有name(整个定义文件中,至少得有一个Model元素)
    2. 每个实体至少要有一个属性:Property
    3. 属性有三种定义方式
       3.1 只提供name属性,则表示该Property为string类型
       3.2 如果不是string类型,则需要指定type
       3.3 如果是一个集合类型,则需要指定Collection, 并且此时就要指定collectionType
  -->

  <Model name="Customer">
    <Property name="CustomerID"/>
    <Property name="CompanyName"/>
  </Model>

  <Model name="Order">
    <Property name="OrderID" type="int"/>
    <Property name="OrderDate" type="DateTime"/>
    <Property name="CustomerID"/>
    <Property name="Items" type="Collection" collectionType="OrderItem"/>
  </Model>

  <Model name="OrderItem">
    <Property name="OrderID" type="int"/>
    <Property name="ProductName"/>
    <Property name="UnitPrice" type="decimal"/>
    <Property name="Quantity" type="int"/>
  </Model>


  <!--
    架构定义,这是为了提供智能提示(通常你不需要做任何修改)
  -->
  <xs:schema
    xmlns:xs="http://www.w3.org/2001/XMLSchema">
    <xs:element name="ModelsDef">
      <xs:complexType>
        <xs:sequence>
          <xs:element name="Model" minOccurs="1" maxOccurs="unbounded">
            <xs:complexType>
              <xs:sequence>
                <xs:element name="Property" minOccurs="1" maxOccurs="unbounded">
                  <xs:complexType>
                    <xs:attribute name="name" type="xs:string" use="required" />
                    <xs:attribute name="type" type="systemTypes" default="string" />
                    <xs:attribute name="collectionType" type="xs:string" use="optional" />
                  </xs:complexType>
                </xs:element>
              </xs:sequence>
              <xs:attribute name="name" type="xs:string" use="required" />
            </xs:complexType>
          </xs:element>
        </xs:sequence>
        <xs:attribute name="baseClass" type="xs:string" default="ModelBase" />
      </xs:complexType>
    </xs:element>
    <xs:simpleType name="systemTypes">
      <xs:restriction base="xs:string">
        <xs:enumeration value="string"></xs:enumeration>
        <xs:enumeration value="int"></xs:enumeration>
        <xs:enumeration value="decimal"></xs:enumeration>
        <xs:enumeration value="double"></xs:enumeration>
        <xs:enumeration value="DateTime"></xs:enumeration>
        <xs:enumeration value="Collection"></xs:enumeration>
      </xs:restriction>
    </xs:simpleType>
  </xs:schema>
</ModelsDef>
定义好了一个XSD Schema(这是为了便于使用,在Visual Studio中可以提供智能提示),并且提供了几个Model的范例。
第二步,定义一个t4模板
<#@ template debug="false" hostspecific="true" language="C#" #>
<#@ output extension=".cs" #>
<#@ assembly name="System.Core.dll" #>
<#@ assembly name="System.Xml" #>
<#@ assembly name="System.Xml.Linq" #>
<#@ assembly name="EnvDTE" #>
<#@ import namespace="EnvDTE" #>
<#@ import namespace="System" #>
<#@ import namespace="System.Linq" #>
<#@ import namespace="System.Xml.Linq" #>
<#
    /*
        MVVM业务实体代码生成模板
        作者:陈希章
        时间:2011年6月
        说明:这个模板会读取一个XML文件,并且根据该文件定义生成业务实体代码。该文件有规定的架构。请参考ModelsDef.xml
        反馈:[email protected]

    */

string defaultNamespace =string.Empty;//这里可以替换为你需要的命名空间,如果不指定,则自动获取当前项目的命名空间下面,再加一个Models的子空间
string definitionFile ="ModelsDef.xml";//这是默认的定义文件,可以替换掉

IServiceProvider serviceProvider = (IServiceProvider)this.Host;
DTE dte = serviceProvider.GetService(typeof(DTE)) as DTE;

try{
    definitionFile = Host.ResolvePath(definitionFile);
    Project p = ((Array)dte.ActiveSolutionProjects).GetValue(0) as Project;
    if(string.IsNullOrEmpty(defaultNamespace))
        defaultNamespace=p.Properties.Item("RootNamespace").Value.ToString()+".Models";


    var doc = XDocument.Load(Host.ResolvePath(definitionFile));
    string baseClass= this.GetAttributeValue(doc.Root,"baseClass","ModelBase");
#>

namespace <#= defaultNamespace #>{
    using System;
    using System.ComponentModel;
    using System.Collections.ObjectModel;
    public abstract class <#= baseClass #> : MarshalByRefObject, INotifyPropertyChanged
    {

        public event PropertyChangedEventHandler PropertyChanged;

        protected virtual void OnPropertyChanged(string name)
        {
            if (PropertyChanged != null)
                PropertyChanged(this, new PropertyChangedEventArgs(name));
        }

    }
<#
foreach (var item in doc.Root.Elements("Model"))
{
    string modelName =this.GetAttributeValue(item,"name",string.Empty);
    if(string.IsNullOrEmpty(modelName))continue;#>

    public class <#= modelName #> : <#= baseClass #>
    {<#

        foreach (var property in item.Elements("Property"))
        {
            string propName =this.GetAttributeValue(property,"name",string.Empty);
            string type =this.GetPropertyTypeString(property);
            string fieldName = string.Format("_{0}",propName.First().ToString().ToLower()+propName.Substring(1));
            if(string.IsNullOrEmpty(propName))continue;#>

        private <#= type #> <#= fieldName #>;
        public <#= type #> <#= propName #>
        {
            get{return <#= fieldName #>;}
            set{
                if(<#= fieldName #>!=value){
                    <#= fieldName #>=value;
                    OnPropertyChanged("<#= propName #>");
                }
            }
        }
        <#}#>

    }

<#

}
#>}<#

}
catch(Exception ex){
    Write(ex.Message);
    Error(ex.Message);
}
#>


<#+
    public string GetAttributeValue(XElement element,string attr,string defaultValue){
        return element.Attribute(attr)!=null?element.Attribute(attr).Value:defaultValue;
    }

    public string GetPropertyTypeString(XElement element){
        var type = this.GetAttributeValue(element,"type","string");
        var collectionType = this.GetAttributeValue(element,"collectionType",string.Empty);

        if(type=="Collection"){
            return string.Format("ObservableCollection<{0}>",collectionType);
        }
        else
            return type;
    }
#>
这个模板的原理是,读取模板文件同一个目录下面的ModelsDef.xml文件,并且生成全部的代码。下面是一个例子
namespace ConsoleApplication1.Models{
    using System;
    using System.ComponentModel;
    using System.Collections.ObjectModel;
    public abstract class ModelBase : MarshalByRefObject, INotifyPropertyChanged
    {

        public event PropertyChangedEventHandler PropertyChanged;

        protected virtual void OnPropertyChanged(string name)
        {
            if (PropertyChanged != null)
                PropertyChanged(this, new PropertyChangedEventArgs(name));
        }

    }

    public class Customer : ModelBase
    {
        private string _customerID;
        public string CustomerID
        {
            get{return _customerID;}
            set{
                if(_customerID!=value){
                    _customerID=value;
                    OnPropertyChanged("CustomerID");
                }
            }
        }

        private string _companyName;
        public string CompanyName
        {
            get{return _companyName;}
            set{
                if(_companyName!=value){
                    _companyName=value;
                    OnPropertyChanged("CompanyName");
                }
            }
        }

    }


    public class Order : ModelBase
    {
        private int _orderID;
        public int OrderID
        {
            get{return _orderID;}
            set{
                if(_orderID!=value){
                    _orderID=value;
                    OnPropertyChanged("OrderID");
                }
            }
        }

        private DateTime _orderDate;
        public DateTime OrderDate
        {
            get{return _orderDate;}
            set{
                if(_orderDate!=value){
                    _orderDate=value;
                    OnPropertyChanged("OrderDate");
                }
            }
        }

        private string _customerID;
        public string CustomerID
        {
            get{return _customerID;}
            set{
                if(_customerID!=value){
                    _customerID=value;
                    OnPropertyChanged("CustomerID");
                }
            }
        }

        private ObservableCollection<OrderItem> _items;
        public ObservableCollection<OrderItem> Items
        {
            get{return _items;}
            set{
                if(_items!=value){
                    _items=value;
                    OnPropertyChanged("Items");
                }
            }
        }

    }


    public class OrderItem : ModelBase
    {
        private int _orderID;
        public int OrderID
        {
            get{return _orderID;}
            set{
                if(_orderID!=value){
                    _orderID=value;
                    OnPropertyChanged("OrderID");
                }
            }
        }

        private string _productName;
        public string ProductName
        {
            get{return _productName;}
            set{
                if(_productName!=value){
                    _productName=value;
                    OnPropertyChanged("ProductName");
                }
            }
        }

        private decimal _unitPrice;
        public decimal UnitPrice
        {
            get{return _unitPrice;}
            set{
                if(_unitPrice!=value){
                    _unitPrice=value;
                    OnPropertyChanged("UnitPrice");
                }
            }
        }

        private int _quantity;
        public int Quantity
        {
            get{return _quantity;}
            set{
                if(_quantity!=value){
                    _quantity=value;
                    OnPropertyChanged("Quantity");
                }
            }
        }

    }

}
看起来还不错,不是吗?那么,你将如何获得这个模板,以及在你的项目中使用呢?
其实很简单,你可以在Nuget gallary中找到我发布的这个Package。
如果你对Nuget不了解,请参考 http://www.nuget.org/
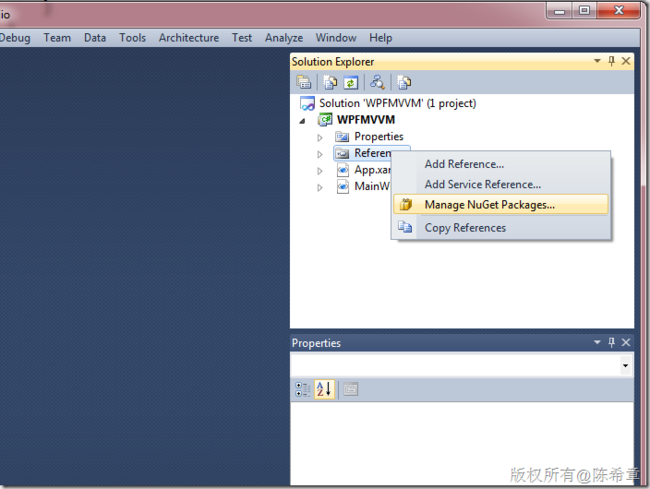
在项目中,”Manage NuGet Packages…”
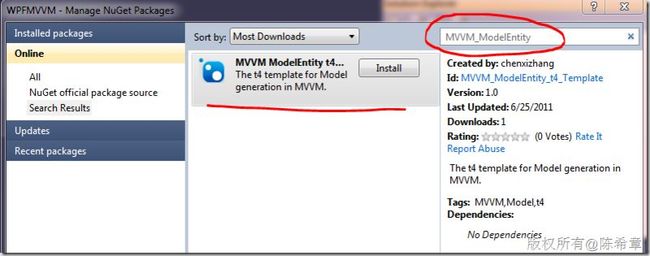
用“MVVM_ModelEntity”作为关键字进行搜索
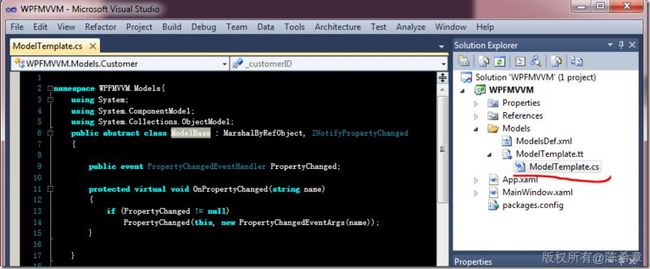
点击“Install”,这个工具会在你的项目中创建一个Models目录,并且添加两个文件
选择“ModelTemplate.tt”,然后”Run Custom Tool”
然后,你可以去查看ModelTemplate.cs文件
有兴趣的朋友,赶紧试试看吧


