Python测试框架pytest(20)插件 - 生成html报告、重复执行用例、用例执行顺序、多重断言
目录
1、pytest-html(生成html报告)
1.1、安装
1.2、操作参数
1.3、报告优化(报错截图)
1.4、报告优化(用例描述+报错截图)
2、pytest-repeat(重复执行用例)
2.1、安装
2.2、操作参数
2.3、兼容性
3、pytest-ordering(用例执行顺序)
3.1、安装
3.2、pytest默认执行
3.3、pytest-ordering自定义用例顺序
4、pytest-assume(多重断言)
4.1、安装
4.2、assert多重断言
4.3、pytest-assume多重断言
4.4、上下文管理器
1、pytest-html(生成html报告)
1.1、安装
在命令行中运行以下命令进行安装:
pip install pytest-html或者(使用国内的豆瓣源,数据会定期同步国外官网,速度快。)
pip install pytest-html -i http://pypi.douban.com/simple/ --trusted-host pypi.douban.com1.2、操作参数
命令行参数:
-
--html=report.html(普通HTML报告,CSS是独立的,分享报告的时候样式会丢。)
-
--html=report.html --self-contained-html(合并CSS的HTML报告,分享报告样式不丢失,如:分享发邮件展示报告。)
创建test_html.py文件
脚本代码:
#!/usr/bin/env python
# -*- coding: utf-8 -*-
"""
微信公众号:AllTests软件测试
"""

def func(abc):
    return abc + 1

def test_case3():
    assert func(3) == 5

class TestClass:
    def test_case1(self):
        x = "AllTests"
        assert "t" in x

    def test_case2(self):
        y = "hello"
        assert "h" in y
1.2.1、HTML报告(普通)
打开命令行,在该脚本目录下,输入执行命令:
pytest test_html.py --html=report.html
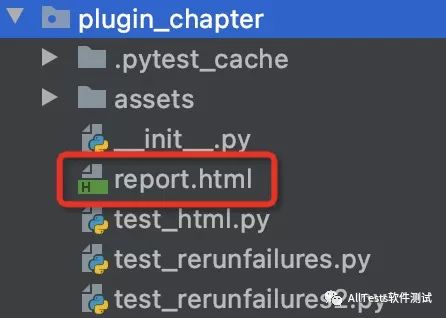
执行完成后,在当前目录下自动创建一个report.html的测试报告。

打开测试报告:

1.2.2、HTML报告(合并CSS)
打开命令行,在该脚本目录下,输入执行命令:
pytest test_html.py --html=report.html --self-contained-html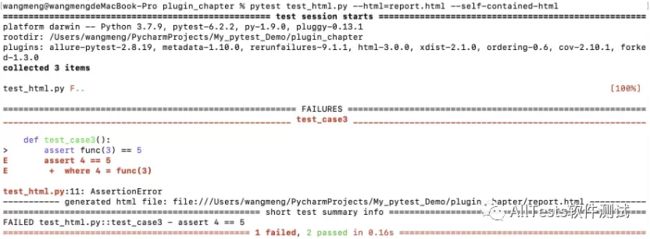
执行完成后,在当前目录下自动创建一个report.html的测试报告。
打开测试报告:

1.3、报告优化(报错截图)
在执行web自动化的时候,希望测试用例失败时,以截图的方式展示在html报告里。
1、修改conftest.py文件
脚本代码:
#!/usr/bin/env python
# -*- coding: utf-8 -*-
"""
微信公众号:AllTests软件测试
"""
from selenium import webdriver
import pytest
driver = None
@pytest.mark.hookwrapper
def pytest_runtest_makereport(item):
"""
当测试失败的时候,自动截图,展示到html报告中
"""
pytest_html = item.config.pluginmanager.getplugin('html')
outcome = yield
report = outcome.get_result()
extra = getattr(report, 'extra', [])
if report.when == 'call' or report.when == "setup":
xfail = hasattr(report, 'wasxfail')
if (report.skipped and xfail) or (report.failed and not xfail):
file_name = report.nodeid.replace("::", "_")+".png"
screen_img = _capture_screenshot()
if file_name:
html = ' ' % screen_img
extra.append(pytest_html.extras.html(html))
report.extra = extra
def _capture_screenshot():
"""
截图保存为base64,展示到html中
"""
return driver.get_screenshot_as_base64()
@pytest.fixture(scope='session', autouse=True)
def browser(request):
global driver
if driver is None:
driver = webdriver.Chrome()
def end():
driver.quit()
request.addfinalizer(end)
return driver
' % screen_img
extra.append(pytest_html.extras.html(html))
report.extra = extra
def _capture_screenshot():
"""
截图保存为base64,展示到html中
"""
return driver.get_screenshot_as_base64()
@pytest.fixture(scope='session', autouse=True)
def browser(request):
global driver
if driver is None:
driver = webdriver.Chrome()
def end():
driver.quit()
request.addfinalizer(end)
return driver2、创建test_html_screenshot.py文件
脚本代码:
#!/usr/bin/env python
# -*- coding: utf-8 -*-
"""
微信公众号:AllTests软件测试
"""

from selenium import webdriver
import time

def test_case(browser):
    browser.get("https://www.baidu.com/")
    time.sleep(2)
    t = browser.title
    assert t == "AllTests软件测试"
3、打开命令行,在该脚本目录下,输入执行命令:
pytest test_html_screenshot.py --html=report.html --self-contained-html4、运行结果:

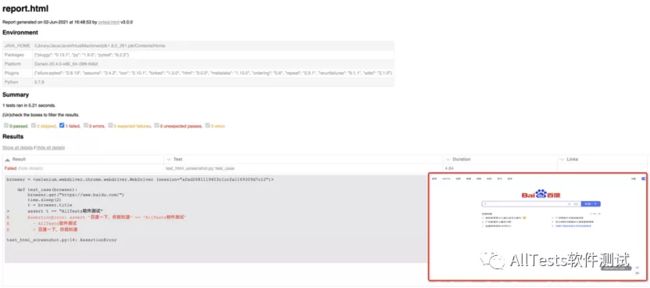
将失败截图展示在报告里
1.4、报告优化(用例描述+报错截图)
pytest-html 测试报告默认是不展示用例描述 Description 内容,可以修改生成的报告内容,添加或删除 html 报告的 table 内容。
1、修改conftest.py文件
脚本代码:
#!/usr/bin/env python
# -*- coding: utf-8 -*-
"""
微信公众号:AllTests软件测试
"""
from selenium import webdriver
from py.xml import html
import pytest

driver = None

@pytest.mark.hookwrapper
def pytest_runtest_makereport(item):
    """
    当测试失败的时候,自动截图,展示到html报告中
    """
    pytest_html = item.config.pluginmanager.getplugin('html')
    outcome = yield
    report = outcome.get_result()
    extra = getattr(report, 'extra', [])

    if report.when == 'call' or report.when == "setup":
        xfail = hasattr(report, 'wasxfail')
        if (report.skipped and xfail) or (report.failed and not xfail):
            file_name = report.nodeid.replace("::", "_")+".png"
            screen_img = _capture_screenshot()
            if file_name:
                html = '' % screen_img
                extra.append(pytest_html.extras.html(html))
        report.extra = extra
    report.description = str(item.function.__doc__)

@pytest.mark.optionalhook
def pytest_html_results_table_header(cells):
    cells.insert(1, html.th('Description'))

@pytest.mark.optionalhook
def pytest_html_results_table_row(report, cells):
    cells.insert(1, html.td(report.description))

def _capture_screenshot():
    """
    截图保存为base64,展示到html中
    """
    return driver.get_screenshot_as_base64()

@pytest.fixture(scope='session', autouse=True)
def browser(request):
    global driver
    if driver is None:
        driver = webdriver.Chrome()

    def end():
        driver.quit()
    request.addfinalizer(end)
    return driver
2、创建test_html_screenshot_description.py文件
测试用例下三个引号里面的注释(docstring)内容就是测试报告展示的Description内容;如果没有注释内容,报告Description内容显示None。
脚本代码:
#!/usr/bin/env python
# -*- coding: utf-8 -*-
"""
微信公众号:AllTests软件测试
"""

from selenium import webdriver
import time

def test_case01(browser):
    """
    测试用例1 失败用例
    """
    browser.get("https://www.baidu.com/")
    time.sleep(2)
    t = browser.title
    assert t == "AllTests软件测试"

def test_case02(browser):
    """
    测试用例2 成功用例
    """
    browser.get("https://www.baidu.com/")
    time.sleep(2)
    t = browser.title
    assert t == "百度一下,你就知道"
3、打开命令行,在该脚本目录下,输入执行命令:
pytest test_html_screenshot_description.py --html=report.html --self-contained-html4、运行结果:

用例描述显示在报告的Description内,并且将失败截图展示在报告里。

2、pytest-repeat(重复执行用例)
2.1、安装
在命令行中运行以下命令进行安装:
pip install pytest-repeat或者(使用国内的豆瓣源,数据会定期同步国外官网,速度快。)
pip install pytest-repeat -i http://pypi.douban.com/simple/ --trusted-host pypi.douban.com2.2、操作参数
1、命令行参数:
--count=n(运行n次一个或多个测试用例)
或者(两种方式皆可,等号或空格)
--count n
--repeat-scope(可以覆盖默认的测试用例执行顺序,类似 fixture 的 scope 参数)
(1)function:默认值,范围针对每个用例重复执行,再执行下一个用例。
(2)class:以类为用例集合单位,重复执行类里面的用例,再执行下一个。
(3)module:以模块为单位,重复执行模块里面的用例,再执行下一个。
(4)session:重复整个测试会话,即所有测试用例执行一次,然后再次执行所有此类测试。
-x(如果您尝试诊断间歇性故障,则一次又一次地运行相同的测试直到失败,将很有用。您可以将 pytest 的 -x 选项与 pytest-repeat 结合使用,以强制测试运行器在第一次失败时停止。)
例如:
pytest --count=1000 -x test_file.py这将尝试运行test_file.py 1000次,但将在发生故障后立即停止。
2、装饰器参数(如果要在代码中将某些测试用例标记为执行重复多次,可以使用此装饰器。):
@pytest.mark.repeat(count)
2.2.1、重复执行(命令行)
1、创建test_repeat.py文件
脚本代码:
#!/usr/bin/env python
# -*- coding: utf-8 -*-
"""
微信公众号:AllTests软件测试
"""

def test_case3():
    assert 123 == 123

class TestClass:
    def test_case1(self):
        x = "AllTests"
        assert "t" in x

    def test_case2(self):
        y = "hello"
        assert "h" in y
2、运行结果:
打开命令行,在该脚本目录下,输入执行命令:
pytest --count=2 test_repeat.py3条用例,每条用例执行2次,所以总共执行6次用例。

2.2.2、重复执行(装饰器@pytest.mark.repeat(count))
如果要在代码中标记要重复多次的测试,可以使用 @pytest.mark.repeat(count) 装饰器。
1、创建test_repeat2.py文件
脚本代码:
#!/usr/bin/env python
# -*- coding: utf-8 -*-
"""
微信公众号:AllTests软件测试
"""

import pytest

@pytest.mark.repeat(5)
def test_case():
    print("\n执行测试用例")
2、运行结果:
打开命令行,在该脚本目录下,输入执行命令:
pytest -s test_repeat2.py用例执行5次。

2.2.3、重复执行(执行顺序-class)
1、创建test_repeat3.py文件
脚本代码:
#!/usr/bin/env python
# -*- coding: utf-8 -*-
"""
微信公众号:AllTests软件测试
"""

class Test_class1:
    def test_case1(self):
        print("执行测试用例test_case1")

class Test_class2:
    def test_case2(self):
        print("执行测试用例test_case2")
2、运行结果:
打开命令行,在该脚本目录下,输入执行命令:
pytest -s --count=2 --repeat-scope=class test_repeat3.py重复执行类里面的用例,再执行下一个类里面的用例。

2.2.4、重复执行(执行顺序-module)
1、创建test_repeat4.py文件
脚本代码:
#!/usr/bin/env python
# -*- coding: utf-8 -*-
"""
微信公众号:AllTests软件测试
"""

def test_case1():
    print("执行测试用例test_case1")

def test_case2():
    print("执行测试用例test_case2")

class Test_class1:
    def test_case3(self):
        print("执行测试用例test_case3")
2、运行结果:
打开命令行,在该脚本目录下,输入执行命令:
pytest -s --count=2 --repeat-scope=module test_repeat4.py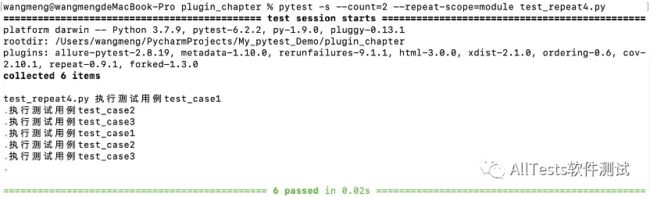
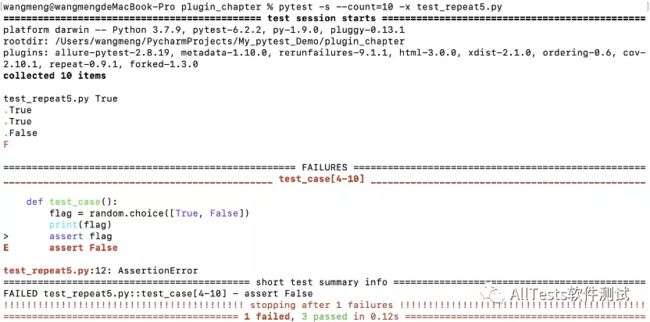
2.2.5、重复执行直到失败
1、创建test_repeat5.py文件
脚本代码:
#!/usr/bin/env python
# -*- coding: utf-8 -*-
"""
微信公众号:AllTests软件测试
"""

import random

def test_case():
    flag = random.choice([True, False])
    print(flag)
    assert flag
2、运行结果:
打开命令行,在该脚本目录下,输入执行命令:
pytest -s --count=10 -x test_repeat5.py尝试执行10次,运行第4次失败,立即停止。
2.3、兼容性
pytest-repeat 不能与 unittest.TestCase 测试类一起使用。无论 --count 设置多少,这些测试始终仅运行一次,并显示警告。
3、pytest-ordering(用例执行顺序)
pytest-ordering 插件可以控制用例的执行顺序。
3.1、安装
在命令行中运行以下命令进行安装:
pip install pytest-ordering或者(使用国内的豆瓣源,数据会定期同步国外官网,速度快。)
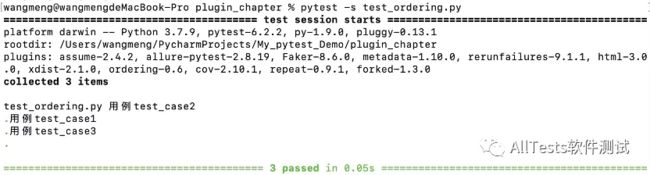
pip install pytest-ordering -i http://pypi.douban.com/simple/ --trusted-host pypi.douban.com3.2、pytest默认执行
1、创建test_ordering.py文件
pytest默认的执行顺序(用例先后顺序执行)
脚本代码:
#!/usr/bin/env python
# -*- coding: utf-8 -*-
"""
微信公众号:AllTests软件测试
"""

def test_case2():
    print("用例test_case2")
    assert True

def test_case1():
    print("用例test_case1")
    assert True

def test_case3():
    print("用例test_case3")
    assert True
2、运行结果:
打开命令行,在该脚本目录下,输入执行命令:
pytest -s test_ordering.py按照用例顺序,先执行test_case2,之后执行test_case1,最后执行test_case3。
3.3、pytest-ordering自定义用例顺序
1、修改test_ordering.py文件
脚本代码:
#!/usr/bin/env python
# -*- coding: utf-8 -*-
"""
微信公众号:AllTests软件测试
"""
import pytest

@pytest.mark.run(order=2)
def test_case2():
    print("用例test_case2")
    assert True

@pytest.mark.run(order=1)
def test_case1():
    print("用例test_case1")
    assert True

@pytest.mark.run(order=3)
def test_case3():
    print("用例test_case3")
    assert True
2、运行结果:
打开命令行,在该脚本目录下,输入执行命令:
pytest -s test_ordering.py使用pytest-ordering自定义用例顺序,先执行test_case1,之后执行test_case2,最后执行test_case3。

4、pytest-assume(多重断言)
pytest 中可以用 python 的 assert 断言,也可以写多个断言,但是如果一个失败,那么后面的断言将不再执行。
此时可以用 pytest-assume 插件,每个测试允许多次失败。
4.1、安装
在命令行中运行以下命令进行安装:
pip install pytest-assume或者(使用国内的豆瓣源,数据会定期同步国外官网,速度快。)
pip install pytest-assume -i http://pypi.douban.com/simple/ --trusted-host pypi.douban.com4.2、assert多重断言
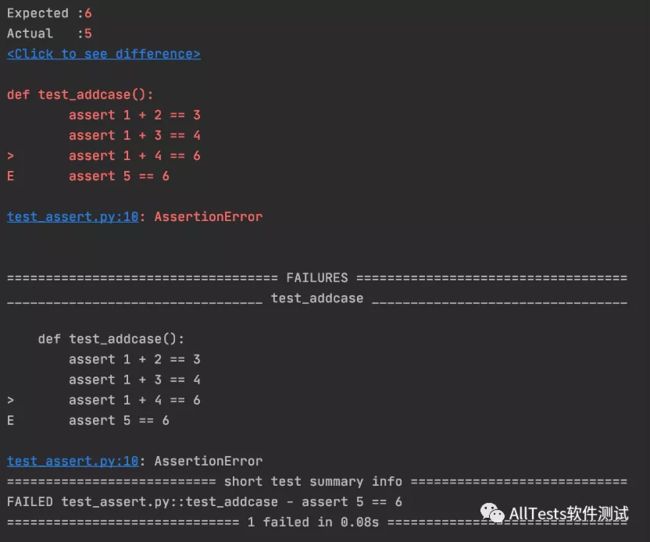
1、创建test_assert.py文件
脚本代码:
#!/usr/bin/env python
# -*- coding: utf-8 -*-
"""
微信公众号:AllTests软件测试
"""

def test_addcase():
    assert 1 + 2 == 3
    assert 1 + 3 == 4
    assert 1 + 4 == 6
    assert 1 + 5 == 6
    print("测试完成")
2、运行结果:
第三个断言(assert 1 + 4 == 6)失败之后,后面的断言也不会执行,包括正常的代码。
4.3、pytest-assume多重断言
1、创建test_assume.py文件
脚本代码:
#!/usr/bin/env python
# -*- coding: utf-8 -*-
"""
微信公众号:AllTests软件测试
"""

import pytest

def test_addcase():
    pytest.assume(1 + 2 == 3)
    pytest.assume(1 + 3 == 4)
    pytest.assume(1 + 4 == 6)
    pytest.assume(1 + 5 == 6)
    print("测试完成")
2、运行结果:
第三个断言(pytest.assume(1 + 4 == 6))失败之后,后面的断言还是会执行的。

4.4、上下文管理器
pytest.assume 也可以用作围绕普通断言的上下文管理器。
1、创建test_assume2.py文件
脚本代码:
#!/usr/bin/env python
# -*- coding: utf-8 -*-
"""
微信公众号:AllTests软件测试
"""

import pytest
from pytest import assume

@pytest.mark.parametrize(('x', 'y'), [(1, 1), (1, 0), (0, 1)])
def test_simple_assume(x, y):
    with assume: assert x == y
    with assume: assert True
    with assume: assert False
2、运行结果:
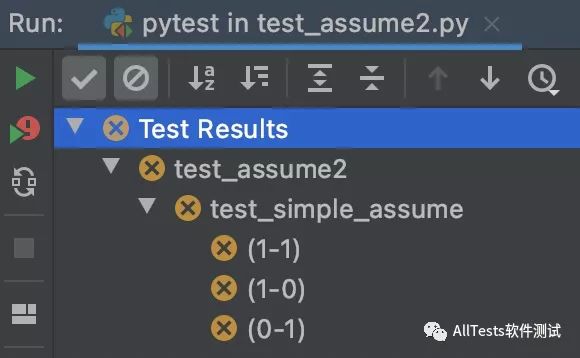

注意:每个 with 块只能有一个断言。如果有多个断言,当第一个失败了,则不会完全验证之后的所有断言。
1、创建test_assume3.py文件
脚本代码:
#!/usr/bin/env python
# -*- coding: utf-8 -*-
"""
微信公众号:AllTests软件测试
"""

import pytest

@pytest.mark.parametrize(('x', 'y'), [(1, 1)])
def test_simple_assume(x, y):
    with pytest.assume:
        assert x != y
        assert x == y
2、运行结果: