Flutter学习笔记(四)消息界面:floatingActionButton动画和TextOverflow踩坑
Flutter学习笔记(四)floatingActionButton动画和TextOverflow踩坑
-
- 一个有动画的floatingActionButton
- There are multiple heroes that share the same tag within a subtree 解决方案
- TextOverflow 需要注意的问题。
上一次笔记已经完成了整体的布局,接下来就是要完善这个布局,然后再用假数据来完成内容上的布局,之后就可以开始学习网络请求了。
一个有动画的floatingActionButton
floatingActionButton(以下简写为fab),是一个浮在页面上方的按钮。它最常见的用法就是在Scaffold中使用,作为一个操作按钮,但是本质上floatingActionButton作为Scaffild中的一个成员变量,它返回的值仍然是一个widget,所以我们可以对它进行一些自定义的操作。
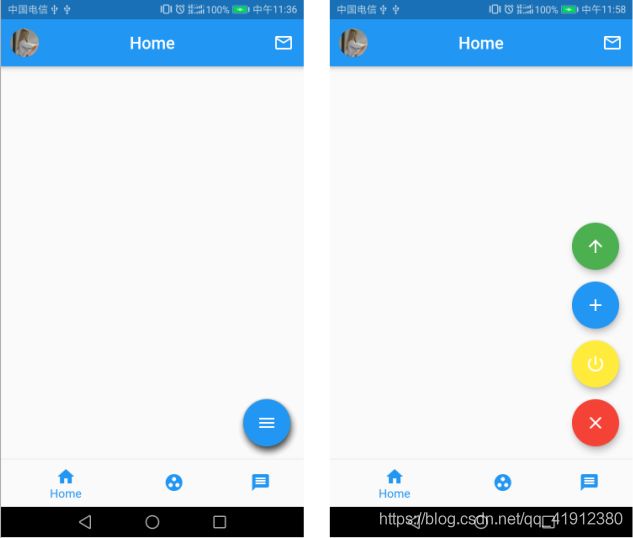
先看效果:

在点击下方的fab之后,会弹出三个其他的fab选项,自身变为新的图案。关于这一部分的详细做法,可以参看Create A Simple Animated FloatingActionButton in Flutter。说的非常详细,但是在实际使用的时候会遇到一些问题。比如我在完成了这个fab之后,在进行页面跳转的时候会报There are multiple heroes that share the same tag within a subtree.这个错误。
There are multiple heroes that share the same tag within a subtree 解决方案
遇到这个问题之后,需要将每一个fab都设置一个单独的tag,例如heroTag: "btn1",之后就解决了问题。那么这个问题是怎么发生的呢?通过查看文档发现
The tag to apply to the button’s Hero widget.
Defaults to a tag that matches other floating action buttons.
Set this to null explicitly if you don’t want the floating action button to have a hero tag.
If this is not explicitly set, then there can only be one FloatingActionButton per route (that is, per screen), since otherwise there would be a tag conflict (multiple heroes on one route can’t have the same tag). The material design specification recommends only using one floating action button per screen.
由于material design建议每个页面仅使用一个fab,所以在未指定tag的时候,这些页面上多出来的fab们会共享一个tag,多以产生冲突。而hero指的就是路由跳转动画,所以只有在进行路由跳转的时候会暴露出这个问题。
TextOverflow 需要注意的问题。
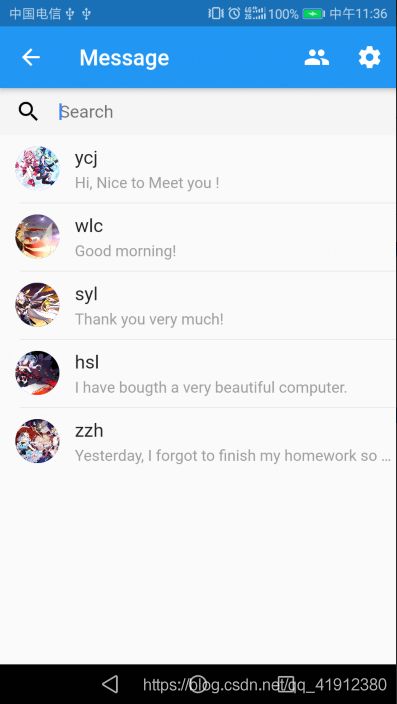
在完成fab之后,就开始写了一个消息页面,由主页上的右边的邮件图标导航到达,效果大体如下:

大概的布局就是一个appbar,下面跟着一个body包含一个搜索框和一个列表,这里主要要注意的就是一个ListView.separated的使用,ListView.separated是一种ListView的构造器,可以产生分割线,下面列表的代码如下:
   //分割线
   Widget divider = Divider(color: Colors.black12, height: 1.0, indent: 18,);
    ......
   Expanded(
       child: ListView.separated(
          itemCount: _message.length,
          separatorBuilder: (BuildContext context, int index) {
             return divider;
          },
          itemBuilder: (context, index) => EachItem(_message[index]),//调用函数构造每一行的内容
      )
 )
构造每一行的内容的代码如下:
//定义消息对象,包含用户名,头像,以及最近一条消息。
class Message {
  String userName;
  String imageUrl;
  String firstMessage;
  Message(this.userName,this.imageUrl,this.firstMessage);
}

//构造每一行的内容的类
class EachItem extends StatelessWidget{

  final Message message;
  const EachItem(this.message);

  @override
  Widget build(BuildContext context) {
    return  Container(
        margin: const EdgeInsets.symmetric(vertical: 10.0),
        child:  Row(
            crossAxisAlignment: CrossAxisAlignment.start,
            children: <Widget>[
              Container(
                margin: const EdgeInsets.only(left: 14.0,right: 14.0),
                child: new CircleAvatar(
                  backgroundImage: NetworkImage(message.imageUrl),
                ),
              ),
              Flexible(
                child:  Column(
                    crossAxisAlignment: CrossAxisAlignment.start,
                    children: <Widget>[
                      new Text(message.userName,
                          overflow: TextOverflow.ellipsis,
                          style: TextStyle(
                              fontSize: 17.0
                          )
                      ),
                      new Container(
                        margin: const EdgeInsets.only(top: 5.0),
                        child: new Text(message.firstMessage,
                          maxLines: 1,
                          overflow: TextOverflow.ellipsis,
                          style: TextStyle(
                            color: Colors.grey,
                          ),
                        ),
                      )
                    ]
                ),
              ),
            ]
        )
    );
  }
}
上面这段代码有一个需要注意的点,就是如果需要将长文本显示在容器中,需要使用TextOverflow这个方法,方式有多种,可以是省略号,可以是渐变fade,也可以是截断,但是我在一开始使用的时候却还是发生了溢出错误。原因是什么呢?
通过查阅资料发现,我的文本Text是包含在Column或者Row当中的,而文本不会换行并且
Row only constrains the width of children that have been wrapped in a Flexible widget
所以如果不将其包裹在一个Flexible内,文本宽度过大导致溢出。将其包裹进Flexible中后问题解决。
参考资料:
- Create A Simple Animated FloatingActionButton in Flutter
- Why does my text not wrap?
- 谈一谈Flutter中的共享元素动画Hero
- https://stackoverflow.com/questions/44579918/flutter-insert-overflow-ellipsis-in-text